-
接口间调用为什么要用json、fastjson怎么赋值的、fastjson 1.2.83@JSONField映射关系问题
接口间调用为什么要用json?
应用之间交互,不像前后台之间交互,那么方便可以定义命名一致,因为正常开发中,可能是多个团队编写的接口去互相访问,因此开发过程接收方和发送方传递的参数命名可能不完全一致,所以,你单纯的定义一个对象去接收,如果命名不一致,你就会得不到值。
如果在联调时才发现这种情况,再去改字段,可能涉及多个文件的依赖关系,改起来很麻烦。
因此接口见交互使用json来接收数据。
fastjson怎么赋值的?
通过@JSONField,可以使接口报文的字段映射到@JSONField name指定的字段。
然后再去通过set方法去赋值给你对应的java bean属性,所以这也是为什么需要你提供对应java bean的set方法,且是public的原因。
fastjson最新版本1.2.83报文与@JSONField映射关系问题
1.2.83结果表格(1.2.70都正常取值)
报文 @JSONField 转换结果 “appId”:“app_id”, @JSONField(name = “app_id”) 取值为null “app_id2”:“app_id2” @JSONField(name = “appId2”) 正常取值 “op_id”:“op_id”, //bean关系①:驼峰接收
@JSONField(name = “op_id”)
private String opId;正常取值 “op_id1”:“op_id1”, //bean关系②:原值接收
@JSONField(name = “op_id1”)
private String op_id1;正常取值 “op_id2”:“op_id2”, //bean关系③:它值接收
@JSONField(name = “op_id2”)
private String param;正常取值 Json报文
{ "op_id":"op_id", "op_id1":"op_id1", "op_id2":"op_id2", "appId":"app_id", "app_id2":"app_id2" }- 1
- 2
- 3
- 4
- 5
- 6
- 7
Bean
@Data public class Json1 { /** * json报文与@JSONField一致 */ //bean关系①:驼峰接收 @JSONField(name = "op_id") private String opId; //bean关系②:原值接收 @JSONField(name = "op_id1") private String op_id1; //bean关系③:它值接收 @JSONField(name = "op_id2") private String param; /** * json报文传与@JSONField的驼峰转换 */ @JSONField(name = "app_id") private String app_id; @JSONField(name = "appId2") private String appId2; }- 1
- 2
- 3
- 4
- 5
- 6
- 7
- 8
- 9
- 10
- 11
- 12
- 13
- 14
- 15
- 16
- 17
- 18
- 19
- 20
- 21
- 22
- 23
- 24
Controller
package com.example.helloworld.controller; import com.alibaba.fastjson.JSON; import org.springframework.beans.factory.annotation.Autowired; import org.springframework.data.redis.core.StringRedisTemplate; import org.springframework.http.MediaType; import org.springframework.web.bind.annotation.RequestBody; import org.springframework.web.bind.annotation.RequestMapping; import org.springframework.web.bind.annotation.RequestMethod; import org.springframework.web.bind.annotation.RestController; @RestController public class HelloController { @RequestMapping("/hello") public String hello() { return "hello ==== " + 222; } @RequestMapping(value = "/json1", method = RequestMethod.POST, produces = MediaType.APPLICATION_JSON_UTF8_VALUE, consumes = MediaType.APPLICATION_JSON_UTF8_VALUE) public Json1 json1(@RequestBody Json1 json) { System.out.println(json); return json; } /** * 为什么用requestJson接?我不想和你的bane属性叫的一样,一样了我也不想改,怎么办? * @param requestJson * @return */ @RequestMapping(value = "/json2", method = RequestMethod.POST, produces = MediaType.APPLICATION_JSON_UTF8_VALUE, consumes = MediaType.APPLICATION_JSON_UTF8_VALUE) public Json1 json1(@RequestBody String requestJson) { System.out.println("request json:" + requestJson); Json1 json1 = JSON.parseObject(requestJson, Json1.class); System.out.println(json1); return json1; } }- 1
- 2
- 3
- 4
- 5
- 6
- 7
- 8
- 9
- 10
- 11
- 12
- 13
- 14
- 15
- 16
- 17
- 18
- 19
- 20
- 21
- 22
- 23
- 24
- 25
- 26
- 27
- 28
- 29
- 30
- 31
- 32
- 33
- 34
- 35
- 36
- 37
- 38
输出结果
1.2.70
request json:{ "op_id":"op_id", "op_id1":"op_id1", "op_id2":"op_id2", "appId":"app_id", "app_id2":"app_id2" } Json1(opId=op_id, op_id1=op_id1, param=op_id2, app_id=app_id, appId2=app_id2)- 1
- 2
- 3
- 4
- 5
- 6
- 7
- 8
1.2.83
request json:{ "op_id":"op_id", "op_id1":"op_id1", "op_id2":"op_id2", "appId":"app_id", "app_id2":"app_id2" } Json1(opId=op_id, op_id1=op_id1, param=op_id2, app_id=null, appId2=app_id2)- 1
- 2
- 3
- 4
- 5
- 6
- 7
- 8
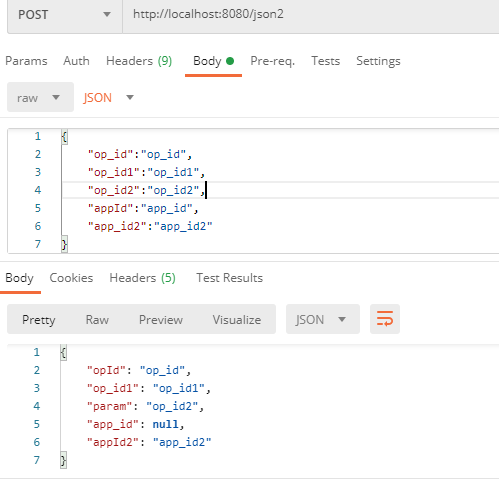
postman设置传输json测试


-
相关阅读:
Hive——Hive常用内置函数总结
【Java Web】利用Spring整合Redis,配置RedisTemplate
【Lua语法】字符串
前端 webSocket 的使用
电动汽车充放电V2G模型MATLAB代码
java:CompletableFuture的简单例子
uniapp+腾讯地图定位获取位置信息
Cache减少失效开销例题:(请求字处理)
mysql 问题解答 2
【源码课件+教程】Python入门教程_Python400集持续更新
- 原文地址:https://blog.csdn.net/qq_41929714/article/details/125605438
