-
YoloV6实战:手把手教你使用Yolov6进行物体检测(附数据集)
摘要
YOLOv6 主要在 BackBone、Neck、Head 以及训练策略等方面进行了诸多的改进:
- 统一设计了更高效的 Backbone 和 Neck :受到硬件感知神经网络设计思想的启发,基于 RepVGG style[4] 设计了可重参数化、更高效的骨干网络 EfficientRep Backbone 和 Rep-PAN Neck。
- 优化设计了更简洁有效的 Efficient Decoupled Head,在维持精度的同时,进一步降低了一般解耦头带来的额外延时开销。
- 在训练策略上,采用Anchor-free 无锚范式,同时辅以 SimOTA[2] 标签分配策略以及 SIoU[9] 边界框回归损失来进一步提高检测精度。
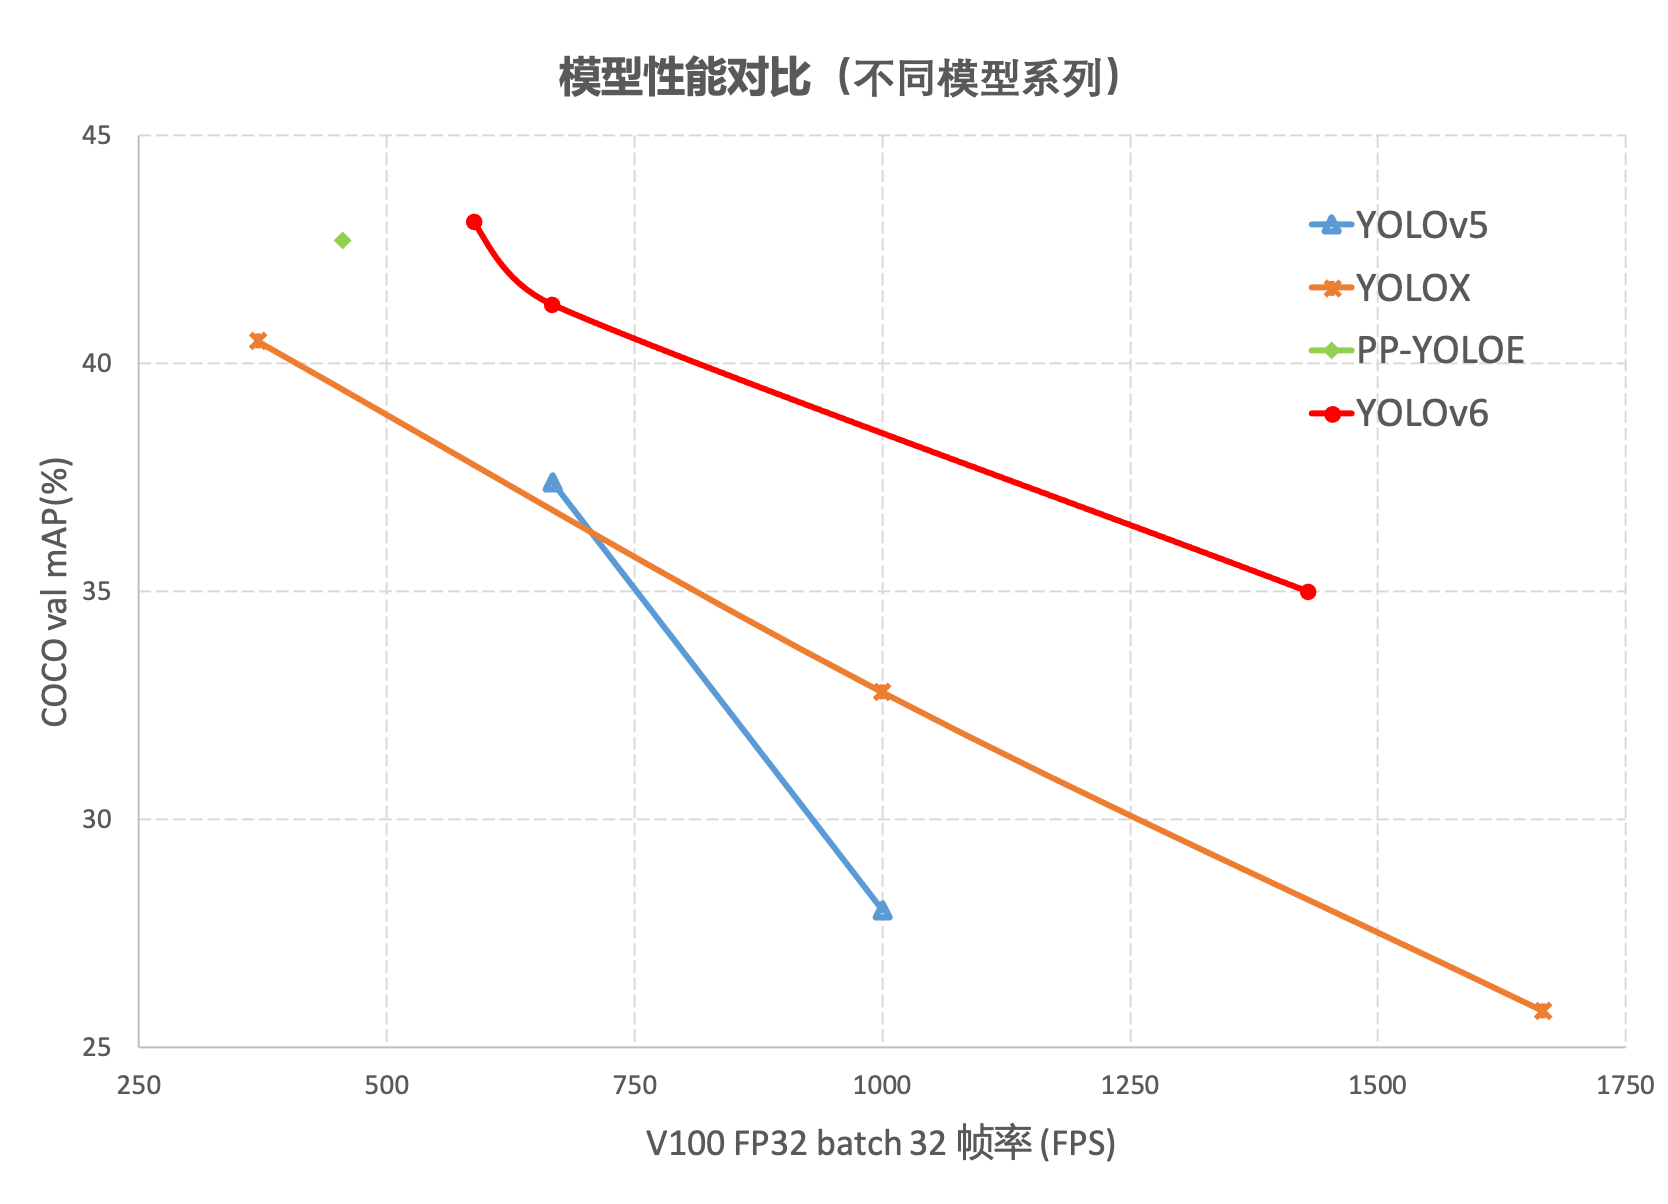
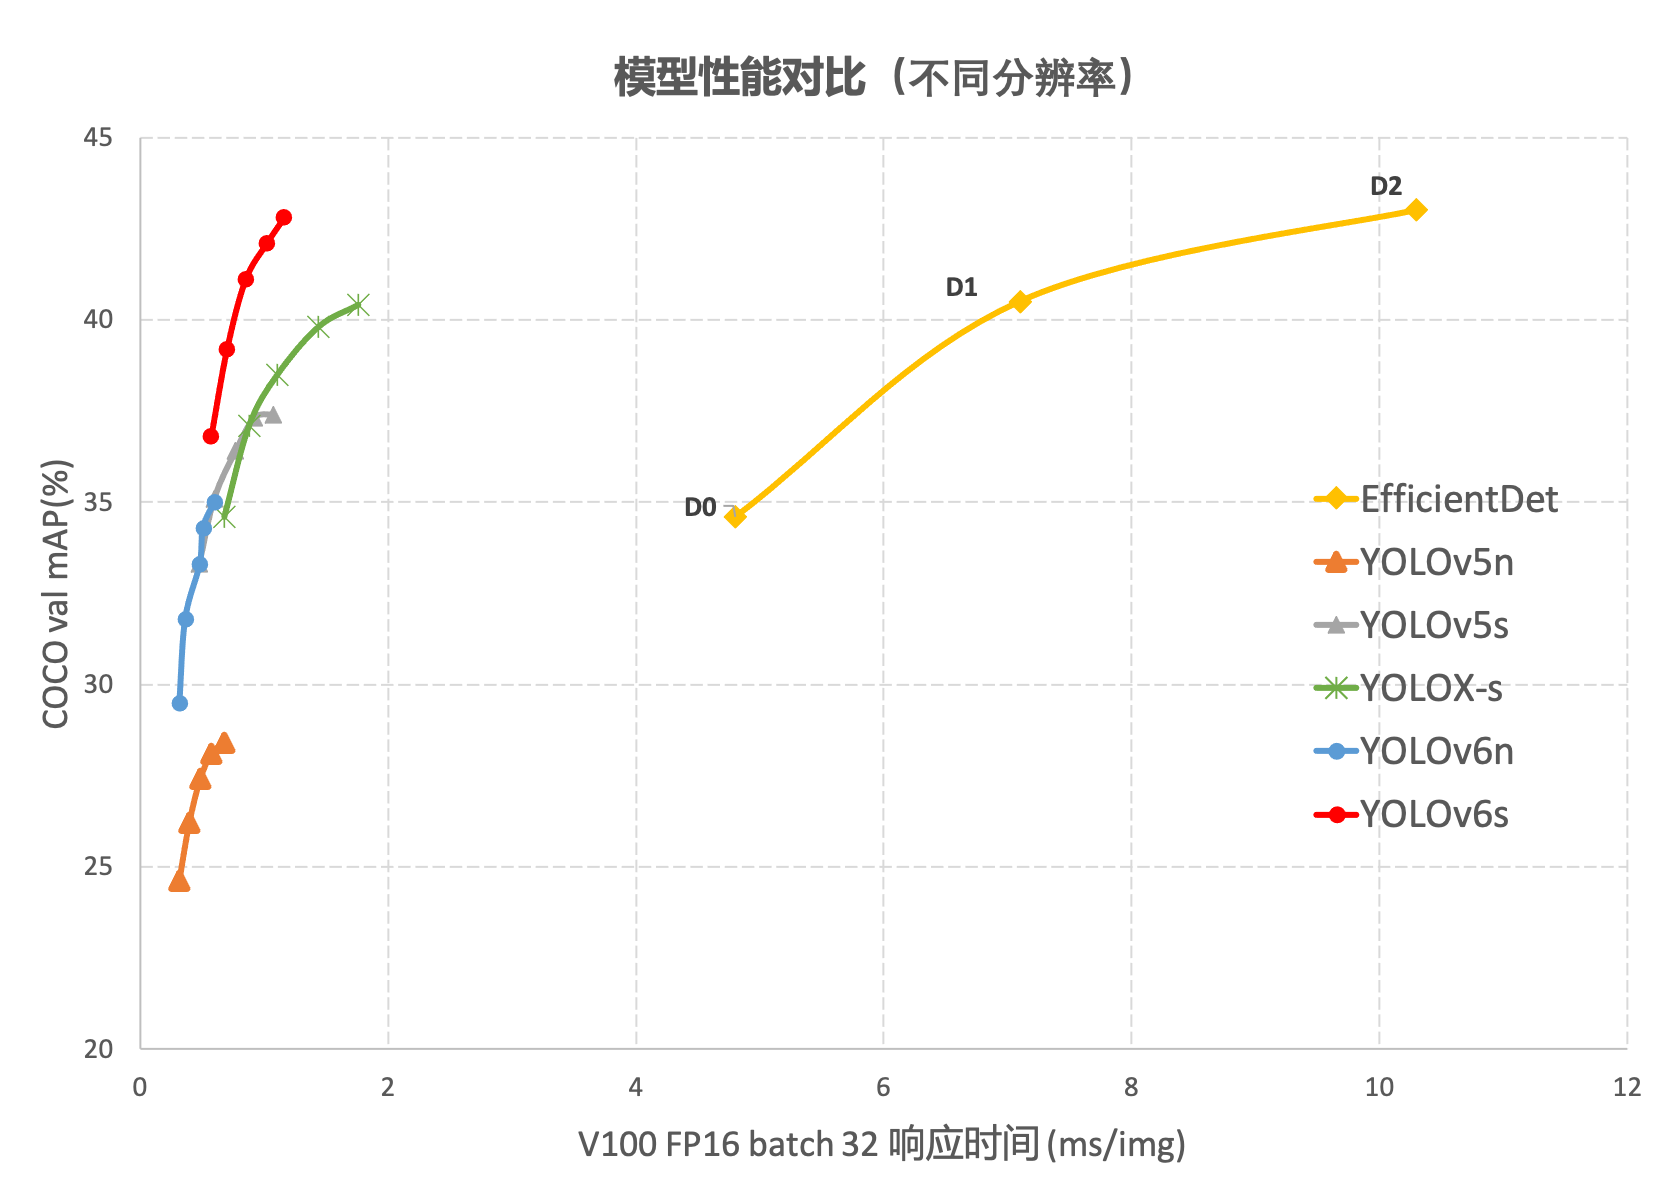
在 COCO 数据集上,YOLOv6 在精度和速度方面均超越YOLOv5、YOLOX和 PP-YOLOE等这样比较有代表性的算法,相关结果如下图 所示:
这篇文章没有论文,只有美团的一篇论文介绍和github的代码,链接如下:
github地址:https://github.com/meituan/YOLOv6
详见:
https://tech.meituan.com/2022/06/23/yolov6-a-fast-and-accurate-target-detection-framework-is-opening-source.html
今天这篇文章主要演示如何跑通代码。数据集
数据集是Labelme标注的数据集,下载地址:
https://download.csdn.net/download/hhhhhhhhhhwwwwwwwwww/14003627
数据集是我为了调物体检测模型制作的,数据集有两个类别,分别是:aircraft,oiltank。
如果有人想做别的尝试,也可以选用我制作的另一个数据集,也是Labelme标注的格式,链接如下:
https://download.csdn.net/download/hhhhhhhhhhwwwwwwwwww/63242994。
总共32种飞机:
[‘c17’, ‘c5’, ‘helicopter’, ‘c130’, ‘f16’, ‘b2’, ‘other’, ‘b52’, ‘kc10’, ‘command’, ‘f15’, ‘kc135’, ‘a10’, ‘b1’, ‘aew’, ‘f22’, ‘p3’, ‘p8’, ‘f35’, ‘f18’, ‘v22’, ‘f4’, ‘globalhawk’, ‘u2’, ‘su-27’, ‘il-38’, ‘tu-134’, ‘su-33’, ‘an-70’, ‘su-24’, ‘tu-22’, ‘il-76’]
接下来是如何制作yolov6数据集,yolov6使用的数据集格式和yolov5一样。如图:
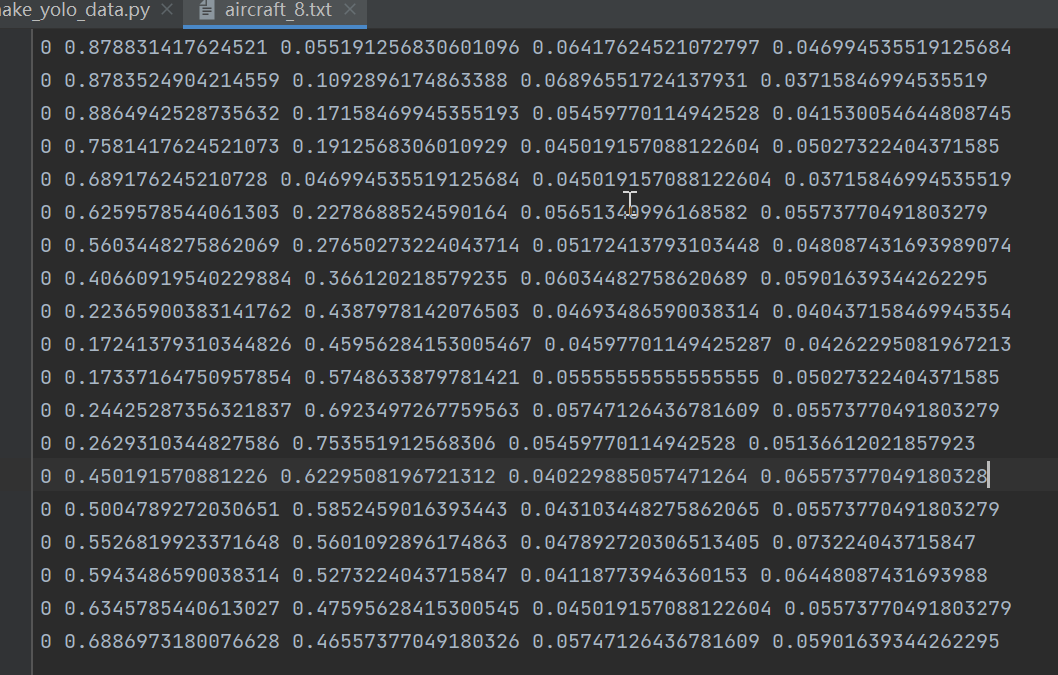
格式:类别,中心点x,中心点y,w,h。
新建脚本make_yolo_data.py,插入代码:import os import shutil import numpy as np import json from glob import glob import cv2 from sklearn.model_selection import train_test_split from os import getcwd def convert(size, box): dw = 1. / (size[0]) dh = 1. / (size[1]) x = (box[0] + box[1]) / 2.0 - 1 y = (box[2] + box[3]) / 2.0 - 1 w = box[1] - box[0] h = box[3] - box[2] x = x * dw w = w * dw y = y * dh h = h * dh return (x, y, w, h) def change_2_yolo5(files, txt_Name): imag_name=[] for json_file_ in files: json_filename = labelme_path + json_file_ + ".json" out_file = open('%s/%s.txt' % (labelme_path, json_file_), 'w') json_file = json.load(open(json_filename, "r", encoding="utf-8")) # image_path = labelme_path + json_file['imagePath'] imag_name.append(json_file['imagePath']) height, width, channels = cv2.imread(labelme_path + json_file_ + ".jpg").shape for multi in json_file["shapes"]: points = np.array(multi["points"]) xmin = min(points[:, 0]) if min(points[:, 0]) > 0 else 0 xmax = max(points[:, 0]) if max(points[:, 0]) > 0 else 0 ymin = min(points[:, 1]) if min(points[:, 1]) > 0 else 0 ymax = max(points[:, 1]) if max(points[:, 1]) > 0 else 0 label = multi["label"] if xmax <= xmin: pass elif ymax <= ymin: pass else: cls_id = classes.index(label) b = (float(xmin), float(xmax), float(ymin), float(ymax)) bb = convert((width, height), b) out_file.write(str(cls_id) + " " + " ".join([str(a) for a in bb]) + '\n') #print(json_filename, xmin, ymin, xmax, ymax, cls_id) return imag_name def image_txt_copy(files,scr_path,dst_img_path,dst_txt_path): """ :param files: 图片名字组成的list :param scr_path: 图片的路径 :param dst_img_path: 图片复制到的路径 :param dst_txt_path: 图片对应的txt复制到的路径 :return: """ for file in files: img_path=scr_path+file shutil.copy(img_path, dst_img_path+file) scr_txt_path=scr_path+file.split('.')[0]+'.txt' shutil.copy(scr_txt_path, dst_txt_path + file.split('.')[0]+'.txt') if __name__ == '__main__': classes = ["aircraft", "oiltank"] # 1.标签路径 labelme_path = "LabelmeData/" isUseTest = True # 是否创建test集 # 3.获取待处理文件 files = glob(labelme_path + "*.json") files = [i.replace("\\", "/").split("/")[-1].split(".json")[0] for i in files] trainval_files, test_files = train_test_split(files, test_size=0.1, random_state=55) # split train_files, val_files = train_test_split(trainval_files, test_size=0.1, random_state=55) train_name_list=change_2_yolo5(train_files, "train") print(train_name_list) val_name_list=change_2_yolo5(val_files, "val") test_name_list=change_2_yolo5(test_files, "test") #创建数据集文件夹。 file_List = ["train", "val", "test"] for file in file_List: if not os.path.exists('./VOC/images/%s' % file): os.makedirs('./VOC/images/%s' % file) if not os.path.exists('./VOC/labels/%s' % file): os.makedirs('./VOC/labels/%s' % file) image_txt_copy(train_name_list,labelme_path,'./VOC/images/train/','./VOC/labels/train/') image_txt_copy(val_name_list, labelme_path, './VOC/images/val/', './VOC/labels/val/') image_txt_copy(test_name_list, labelme_path, './VOC/images/test/', './VOC/labels/test/')- 1
- 2
- 3
- 4
- 5
- 6
- 7
- 8
- 9
- 10
- 11
- 12
- 13
- 14
- 15
- 16
- 17
- 18
- 19
- 20
- 21
- 22
- 23
- 24
- 25
- 26
- 27
- 28
- 29
- 30
- 31
- 32
- 33
- 34
- 35
- 36
- 37
- 38
- 39
- 40
- 41
- 42
- 43
- 44
- 45
- 46
- 47
- 48
- 49
- 50
- 51
- 52
- 53
- 54
- 55
- 56
- 57
- 58
- 59
- 60
- 61
- 62
- 63
- 64
- 65
- 66
- 67
- 68
- 69
- 70
- 71
- 72
- 73
- 74
- 75
- 76
- 77
- 78
- 79
- 80
- 81
- 82
- 83
- 84
- 85
- 86
- 87
- 88
- 89
- 90
- 91
- 92
思路:
第一步 使用train_test_split方法切分出训练集、验证集和测试集。
第二步 调用change_2_yolo5方法将json里面的数据转为yolov5格式的txt数据,返回训练集、验证集和测试集的图片list。
第三步 创建数据集文件夹,然后将图片和txt文件copy到对应的目录下面。数据集的结构如下图:
Yolodata_demo └─VOC ├─images │ ├─test │ ├─train │ └─val └─labels ├─test ├─train └─val- 1
- 2
- 3
- 4
- 5
- 6
- 7
- 8
- 9
- 10
训练
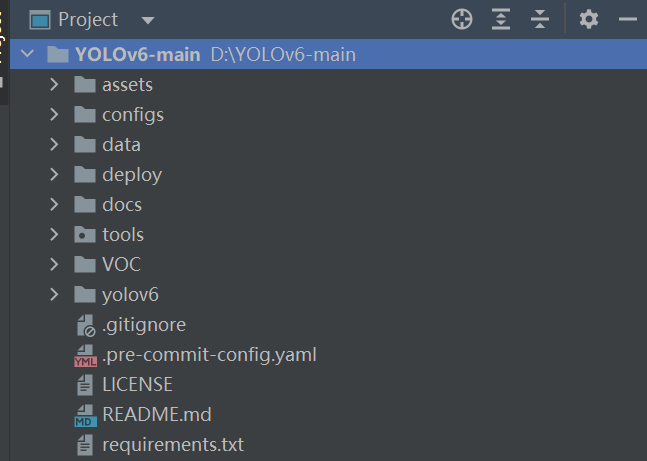
有了数据集就可以开始训练了。下载yolov6的代码,将其解压到指定的位置,然后将数据集复制到yolov6的根目录。如下图:
打开requirements.txt,查看本地环境缺少哪些库,然后安装即可。torch>=1.8.0 torchvision>=0.9.0 numpy>=1.18.5 opencv-python>=4.1.2 PyYAML>=5.3.1 scipy>=1.4.1 tqdm>=4.41.0 addict>=2.4.0 tensorboard>=2.7.0 pycocotools>=2.0 onnx>=1.10.0 # ONNX export onnx-simplifier>=0.3.6 # ONNX simplifier thop # FLOPs computation- 1
- 2
- 3
- 4
- 5
- 6
- 7
- 8
- 9
- 10
- 11
- 12
- 13
在tools文件夹下面新建__init__.py,里面不放任何内容。
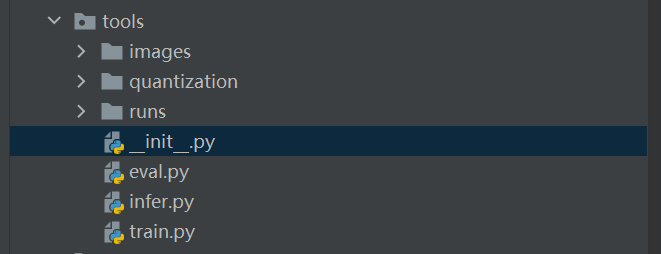
因为在其他地方引用了tools里面的文件,不加这个脚本就会报错。修改yaml文件
打开data/dataset.yaml,如下图:
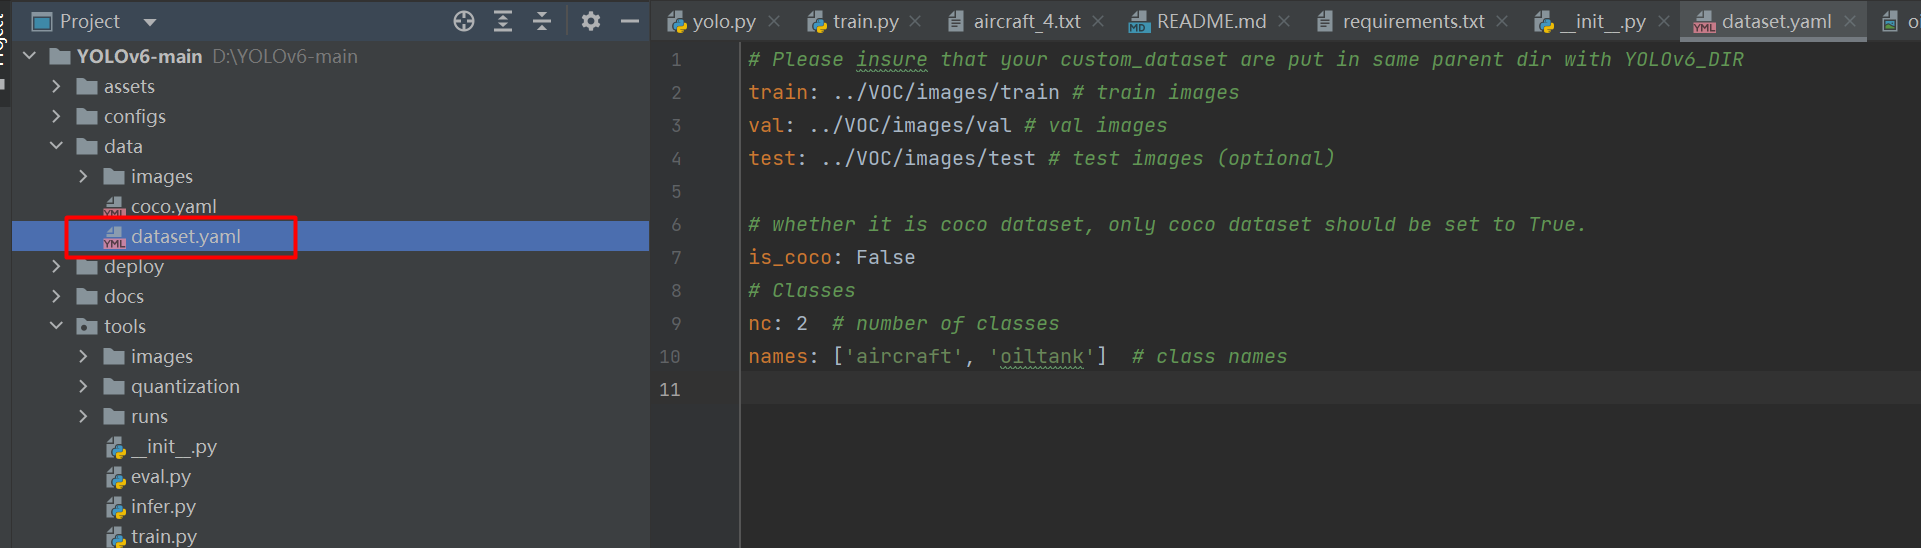
# Please insure that your custom_dataset are put in same parent dir with YOLOv6_DIR train: ../VOC/images/train # train images val: ../VOC/images/val # val images test: ../VOC/images/test # test images (optional) # whether it is coco dataset, only coco dataset should be set to True. is_coco: False # Classes nc: 2 # number of classes names: ['aircraft', 'oiltank'] # class names- 1
- 2
- 3
- 4
- 5
- 6
- 7
- 8
- 9
- 10
train、val、test:代表image路径。
如果我们使用命令python tools/train.py训练,则将目录设置为:train: ./VOC/images/train # train images val: ./VOC/images/val # val images test: ./VOC/images/test # test images (optional)- 1
- 2
- 3
如果在tools目录下使用
python train.py或者直接run,则将目录设置为:train: ../VOC/images/train # train images val: ../VOC/images/val # val images test: ../VOC/images/test # test images (optional)- 1
- 2
- 3
这个细节要注意一下,启动的目录不同,对应的路径也不相同。
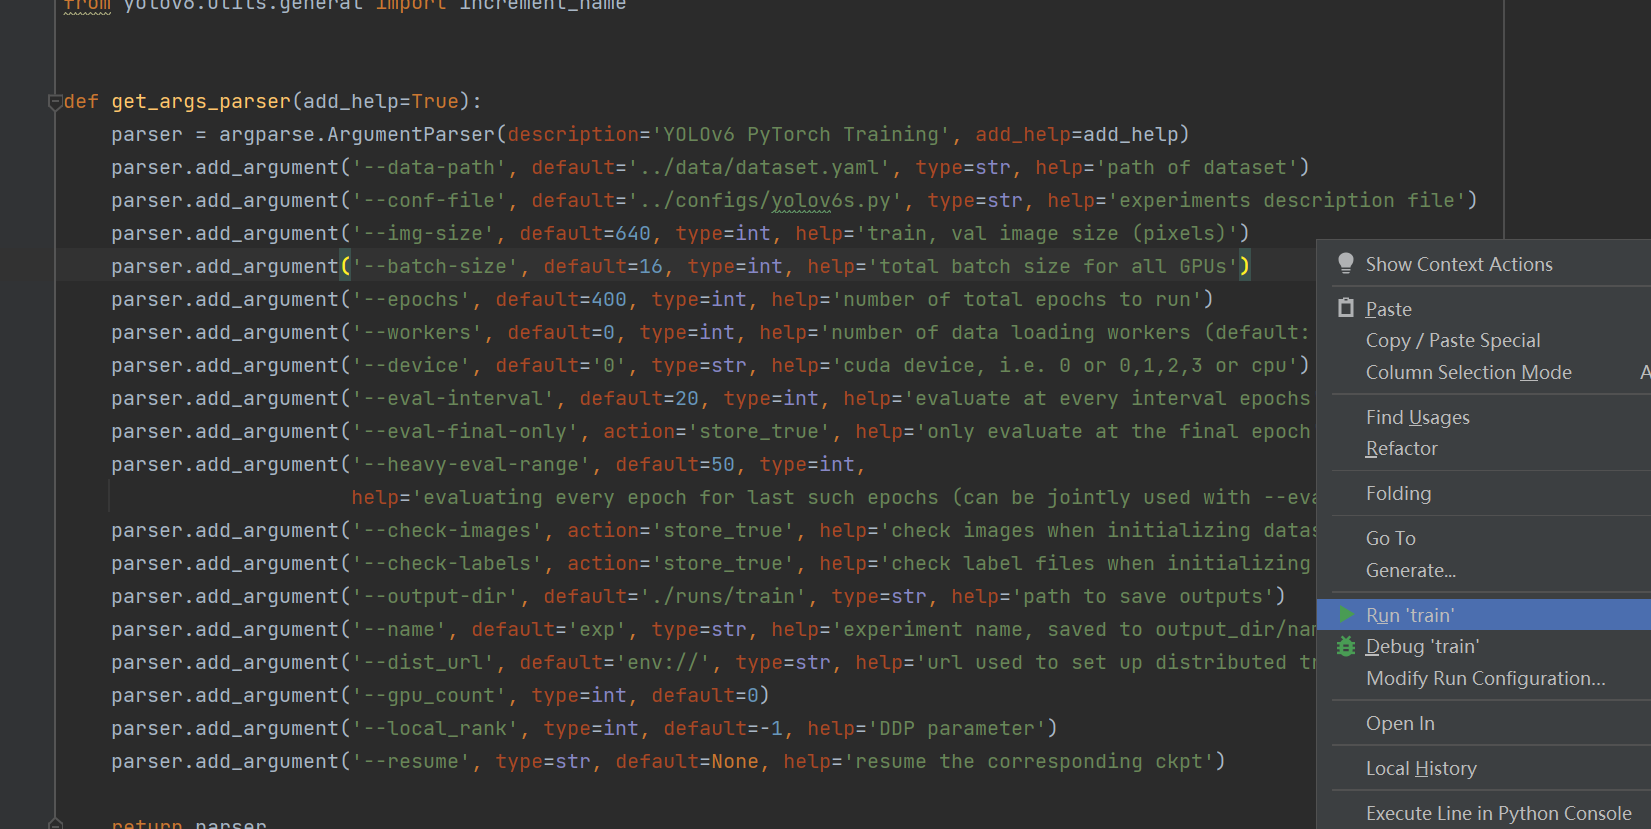
修改train.py
def get_args_parser(add_help=True): parser = argparse.ArgumentParser(description='YOLOv6 PyTorch Training', add_help=add_help) parser.add_argument('--data-path', default='../data/dataset.yaml', type=str, help='path of dataset') parser.add_argument('--conf-file', default='../configs/yolov6s.py', type=str, help='experiments description file') parser.add_argument('--img-size', default=640, type=int, help='train, val image size (pixels)') parser.add_argument('--batch-size', default=16, type=int, help='total batch size for all GPUs') parser.add_argument('--epochs', default=400, type=int, help='number of total epochs to run') parser.add_argument('--workers', default=0, type=int, help='number of data loading workers (default: 8)') parser.add_argument('--device', default='0', type=str, help='cuda device, i.e. 0 or 0,1,2,3 or cpu') parser.add_argument('--eval-interval', default=20, type=int, help='evaluate at every interval epochs') parser.add_argument('--eval-final-only', action='store_true', help='only evaluate at the final epoch') parser.add_argument('--heavy-eval-range', default=50, type=int, help='evaluating every epoch for last such epochs (can be jointly used with --eval-interval)')- 1
- 2
- 3
- 4
- 5
- 6
- 7
- 8
- 9
- 10
- 11
- 12
- 13
data-path:数据集配置文件的路径。
conf-file:模型配置文件的路径。
img-size:输入图片的尺寸,将图片resize该尺寸输入到模型中。yolo系列的模型一般要求尺寸为32的倍数。
batch-size:BatchSize的大小。根据显卡的显存设置,一般情况拉满显存即可。
epochs:epoch的大小。
workers:cpu核数的设置,在win系统设置为0。
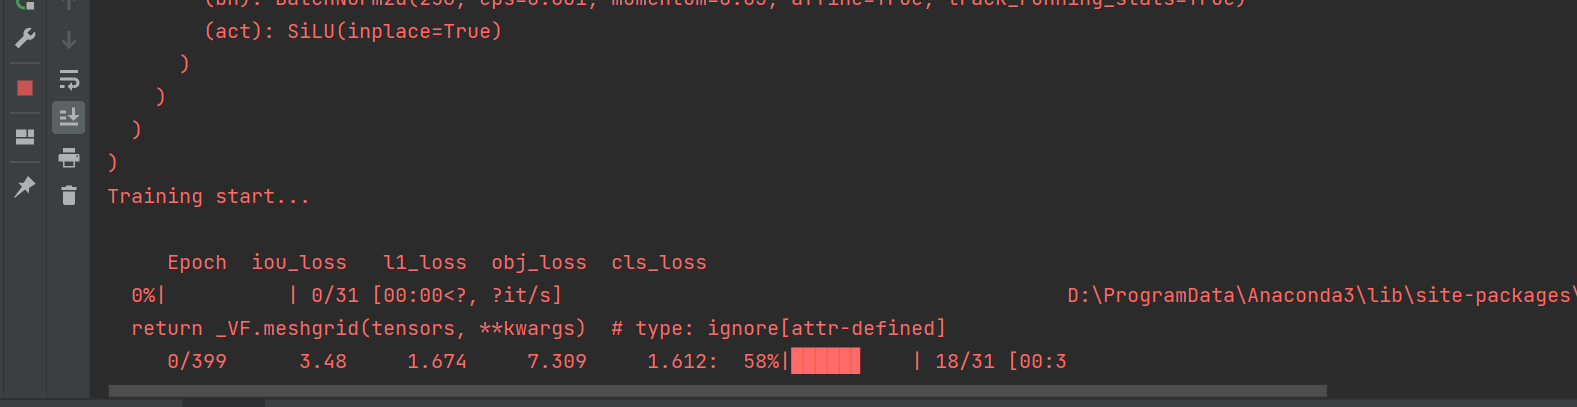
workers:验证的间隔。然后就可以开始训练,我这里直接运行train.py脚本。
由于数据集量不大,很快就能跑完。
测试
等训练完成后就可以开启测试了。训练完成后我们在tools/runs找到weights,选用best_ckpt.pt。
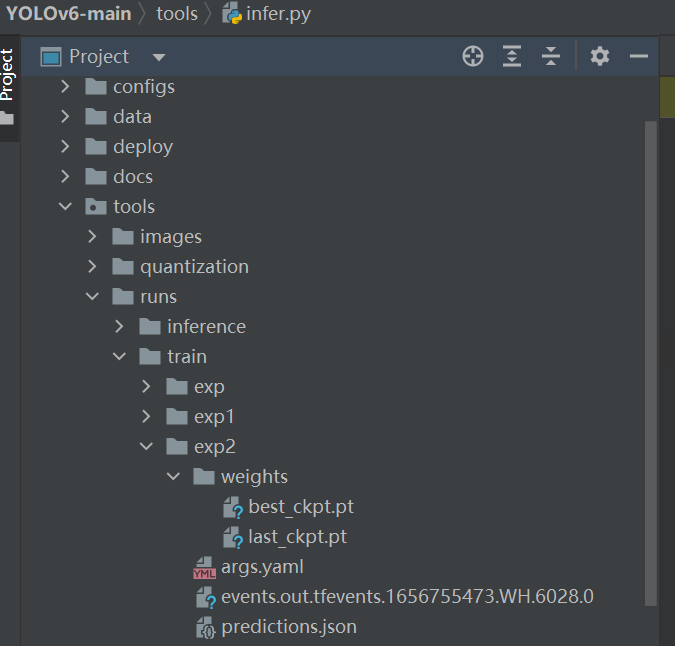
打开tools/infer.py,修改参数:
def get_args_parser(add_help=True): parser = argparse.ArgumentParser(description='YOLOv6 PyTorch Inference.', add_help=add_help) parser.add_argument('--weights', type=str, default='runs/train/exp2/weights/best_ckpt.pt', help='model path(s) for inference.') parser.add_argument('--source', type=str, default='images', help='the source path, e.g. image-file/dir.') parser.add_argument('--yaml', type=str, default='../data/dataset.yaml', help='data yaml file.') parser.add_argument('--img-size', type=int, default=640, help='the image-size(h,w) in inference size.') parser.add_argument('--conf-thres', type=float, default=0.25, help='confidence threshold for inference.') parser.add_argument('--iou-thres', type=float, default=0.45, help='NMS IoU threshold for inference.') parser.add_argument('--max-det', type=int, default=1000, help='maximal- 1
- 2
- 3
- 4
- 5
- 6
- 7
- 8
- 9
weights:训练权重的路径。
source:测试图片的路径,我这里把测试图片放在tools/images文件夹下面。
img-size:和训练的图片保持一致。
conf-thres:置信度的最小值。
iou-thres:IoU的值。
max-det:单张图片检测到目标不能超过该值。运行inter.py测试images中的图片。
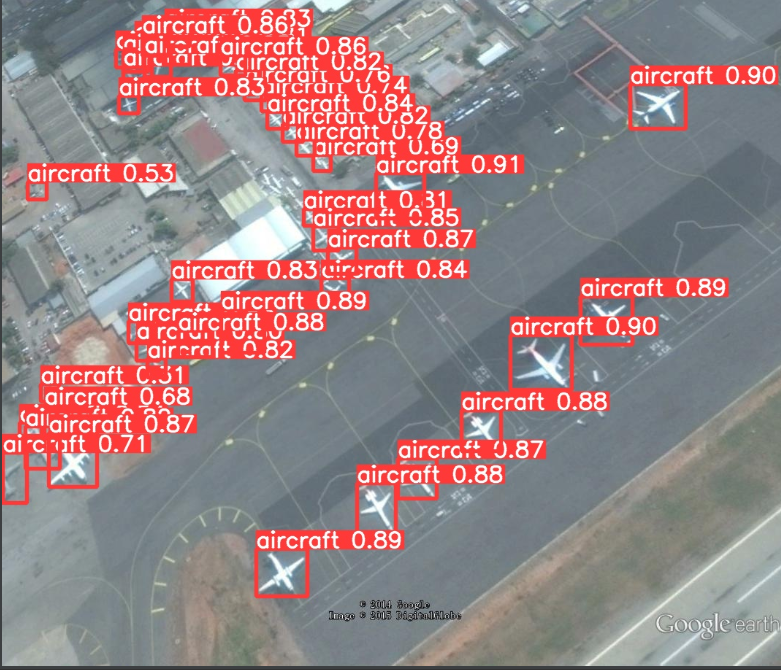

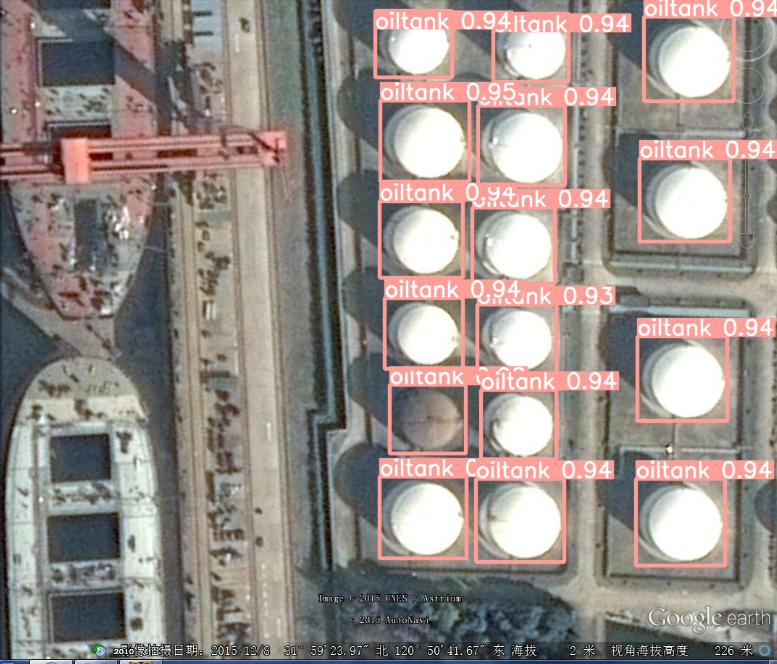
效果确实不错!!!完整的代码
https://download.csdn.net/download/hhhhhhhhhhwwwwwwwwww/85881120?spm=1001.2014.3001.5503
-
相关阅读:
Java 框架、库和软件的精选列表(awesome java)
本地开机启动jar
剑指offer——JZ37 序列化二叉树 解题思路与具体代码【C++】
西门子S7-200 SMART如何实现远程监控并通过手机自动报警
分布式(一致性协议)之领导人选举( DotNext.Net.Cluster 实现Raft 选举 )
RPC 接口测试技术 —— websocket 自动化测试实践!
【C语言】指针和数组笔试题解析(1)
Ansys Zemax | 如何设计光谱仪——实际应用
面试题:百万数据的导入导出解决方案,怎么设计?
9.复杂的例子:模块的使用和自定义模块
- 原文地址:https://blog.csdn.net/hhhhhhhhhhwwwwwwwwww/article/details/125581604
