-
Discuz 安装全流程 CentOS+Docker+PHP+Nginx+Mariadb
系统环境:CentOS 8 Stream远程SSH工具:FinalShell 4.9.4
PHP版本:7.2-fpm
Discuz版本:Discuz_X3.4_SC_UTF8_20220518
1 Docker 安装
安装 yum 工具:
yum install -y -q yum-utils- 1
添加 docker-ce 软件源:
yum-config-manager --add-repo https://mirrors.aliyun.com/docker-ce/linux/centos/docker-ce.repo- 1
更新 yum :
yum update- 1
安装 docker:
yum install -y docker-ce # yum install docker 默认安装 podman-docker,所以要用docker-ce- 1
- 2
虚拟机可能自带了 podman,如果再安装 docker-ce 会报错:
Problem: package podman-2:4.0.2-1.module_el8.7.0+1106+45480ee0.x86_64 requires runc >= 1.0.0-57, but none of the providers can be installed ....- 1
- 2
podman 与 docker 功能类似,将 docker 命令中的 docker 替换为 podman 即可正常使用,若不习惯,可以卸载 podman 和 buildah:
yum rm podman buildah- 1
再安装docker:
yum install -y docker-ce # yum install docker 默认安装 podman-docker,所以要用docker-ce- 1
- 2
启动 docker 服务:
systemctl start docker- 1
2 MariaDB 安装
拉取镜像:
docker pull mariadb:latest # 此步也可不执行,直接run也会自动拉取镜像- 1
运行容器:(命令参数顺序不对可能导致容器启动就退出)
docker run --name mymariadb -e MYSQL_ROOT_PASSWORD=你的密码 -itd mariadb- 1
参数解释
--name mariadb: 容器名称为mariadb-e MYSQL_ROOT_PASSWORD=你的密码:设置环境变量MYSQL_ROOT_PASSWORD为密码-itd:-i,-t,-d的组合,分别为以交互模式运行容器、为容器重新分配一个伪输入终端、后台运行容器,并返回容器ID3 PHP 安装
拉取镜像:
docker pull php:7.2-fpm # 此步也可不执行,直接run也会自动拉取镜像- 1
运行容器:(注意 link 和 name 前均为两个横杠)
docker run --name myphp -v ~/nginx/www:/www --link mymariadb:db -itd php:7.2-fpm- 1
参数解释
--name myphp-test: 容器名称为myphp-v ~/nginx/www:/www:将主机的目录~/nginx/www映射到容器的/www,/www存放 php 服务器文件,文件夹会自动创建--link mariadb:db:连接名为mariadb的容器,并为其设置了别名db,这里别名 db 就可以代表 mymariadb 容器的 ip 地址。–link 使容器之间可以通过容器名互相通信,而不再使用易发生变化的 ip 地址。
4 Nginx 安装
拉取镜像:
docker pull nginx # 此步也可不执行,直接run也会自动拉取镜像- 1
运行容器:
docker run --name nginx -p 80:80 \ -v ~/nginx/www:/usr/share/nginx/html:ro \ -v ~/nginx/conf/conf.d:/etc/nginx/conf.d:ro \ --link myphp:php \ -itd nginx- 1
- 2
- 3
- 4
- 5
参数解释
-p 80:80: 容器内 80 端口映射主机 80 端口-v ~/nginx/www:/usr/share/nginx/html:ro:将主机的目录~/nginx/www映射到容器的/usr/share/nginx/html-v ~/nginx/conf/conf.d:/etc/nginx/conf.d:ro:将主机的目录~/nginx/conf/conf.d映射到容器的/etc/nginx/conf.d--link myphp:php:连接名为myphp的容器,并为其设置了别名php在自己的电脑上新建一个 php.conf,内容如下:
server { listen 80; server_name localhost; location / { root /usr/share/nginx/html; index index.html index.htm index.php; } error_page 500 502 503 504 /50x.html; location = /50x.html { root /usr/share/nginx/html; } location ~ \.php$ { fastcgi_pass php:9000; fastcgi_index index.php; fastcgi_param SCRIPT_FILENAME /www/$fastcgi_script_name; include fastcgi_params; } }- 1
- 2
- 3
- 4
- 5
- 6
- 7
- 8
- 9
- 10
- 11
- 12
- 13
- 14
- 15
- 16
- 17
- 18
- 19
- 20
- 21
参数解释
fastcgi_pass php:9000;:php与之前启动 Nginx 容器时的参数--link myphp:php中设置的别名php保持一致,即php代表 myphp 容器的 ip 地址。9000为 myphp 容器中 php 服务器默认的端口号。fastcgi_pass:Nginx本身不能处理PHP,它只是个 web 服务器,当接收到请求后,如果是 php 请求,则发给php解释器处理,并把结果返回给客户端。nginx 一般是把请求发 fastcgi 管理进程处理, fascgi 管理进程选择 cgi 子进程处理结果并返回给 Nginx。
将自己电脑上的 php.conf 利用 FinalShell 上传至服务器的
~/nginx/conf/conf.d/位置。5 Discuz 安装
5.1 安装文件部署
从官网下载 Discuz 安装包,这里使用的是 Discuz_X3.4_SC_UTF8_20220518.zip,附件所在帖子链接为:https://www.dismall.com/thread-73-1-1.html。
打开路径 `~/nginx/www
cd ~/nginx/www- 1
利用 FinalShell 将安装包上传至
~/nginx/www。解压安装包:
unzip Discuz_X3.4_SC_UTF8_20220518.zip- 1
将其 upload 文件夹的内容个复制到
~/nginx/www:mv ./Discuz_X3.4_SC_UTF8_20220518/upload/* ./- 1
删除剩余文件:
rm -rf ./Discuz_X3.4_SC_UTF8_20220518- 1
删除安装包:
rm -f ./Discuz_X3.4_SC_UTF8_20220518.zip- 1
给
~/nginx/www/赋最高权限:chmod 777 -r ~/nginx/www/ # 无这一步,Discuz安装会报一堆权限问题- 1
重启所有容器:
docker restart mymariadb nginx myphp- 1
5.2 安装
使用浏览器访问服务器的 ip 地址,即 Discuz 网站,进入 Discuz 安装阶段,同意授权协议后,显示安装环境检查界面:
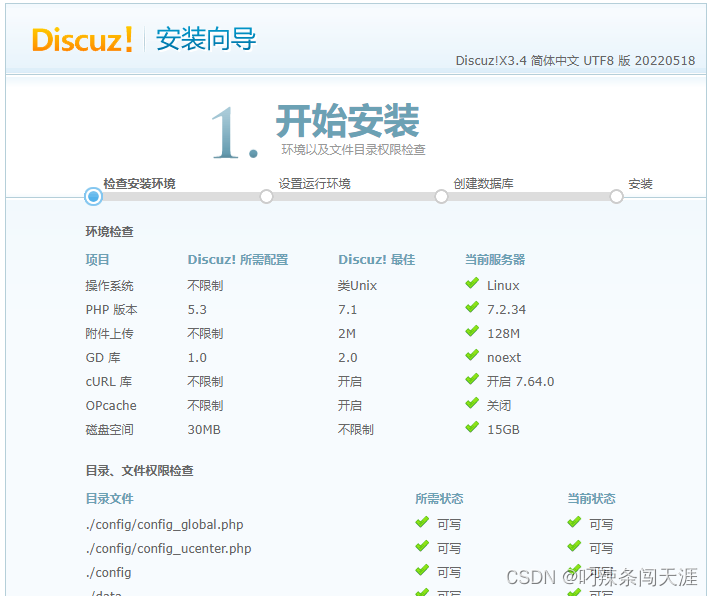
如果之前步骤进行正确,除如下 mysql_connect() 函数依赖问题外,其他项目均正常。

下边解决 mysql_connect() 函数依赖问题,进入启动的 myphp 容器:
docker exec -it myphp bash- 1
进入目录 bin:
cd /usr/local/bin- 1
安装扩展 pdo_mysql:
./docker-php-ext-install pdo_mysql- 1
安装扩展 mysqli:
./docker-php-ext-install mysqli- 1
退出 myphp 容器:
exit- 1
重启所有容器:
docker restart mymariadb nginx myphp- 1
重新访问 Discuz 网站,显示函数依赖已正常:

进入下一步,运行环境设置,笔者不太清楚两选项区别,选择了含 UCenter Server 安装,有备无患。
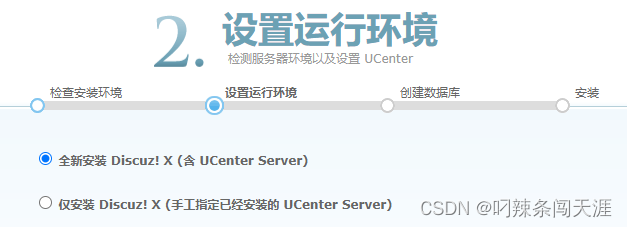
进入下一步,安装数据库:
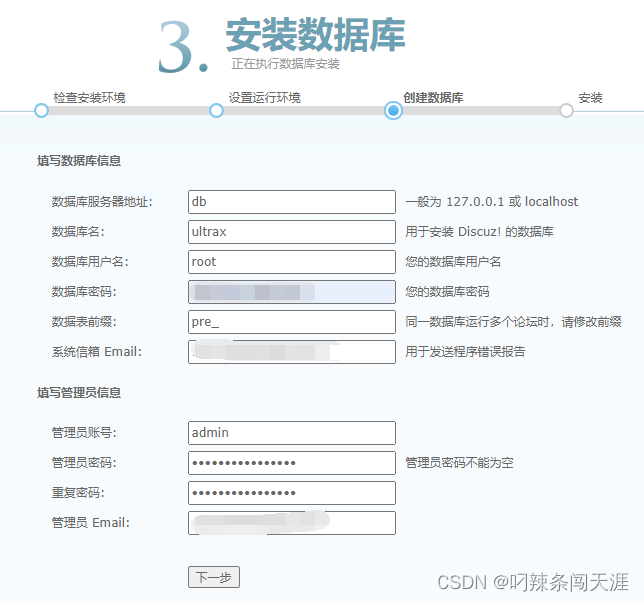
参数解释
数据库服务器地址:db,即第 3 节 PHP 安装中连接 mymariadb 容器设置的别名db数据库用户名:root,即默认数据库密码:第 2 节MariaDB 安装中设置的 MYSQL_ROOT_PASSWORD 环境变量值数据库名、数据表前缀:无特殊需要保持默认即可其他信息根据自身情况填写即可。点击下一步之后自动安装,片刻即好,之后可进入 Discuz 网站,使用安装过程填写的管理员信息登录(初次可设置验证问题提高账户安全性)。
5.3 GD图像处理软件安装
此时网站还存在一个问题,在 Discuz 后台的全局->上传设置,点击“预览略缩图效果”,会显示如下错误:

从下图位置进入管理中心,使用管理员账号登录后台:

首页会显示如下警告:

下边安装 GD ,进入 myphp 容器:
docker exec -it myphp bash- 1
需要将 apt-get 软件安装源替换,才能找到后边要用的安装包。
软件源替换方法如下:
备份原来的源文件:
cp /etc/apt/sources.list /etc/apt/sources.list.bak- 1
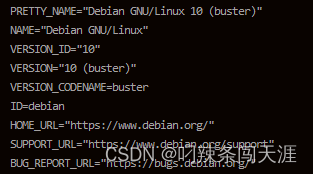
在容器内查看系统版本:
cat /etc/os-release- 1
显示如下信息,说明容器内的环境为 Debian buster 10。
打开清华大学镜像网站
https://mirrors.tuna.tsinghua.edu.cn/help/debian/,找到对应版本的国内源:[外链图片转存失败,源站可能有防盗链机制,建议将图片保存下来直接上传(img-4uwWhdaV-1656570011805)(Discuz安装全流程 CentOS+Docker+PHP+Nginx+Mariadb.assets/image-20220630132642952.png)]
复制网页下方代码,Debian buster如下:
# 默认注释了源码镜像以提高 apt update 速度,如有需要可自行取消注释 deb https://mirrors.tuna.tsinghua.edu.cn/debian/ buster main contrib non-free # deb-src https://mirrors.tuna.tsinghua.edu.cn/debian/ buster main contrib non-free deb https://mirrors.tuna.tsinghua.edu.cn/debian/ buster-updates main contrib non-free # deb-src https://mirrors.tuna.tsinghua.edu.cn/debian/ buster-updates main contrib non-free deb https://mirrors.tuna.tsinghua.edu.cn/debian/ buster-backports main contrib non-free # deb-src https://mirrors.tuna.tsinghua.edu.cn/debian/ buster-backports main contrib non-free deb https://mirrors.tuna.tsinghua.edu.cn/debian-security buster/updates main contrib non-free # deb-src https://mirrors.tuna.tsinghua.edu.cn/debian-security buster/updates main contrib non-free- 1
- 2
- 3
- 4
- 5
- 6
- 7
- 8
- 9
- 10
- 11
在自己的电脑上新建
source.list文件,粘贴清华源到文件里,借助 FinalShell 先将文件上传至~/nginx/www(为了可以从容器中的/www访问),然后移动到软件源所在位置:mv /www/sources.list /etc/apt/sources.list- 1
更新:
apt-get update- 1
安装依赖库:
apt install -y libwebp-dev libjpeg-dev libpng-dev libfreetype6-dev- 1
解压源码:
docker-php-source extract- 1
进入gd源码文件夹:
cd /usr/src/php/ext/gd- 1
准备编译:
docker-php-ext-configure gd --with-webp-dir=/usr/include/webp --with-jpeg-dir=/usr/include --with-png-dir=/usr/include --with-freetype-dir=/usr/include/freetype2- 1
编译安装:
docker-php-ext-install gd- 1
检查扩展是否安装成功:
php -m | grep gd- 1
显示 gd 即表示安装成功:

退出容器:
exit- 1
重启所有容器:
docker restart mymariadb nginx myphp- 1
重新登录 Discuz 后台后,运行环境检测显示一切正常:

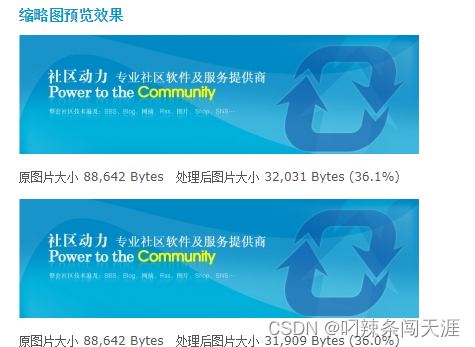
略缩图预览正常:
5.4 附件上传失败问题
换比较小的文件试试,需要修改 php 最大上传大小,docker 里边不是修改 php.ini,先挖个坑,以后补方法。
-
相关阅读:
Java反射机制(详解)——获取class的三种方式
【大麦小米学量化】什么是量化交易?哪些人适合做量化交易?
蒙特卡洛方法使用原理解系-单位圆的面积计算
C++ 智能指针
vue-i18n及ElementUI国际化配置步骤
Window10安装Docker
VMware安装Android-x86示例
2024.8.7(SQL语句)
java毕业生设计高校固定资产采购预算申报系统计算机源码+系统+mysql+调试部署+lw
【毕业设计】基于单片机的智能鱼缸系统设计与实现 - 嵌入式 物联网 stm32 c51
- 原文地址:https://blog.csdn.net/weixin_43529394/article/details/125539660