-
SpringBoot
目录
2.4理解主程序@SpringBootApplication
3.2Spring Boot获取配置文件的值及配置文件编码设置
3.3@ConfigurationProperties与@Value区别
3.4 @PropertySource@Bean@Configuration@Import
static,public,resources或者META-INF/resources/
1、SpringBoot简介
Spring Boot 是由 Pivotal 团队提供的全新框架,其设计目的是用来简化新 Spring 应用的初始搭建以及开发过程。该框架使用了特定的方式进行配置,从而使开发人员不再需要定义样板化的配置。用我的话来理解,就是 Spring Boot 其实不是什么新的框架,它默认配置了很多框架的使用方式,就像 Maven 整合了所有的 Jar 包,Spring Boot 整合了所有的框架。
Spring Boot是一个快速的开发框架,能够帮助程序员快速整合第三方框架,内置了第三方容器(tomcat/jetty/undertom),完全简化编写xml,采用是注解方式。
优势:- 快速构建项目
- 对主流开发框架的无配置集成
- 项目可独立运行,无须外部依赖Servlet容器
- 提供运行时的应用监控
- 极大的提高了开发、部署效率
- 与云计算的天然集成
2、第一个SpringBoot项目
2.1maven形式创建
2.1.1创建maven工程
选择maven,直接next
点击next,填写相应信息:
点击finish。
2.1.2导入依赖
- <!-- 导入springboot版本和框架依赖 -->
- <parent>
- <groupId>org.springframework.boot</groupId>
- <artifactId>spring-boot-starter-parent</artifactId>
- <version>2.5.1</version>
- <relativePath></relativePath>
- </parent>
- <!-- 导入动态web场景启动器 -->
- <dependencies>
- <dependency>
- <groupId>org.springframework.boot</groupId>
- <artifactId>spring-boot-starter-web</artifactId>
- </dependency>
- </dependencies>
- <!--添加maven插件,项目的打包工具,打成jar包,否则在打包运行时报错 -->
- <build>
- <plugins>
- <plugin>
- <groupId>org.springframework.boot</groupId>
- <artifactId>spring-boot-maven-plugin</artifactId>
- <version>2.5.1</version>
- </plugin>
- </plugins>
- </build>
2.1.3创建springboot启动类
创建包com.tjetc,在包下创建启动类
创建启动类- package com.tjetc;
- import org.springframework.boot.SpringApplication;
- import org.springframework.boot.autoconfigure.SpringBootApplication;
- /**
- * 启动类
- */
- @SpringBootApplication
- public class HelloApplication {
- public static void main(String[] args) {
- SpringApplication.run(HelloApplication.class, args);
- }
- }
2.1.4创建controller
创建com.tjetc.controller包,在包下创建controller类
- package com.tjetc.controller;
- import org.springframework.stereotype.Controller;
- import org.springframework.web.bind.annotation.RequestMapping;
- import org.springframework.web.bind.annotation.ResponseBody;
- @Controller
- public class HelloController {
- @RequestMapping("/hello")
- @ResponseBody
- public String hello() {
- return "hello springboot";
- }
- }
2.1.5启动springBoot
运行启动类的main方法
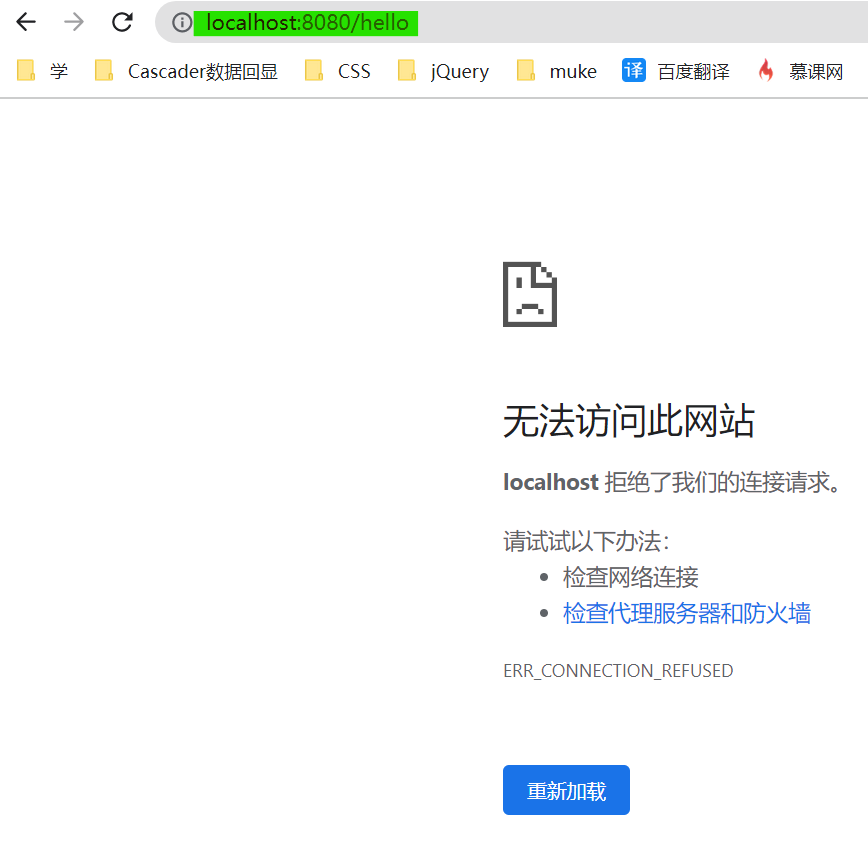
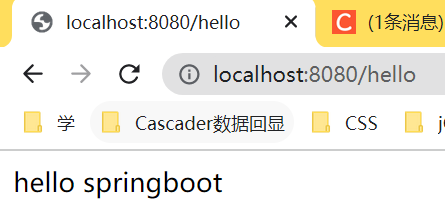
启动成功,端口号8080

2.1.6访问controller
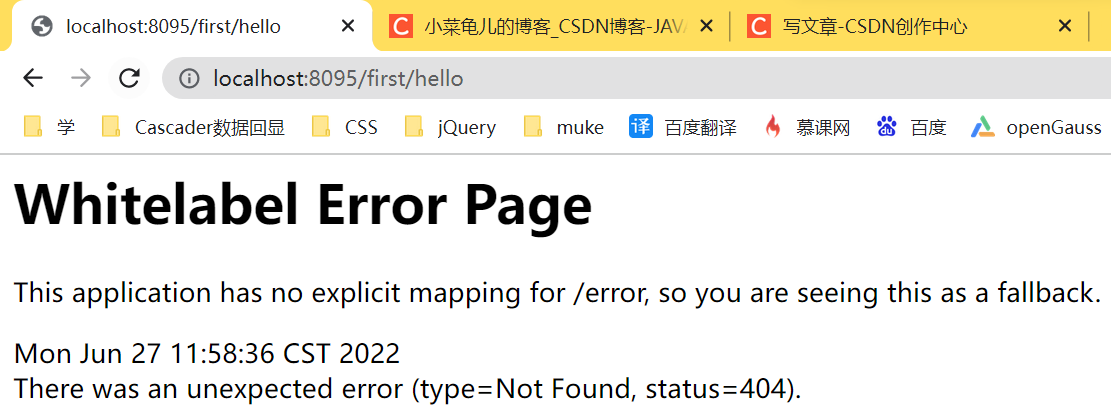
在resources下创建配置文件,application.properties,springboot启动以后,默认读取该配置文件。配置端口号,contextpath

- #配置web启动端口
- server.port=8095
- #配置web上下文路径
- server.servlet.context-path=/first
访问:

2.1.7打包部署
Springboot工程被打包成jar包,通过package命令打成jar包。

将当前的工程打成jar包, 放在target下面。


/usr/local >java -jar jar包名称
Dfsd> java -jar /usr/local/jar包的名称
在当前的路径下打开cmd窗口。运行jar包:
访问controller
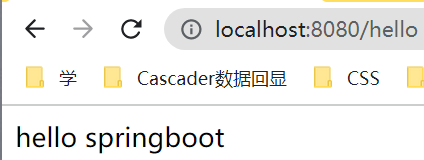
2.2引导器快速创建1、法1


导入依赖
- <parent>
- <groupId>org.springframework.boot</groupId>
- <artifactId>spring-boot-starter-parent</artifactId>
- <!-- <version>2.6.9</version>-->
- <version>2.5.1</version>
- <relativePath/> <!-- lookup parent from repository -->
- </parent>
- <groupId>com.tjetc</groupId>
- <artifactId>20220627-springboot-demo2</artifactId>
- <version>0.0.1-SNAPSHOT</version>
- <name>20220627-springboot-demo2</name>
- <description>Demo project for Spring Boot</description>
- <properties>
- <java.version>1.8</java.version>
- </properties>
- <dependencies>
- <dependency>
- <groupId>org.springframework.boot</groupId>
- <artifactId>spring-boot-starter-web</artifactId>
- </dependency>
- <dependency>
- <groupId>org.springframework.boot</groupId>
- <artifactId>spring-boot-starter-test</artifactId>
- <scope>test</scope>
- </dependency>
- </dependencies>
- <build>
- <plugins>
- <plugin>
- <groupId>org.springframework.boot</groupId>
- <artifactId>spring-boot-maven-plugin</artifactId>
- <version>2.5.1</version>
- </plugin>
- </plugins>
- </build>
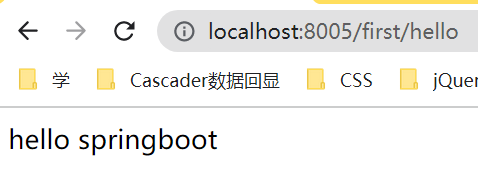
application.properties
- #配置web启动端口
- server.port=8005
- #配置web上下文路径
- server.servlet.context-path=/first
2、法2
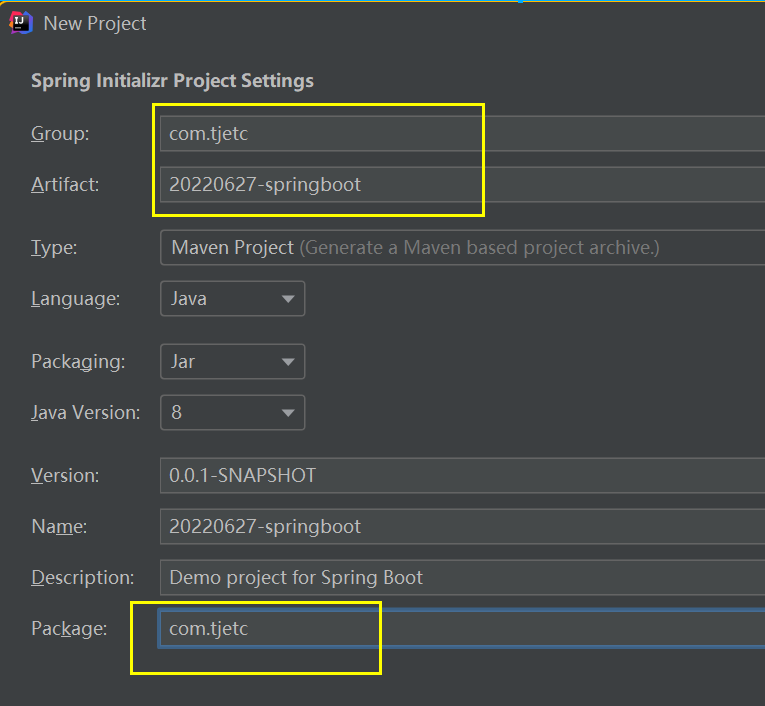
创建project

点击next:填写group和Artifact,确定打包方式,jdk版本,和package表示的启动类所在的包名,如果连接失败,可以使用Custom:阿里的镜像服务Custom:https://start.aliyun.com
没有问题,点击next。选择依赖:创建web工程,只要选择web依赖即可,选择springboot版本,选择当前稳定版本。点击next。
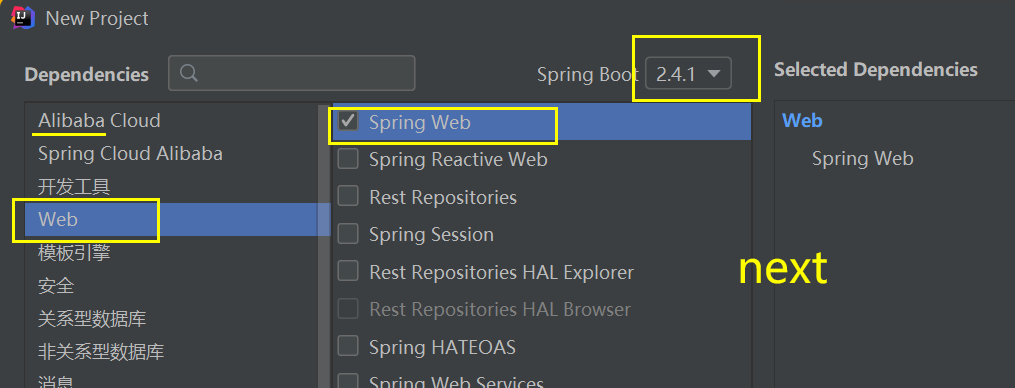
确定module信息以后,点击finish

创建工程以后,查看工程的目录结构:自动创建了包:com.tjetc,并在包下创建了启动类和测试类。同时在resources下创建了static,templates和springboot的主配置文件application.properties,在启动类启动时,会自动读取主配置文件中的数据。Springboot内部集成了tomcat,默认端口号8080,可以在主配置文件中指定端口号:在application.properties中添加如下代码:
- # 应用名称
- spring.application.name=20220627-springboor-demo3
- # 应用服务 WEB 访问端口
- server.port=8080
pox.xml导入依赖
- <parent>
- <groupId>org.springframework.boot</groupId>
- <artifactId>spring-boot-starter-parent</artifactId>
- <version>2.5.2</version>
- <relativePath/> <!-- lookup parent from repository -->
- </parent>
- 。。。。。
- <dependencies>
- <dependency>
- <groupId>org.springframework.boot</groupId>
- <artifactId>spring-boot-starter-web</artifactId>
- </dependency>
- <dependency>
- <groupId>org.springframework.boot</groupId>
- <artifactId>spring-boot-starter-test</artifactId>
- <scope>test</scope>
- </dependency>
- </dependencies>
- <build>
- <plugins>
- <plugin>
- <groupId>org.springframework.boot</groupId>
- <artifactId>spring-boot-maven-plugin</artifactId>
- </plugin>
- </plugins>
- </build>
2.3理解Pom文件的依赖与starter启动器的作用
2.3.1Pom文件的依赖
Pom文件中的parent是Spring Boot的框架版本控制中心
- <parent>
- <groupId>org.springframework.boot</groupId>
- <artifactId>spring-boot-starter-parent</artifactId>
- <version>2.5.1</version>
- <relativePath/> <!-- lookup parent from repository -->
- </parent>
点进去看一下parent是如何控制版本的。点进去之后,也有一个父工程
- <parent>
- <groupId>org.springframework.boot</groupId>
- <artifactId>spring-boot-dependencies</artifactId>
- <version>2.5.1</version>
- </parent>
父工程为spring-boot-dependencies,看到名字应该想到,是springboot的依赖。同时还有其他东西。再点进去,看到里面有<dependencyManagement>,管理各种依赖的版本。


到这里就理解了parent是如何控制版本的。我们创建的springboot工程是spring-boot-start-parent的子工程,spring-boot-starter-parent是spring-boot-denpendencies的子工程,父工程通过dependencyManagement控制了各种依赖的版本。所以当子工程导入依赖时,可以不写版本,自动使用父工程规定的版本。以此来进行版本的控制。2.3.2spring-boot场景启动器
starter:spring-boot场景启动器,以web启动器为例:
- <dependency>
- <groupId>org.springframework.boot</groupId>
- <artifactId>spring-boot-starter-web</artifactId>
- </dependency>
点进去看到spring-boot-starter-web的内容:
- <dependencies>
- <dependency>
- <groupId>org.springframework.boot</groupId>
- <artifactId>spring-boot-starter</artifactId>
- <version>2.5.1</version>
- <scope>compile</scope>
- </dependency>
- <dependency>
- <groupId>org.springframework.boot</groupId>
- <artifactId>spring-boot-starter-json</artifactId>
- <version>2.5.1</version>
- <scope>compile</scope>
- </dependency>
- <dependency>
- <groupId>org.springframework.boot</groupId>
- <artifactId>spring-boot-starter-tomcat</artifactId>
- <version>2.5.1</version>
- <scope>compile</scope>
- </dependency>
- <dependency>
- <groupId>org.springframework</groupId>
- <artifactId>spring-web</artifactId>
- <version>5.3.8</version>
- <scope>compile</scope>
- </dependency>
- <dependency>
- <groupId>org.springframework</groupId>
- <artifactId>spring-webmvc</artifactId>
- <version>5.3.8</version>
- <scope>compile</scope>
- </dependency>
- </dependencies>
Spring-boot-starter-web导入了web环境所有的依赖,只需导入starter,可自动导入web模块正常运行所依赖的组件。其他的starter也是一样的。
springboot出厂默认就写好了很多starter,如:
spring-boot-starter-activemq,spring-boot-starter-aop,spring-boot-starter-data-redis,spring-boot-starter-data-solr等
重要提示:Spring Boot将所有的绝大部分框架整合场景都进行了抽取,做成一个个的starters(启动器),只需要在项目里面引入这些starter相关整合所需的依赖都会导入进来。2.4理解主程序@SpringBootApplication
@SpringBootApplication 用于标识spring boot应用程序,代表该类是一个spring boot启动类
Spring boot运行这个类的main方法时启动SpringBoot应用。@SpringBootConfiguration
@EnableAutoConfiguration
@ComponentScan
public @interface SpringBootApplication {}@SpringBootConfiguration: Spring Boot的配置类。标注在类上表示是一个Spring Boot的配置类.
@Configuration:配置类上来标注这个注解。配置类相当于配置文件。配置类也是容器中的一个组件。
@Component把组件实例化到spring容器中。
@EnableAutoConfiguration:开启自动配置功能;
当我们需要Spring Boot帮我们自动配置所需要的配置,@EnableAutoConfiguration告诉Spring Boot开启自动配置功能,这样Spring Boot会自动配置好并使之生效。将HelloApplication 移到common中,会报错,扫描不到,不移动HelloApplication会自动扫描

解决方法
@ComponentScan(value = {"com.tjetc"}) 加上这个注解,扫描com.tjetc整个包,就不会报错
- package com.tjetc.common;
- import org.springframework.boot.SpringApplication;
- import org.springframework.boot.autoconfigure.SpringBootApplication;
- import org.springframework.context.ConfigurableApplicationContext;
- import org.springframework.context.annotation.ComponentScan;
- /**
- * 启动类
- */
- @SpringBootApplication
- //虽然启动类没有放在根包, 可以通过@ComponentScan 注解重新定义的包, 不再使用springboot默认扫描启动类所在的包和子包
- @ComponentScan(value = {"com.tjetc"})
- public class HelloApplication {
- public static void main(String[] args) {
- //返回值是springboot的上下文容器
- ConfigurableApplicationContext context = SpringApplication.run(HelloApplication.class, args);
- }
- }

3、SpringBoot配置文件
3.1学会Spring Boot全局配置和yaml的语法
Spring Boot全局配置文件(在src/main/resources目录或者类路径/config下),名称如下:
application.properties
application.yaml/yml
也许作者认为properties或json 的写法不爽,于是发明了yml这种以数据为中心写法的配置文件。
yml是YAML(YAML Ain't Markup Language)语言的文件,以数据为中心,比json、xml等更适合做配置文件
properties:#指定端口号server.port=8081
yml:
3.1.1语法
参考语法规范:http://www.yaml.org
语法校验 : https://nodeca.github.io/js-yaml
YAML基本语法- 使用缩进表示层级关系
- 缩进时不允许使用Tab键,只允许使用空格。
- 缩进的空格数目不重要,只要相同层级的元素左侧对齐即可
- 大小写敏感
- 键与值之间一定要有空格
3.1.2yml支持的三种数据的结构
YAML 支持的三种数据结构
- 常见普通值:单个的、不可再分的值
- 对象:键值对的集合
- 数组:一组按次序排列的值
1.单个的,不能再分割的值

2.对象:键值对的集合

3.数组:一组按次序排列的值,-与值之间也要空格


3.2Spring Boot获取配置文件的值及配置文件编码设置
3.2.1创建实体类
Book实体类
- package com.tjetc.entity;
- public class Book {
- private String bookName;
- private String author;
- public String getBookName() {
- return bookName;
- }
- public void setBookName(String bookName) {
- this.bookName = bookName;
- }
- public String getAuthor() {
- return author;
- }
- public void setAuthor(String author) {
- this.author = author;
- }
- @Override
- public String toString() {
- return "Book{" +
- "bookName='" + bookName + '\'' +
- ", author='" + author + '\'' +
- '}';
- }
- }
Student实体类
- package com.tjetc.entity;
- import org.springframework.boot.context.properties.ConfigurationProperties;
- import org.springframework.format.annotation.DateTimeFormat;
- import org.springframework.stereotype.Component;
- import java.time.LocalDate;
- import java.util.List;
- import java.util.Map;
- //springboot容器创建student的bean对象并管理
- @Component
- //@ConfigurationProperties读取application.properties或者application.yml或者application.yaml配置文件,
- // 并且把数据注入到springboot管理的student对象的属性中
- //prefix = "student1" 表示在配置文件中 第一个层级是student1
- @ConfigurationProperties(prefix = "student1")
- public class Student {
- private String studentName;
- private Integer age;
- private Boolean sex;
- @DateTimeFormat(pattern = "yyyy/MM/dd")
- private LocalDate birth;
- private Map<String, Object> maps;
- private List<Object> lists;
- private Book book;
- public String getStudentName() {
- return studentName;
- }
- public void setStudentName(String studentName) {
- this.studentName = studentName;
- }
- public Integer getAge() {
- return age;
- }
- public void setAge(Integer age) {
- this.age = age;
- }
- public Boolean getSex() {
- return sex;
- }
- public void setSex(Boolean sex) {
- this.sex = sex;
- }
- public LocalDate getBirth() {
- return birth;
- }
- public void setBirth(LocalDate birth) {
- this.birth = birth;
- }
- public Map<String, Object> getMaps() {
- return maps;
- }
- public void setMaps(Map<String, Object> maps) {
- this.maps = maps;
- }
- public List<Object> getLists() {
- return lists;
- }
- public void setLists(List<Object> lists) {
- this.lists = lists;
- }
- public Book getBook() {
- return book;
- }
- public void setBook(Book book) {
- this.book = book;
- }
- @Override
- public String toString() {
- return "Student{" +
- "\nstudentName='" + studentName + '\'' +
- ", \nage=" + age +
- ", \nsex=" + sex +
- ", \nbirth=" + birth +
- ", \nmaps=" + maps +
- ", \nlists=" + lists +
- ", \nbook=" + book +
- '}';
- }
- }
3.2.2在主配置文件中配置student
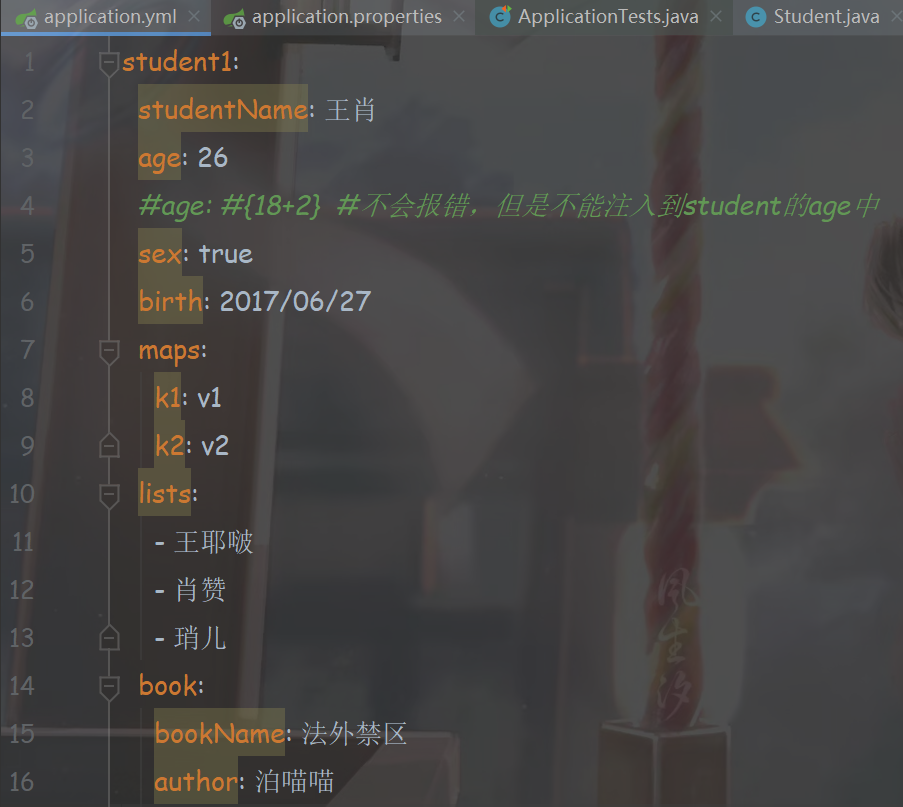
3.2.3编写测试类
- package com.tjetc;
- import com.tjetc.entity.Student;
- import org.junit.jupiter.api.Test;
- import org.springframework.beans.factory.annotation.Autowired;
- import org.springframework.boot.test.context.SpringBootTest;
- @SpringBootTest
- class ApplicationTests {
- @Autowired
- private Student student;
- @Test
- public void contextLoads() {
- System.out.println(student);
- }
- }
3.2.4执行结果
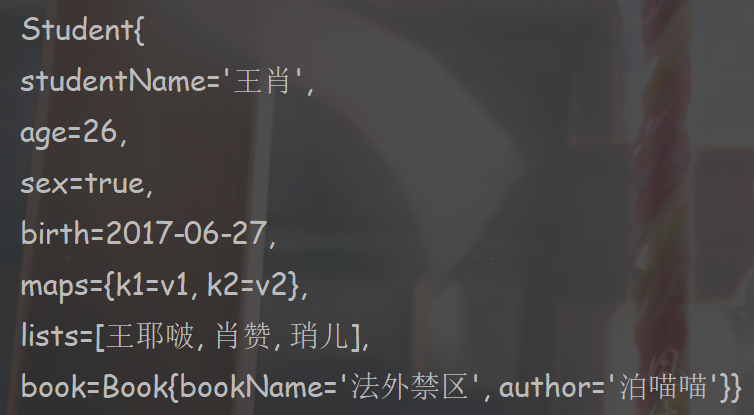
启动springboot测试类,会自动加载主配置文件,@ConfigurationProperties负责将主配置文件中的数据赋值给student对象。Student对象已经通过@Component注解注册到容器中,所以在测试类中可以直接注入。@ConfigurationProperties 映射实体的属性值
可以为实体对读入配置文件的值,支持所有类型值的读取;
前提是实体类需要提供一个setter或使用可变的值初始化它.
在application.properties中配置student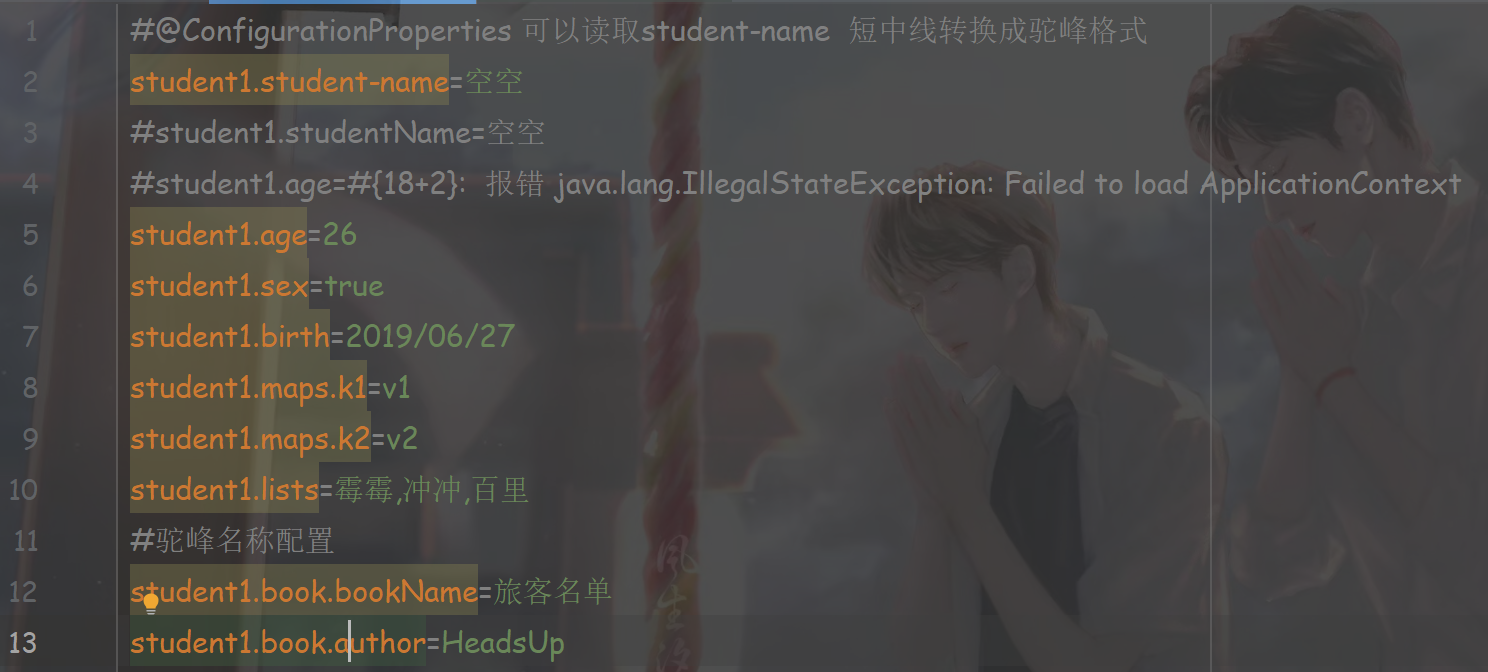
最终执行结果会出现乱码
在使用properties文件的时候,中文乱码。如何解决?修改properties文件的编码,将所有编码类型都设置为utf-8
都改好以后,点击OK。
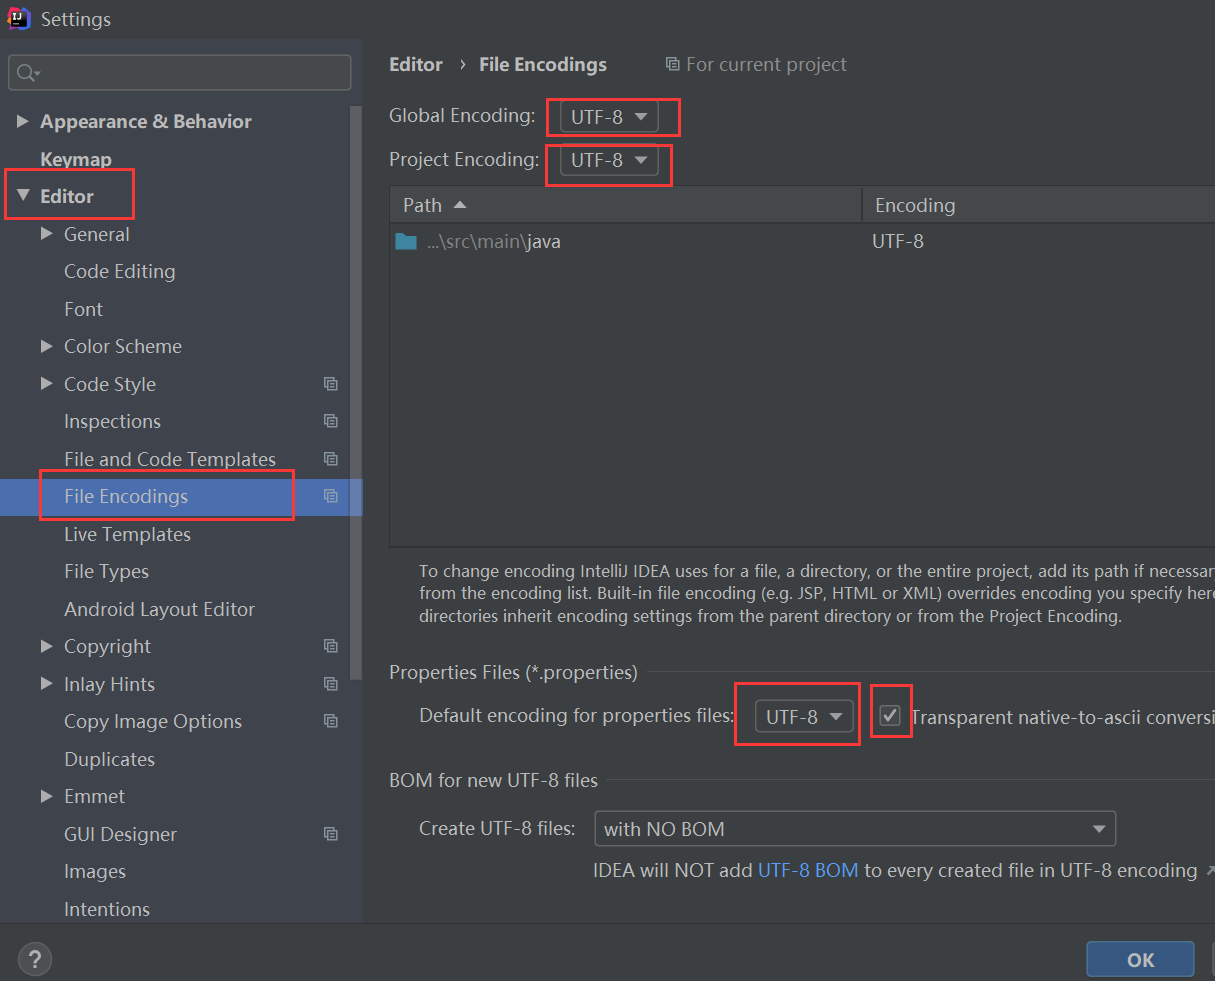
原来的application.properties就乱码了,修改乱码,重新运行,乱码问题解决了
3.3@ConfigurationProperties与@Value区别

松散语法属性名匹配规则:
student.studentName:使用标准方式
student.student-name:小写用-
student. STUDENT_NAME:大写用_3.3.1功能不同
通过前面的例子我们知道,@ConfigurationProperties是可以批量注入的,一次搞定
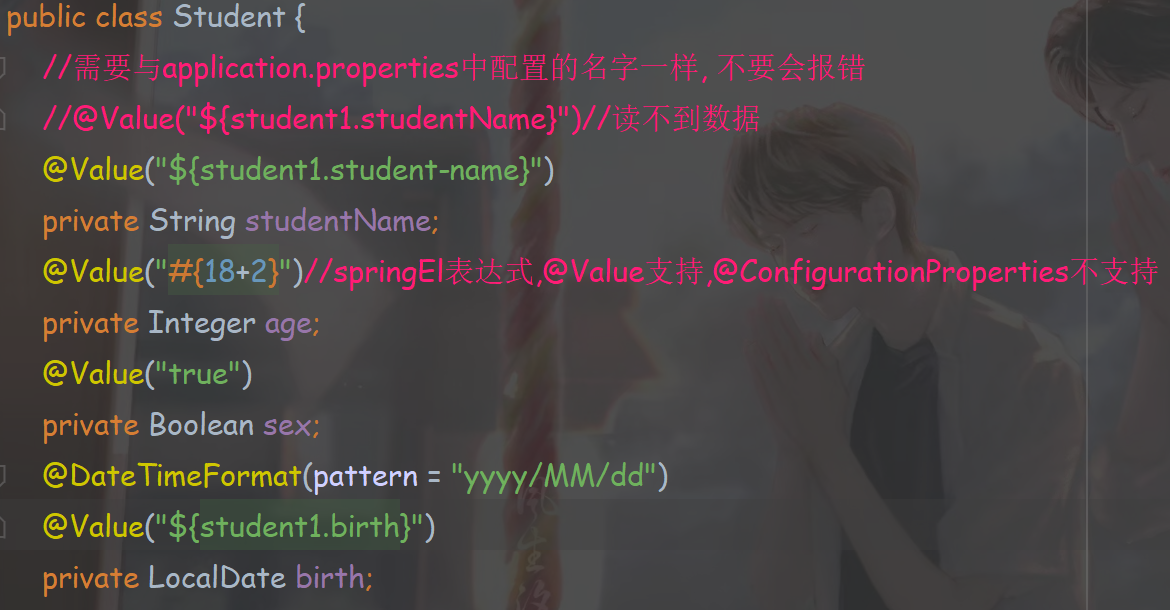
而@Value只能一个一个注入,如下: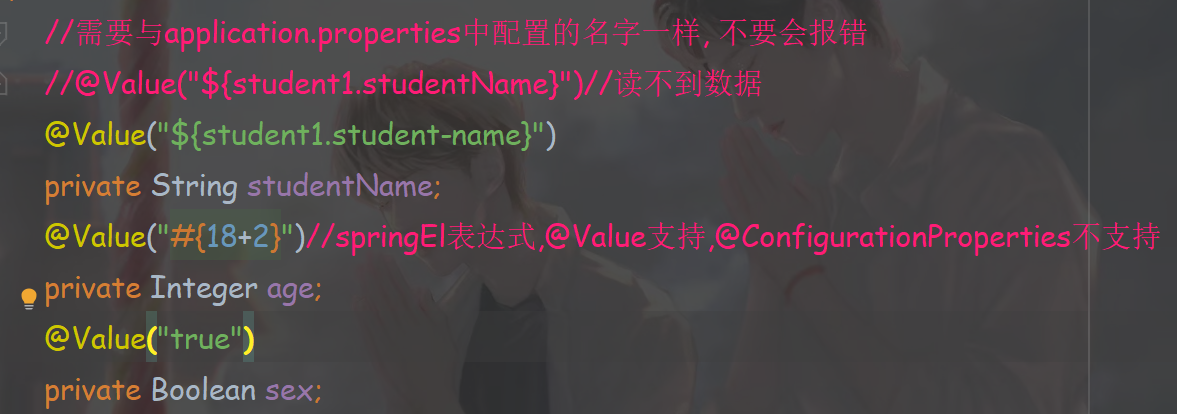
3.3.1松散绑定
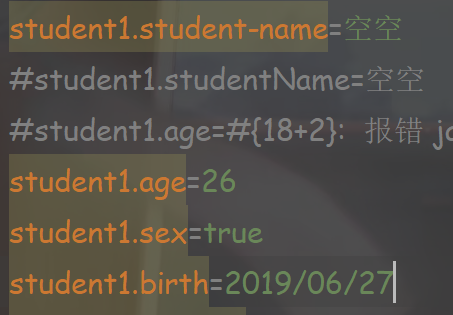
@ConfigurationProperties支持松散绑定studentName可以写为student-name都没有问题。而@Value不可以。@Value进行绑定时,名称只能与application.properties中属性的名称相同
3.3.2SpEL
@ConfigurationProperties不支持SpEL,比如:

Yml文件配置不支持SpEL

@Value支持SpEL。比如:

Age是可以正常注入的。

3.3.3复杂类型封装
@ConfigurationProperties支持复杂类型封装
@Value不支持复杂类型,只支持字符串,和基本数据类型及其包装类。3.4 @PropertySource@Bean@Configuration@Import
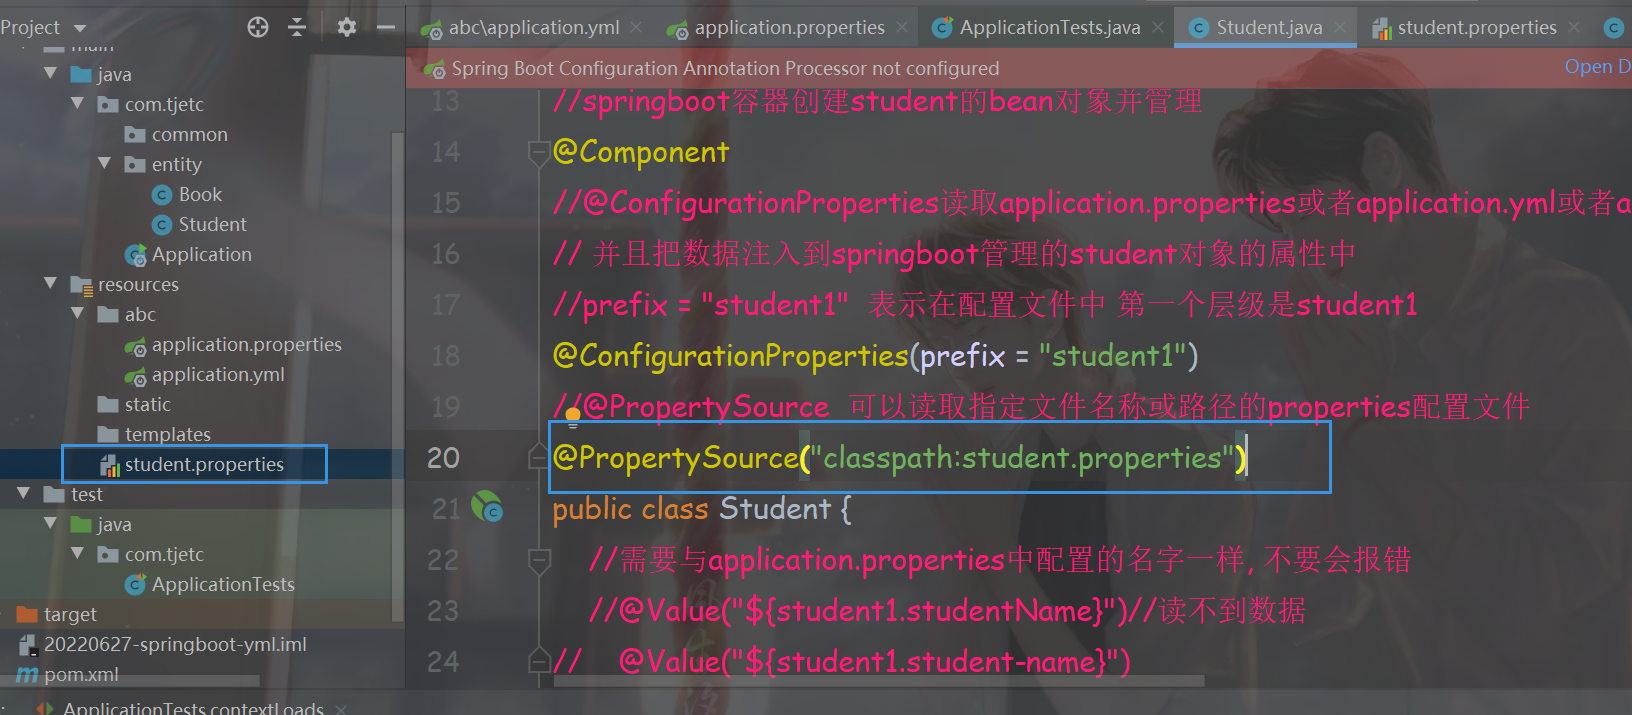
3.4.1@PropertySource
读取指定的properties配置文件
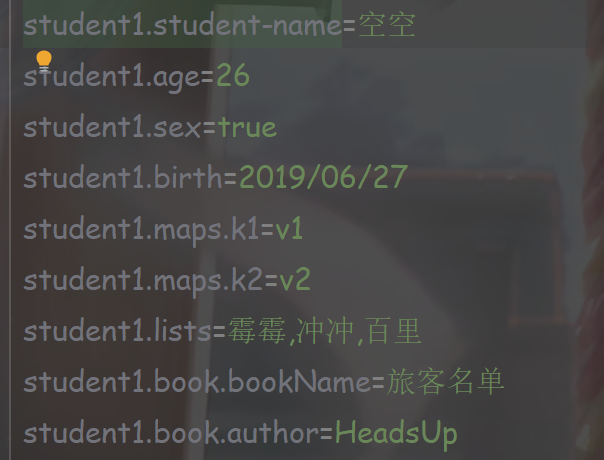
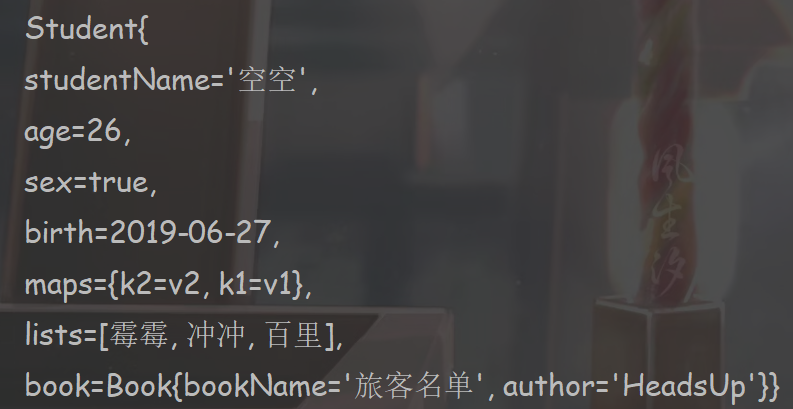
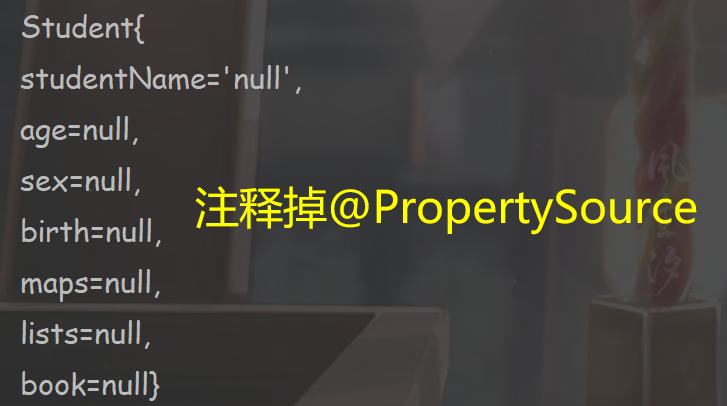
如果我们将student的数据写在任意一个配置文件中,比如。student.properties文件中,如何读取配置中信息,注入到student中。可以使用该注解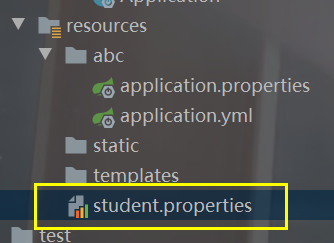
student.properties
3.4.2@Bean、@Configuration
Spring Boot 由于没有XML文件,所以所有的Bean管理都放入在一个配置类中实现。
配置类就是类上具有@Configuration的类。这个类就相当于之前的applicationContext.xml
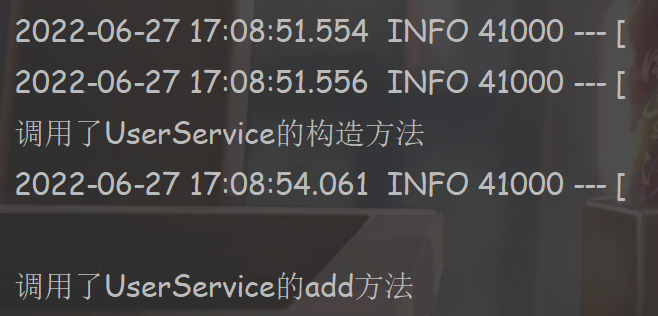
配置类中的bean注入到容器UserService
- package com.tjetc.service;
- public class UserService {
- public UserService() {
- System.out.println("调用了UserService的构造方法");
- }
- public void add() {
- System.out.println("调用了UserService的add方法");
- }
- }
写一个config包,用来存放配置类:
创建配置类:- package com.tjetc.config;
- import com.tjetc.service.UserService;
- import org.springframework.context.annotation.Bean;
- import org.springframework.context.annotation.Configuration;
- import org.springframework.stereotype.Component;
- //@Configuration 用在类上,表示类是配置类
- @Configuration//可以调用 userService();
- //注释掉@Configuration报错: org.springframework.beans.factory.NoSuchBeanDefinitionException: No qualifying bean of type 'com.tjetc.service.UserService' available: expected at least 1 bean which qualifies as autowire candidate. Dependency annotations: {@org.springframework.beans.factory.annotation.Autowired(required=true)}
- //@Component//不能调用 userService();
- public class MyConfig {
- //@Bean springboot启动过程中调用@Bean注解的方法,生成bean对象交给springboot容器管理
- //@Configuration+@Bean 取代spring的xml配置标签<bean>标签
- // @Bean
- // public static UserService userService() {
- // System.out.println("调用了MyConfig的UserService方法");
- // return new UserService();
- // }
- @Bean
- public UserService userService() {
- System.out.println("调用了MyConfig的UserService方法");
- return new UserService();
- }
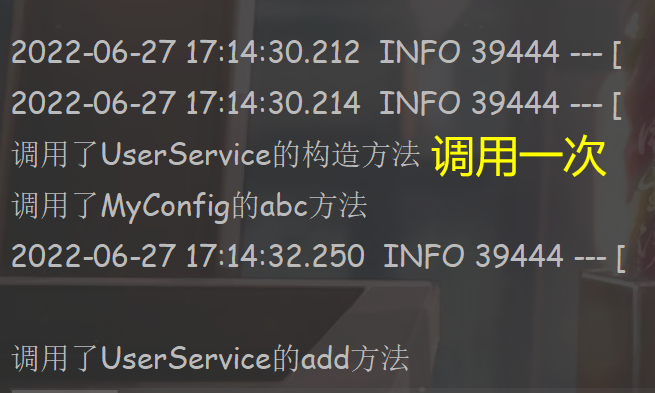
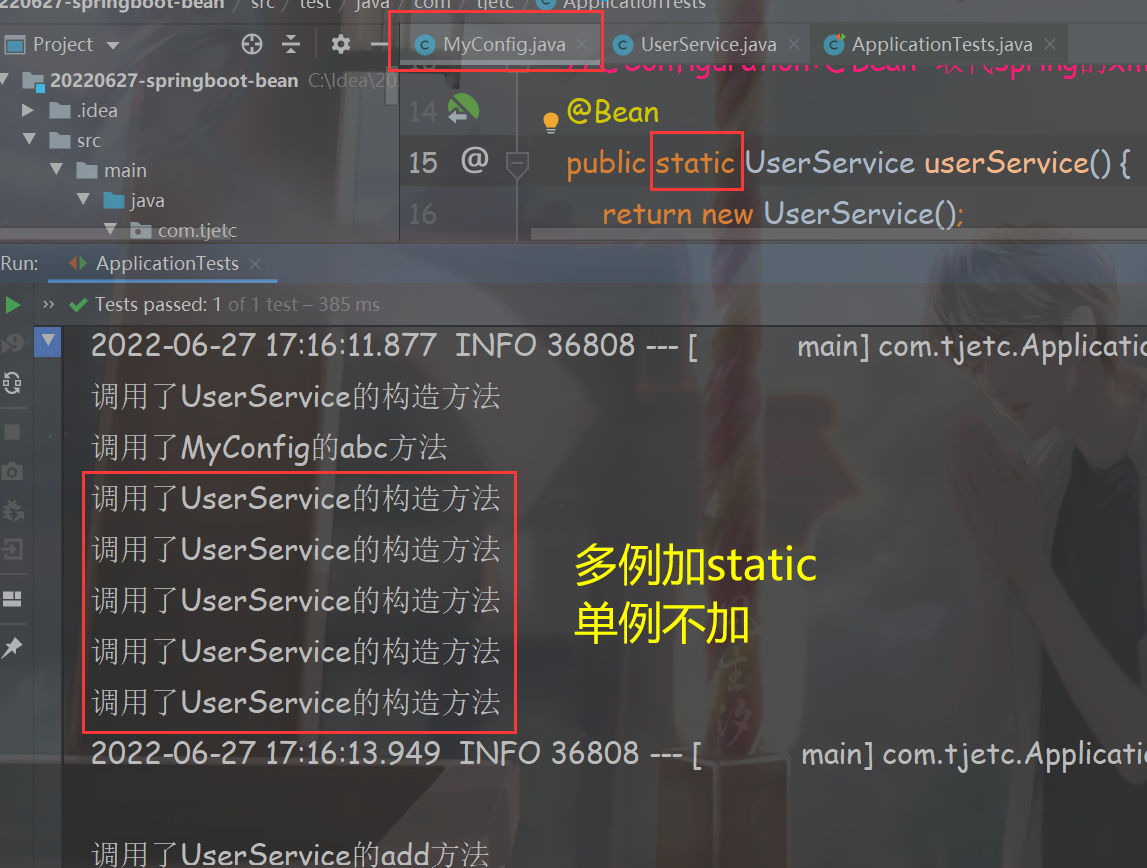
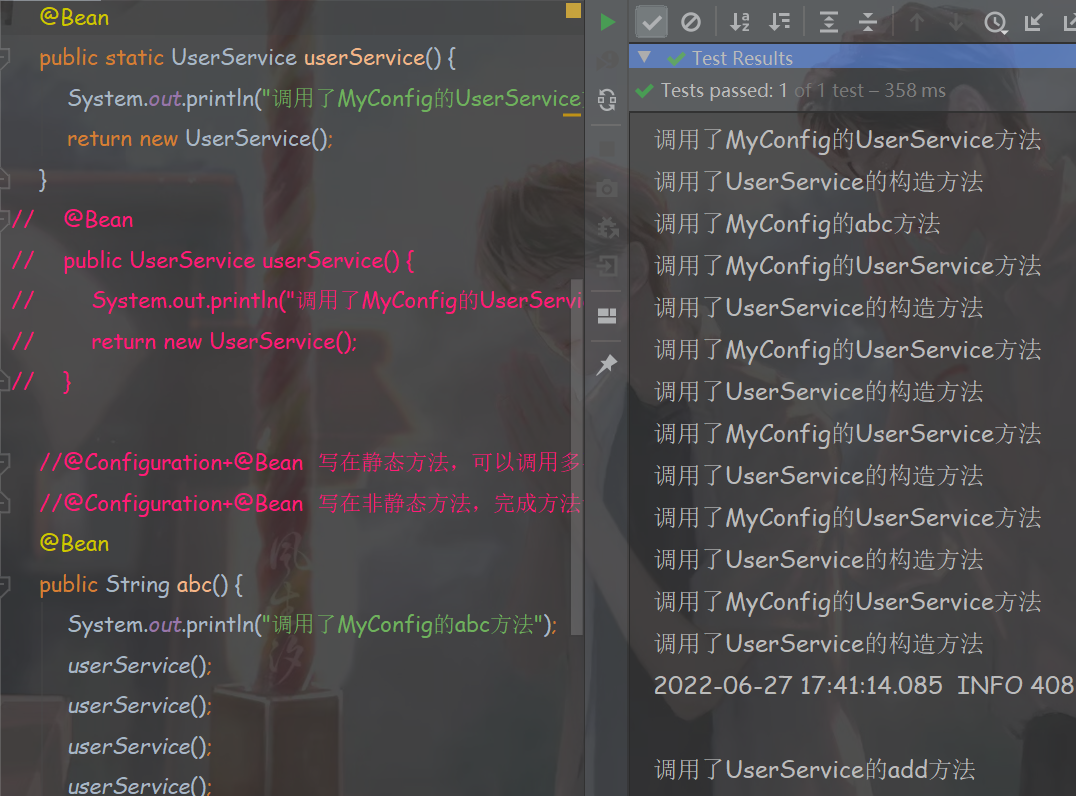
- //@Configuration+@Bean 写在静态方法,可以调用多次,可以执行多次,创建多个bean对象
- //@Configuration+@Bean 写在非静态方法,完成方法调用时,只会执行一次,创建一个单例对象
- @Bean
- public String abc() {
- System.out.println("调用了MyConfig的abc方法");
- userService();
- userService();
- userService();
- userService();
- userService();
- return "abc";
- }
- }
测试:
- package com.tjetc;
- import com.tjetc.service.UserService;
- import org.junit.jupiter.api.Test;
- import org.springframework.beans.factory.annotation.Autowired;
- import org.springframework.boot.test.context.SpringBootTest;
- @SpringBootTest
- class ApplicationTests {
- @Autowired
- private UserService userService;
- @Test
- void contextLoads() {
- userService.add();
- }
- }
结果:

3.4.3@Import
@Import可以引入一个或多个类型,代表将该类实例化到IOC容器中。可以用在启动类上,或者配置类上,只能在程序启动的时候,能够读取该注解即可,这样该注解表示的类型就会被实例化到容器中。
创建db.properties属性文件
创建DbConfiguration类,读取db.properties属性文件,并为属性赋值。
- package com.tjetc.common;
- import org.springframework.beans.factory.annotation.Value;
- import org.springframework.boot.context.properties.ConfigurationProperties;
- import org.springframework.context.annotation.PropertySource;
- //读取db.properties配置文件
- @PropertySource("classpath:db.properties")
- //@ConfigurationProperties(prefix = "jdbc")
- public class DbConfiguration {
- @Value("${jdbc.driverName}")
- private String driverName;
- @Value("${jdbc.url}")
- private String url;
- @Value("${jdbc.username}")
- private String username;
- @Value("${jdbc.password}")
- private String password;
- public String getDriverName() {
- return driverName;
- }
- public void setDriverName(String driverName) {
- this.driverName = driverName;
- }
- public String getUrl() {
- return url;
- }
- public void setUrl(String url) {
- this.url = url;
- }
- public String getUsername() {
- return username;
- }
- public void setUsername(String username) {
- this.username = username;
- }
- public String getPassword() {
- return password;
- }
- public void setPassword(String password) {
- this.password = password;
- }
- @Override
- public String toString() {
- return "DbConfiguration{" +
- "\ndriverName='" + driverName + '\'' +
- ", \nurl='" + url + '\'' +
- ", \nusername='" + username + '\'' +
- ",\npassword='" + password + '\'' +
- '}';
- }
- }
在配置类上,通过@Import注解引入DbConfiguration,当配置类加载时,就会加载DbConfiguration
- package com.tjetc;
- import com.tjetc.common.DbConfiguration;
- import org.springframework.boot.SpringApplication;
- import org.springframework.boot.autoconfigure.SpringBootApplication;
- import org.springframework.context.annotation.Import;
- @SpringBootApplication
- //@Import 注释的作用, springboot启动容器过程中, 创建配置import的对象, 纳入springboot容器的管理
- @Import(value = {DbConfiguration.class})
- public class Application {
- public static void main(String[] args) {
- SpringApplication.run(Application.class, args);
- }
- }
测试:
- package com.tjetc;
- import com.tjetc.common.DbConfiguration;
- import org.junit.jupiter.api.Test;
- import org.springframework.beans.factory.annotation.Autowired;
- import org.springframework.boot.test.context.SpringBootTest;
- @SpringBootTest
- class ApplicationTests {
- @Autowired
- private DbConfiguration dbConfiguration;
- @Test
- public void testConfiguration() {
- System.out.println(dbConfiguration);
- }
- }
打开注解@ConfigurationProperties(prefix = "jdbc")并关闭注解@Value运行效果一样

3.5多文件配置,加载顺序与位置
多文件配置:spring boot为了适应开发环境或生产环境的变化,专门打造profile通过指定参数来快速切换环境!
3.5.1.多文件的形式
格式: application-{profile}.properties 或 application-{profile}.yml

Spring boot提供几种的激活配置方式
3.5.2Spring boot提供几种的激活配置方式
一.JVM参数 -Dspring.profiles.active=prod
确定,启动springboot程序即可。
这时激活的是prod,端口号8083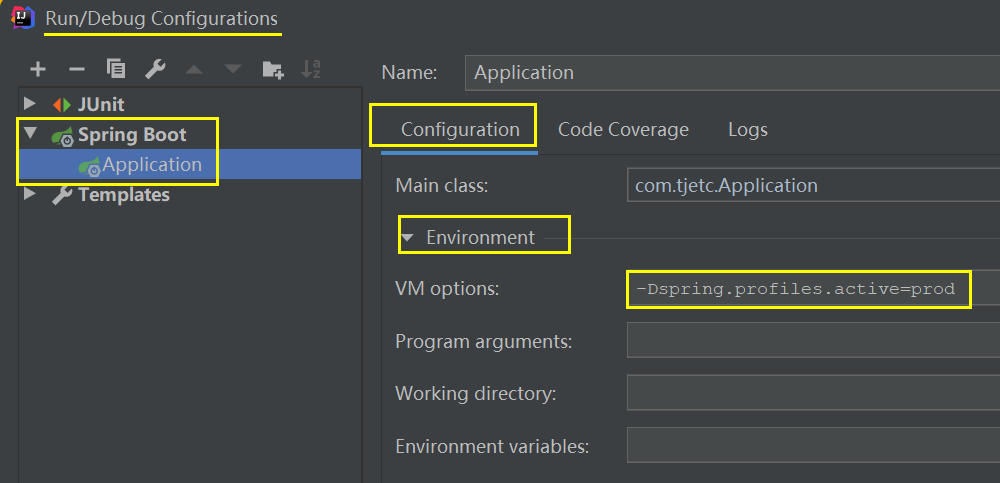

二. 配置文件 spring.profiles.active=prod
在全局配置文件application.properties中激活相应的profile即可
此时,prod被激活,端口号为8083
三.命令行 : --spring.profiles.active=prod
先打包应用。
打开terminal,进入命令行,进入target目录,运行jar包,激活profile
此时,prod被激活,端口号为8083


3.5.3加载顺序
SpringApplication将从以下位置加载application.properties文件, 并把它们添加到Spring环境上下文中:
1、当前目录下的/config子目录
2、当前目录
3、classpath下的/config包
4、classpath根路径(项目root)
这个列表是按优先级排序的(列表中位置高的将覆盖位置低的),同时也可以使用YAML文件替代properties文件!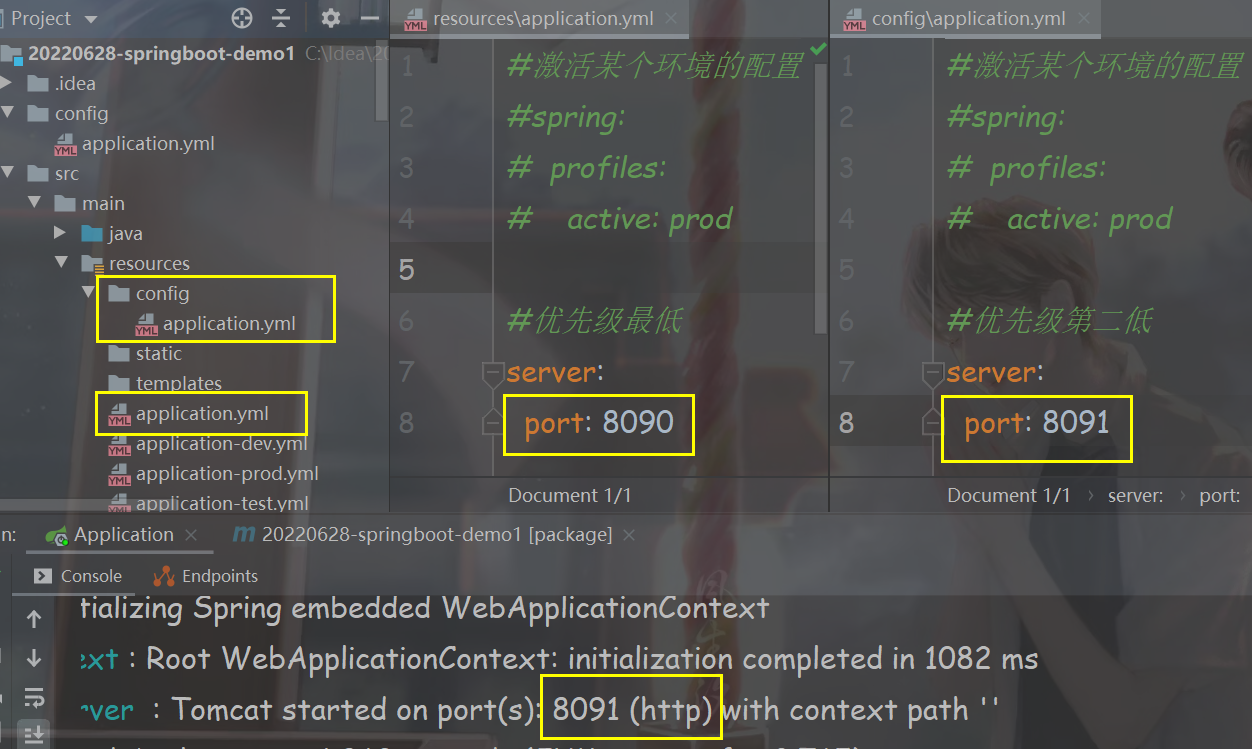


优先级:当前目录下的/config子目录>当前目录>classpath下的/config包>classpath根路径
如果不希望使用默认的application.properties作为配置文件名,可以通过指定spring.config.name环境属性来切换其他的名称。 也可以使用spring.config.location环境属性来引用一个明确的路径(目录位置或文件路径列表以逗号分割)
java -jar myproject.jar --spring.config.location=c:/application.propertiesSpring boot加载规则:优先级从高到低,高优先级的配置覆盖低优先级的配置,不同的配置混合一起使用。所有的配置由jar包外向jar内查找,优先加载带profile的,再加载不带profile的。
4、SpringBoot整合MyBatis
4.1 lombok
为了简化实体类的写法,可以使用lombok
4.1.1安装Lombok插件

4.1.2导入lombok依赖
- <dependency>
- <groupId>org.projectlombok</groupId>
- <artifactId>lombok</artifactId>
- <optional>true</optional>
- </dependency>
4.1.3使用lombok注解
在User上加上@Data注解,会自动拥有set方法,get方法,equals和hoshcode方法,toString方法。
- package com.tjetc.entity;
- import lombok.Data;
- import lombok.Getter;
- import lombok.Setter;
- @Data//@Data 注解是lombok插件生成getter、set方法
- //@Setter//只生成setter方法
- //@Getter//只生成getter方法
- public class User {
- private Long id;
- // @Setter
- // @Getter
- private String username;
- // @Setter
- private String password;
- }
4.2整合Mybatis注解开发
4.2.1导入依赖
- <?xml version="1.0" encoding="UTF-8"?>
- <project xmlns="http://maven.apache.org/POM/4.0.0" xmlns:xsi="http://www.w3.org/2001/XMLSchema-instance"
- xsi:schemaLocation="http://maven.apache.org/POM/4.0.0 https://maven.apache.org/xsd/maven-4.0.0.xsd">
- <modelVersion>4.0.0</modelVersion>
- <parent>
- <groupId>org.springframework.boot</groupId>
- <artifactId>spring-boot-starter-parent</artifactId>
- <version>2.7.1</version>
- <relativePath/> <!-- lookup parent from repository -->
- </parent>
- <groupId>com.tjetc</groupId>
- <artifactId>20220628-springboot-mybatis</artifactId>
- <version>0.0.1-SNAPSHOT</version>
- <name>20220628-springboot-mybatis</name>
- <description>Demo project for Spring Boot</description>
- <properties>
- <java.version>1.8</java.version>
- </properties>
- <dependencies>
- <dependency>
- <groupId>org.springframework.boot</groupId>
- <artifactId>spring-boot-starter-web</artifactId>
- </dependency>
- <dependency>
- <groupId>org.mybatis.spring.boot</groupId>
- <artifactId>mybatis-spring-boot-starter</artifactId>
- <version>2.2.2</version>
- </dependency>
- <dependency>
- <groupId>org.projectlombok</groupId>
- <artifactId>lombok</artifactId>
- <optional>true</optional>
- </dependency>
- <dependency>
- <groupId>org.springframework.boot</groupId>
- <artifactId>spring-boot-starter-test</artifactId>
- <scope>test</scope>
- </dependency>
- <dependency>
- <groupId>mysql</groupId>
- <artifactId>mysql-connector-java</artifactId>
- </dependency>
- </dependencies>
- <build>
- <plugins>
- <plugin>
- <groupId>org.springframework.boot</groupId>
- <artifactId>spring-boot-maven-plugin</artifactId>
- <version>2.5.1</version>
- <configuration>
- <excludes>
- <exclude>
- <groupId>org.projectlombok</groupId>
- <artifactId>lombok</artifactId>
- </exclude>
- </excludes>
- </configuration>
- </plugin>
- </plugins>
- </build>
- </project>
4.2.2创建user表

4.2.3创建实体类
- package com.tjetc.entity;
- import lombok.Data;
- import lombok.Getter;
- import lombok.Setter;
- @Data//@Data 注解是lombok插件生成getter、set方法
- //@Setter//只生成setter方法
- //@Getter//只生成getter方法
- public class User {
- private Long id;
- // @Setter
- // @Getter
- private String username;
- // @Setter
- private String password;
- }
4.2.4创建Mapper
- package com.tjetc.dao;
- import com.tjetc.entity.User;
- import org.apache.ibatis.annotations.Select;
- import java.util.List;
- public interface UserMapper {
- //注解的方式
- @Select("select id,`username`,`password` from `user`")
- public List<User> selectAll();
- }
4.2.5创建Service
- package com.tjetc.service;
- import com.tjetc.entity.User;
- import java.util.List;
- public interface UserService {
- List<User> finAll();
- }
4.2.6创建service实现类
- package com.tjetc.service.Impl;
- import com.tjetc.dao.UserMapper;
- import com.tjetc.entity.User;
- import com.tjetc.service.UserService;
- import org.springframework.beans.factory.annotation.Autowired;
- import org.springframework.stereotype.Service;
- import java.util.List;
- @Service
- public class UserServiceImpl implements UserService {
- @Autowired
- private UserMapper userMapper;
- @Override
- public List<User> finAll() {
- return userMapper.selectAll();
- }
- }
4.2.7编写controller
- package com.tjetc.controller;
- import com.tjetc.entity.User;
- import com.tjetc.service.UserService;
- import org.springframework.beans.factory.annotation.Autowired;
- import org.springframework.stereotype.Controller;
- import org.springframework.web.bind.annotation.RequestMapping;
- import org.springframework.web.bind.annotation.ResponseBody;
- import java.util.List;
- @Controller
- @RequestMapping("user")
- public class UserController {
- @Autowired
- private UserService userService;
- @RequestMapping("all")
- @ResponseBody//返回json
- public List<User> All() {
- List<User> users = userService.finAll();
- return users;
- }
- }
4.2.8添加mapper扫描
如果在UserMapper接口上添加@Mapper注解,则不需要添加mapper扫描。二者用一种就可以。
- package com.tjetc;
- import org.mybatis.spring.annotation.MapperScan;
- import org.springframework.boot.SpringApplication;
- import org.springframework.boot.autoconfigure.SpringBootApplication;
- @SpringBootApplication
- //MapperScan 扫描指定包下,mapper接口生成代理对象,交给springboot容器管理
- @MapperScan(basePackages = {"com.tjetc.dao"})
- public class Application {
- public static void main(String[] args) {
- SpringApplication.run(Application.class, args);
- }
- }
在UserMapper中加上@Mapper,Application.java 把@MapperScan注释也可以

4.2.9添加配置
在application.properties中配置datasource

4.2.10启动测试


4.3基于xml整合mybatis
以查询所有用户为例。
4.3.1编写UserMapper

4.3.2编写mapper映射
在resources下创建mapper目录,新增UserMapper.xml映射文件
- <?xml version="1.0" encoding="UTF-8" ?>
- <!DOCTYPE mapper
- PUBLIC "-//mybatis.org//DTD Mapper 3.0//EN"
- "http://mybatis.org/dtd/mybatis-3-mapper.dtd">
- <mapper namespace="com.tjetc.dao.UserMapper">
- <select id="selectAll" resultMap="userMap">
- select id,username,`password` from `user`
- </select>
- <resultMap id="userMap" type="user">
- <id column="id" property="id"></id>
- <result column="username" property="username"></result>
- <result column="password" property="password"></result>
- </resultMap>
- </mapper>
4.3.3添加mybatis配置

4.3.4启动测试
实现跟注解相同的效果。

4.4整合PageHelper

PageHelper是一款犀利的Mybatis分页插件,使用了这个插件之后,分页开发起来更加简单容易。

Spring Boot整合PageHelper不需要做任何配置文件的配置,添加依赖后就可以直接使用。
4.4.1导入依赖
- <dependency>
- <groupId>com.github.pagehelper</groupId>
- <artifactId>pagehelper-spring-boot-starter</artifactId>
- <version>1.4.3</version>
- </dependency>
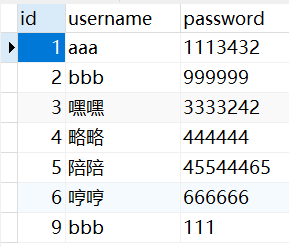
4.4.2准备数据
在service中实现分页,以查询所有用户为例:
4.4.3编写分页service

userServiceImpl
- package com.tjetc.service.Impl;
- import com.github.pagehelper.PageHelper;
- import com.github.pagehelper.PageInfo;
- import com.tjetc.dao.UserMapper;
- import com.tjetc.entity.User;
- import com.tjetc.service.UserService;
- import org.springframework.beans.factory.annotation.Autowired;
- import org.springframework.stereotype.Service;
- import java.util.List;
- @Service
- public class UserServiceImpl implements UserService {
- @Autowired
- private UserMapper userMapper;
- @Override
- public List<User> finAll() {
- return userMapper.selectAll();
- }
- @Override
- public PageInfo<User> findPage(int pageNo, int pageSize) {
- PageHelper.startPage(pageNo,pageSize);
- List<User> users = userMapper.selectAll();
- PageInfo<User> userPageInfo = new PageInfo<>(users);
- return userPageInfo;
- }
- }
4.4.4编写测试
- package com.tjetc.controller;
- import com.github.pagehelper.PageInfo;
- import com.tjetc.entity.User;
- import com.tjetc.service.UserService;
- import org.springframework.beans.factory.annotation.Autowired;
- import org.springframework.stereotype.Controller;
- import org.springframework.web.bind.annotation.RequestMapping;
- import org.springframework.web.bind.annotation.RequestParam;
- import org.springframework.web.bind.annotation.ResponseBody;
- import org.springframework.web.bind.annotation.RestController;
- import java.util.List;
- //@Controller
- @RestController//@RestController=@Controller+@ResponseBody
- @RequestMapping("user")
- public class UserController {
- @Autowired
- private UserService userService;
- @RequestMapping("all")
- //@ResponseBody//返回json
- public List<User> All() {
- List<User> users = userService.finAll();
- return users;
- }
- @RequestMapping("page")
- public PageInfo<User> page(@RequestParam(value = "pageNo", required = false, defaultValue = "1") int pageNo,
- @RequestParam(value = "pageSize", required = false, defaultValue = "3") int pageSize) {
- PageInfo<User> page = userService.findPage(pageNo, pageSize);
- return page;
- }
- }
4.4.5结果


5、SpringBoot整合logback
5.1日志框架设计思想
市面上存在的大量日志框架:
JUL、JCL、Jboss-logging、logback、log4j、log4j2、slf4j......
日志框架分为两类:
1、抽象类日志:
JCL、 slf4j、 Jboss-logging……
2、实现类日志
log4j、JUL、log4j2、logback……
Spring Boot使用的是SLF4j抽象和logback实现。
Logback是由log4j创始人设计的另一个开源日志组件,官方网站http://logback.qos.ch。它当前分为下面下个模块:
logback-core:其它两个模块的基础模块
logback-classic:它是log4j的一个改良版本,同时它完整实现了slf4j API使你可以很方便地更换成其它日志系统如log4j或JDK14 Logging
logback-access:访问模块与Servlet容器集成提供通过Http来访问日志的功能。5.2 Spring Boot日志依赖原理和日志级别

<dependency>
<groupId> org.springframework.boot </groupId>
<artifactId> spring-boot-starter-logging </artifactId>
</dependency>日志级别
在log4j2中, 共有8个级别,按照从低到高:
ALL < TRACE < DEBUG < INFO < WARN < ERROR < FATAL < OFF。
All:最低等级的,用于打开所有日志记录.
Trace:是追踪,就是程序推进一下.
Debug:指出细粒度信息事件对调试应用程序是非常有帮助的.
Info:消息在粗粒度级别上突出强调应用程序的运行过程.
Warn:输出警告及warn以下级别的日志.
Error:输出错误信息日志.
Fatal:输出每个严重的错误事件将会导致应用程序的退出的日志.
OFF:最高等级的,用于关闭所有日志记录.
程序会打印高于或等于所设置级别的日志,设置的日志等级越高,打印出来的日志就越少 。5.3Spring Boot日志默认配置
5.3.1日志级别配置
日志的默认级别是info,只有info级别,以及比info级别高的日志信息会打印。Info,warn,error这三个级别的日志会打印。
在测试类中添加如下代码:- package com.tjetc;
- import org.junit.jupiter.api.Test;
- import org.slf4j.Logger;
- import org.slf4j.LoggerFactory;
- import org.springframework.boot.test.context.SpringBootTest;
- @SpringBootTest
- class ApplicationTests {
- @Test
- void testLog() {
- //获取logger对象
- Logger logger = LoggerFactory.getLogger(ApplicationTests.class);
- logger.trace("trace跟踪日志");
- logger.debug("debug调试日志");
- logger.info("info输出信息");
- logger.warn("warn警告信息");
- logger.error("error错误或异常信息");
- }
- }
执行结果:

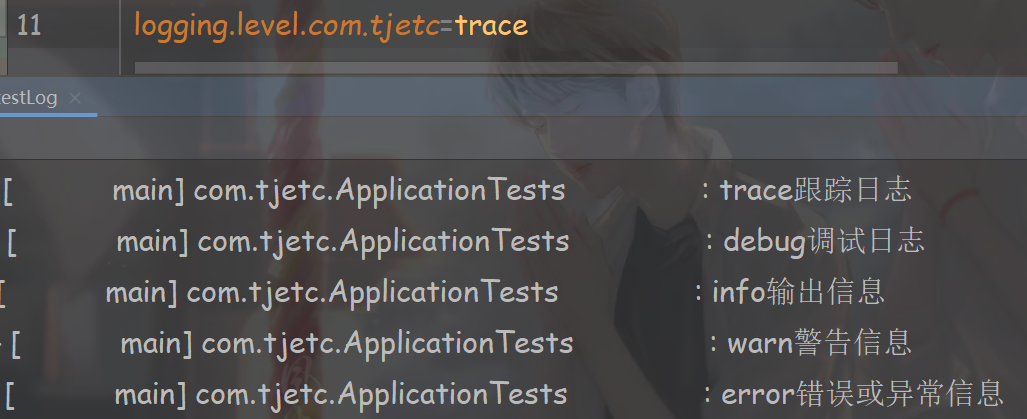
日志级别:logging.level.包名=级别
设置了日志的级别信息以后,大于等于该级别的日志信息都会打印,不是只打印当前级别,默认info级别
在application.properties文件中可以修改日志的级别,修改com.tjetc下面的类在执行的时候的日志级别为debug。
再次执行单元测试,debug级别的日志也会打印。
5.3.2日志文件与路径配置
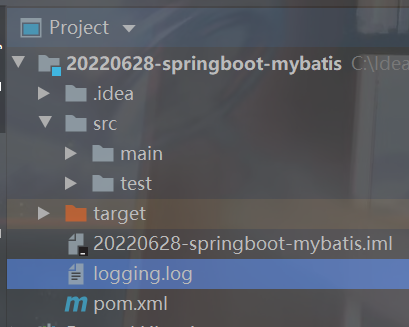
Springboot的日志level来控制的,根据不同的level来显示。在哪里控制呢? Springboot默认的配置。
logging.file.name= 文件完全名称
Springboot包下,logging包下的logback包下,有一个base.xml文件和defaults.xml文件。
Base.xml文件的内容:Level:设置日志的级别为info。可以在控制台打印,也可以写入文件。
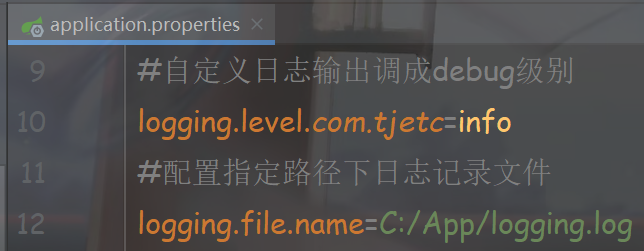
 上面的文件名可以是全路径名。比如c:/logging.log
如果不写盘符,直接写/log:在工程所在的盘符下创建一个log文件夹

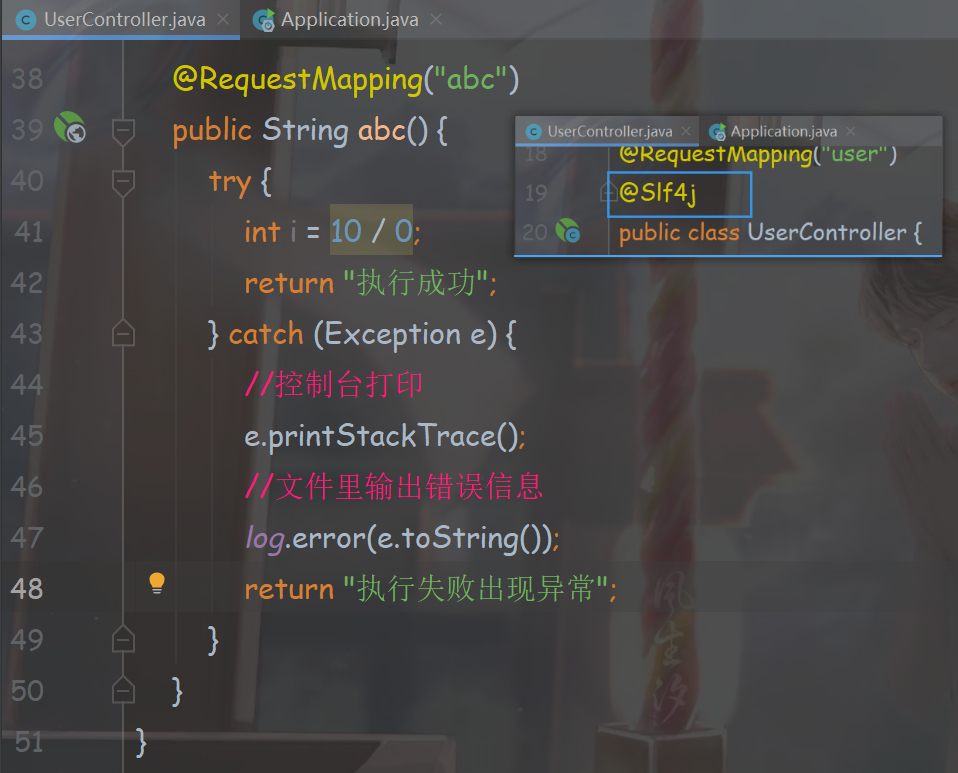
打印追踪异常


6、SpringBoot整合JSP
6.1JSP简介
JSP全称Java Server Pages,是一种动态网页开发技术。它使用JSP标签在HTML网页中插入Java代码。标签通常以<%开头以%>结束。
JSP是一种Java servlet,主要用于实现Java web应用程序的用户界面部分。网页开发者们通过结合HTML代码、XHTML代码、XML元素以及嵌入JSP操作和命令来编写JSP。
JSP通过网页表单获取用户输入数据、访问数据库及其他数据源,然后动态地创建网页。
JSP标签有多种功能,比如访问数据库、记录用户选择信息、访问JavaBeans组件等,还可以在不同的网页中传递控制信息和共享信息。6.2整合JSP
6.2.1创建工程
6.2.2配置web.xml
6.2.3将webapp指定为web资源目录
6.2.4添加jsp解析器依赖
- <!-- 添加jsp解析器依赖-->
- <dependency>
- <groupId>org.apache.tomcat.embed</groupId>
- <artifactId>tomcat-embed-jasper</artifactId>
- </dependency>
- <!-- 添加jstl-->
- <dependency>
- <groupId>javax.servlet</groupId>
- <artifactId>jstl</artifactId>
- </dependency>
6.2.5配置视图解析器
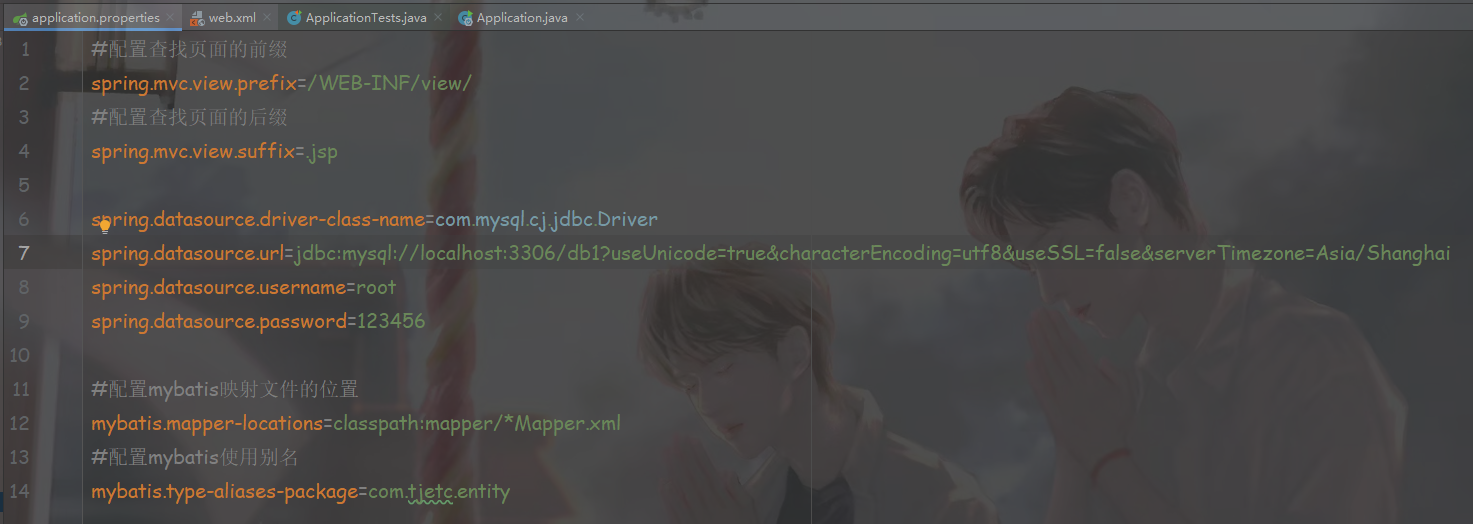
6.2.6编写controller
- package com.tjetc.controller;
- import com.github.pagehelper.PageInfo;
- import com.tjetc.entity.User;
- import com.tjetc.service.UserService;
- import lombok.extern.slf4j.Slf4j;
- import org.springframework.beans.factory.annotation.Autowired;
- import org.springframework.stereotype.Controller;
- import org.springframework.ui.Model;
- import org.springframework.web.bind.annotation.RequestMapping;
- import org.springframework.web.bind.annotation.RequestParam;
- import org.springframework.web.bind.annotation.ResponseBody;
- import org.springframework.web.bind.annotation.RestController;
- import java.util.List;
- @Controller/*返回页面*/
- /*@RestController
- 相当于 @Controller+@ResponseBody 返回json
- */
- @RequestMapping("user")
- public class UserController {
- @Autowired
- private UserService userService;
- @RequestMapping("all")
- /*@ResponseBody//返回json*/
- public String findAll(Model model) {
- List<User> users = userService.findAll();
- model.addAttribute("users", users);
- return "user-list";
- }
- @RequestMapping("page")
- /*@ResponseBody//返回json*/
- public PageInfo<User> page(@RequestParam(value = "pageNum", required = false, defaultValue = "3") int pageNum,
- @RequestParam(value = "pageSize", required = false, defaultValue = "3") int pageSize) {
- PageInfo<User> userPage = userService.findPage(pageNum, pageSize);
- return userPage;
- }
- }
6.2.7创建jsp
- <%@ page contentType="text/html;charset=UTF-8" language="java" %>
- <%@taglib prefix="c" uri="http://java.sun.com/jsp/jstl/core" %>
- <html>
- <head>
- <title>Title</title>
- <base href="<%=request.getContextPath()%>/">
- </head>
- <body>
- <table border="1" cellspacing="0" cellpadding="1">
- <tr>
- <td>编号</td>
- <td>用户名</td>
- <td>密码</td>
- </tr>
- <c:forEach items="${users}" var="user">
- <tr>
- <td>${user.id}</td>
- <td>${user.username}</td>
- <td>${user.password}</td>
- </tr>
- </c:forEach>
- </table>
- </body>
- </html>
代码编写完成,这时启动服务,会看到端口号8080,默认contextpath为””。访问controller的路径为localhost:8080/user/all,这时很有可能会404。解决办法:打开project constructor
idea右上角。选择artifacts,选中springboot-jsp,右键,将该工程下所有的jar包导到左边。点击put into output root即可。会看到右边所有的jar都到了lib下。重启服务,如果这时是404的话。解决方法:
idea右上角,edit configurations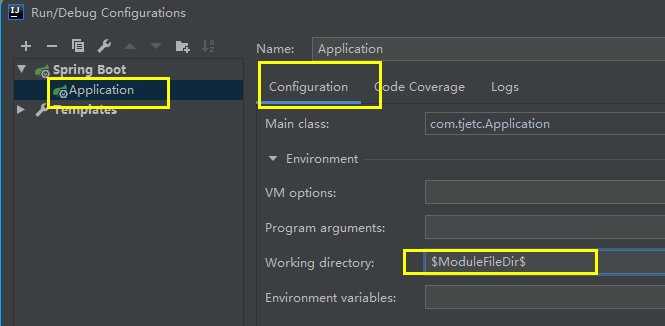
选择SpringBOotJSPApplication,点开Environment,选择Workingdirectory,在列表中选择ModuleFileDir,确定即可。重新启动服务。访问controller。会看到如下内容:

7、SpringBoot异常处理
7.1异常显示的页面
默认情况下,SpringBoot 项目错误页面如下:


当项目实际上线,如果给用户显示这个页面就不是很友好。当系统出现异常时应该给用户更加友好的错误页面
下面我们来看具体是如何实现的。
1.在templates/下新建error文件夹,在error中新建:状态.html的页面。例如当出现500时显示的页面为500.html- <!DOCTYPE html>
- <html lang="en">
- <head>
- <meta charset="UTF-8">
- <title>500</title>
- </head>
- <body>
- 您的代码出现了内部错误,请检查!
- </body>
- </html>
2.创建controller
- @Controller
- public class ErrorController {
- @RequestMapping("/test")
- public String testError(){
- System.out.println(5/0);
- return "index";
- }
- }
我们知道,在运行上面代码的时候发生算术异常。错误码为500。
3.使用X进行模糊匹配
a)当出现5开头状态码的错误时,显示页面可以命名为5xx.html
b)如果500.html和5xx.html同时存在,则会精确匹配相应页面。
我们把刚才的500.html改为5xx.html,也是可以的。因为发生了5开头的异常,会走5xx.html。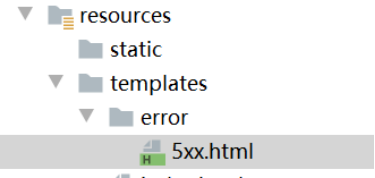
执行结果:
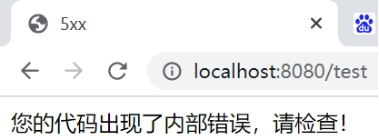
如果500.html和5xx.html同时存在的话,可以会根据状态码精确匹配,如果没有相关状态码的html,则还是执行5xx.html

500.html和5xx.html同时存在,则会根据状态码精确匹配500.html。
4. 统一错误页面显示
在templates下新建error.html。如果项目中不存在具体状态码的页面或没有使用x成功匹配的页面时,显示error.html作为错误显示页面。
比如我们在error下没有设置4xx相关的错误页面,当发生状态码为4xx的错误时,找不到相关的错误处理页面,这时会走一个统一的错误处理页面。一般会在templates下创建error.html,作为统一的错误处理页面。
在templates下创建error.html
- <!DOCTYPE html>
- <html lang="en">
- <head>
- <meta charset="UTF-8">
- <title>error</title>
- </head>
- <body>
- error
- </body>
- </html>
当发生404错误时,会自动走error.html

7.2异常处理
在Spring Boot项目中除了设置错误页面,还可以通过注解实现错误处理。
7.2.1局部异常
在Spring Boot项目中除了设置错误页面,还可以通过注解实现错误处理。
局部异常:
在控制器类中添加一个方法,结合@ExceptionHandler。但是只能对当前控制器中方法出现异常进行解决。
1.创建异常信息类
2.在controller中设置异常处理
- package com.tjetc.controller;
- import com.tjetc.exception.ExceptionMessage;
- import lombok.extern.slf4j.Slf4j;
- import org.springframework.web.bind.annotation.ExceptionHandler;
- import org.springframework.web.bind.annotation.RequestMapping;
- import org.springframework.web.bind.annotation.RestController;
- @Slf4j
- @RestController
- public class HelloController {
- @RequestMapping("hello")
- public String hello() {
- System.out.println(5 / 0);
- return "hello";
- }
- @RequestMapping("world")
- public String world() {
- System.out.println(10 / 0);
- return "world";
- }
- /*局部异常处理,controller中的所有方法出现的异常是ArithmeticException类型的 全部由如下方法处理*/
- @ExceptionHandler(ArithmeticException.class)
- public ExceptionMessage exception(ArithmeticException e) {
- System.out.println("HelloController中的局部异常处理");
- log.error(e.toString());
- ExceptionMessage message = new ExceptionMessage("2100", "出错了");
- return message;
- }
- }
@ExceptionHandler的参数为发生异常的类型。如果controller的方法中捕获到了这种异常,就会走@ExceptionHandler表示的方法arithmeticException(),在方法参数中,可以获取异常对象。
最终执行结果: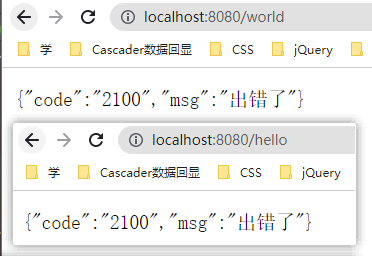

当访问hello的controller方法时,会出现除0异常,就会走异常处理方法,封装异常信息,返回。
7.2.2全局异常
新建全局异常类,通过@ControllerAdvice结合@ExceptionHandler。当全局异常处理和局部处理同时存在时,局部生效(就近原则)
1.编写异常处理controller- package com.tjetc.controller;
- import com.tjetc.exception.ExceptionMessage;
- import org.springframework.web.bind.annotation.ControllerAdvice;
- import org.springframework.web.bind.annotation.ExceptionHandler;
- import org.springframework.web.bind.annotation.ResponseBody;
- /**
- * 全局异常处理的Controller
- */
- @ControllerAdvice//全局异常处理的注解(@ControllerAdvice)
- public class GlobalExceptionHandleController {
- //@ExceptionHandler 加在方法上,表示异常处理
- @ExceptionHandler(ArithmeticException.class)//处理哪种异常与异常类型有关
- @ResponseBody
- public ExceptionMessage automicException(ArithmeticException arithmeticException) {
- ExceptionMessage message = new ExceptionMessage("670", arithmeticException.toString());
- return message;
- }
- @ExceptionHandler(NullPointerException.class)//处理空指针异常
- @ResponseBody
- public ExceptionMessage nullException(NullPointerException nullPointerException) {
- ExceptionMessage message = new ExceptionMessage("770", nullPointerException.toString());
- return message;
- }
- @ExceptionHandler(Exception.class)//没有处理的其他异常, 都由Exception处理
- @ResponseBody
- public ExceptionMessage exception(Exception e) {
- ExceptionMessage message = new ExceptionMessage("1070", e.toString());
- return message;
- }
- }
2.编写controller
- package com.tjetc.controller;
- import com.tjetc.exception.ExceptionMessage;
- import lombok.extern.slf4j.Slf4j;
- import org.springframework.web.bind.annotation.ExceptionHandler;
- import org.springframework.web.bind.annotation.RequestMapping;
- import org.springframework.web.bind.annotation.RestController;
- @Slf4j
- @RestController
- public class HelloController {
- @RequestMapping("hello")
- public String hello() {
- System.out.println(5 / 0);
- return "hello";
- }
- @RequestMapping("world")
- public String world() {
- System.out.println(10 / 0);
- return "world";
- }
- @RequestMapping("aaa")
- public String abc() {
- String str = null;
- str.length(); //出现空指针异常
- return "abcdc";
- }
- @RequestMapping("bbb")
- public String bb() {
- int[] i = new int[0];
- int num = i[1]; // 会出现数组越界异常
- return "bb";
- }
- /*局部异常处理,controller中的所有方法出现的异常是ArithmeticException类型的 全部由如下方法处理*/
- @ExceptionHandler(ArithmeticException.class)
- public ExceptionMessage exception(ArithmeticException e) {
- System.out.println("HelloController中的局部异常处理");
- log.error(e.toString());
- ExceptionMessage message = new ExceptionMessage("2100", "出错了");
- return message;
- }
- }
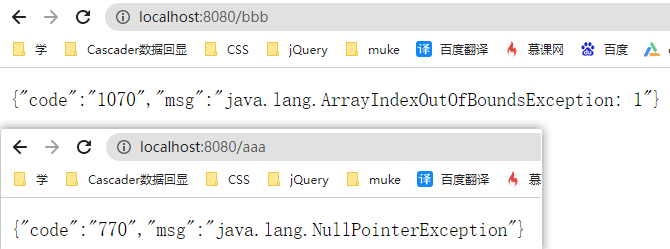
3.测试结果
8、SpringBoot定时任务
8.1 Scheduled简介
Scheduled是Spring3.0后内置的定时任务器。通过Scheduled可以完成周期的执行一些功能。存在于spring-conext-support.jar中。
在SpringBoot中使用Scheduled非常简单,只需要在对应的方法上添加@Scheduled注解,再配置对应的参数就可以完成。8.1.1创建工程
8.1.2添加依赖- <dependency>
- <groupId>org.springframework</groupId>
- <artifactId>spring-context-support</artifactId>
- </dependency>
8.1.3在启动类上添加注解

8.1.4 创建定时任务
- package com.tjetc.scheduled;
- import org.springframework.scheduling.annotation.Scheduled;
- import org.springframework.stereotype.Component;
- @Component
- public class ScheduledDemo {
- //调度注解 cron填写表达式 每个参数之间有空格
- @Scheduled(cron = "0/2 * * * * *")
- public void test(){
- //模拟业务逻辑
- System.out.println("test scheduled");
- }
- }
8.1.5启动服务
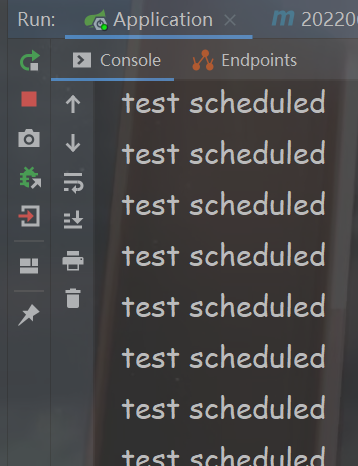
启动spring服务,运行结果如下,每隔两秒执行一次任务。
8.2Cron表达式
Cron表达式是一个字符串,分为6或7个域,每一个域代表一个含义
Cron有如下两种语法格式:
• Seconds Minutes Hours Day Month Week Year
• Seconds Minutes Hours Day Month Week Year
corn从左到右(用空格隔开):
秒 分 小时 月份中的日期 月份 星期中的日期年份位置
时间域名
允许值
允许的特殊字符
1
秒
0-59
, - * /
2
分钟
0-59
, - * /
3
小时
0-23
, - * /
4
日
1-31
, - * / L W C
5
月
1-12
, - * /
6
星期
1-7(周日到周六)
, - * ? / L C #
7
年(可选)
1970-2099
, - * /
Cron表达式的时间字段除允许设置数值外,还可使用一些特殊的字符,提供列表、范围、通配符等功能,细说如下:
- 星号(*):可用在所有字段中,表示对应时间域的每一个时刻,例如,*在分钟字段时,表示“每分钟”;
- 问号(?):该字符只在星期字段中使用,它通常指定为“无意义的值”,相当于占位符;
- 减号(-):表达一个范围,如在小时字段中使用“10-12”,则表示从10到12点,即10,11,12;
- 逗号(,):表达一个列表值,如在星期字段中使用“MON,WED,FRI”,则表示星期一,星期三和星期五;
- 斜杠(/):x/y表达一个等步长序列,x为起始值,y为增量步长值。如在秒字段中使用0/15,则表示为0,15,30和45秒,而5/15在分钟字段中表示5,20,35,50,你也可以使用*/y,它等同于0/y;
- L:该字符只在日期和星期字段中使用,代表"Last"的意思,但它在两个字段中意思不同。L在日期字段中,表示这个月份的最后一天,如一月的31号,非闰年二月的28号;如果L用在星期中,则表示星期六,等同于7。但是,如果L出现在星期字段里,而且在前面有一个数值X,则表示"这个月的最后X天",例如,6L表示该月的最后星期五;
- W:该字符只能出现在日期字段里,是对前导日期的修饰,表示离该日期最近的工作日。例如15W表示离该月15号最近的工作日,如果该月15号是星期六,则匹配14号星期五;如果15日是星期日,则匹配16号星期一;如果15号是星期二,那结果就是15号星期二。但必须注意关联的匹配日期不能够跨月,如你指定1W,如果1号是星期六,结果匹配的是3号星期一,而非上个月最后的那天。W字符串只能指定单一日期,而不能指定日期范围
- LW组合:在日期字段可以组合使用LW,它的意思是当月的最后一个工作日;
- 井号(#):该字符只能在星期字段中使用,表示当月某个工作日。如6#3表示当月的第三个星期五(6表示星期五,#3表示当前的第三个),而4#5表示当月的第五个星期三,假设当月没有第五个星期三,忽略不触发;
- C:该字符只在日期和星期字段中使用,代表"Calendar"的意思。它的意思是计划所关联的日期,如果日期没有被关联,则相当于日历中所有日期。例如5C在日期字段中就相当于日历5日以后的第一天。1C在星期字段中相当于星期日后的第一天。
Cron表达式对特殊字符的大小写不敏感,对代表星期的缩写英文大小写也不敏感。
- @Scheduled(cron = "0 0 1 1 1 ?") //每年一月的一号的1:00:00 执行一次
- @Scheduled(cron = "0 0 1 1 1,6 ?") //一月和六月的一号的1:00:00 执行一次
- @Scheduled(cron = "0 0 1 1 1,4,7,10 ?") //每个季度的第一个月的一号的1:00:00 执行一次
- @Scheduled(cron = "0 0 0 11 11 ?") //11月11日0点执行
9、SpringBoot与web开发
9.1静态资源映射规则"/**" 访问当前项目任何资源,全部找静态资源的文件夹进行映射
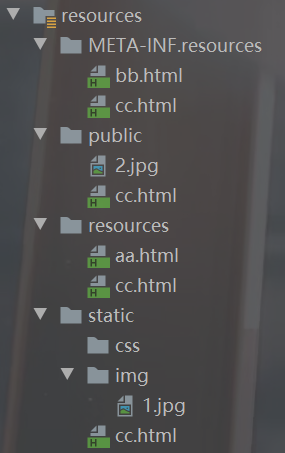
静态资源的文件夹:- "classpath:/META-INF/resources/",
- "classpath:/resources/",
- "classpath:/static/",
- "classpath:/public/"
static,public,resources或者META-INF/resources/


静态资源路径下的文件,可以通过地址栏直接访问。在static,public,resources或者META-INF/resources/下放图片1.jpg
static

public

resources

META-INF/resources

优先级
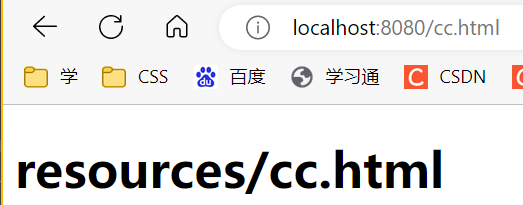
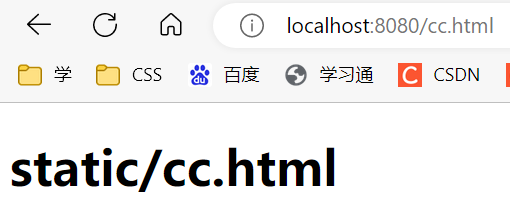
static,public,resources或者META-INF/resources/下写相同名称不同路径的的cc.html文件
第一个

第二个
第三个
最后一个
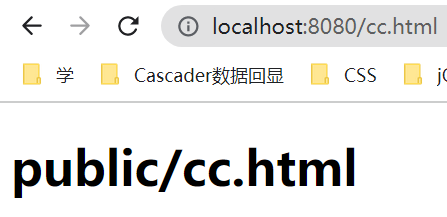
资源访问问题
可以访问到c:/image/下的图片,但访问不到static,public,resources或者META-INF/resources/下放图片
- package com.tjetc.config;
- import org.springframework.context.annotation.Configuration;
- import org.springframework.web.servlet.config.annotation.ResourceHandlerRegistry;
- import org.springframework.web.servlet.config.annotation.WebMvcConfigurer;
- @Configuration
- public class MyWebAppConfigurer implements WebMvcConfigurer {
- /**
- * 添加自定义资源处理
- *
- * @param registry
- */
- @Override
- public void addResourceHandlers(ResourceHandlerRegistry registry) {
- //处理所有静态资源url处理
- registry.addResourceHandler("/**").addResourceLocations("file:c:/image/");
- }
- }

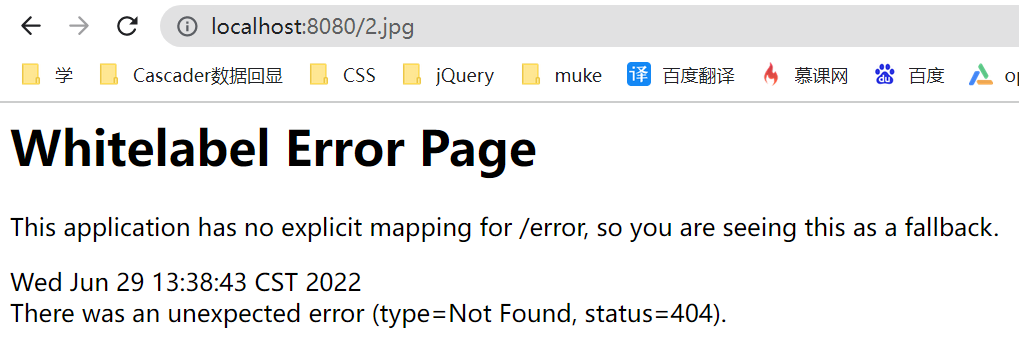
此图片为C:/image/下的图片

如果想要访问static,public,resources或者META-INF/resources/下放图片,只需在代码中加入如下内容便可访问成功。

上面是将file:c:/image/写死在了代码中,不好修改,解决方案如下:
配置文件user.properties

新建一个类:
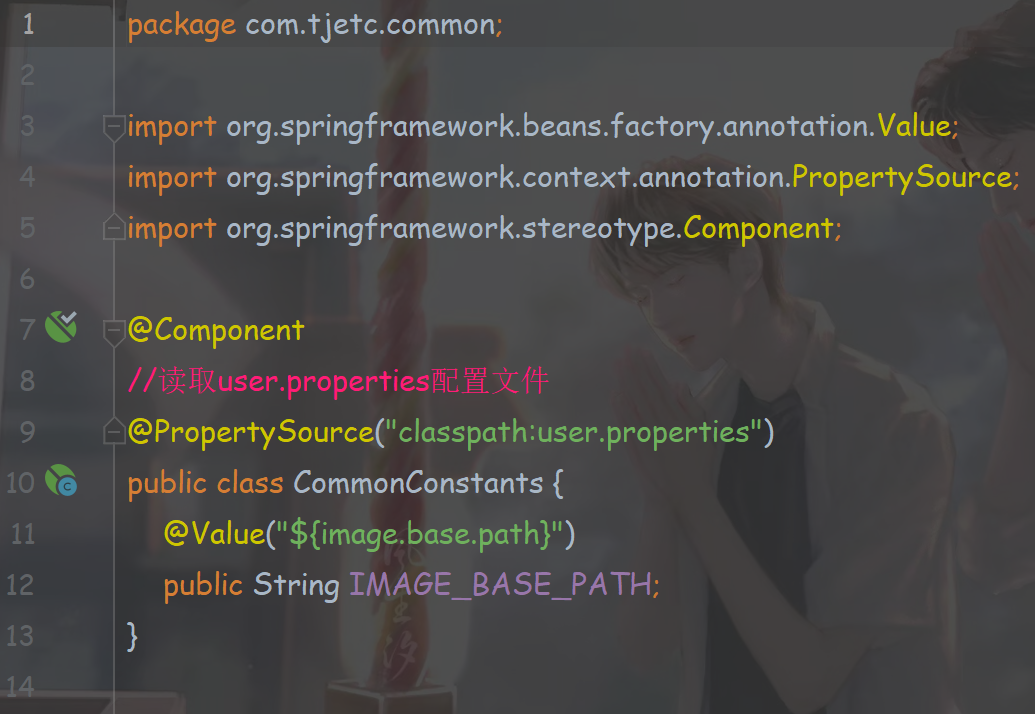
修改MyWebAppConfigurer中部分代码(优化代码)

依旧可以访问

9.2登录拦截器
9.2.1编写controller- package com.tjetc.controller;
- import com.tjetc.common.model.JsonResult;
- import org.springframework.web.bind.annotation.RequestMapping;
- import org.springframework.web.bind.annotation.RequestParam;
- import org.springframework.web.bind.annotation.RestController;
- import javax.servlet.http.HttpSession;
- @RestController
- public class LoginController {
- @RequestMapping("login")
- public JsonResult login(@RequestParam("username") String username,
- @RequestParam("password") String password,
- HttpSession session) {
- //取数据判断 todo
- if ("tom".equals(username) && "123".equals(password)) {
- //用户信息存储到session中
- session.setAttribute("username", username);
- JsonResult jsonResult = new JsonResult(0, "登陆成功", null);
- return jsonResult;
- } else {
- JsonResult jsonResult = new JsonResult(1, "用户名或密码错误", null);
- return jsonResult;
- }
- }
- }
- package com.tjetc.controller;
- import org.springframework.stereotype.Controller;
- import org.springframework.web.bind.annotation.RequestMapping;
- import org.springframework.web.bind.annotation.ResponseBody;
- @Controller
- public class HelloController {
- /**
- * 请求转发到页面
- *
- * @return
- */
- @RequestMapping("hello")
- public String hello() {
- int i = 1 / 0;
- return "hello";
- }
- /**
- * 返回json
- *
- * @return
- */
- @RequestMapping("world")
- @ResponseBody
- public String world() {
- return "world";
- }
- }
9.2.2编写登录拦截器
- package com.tjetc.interceptor;
- import com.alibaba.fastjson.JSONObject;
- import com.tjetc.common.model.JsonResult;
- import org.springframework.web.servlet.HandlerInterceptor;
- import javax.servlet.http.HttpServletRequest;
- import javax.servlet.http.HttpServletResponse;
- import javax.servlet.http.HttpSession;
- /**
- * 登录验证拦截器
- */
- public class LoginInterceptor implements HandlerInterceptor {
- @Override
- public boolean preHandle(HttpServletRequest request,
- HttpServletResponse response,
- Object handler) throws Exception {
- HttpSession session = request.getSession();
- Object username = session.getAttribute("username");
- if (username == null) {
- response.setContentType("text/html;charset=utf-8");
- JsonResult jsonResult = new JsonResult(-1, "未登录或者登录过期", null);
- String json = JSONObject.toJSONString(jsonResult);
- //json输出到页面
- response.getWriter().write(json);
- //不放行
- return false;
- } else {
- //放行
- return true;
- }
- }
- }
9.2.3配置拦截器
- package com.tjetc.config;
- import com.tjetc.interceptor.LoginInterceptor;
- import org.springframework.context.annotation.Configuration;
- import org.springframework.web.servlet.config.annotation.InterceptorRegistry;
- import org.springframework.web.servlet.config.annotation.ResourceHandlerRegistry;
- import org.springframework.web.servlet.config.annotation.WebMvcConfigurer;
- @Configuration
- public class LoginWebMvcConfigure implements WebMvcConfigurer {
- //添加自定义的登录拦截器
- @Override
- public void addInterceptors(InterceptorRegistry registry) {
- registry.addInterceptor(new LoginInterceptor())
- .addPathPatterns("/**")//拦截所有请求的url
- .excludePathPatterns("/login", "/css/**", "/js/**", "/img/**");//排除不要登录验证的url
- }
- }
先访问world显示未登录

登录

登陆成功显示world
密码错误也不会登录成功

-
相关阅读:
JVM 内存模型
安利!如何提优质的ISSUE?学霸是这样写的!
VectorDrawable-pathdata
水能自发变成“消毒水”,83岁斯坦福教授:揭示冬天容易得流感的部分原因...
python爬虫(3)
python 动态规划(背包问题和最长公共子串)
LabVIEW使用Deskto pExecution Trace工具包
CTF 代码审计之绕过过滤的空白字符
nginx 配置相关详解
centos编译升级cmake,痛苦的Linux小白
- 原文地址:https://blog.csdn.net/weixin_45701868/article/details/125478631
