-
Python零基础速成班-第18讲-Python for Database MySQL数据库,Web Sever打造网页和API接口服务
Python零基础速成班-第18讲-Python for Database MySQL数据库,Web Sever打造网页和API接口服务
学习目标
- Python Database MySQL数据库
- Python Web Sever打造网页和API接口服务
友情提示:将下文中代码拷贝到JupyterNotebook中直接执行即可,部分代码需要连续执行。
1、Python Database MySQL数据库
1.1 MySQL数据库简介
MySQL是一个关系型数据库管理系统,由瑞典MySQL AB 公司开发,属于 Oracle 旗下产品。MySQL 是最流行的关系型数据库管理系统之一,其体积小、速度快、总体拥有成本低,尤其是开放源码这一特点,一般中小型和大型网站的开发都选择 MySQL 作为网站数据库。
1.2 MySQL数据库数据类型简介
1.2.1 数值类型
- MySQL支持所有标准SQL数值数据类型。
- 这些类型包括严格数值数据类型(INTEGER、SMALLINT、DECIMAL和NUMERIC),以及近似数值数据类型(FLOAT、REAL和DOUBLE PRECISION)。
- 关键字INT是INTEGER的同义词,关键字DEC是DECIMAL的同义词。
- BIT数据类型保存位字段值,并且支持MyISAM、MEMORY、InnoDB和BDB表。
- 作为SQL标准的扩展,MySQL也支持整数类型TINYINT、MEDIUMINT和BIGINT。下面的表显示了需要的每个整数类型的存储和范围。
类型 大小 范围(有符号) 范围(无符号) 用途 TINYINT 1 字节 (-128,127) (0,255) 小整数值 SMALLINT 2 字节 (-32 768,32 767) (0,65 535) 大整数值 MEDIUMINT 3 字节 (-8 388 608,8 388 607) (0,16 777 215) 大整数值 INT或INTEGER 4 字节 (-2 147 483 648,2 147 483 647) (0,4 294 967 295) 大整数值 BIGINT 8 字节 (-9,223,372,036,854,775,808,9 223 372 036 854 775 807) (0,18 446 744 073 709 551 615) 极大整数值 FLOAT 4 字节 (-3.402 823 466 E+38,-1.175 494 351 E-38),0,(1.175 494 351 E-38,3.402 823 466 351 E+38) 0,(1.175 494 351 E-38,3.402 823 466 E+38) 单精度
浮点数值DOUBLE 8 字节 (-1.797 693 134 862 315 7 E+308,-2.225 073 858 507 201 4 E-308),0,(2.225 073 858 507 201 4 E-308,1.797 693 134 862 315 7 E+308) 0,(2.225 073 858 507 201 4 E-308,1.797 693 134 862 315 7 E+308) 双精度
浮点数值DECIMAL 对DECIMAL(M,D) ,如果M>D,为M+2否则为D+2 依赖于M和D的值 依赖于M和D的值 小数值 1.2.2 日期和时间类型
- 表示时间值的日期和时间类型为DATETIME、DATE、TIMESTAMP、TIME和YEAR。
- 每个时间类型有一个有效值范围和一个"零"值,当指定不合法的MySQL不能表示的值时使用"零"值。
类型 大小
(字节)范围 格式 用途 DATE 3 1000-01-01/9999-12-31 YYYY-MM-DD 日期值 TIME 3 '-838:59:59'/'838:59:59' HH:MM:SS 时间值或持续时间 YEAR 1 1901/2155 YYYY 年份值 DATETIME 8 1000-01-01 00:00:00/9999-12-31 23:59:59 YYYY-MM-DD HH:MM:SS 混合日期和时间值 TIMESTAMP 4 1970-01-01 00:00:00/2038
结束时间是第 2147483647 秒,北京时间 2038-1-19 11:14:07,格林尼治时间 2038年1月19日 凌晨 03:14:07
YYYYMMDD HHMMSS 混合日期和时间值,时间戳 1.2.3 字符串类型
字符串类型指CHAR、VARCHAR、BINARY、VARBINARY、BLOB、TEXT、ENUM和SET。下表描述了这些类型如何工作以及如何在查询中使用这些类型。
类型 大小 用途 CHAR 0-255字节 定长字符串 VARCHAR 0-65535 字节 变长字符串 TINYBLOB 0-255字节 不超过 255 个字符的二进制字符串 TINYTEXT 0-255字节 短文本字符串 BLOB 0-65 535字节 二进制形式的长文本数据 TEXT 0-65 535字节 长文本数据 MEDIUMBLOB 0-16 777 215字节 二进制形式的中等长度文本数据 MEDIUMTEXT 0-16 777 215字节 中等长度文本数据 LONGBLOB 0-4 294 967 295字节 二进制形式的极大文本数据 LONGTEXT 0-4 294 967 295字节 极大文本数据 1.2.4 数据类型的属性
MySQL关键字 含义 NULL 数据列可包含NULL值 NOT NULL 数据列不允许包含NULL值 DEFAULT 默认值 PRIMARY KEY 主键 AUTO_INCREMENT 自动递增,适用于整数类型 UNSIGNED 无符号 CHARACTER SET name 指定一个字符集 1.3 MySQL数据库安装配置及数据准备
- 我们选择开源的MySQL8.0+版本,安装在本地运行。具体教程请参考
Mysql8.0.22安装与配置详细教程 - 安装好后,我们创建一个testdb数据库,新建t_book表,并插入6条数据,如下图:

- MySQL连接信息:数据库账号"root",密码"lulu@123456!“,端口"3306”,数据库名"testdb",编码"utf8"
附建表sql如下:
CREATE DATABASE if not exists testdb; USE testdb; DROP TABLE IF EXISTS `t_book`; CREATE TABLE `t_book` ( `id` int NOT NULL AUTO_INCREMENT, `name` varchar(255) CHARACTER SET utf8 COLLATE utf8_general_ci NULL DEFAULT NULL, `author` varchar(255) CHARACTER SET utf8 COLLATE utf8_general_ci NULL DEFAULT NULL, `price` double(10, 2) NULL DEFAULT NULL, PRIMARY KEY (`id`) USING BTREE ) ENGINE = InnoDB CHARACTER SET = utf8 COLLATE = utf8_general_ci ROW_FORMAT = Dynamic; INSERT INTO `t_book` VALUES (1, '红楼梦', '曹雪芹', 29.50); INSERT INTO `t_book` VALUES (2, '西游记', '吴承恩', 15.80); INSERT INTO `t_book` VALUES (3, '三国演义', '罗贯中', 30.00); INSERT INTO `t_book` VALUES (4, '水浒传', '施耐庵', 26.58); INSERT INTO `t_book` VALUES (5, '聊斋志异', '蒲松龄', 18.00); INSERT INTO `t_book` VALUES (6, '镜花缘', '李汝珍', 15.50); INSERT INTO `t_book` VALUES (7, '搜神记', '干宝', 22.00); SET FOREIGN_KEY_CHECKS = 1;- 1
- 2
- 3
- 4
- 5
- 6
- 7
- 8
- 9
- 10
- 11
- 12
- 13
- 14
- 15
- 16
- 17
- 18
- 19
- 20
1.4 Python连接MySQL数据库并取值(select)
在线安装命令:pip install pymysql
清华镜像安装:pip install -i https://pypi.tuna.tsinghua.edu.cn/simple pymysql
引入相关包:import pymysql接下来我们通过db = pymysql.connect()创建数据库连接
pymysql.connect()参数说明:
- host(str):MySQL服务器地址
- port(int):MySQL服务器端口号
- user(str):用户名
- passwd(str):密码
- database(str):数据库名称
- charset(str):连接编码
pip install -i https://pypi.tuna.tsinghua.edu.cn/simple pymysql- 1
import pymysql db = pymysql.connect(host="127.0.0.1",port=3306,user="root",password="lulu@123456!",database="testdb",charset="utf8")- 1
- 2
db 是数据库连接对象,其支持的方法有:
- cursor():使用该连接创建并返回游标
- commit():提交当前事务
- rollback():回滚当前事务
- close():关闭连接
接下来我们通过cursor()游标完成数据库取值
cursor() 游标支持的方法有:
- execute(op):执行一个数据库的查询命令
- fetchone():取得结果集的下一行
- fetchmany(size):获取结果集的下几行
- fetchall(): 获取结果集中的所有行
- rowcount():返回数据条数或影响行数
- close():关闭游标对象
cur = db.cursor()# 建立游标对象 sql = "select * from t_book"# sql代码 cur.execute(sql)# 执行sql代码 data = cur.fetchall()# 获取结果集 data- 1
- 2
- 3
- 4
- 5
((1, '红楼梦', '曹雪芹', 29.5), (2, '西游记', '吴承恩', 15.8), (3, '三国演义', '罗贯中', 30.0), (4, '水浒传', '施耐庵', 26.58), (5, '聊斋志异', '蒲松龄', 18.0), (6, '镜花缘', '李汝珍', 15.5), (7, '搜神记', '干宝', 22.0))- 1
- 2
- 3
- 4
- 5
- 6
- 7
我们还可以使用Pandas 连接数据库并取值,结果直接转化为DataFrame 格式。
语法为:dataframe = pd.read_sql(sql,db)
import pymysql import pandas as pd db = pymysql.connect(host="127.0.0.1",port=3306,user="root",password="lulu@123456!",database="testdb",charset="utf8") sql = "select * from t_book" dataframe = pd.read_sql(sql,db) dataframe.head(4)# 取前4行值- 1
- 2
- 3
- 4
- 5
- 6
id name author price 0 1 红楼梦 曹雪芹 29.50 1 2 西游记 吴承恩 15.80 2 3 三国演义 罗贯中 30.00 3 4 水浒传 施耐庵 26.58 1.5 Python创建MySQL数据库和表(create)
我们首先使用cursor.execute(“建库代码”)直接创建一个pytest数据库。
import pymysql db=pymysql.connect(host="localhost",port=3306,user="root",password="lulu@123456!",charset="utf8") cursor = db.cursor() cursor.execute("create database if not exists pytest") # 创建数据库pytest- 1
- 2
- 3
- 4
1- 1
接下来我们在新建的pytest数据库中通过cursor.execute(“建表代码”)创建一张employee表,包含id、first_name、lastname、age、sex、income 6个字段。

import pymysql db=pymysql.connect(host="localhost",port=3306,user="root",password="lulu@123456!",database="pytest",charset="utf8") cursor = db.cursor()# 创建一张表employee 包含6个字段 cursor.execute("create table if not exists employee(id int primary key AUTO_INCREMENT,first_name char(20) not null,last_name char(20),age int,sex char(1),income float);")- 1
- 2
- 3
- 4
0- 1
1.6 Python向MySQL表中插入数据(insert)
因为涉及数据更改,所以需要使用db.commit():提交当前事务,或者当执行失败时使用db.rollback():回滚当前事务。如下例,我们插入两条数据:
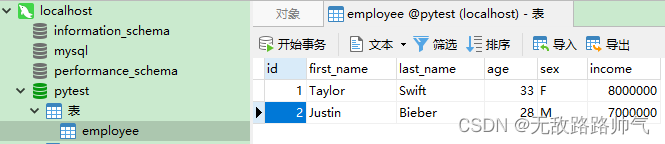
import pymysql db=pymysql.connect(host="localhost",port=3306,user="root",password="lulu@123456!",database="pytest",charset="utf8") cursor = db.cursor() sql = "insert into employee(first_name,last_name,age,sex,income) values('Taylor','Swift',33,'F',8000000.00),('Justin','Bieber',28,'M',7000000.00)"# 因为是AUTO_INCREMENT自增长字段,所以sql不需要指定id try: cursor.execute(sql) db.commit() except Exception as ex: db.rollback() print(repr(ex))- 1
- 2
- 3
- 4
- 5
- 6
- 7
- 8
- 9
- 10
1.7 Python更新MySQL表中数据(update)
result = cursor.execute(sql)表示将执行成功条数返回给result,更新操作同样需要commit()或者rollback()。如下例,我们更新一条数据:
import pymysql db=pymysql.connect(host="localhost",port=3306,user="root",password="lulu@123456!",database="pytest",charset="utf8") cursor = db.cursor() sql = "update employee set income = 11000000.00 where id = 1" try: result = cursor.execute(sql)# 返回执行成功条数 db.commit() print("update {} success!".format(result)) except Exception as ex: db.rollback() print(repr(ex))- 1
- 2
- 3
- 4
- 5
- 6
- 7
- 8
- 9
- 10
- 11
update 1 success!- 1
1.8 Python删除MySQL表中数据(delete)
result = cursor.execute(sql)表示将执行成功条数返回给result,删除操作同样需要commit()或者rollback()。如下例,我们删除两条数据:
import pymysql db=pymysql.connect(host="localhost",port=3306,user="root",password="lulu@123456!",database="pytest",charset="utf8") cursor = db.cursor() sql = "delete from employee where id between {} and {} ".format(1,2)# 删除id在1到2之间的 try: result = cursor.execute(sql) db.commit() print("delete {} success".format(result)) except Exception as ex: db.rollback() print(repr(ex))- 1
- 2
- 3
- 4
- 5
- 6
- 7
- 8
- 9
- 10
- 11
delete 2 success- 1
1.9 通过循环方式取值(select)
我们将testdb数据库中t_book的值全部取出,并通过for循环输出,如下例:
import pymysql db=pymysql.connect(host="localhost",port=3306,user="root",password="lulu@123456!",database="testdb",charset="utf8") cursor = db.cursor() sql = "select * from t_book" try: cursor.execute(sql) results = cursor.fetchall() for row in results: id=row[0] name=row[1] author=row[2] price=row[3] print("id={},name={},author={},price={}".format(id,name,author,price)) except Exception as ex: print(repr(ex)) db.close()- 1
- 2
- 3
- 4
- 5
- 6
- 7
- 8
- 9
- 10
- 11
- 12
- 13
- 14
- 15
- 16
id=1,name=红楼梦,author=曹雪芹,price=29.5 id=2,name=西游记,author=吴承恩,price=15.8 id=3,name=三国演义,author=罗贯中,price=30.0 id=4,name=水浒传,author=施耐庵,price=26.58 id=5,name=聊斋志异,author=蒲松龄,price=18.0 id=6,name=镜花缘,author=李汝珍,price=15.5 id=7,name=搜神记,author=干宝,price=22.0- 1
- 2
- 3
- 4
- 5
- 6
- 7
2、Python Web Sever打造网页和API接口服务
2.1 目标及代码功能简介:
2.1.1 目标
利用Python Web Sever组件http.server(HTTPServer,BaseHTTPRequestHandler),打造静态及动态网页,实现API接口服务。
2.1.2 代码功能介绍
1 BaseHTTPRequestHandler:这是一个以TCPServer为基础开发的模块,可以在请求外层添加http协议报文,发送http协议,常用方法及属性如下:(BaseHTTPRequestHandler简写为handler)
- handler.path 包含的请求路径和GET请求的数据
- handler.command 请求类型GET、POST、PUT…
- handler.headers 请求的头
- handler.responses HTTP错误代码及对应错误信息的字典
- handler.handle() 用于处理某一连接对象的请求,调用handle_one_request方法处理
- handler.handle_one_request() 根据请求类型调用do_XXX()方法,XXX为请求类型
- handler.do_XXX() 处理请求
- handler.send_error() 发送并记录一个完整的错误回复到客户端,内部调用send_response()方法实现
- handler.send_response() 发送一个响应头并记录已接收的请求
- handler.send_header() 发送一个指定的HTTP头到输出流。 keyword 应该指定头关键字,value 指定它的值
- handler.end_headers() 发送一个空白行,标识发送HTTP头部结束
- handler.wfile self.connection.makefile(“rb”, self.wbufsize) self.wbufsize = -1 应答的HTTP文本流对象,可写入应答信息
- handler.rfile self.connection.makefile(‘wb’, self.rbufsize) self.rbufsize = 0 请求的HTTP文本流对象,可读取请求信息
2 Http Server:用于网页及接口的监听和应答。基于BaseHTTPServer 的Http Server的处理流程如下:
- HTTPServer绑定对应的应答类 http_server = HTTPServer((’’, int(port)), ServerHTTP)。
- 监听端口 http_server.serve_forever(),使用select.select()循环监听请求,当接收到请求后调用当监听到请求时,取出请求对象。
- 应答类 ServerHTTP(),创建新线程处理请求对象,使用ServerHTTP.do_XXX方法。
2.2 完成一个静态网页服务,如下例:
我们把返回的网页内容写入HtmlPage(Byte格式),go_GET表明当Web访问或者get请求时,返回HtmlPage。
服务启动后,网页访问路径 http://localhost:8081 或者 http://127.0.0.1:8081
from http.server import HTTPServer,BaseHTTPRequestHandler import logging logging.basicConfig(level=logging.INFO,encoding="utf-8", format='%(asctime)s - %(levelname)s- %(message)s') class RequestHandle(BaseHTTPRequestHandler): HtmlPage = b"""\ <html> <head> <meta charset="utf-8"> <title>Web Server</title> </head> <body> hello Python Http! </body> </html>""" def do_GET(self): self.send_response(200) # 200 Status表明访问成功 self.send_header("Content-type","text/html")# 设置返回头部内容 格式text/html self.send_header("Content-Length",str(len(self.HtmlPage))) self.end_headers() # 发送HTTP头部结束 self.wfile.write(self.HtmlPage) # 返回静态网页 内容为Byte型 if __name__ == "__main__": try: server_address =("",8081) # 服务地址为本地端口8081 server = HTTPServer(server_address,RequestHandle) logging.info("start server...127.0.0.1:8081") # 写入日志 server.serve_forever() # 持续开启服务和监听 except KeyboardInterrupt: logging.info("^C received,shutting down the web servce") # 按下按键CTRL+C后,服务终止 server.socket.close() # 服务终止 #网页访问路径 http://localhost:8081 或者 http://127.0.0.1:8081- 1
- 2
- 3
- 4
- 5
- 6
- 7
- 8
- 9
- 10
- 11
- 12
- 13
- 14
- 15
- 16
- 17
- 18
- 19
- 20
- 21
- 22
- 23
- 24
- 25
- 26
- 27
- 28
- 29
- 30
2022-06-27 13:18:38,218 - INFO- start server...127.0.0.1:8081 127.0.0.1 - - [27/Jun/2022 13:18:40] "GET / HTTP/1.1" 200 - 127.0.0.1 - - [27/Jun/2022 13:18:40] "GET /favicon.ico HTTP/1.1" 200 - 2022-06-27 13:36:43,596 - INFO- ^C received,shutting down the web servce- 1
- 2
- 3
- 4
2.3完成一个API接口服务端,返回JSON数据,如下例:
我们定义一个json字典jsondict并将其转化为byte格式jsonbyte,go_POST表明是POST请求,利用self.wfile.write(self.jsonbyte)发送json数据,端口改为8082。
服务启动后,利用POSTMAN等工具发起POST请求 http://localhost:8082 或者 http://127.0.0.1:8082
from http.server import HTTPServer,BaseHTTPRequestHandler import logging import json logging.basicConfig(level=logging.INFO,encoding="utf-8", format='%(asctime)s - %(levelname)s- %(message)s') class RequestHandle(BaseHTTPRequestHandler): jsondict = {"status":"ok","version":0,"data":{"name":"聊斋志异","author":"蒲松龄"}} # 定义一个json字符串 jsonbyte = bytes(str(jsondict),"utf-8") def do_POST(self): self.send_response(200) # 200 Status表明访问成功 self.send_header("Content-type","application/json;charset=UTF-8")# 设置返回头部内容 格式json self.send_header("Content-Length",str(len(self.jsonbyte))) self.end_headers() # 发送HTTP头部结束 self.wfile.write(self.jsonbyte) # 返回json格式数据 if __name__ == "__main__": try: server_address =("",8082) # 服务地址为本地端口8082 server = HTTPServer(server_address,RequestHandle) logging.info("start server...127.0.0.1:8082") # 写入日志 server.serve_forever() # 持续开启服务和监听 except KeyboardInterrupt: logging.info("^C received,shutting down the web servce") # 按下按键CTRL+C后,服务终止 server.socket.close() # 服务终止 #网页访问路径 http://localhost:8082 或者 http://127.0.0.1:8082- 1
- 2
- 3
- 4
- 5
- 6
- 7
- 8
- 9
- 10
- 11
- 12
- 13
- 14
- 15
- 16
- 17
- 18
- 19
- 20
- 21
- 22
- 23
2022-06-27 14:20:26,031 - INFO- start server...127.0.0.1:8082 127.0.0.1 - - [27/Jun/2022 14:20:28] "POST / HTTP/1.1" 200 - 2022-06-27 14:34:26,006 - INFO- ^C received,shutting down the web servce- 1
- 2
- 3
2.4 完成一个动态网页服务,如下例:
HTMLPage为动态网页模板,create_page函数将服务器当前信息传入模板,形成动态网页并转化为Byte格式。
send_page函数发送动态网页,do_GET表明当Web访问或者get请求时,分别调用create_page函数和send_page函数。
服务启动后,网页访问路径 http://localhost:8083 或者 http://127.0.0.1:8083
from http.server import HTTPServer,BaseHTTPRequestHandler import logging import time logging.basicConfig(level=logging.INFO,encoding="utf-8",format='%(asctime)s - %(levelname)s- %(message)s') port = 8083 class RequestHandle(BaseHTTPRequestHandler): HTMLPage="""\ <!DOCTYPE html> <html> <head> <meta charset="utf-8"> <title>我的Web服务</title> </head> <body> <table align="left" cellspacing="0" border="1" bgcolor="#F2F2F2" width="600px" > <caption>服务器信息</caption> <tr><td>标题</td><td>内容</td></tr> <tr><td>时间</td><td>{data}</td></tr> <tr><td>访问地址</td><td>{host}</td></tr> <tr><td>访问端口</td><td>{port}</td></tr> <tr><td>命令</td><td>{command}</td></tr> <tr><td>地址</td><td>{path}</td></tr> </table> </body> </html> """ def create_page(self): # 创建动态网页 value={"data":time.strftime("%Y-%m-%d %H:%M:%S",time.localtime()), "host":self.client_address[0], "port":port, "command":self.command, "path":self.path} HTMLPage = self.HTMLPage.format(**value) # 使用dict方式传入 BytePage = HTMLPage.encode("utf-8") # 转化为Byte格式 return BytePage def send_page(self,page): # 发送动态网页 self.send_response(200) # 200 Status表明访问成功 self.send_header("Content-type","text/html") # 设置返回头部内容 格式text/html self.send_header("Content-Length",str(len(page))) self.end_headers() self.wfile.write(page) # 返回动态网页 内容为Byte型 def do_GET(self): page = self.create_page() # 创建需要返回的页面 self.send_page(page) # 返回状态及页面 if __name__ == "__main__": #启动网页服务 try: server_address= ("",port)# 服务地址为本地端口8083 server = HTTPServer(server_address,RequestHandle) logging.info("动态网页服务启动...127.0.0.1:8083") # 写入日志 server.serve_forever() # 持续开启服务和监听 except KeyboardInterrupt: logging.info("^C received,shutting down the web servce")# 按下按键CTRL+C后,服务终止 server.socket.close() # 服务终止 #网页访问路径 http://localhost:8083 或者 http://127.0.0.1:8083- 1
- 2
- 3
- 4
- 5
- 6
- 7
- 8
- 9
- 10
- 11
- 12
- 13
- 14
- 15
- 16
- 17
- 18
- 19
- 20
- 21
- 22
- 23
- 24
- 25
- 26
- 27
- 28
- 29
- 30
- 31
- 32
- 33
- 34
- 35
- 36
- 37
- 38
- 39
- 40
- 41
- 42
- 43
- 44
- 45
- 46
- 47
- 48
- 49
- 50
- 51
- 52
- 53
- 54
- 55
2022-06-28 13:29:49,954 - INFO- 动态网页服务启动...127.0.0.1:8083 127.0.0.1 - - [28/Jun/2022 13:29:50] "GET / HTTP/1.1" 200 - 127.0.0.1 - - [28/Jun/2022 13:29:50] "GET /favicon.ico HTTP/1.1" 200 -- 1
- 2
- 3
2.5 完成一个动态网页服务,读取服务器文件返回到网页中,如下例:
errorpage为统一定义的错误网页动态模板,error_handle函数将调用该模板并将错误信息写入动态网页中。
正常情况下handle_file函数为读取文件服务,并将文件信息通过send_content函数返回到前端页面,如有报错,则执行error_handle函数。
服务启动后,网页访问路径 http://localhost:8084 或者 http://127.0.0.1:8084from http.server import HTTPServer,BaseHTTPRequestHandler import logging logging.basicConfig(level=logging.INFO,encoding="utf-8",format='%(asctime)s - %(levelname)s- %(message)s') port = 8084 class RequestHandle(BaseHTTPRequestHandler): errorpage='''\ <!DOCTYPE html> <html> <head> <meta charset="utf-8"> <title>我的Web服务</title> </head> <body> {} </body> </html> ''' def handle_file(self,path): # 读取文件服务,传入文件地址 try: with open(path,"rb") as file: content = file.read() self.send_content(content) except IOError as ex: # 如有报错,调用error_handle函数,传入错误信息 content = "{} 错误:{}".format(path,repr(ex))# 提取错误信息 self.error_handle(content)# 调用统一错误网页动态模板 def send_content(self,content,status=200): # 发送动态网页 self.send_response(status) # 200 Status表明访问成功 self.send_header("Content-type","text/html") self.send_header("Content-Length",str(len(content))) self.end_headers() self.wfile.write(content)# 返回动态网页 内容为Byte型 def error_handle(self,msg): # 统一输出错误接口 errorpage = self.errorpage.format(msg) # 将错误信息写入动态网页中 errorbytepage = errorpage.encode('utf-8') # 转码 self.send_content(errorbytepage) #调用发送接口 def do_GET(self): self.handle_file("D://python.txt") if __name__ == "__main__": # 创建一个本地文件 pythonthis = """优美胜于丑陋 明了胜于晦涩 简洁胜于复杂 复杂胜于凌乱 扁平胜于嵌套 可读性很重要 """ with open(file="D://python.txt",mode="wt") as file: file.write(pythonthis) #启动网页服务 try: server_address= ("",port)# 服务地址为本地端口8084 server = HTTPServer(server_address,RequestHandle) logging.info("动态网页服务启动...127.0.0.1:8084") # 写入日志 server.serve_forever() # 持续开启服务和监听 except KeyboardInterrupt: logging.info("^C received,shutting down the web servce")# 按下按键CTRL+C后,服务终止 server.socket.close() # 服务终止 #网页访问路径 http://localhost:8084 或者 http://127.0.0.1:8084- 1
- 2
- 3
- 4
- 5
- 6
- 7
- 8
- 9
- 10
- 11
- 12
- 13
- 14
- 15
- 16
- 17
- 18
- 19
- 20
- 21
- 22
- 23
- 24
- 25
- 26
- 27
- 28
- 29
- 30
- 31
- 32
- 33
- 34
- 35
- 36
- 37
- 38
- 39
- 40
- 41
- 42
- 43
- 44
- 45
- 46
- 47
- 48
- 49
- 50
- 51
- 52
- 53
- 54
- 55
- 56
- 57
- 58
- 59
- 60
- 61
- 62
2022-06-28 13:29:59,368 - INFO- 动态网页服务启动...127.0.0.1:8084 127.0.0.1 - - [28/Jun/2022 13:30:03] "GET / HTTP/1.1" 200 - 127.0.0.1 - - [28/Jun/2022 13:30:03] "GET /favicon.ico HTTP/1.1" 200 -- 1
- 2
- 3
2.6 完成一个动态交互式网页服务,获取网址后缀值,返回在网页中,如下例:
服务启动后,网页访问路径 http://localhost:8085?id=4 或者 http://127.0.0.1:8085?id=4
self.path获取网址后缀值并将其返回到网页中,形成交互式网页服务。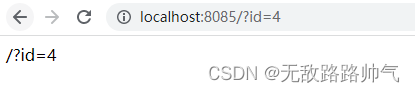
from http.server import HTTPServer,BaseHTTPRequestHandler import logging logging.basicConfig(level=logging.INFO,encoding="utf-8",format='%(asctime)s - %(levelname)s- %(message)s') port = 8085 class RequestHandle(BaseHTTPRequestHandler): def do_GET(self): self.send_response(200)#200 Status表明访问成功 self.send_header("Content-type","text/html") self.end_headers() self.wfile.write(bytes(self.path,'utf-8')) # 返回网址后缀 if __name__ == "__main__": #启动网页服务 try: server_address= ("",port)# 服务地址为本地端口8085 server = HTTPServer(server_address,RequestHandle) logging.info("动态网页服务启动...127.0.0.1:8085") # 写入日志 server.serve_forever() # 持续开启服务和监听 except KeyboardInterrupt: logging.info("^C received,shutting down the web servce")# 按下按键CTRL+C后,服务终止 server.socket.close() # 服务终止 #网页访问路径 http://localhost:8085?id=4 或者 http://127.0.0.1:8085?id=4- 1
- 2
- 3
- 4
- 5
- 6
- 7
- 8
- 9
- 10
- 11
- 12
- 13
- 14
- 15
- 16
- 17
- 18
- 19
- 20
- 21
2022-06-28 13:21:44,906 - INFO- 动态网页服务启动...127.0.0.1:8085 127.0.0.1 - - [28/Jun/2022 13:21:48] "GET /?id=4 HTTP/1.1" 200 - 127.0.0.1 - - [28/Jun/2022 13:21:48] "GET /favicon.ico HTTP/1.1" 200 -- 1
- 2
- 3
-
相关阅读:
wifi无线使用adb
精讲java中的CAS
Python | Leetcode Python题解之第200题岛屿数量
PyTorch - 高效快速配置 Conda + PyTorch 环境 (解决 segment fault )
外包干了3个月,技术退步明显。。。。。
利用C++开发一个迷你的英文单词录入和测试小程序-源码
汇编-ARMv8架构指令集
python+SQL sever+thinter学生宿舍管理系统
deepstream6.2部署yolov5详细教程与代码解读
stable diffusion实践操作-黑白稿线稿上色
- 原文地址:https://blog.csdn.net/m0_59562547/article/details/125518125
