-
基于Hardhat和Openzeppelin开发可升级合约(一)
基于Hardhat和Openzeppelin开发可升级合约(一)
本章主要演示通过使用Hardhat框架快速开发普通合约(不可升级),在本地节点部署,并通过控制台与合约进行交互。希望通过这篇文章能让读者快速上手Hardhat框架
可升级版合约将在下一章节开始第三方库
- Hardhat 关于Hardhat的安装和介绍, 参考我的另一篇文章<<简介智能合约开发框架-Hardhat>>
初始化
创建目录
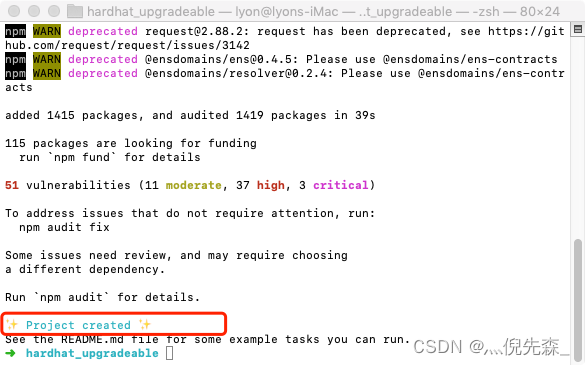
➜ mkdir hardhat_upgradeable ➜ cd hardhat_upgradeable ➜ npx hardhat 888 888 888 888 888 888 888 888 888 888 888 888 888 888 888 8888888888 8888b. 888d888 .d88888 88888b. 8888b. 888888 888 888 "88b 888P" d88" 888 888 "88b "88b 888 888 888 .d888888 888 888 888 888 888 .d888888 888 888 888 888 888 888 Y88b 888 888 888 888 888 Y88b. 888 888 "Y888888 888 "Y88888 888 888 "Y888888 "Y888 👷 Welcome to Hardhat v2.9.9 👷 ? What do you want to do? … ❯ Create a basic sample project Create an advanced sample project Create an advanced sample project that uses TypeScript Create an empty hardhat.config.js Quit # 选择第一个, 直接回车 ? Hardhat project root: › /Users/lyon/Desktop/Solidity/hardhat_upgradeable # 确认项目目录, 还是直接回车 ? Do you want to add a .gitignore? (Y/n) › y # 提示是否创建git忽略文件, 默认 y(yes), 直接回车 ? Do you want to install this sample project's dependencies with npm (hardhat @nomiclabs/hardhat-waffle ethereum-waffle chai @nomiclabs/hardhat-ethers ethers)? (Y/n) › y # 提示是否想要通过 npm 安装依赖, 默认 y(yes), 还是直接回车- 1
- 2
- 3
- 4
- 5
- 6
- 7
- 8
- 9
- 10
- 11
- 12
- 13
- 14
- 15
- 16
- 17
- 18
- 19
- 20
- 21
- 22
- 23
- 24
- 25
- 26
- 27
等待 npm 拉取依赖完成即可

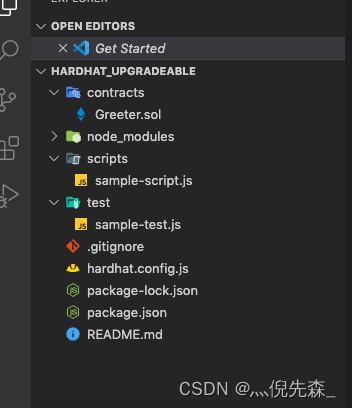
项目默认目录

不可升级合约
我希望通过开发不可合约来让读者熟悉基于Hardhat的开发流程, 并可以在编写可升级合约时做对比
创建合约
# 删除目录演示合约文件 Greeter.sol ➜ rm contracts/Greeter.sol # 创建 MyContract.sol ➜ touch contracts/MyContract.sol- 1
- 2
- 3
- 4
添加如下合约代码
// SPDX-License-Identifier: UNLICENSED pragma solidity ^0.8.0; contract MyContract { int storageValue; constructor(int initValue) { storageValue = initValue; } function setValue(int newValue) public { storageValue = newValue + 1; } function getValue() public view returns (int) { return storageValue; } }- 1
- 2
- 3
- 4
- 5
- 6
- 7
- 8
- 9
- 10
- 11
- 12
- 13
- 14
- 15
- 16
- 17
- 18
我们假设这是我们开发的一个错误的合约, 因为我们在设置新的 storageValue 数值时, 多了 +1(这是为了演示的可以为之).
编译
我们先通过使用Hardhat的工具快速编译合约文件
通过编译, 可快速发现和定位合约代码的错误# 编译 ➜ npx hardhat compile Compiled 1 Solidity file successfully # 提示成功编译了1个 solidity文件, 那就是我们写的合约了- 1
- 2
- 3
- 4
合约编译没有问题, 那么接下来我们可以开始部署测试了
修改部署脚本文件
在**/script**目录下有一个sample-script.js文件, 重命名为deploy.js, 并使用下面的代码替换整个脚本内容
const hre = require("hardhat"); async function main() { // 获取 MyContract合约 const MyContract = await hre.ethers.getContractFactory("MyContract"); // 部署, 传入初始化 storageValue 的值 const myContract = await MyContract.deploy(666); // 等待 MyContract合约部署完成 await myContract.deployed(); // 输出 MyContract合约地址 console.log("MyContract deployed to:", myContract.address); } // We recommend this pattern to be able to use async/await everywhere // and properly handle errors. main() .then(() => process.exit(0)) .catch((error) => { console.error(error); process.exit(1); });- 1
- 2
- 3
- 4
- 5
- 6
- 7
- 8
- 9
- 10
- 11
- 12
- 13
- 14
- 15
- 16
- 17
- 18
- 19
- 20
- 21
- 22
- 23
这里我们的部署脚本已经修改完成, 接下来我们在本地启动一个hardhat本地节点, 然后我们在本地节点进行部署和测试
部署与测试
启动本地节点
➜ npx hardhat node Started HTTP and WebSocket JSON-RPC server at http://127.0.0.1:8545/ Accounts ======== WARNING: These accounts, and their private keys, are publicly known. Any funds sent to them on Mainnet or any other live network WILL BE LOST. Account #0: 0xf39Fd6e51aad88Fxxxxxxxxxxxxxxx (10000 ETH) Private Key: 0xac097xxxxxxxxxxxxxxx6b4d238ff944bacb478xxxxxxxxxxxxxxx .......... Account #19: 0x8626f6940E2exxxxxxxxxxxxxxxxxxxx (10000 ETH) Private Key: 0xdf570xxxxxxxxxxxxxxx27dafbffa9fc08a93xxxxxxxxxxxxxxx23656e WARNING: These accounts, and their private keys, are publicly known. Any funds sent to them on Mainnet or any other live network WILL BE LOST. # 这边是本地节点已经启动成功了- 1
- 2
- 3
- 4
- 5
- 6
- 7
- 8
- 9
- 10
- 11
- 12
- 13
- 14
- 15
- 16
- 17
- 18
部署
打开一个新的终端,在localhost网络中部署智能合约
➜ npx hardhat run --network localhost scripts/deploy.js Compiled 1 Solidity file successfully MyContract deployed to: 0x5FbDB2315678afecb367f032d93F642f64180aa3 # 0x5FbDB2315678afecb367f032d93F642f64180aa3 就是我们的MyContract合约地址- 1
- 2
- 3
- 4
接下来, 我们将通过 Hardhat 控制台与本地节点上的MyContract合约交互
本地节点上的合约交互
# 打开控制台 ➜ npx hardhat console --network localhost Welcome to Node.js v16.15.1. Type ".help" for more information. > # 获取MyContract合约 > const MyContract = await ethers.getContractFactory("MyContract") undefined # 获取myContract合约实例 > const myContract = await MyContract.attach("0x5FbDB2315678afecb367f032d93F642f64180aa3") undefined # 调用 getValue 方法 > await myContract.getValue() BigNumber { value: "666" } # 调用 setValue 方法 > await myContract.setValue(111) { hash: '0x70f2e5baf434c3f15eb6618e54ecb7636a19c1d82f632cd27cd62f97c3d4c5fb', type: 2, accessList: [], blockHash: '0xf1b93fcf0a7b7c1ddaaedf74ec42bbb4a6b54f7748ce78fe8632b7c68cbd36ca', blockNumber: 2, transactionIndex: 0, confirmations: 1, from: '0xf39Fd6e51aad88F6F4ce6aB8827279cffFb92266', gasPrice: BigNumber { value: "767027553" }, maxPriorityFeePerGas: BigNumber { value: "0" }, maxFeePerGas: BigNumber { value: "970769246" }, gasLimit: BigNumber { value: "26877" }, to: '0x5FbDB2315678afecb367f032d93F642f64180aa3', value: BigNumber { value: "0" }, nonce: 1, data: '0x5093dc7d000000000000000000000000000000000000000000000000000000000000006f', r: '0x35d5ecb1abf017d44f544e857546c781ce3af0fdc5d9d3b4c1ea7d18fcba34ca', s: '0x43bf5017ca7554071e7ebbacb75fb0e0a4934b49fa87bf3847c0bb38c3c73e06', v: 1, creates: null, chainId: 31337, wait: [Function (anonymous)] } # 再次调用 getValue 方法验证setValue执行结果 > await myContract.getValue() BigNumber { value: "112" }- 1
- 2
- 3
- 4
- 5
- 6
- 7
- 8
- 9
- 10
- 11
- 12
- 13
- 14
- 15
- 16
- 17
- 18
- 19
- 20
- 21
- 22
- 23
- 24
- 25
- 26
- 27
- 28
- 29
- 30
- 31
- 32
- 33
- 34
- 35
- 36
- 37
- 38
- 39
- 40
- 41
- 42
- 43
这里我们演示了通过控制台连接本地节点与合约交互的过程, 并且验证了合约的执行是否成功
问题
前面我们提到,我们想通过 setValue 方法设置新的 storageValue 值,但是我们在合约里的代码多写了一个 +1(虽然是为了演示故意为之)。当我们的合约上线后发现了这个bug,如果我们现在要修改,只能重新部署一个合约,因为我们没有使用可升级合约。
合约一旦上链就不可修改了,这是一定的。
如果每次合约出现问题, 我们都通过重新部署合约来解决的话成本就太高了。- 要对用户公开并替换新的合约地址
- 如果合约内有大量的数据, 我们还需要对数据做 迁移
Next
那么下一章开始, 我将会演示如何对现有合约做可升级版本的修改,并完成部署与测试。
有问题,或者建议请留言,谢谢。
-
相关阅读:
Ribbon负载均衡算法
ssh 登录虚拟机的linux
GBMLlib(GBase支撑数据挖掘和机器学习)简介
解读 --- System.Windows.Forms.Timer是前台线程吗?
Hadoop入门(四):SSH免密登录 配置
Making Anti-Palindromes
SNCP,子网连接保护简介
miniprogram-ci 使用说明
知识图谱应用---智慧医疗
JS的深拷贝和浅拷贝
- 原文地址:https://blog.csdn.net/Lyon_Nee/article/details/125504619
