-
Python tkinter - 第10章 文本控件(Text)方法
10.3 方法
方法 描述 bbox(index) 计算指定字符串的矩形边界。 Index 字符串标识索引
返回值:
一个(x,y,width,height)的四元组。或者None,如果字符串不可见compare(index1, op, index2) 比较两个索引的大小。比较方法是:“<”, “<=”, “==”, “>=”, “>”, or “!=”。
根据比较结果返回True或者False。count(index1, index2, *args) 统计标识index1和index2之间的字符数、行数等信息。args包括:-chars, -displaychars, -displayindices, -displaylines, -indices, -lines, -update, -xpixels, -ypixels debug(boolean=None) 设置文本控件内部B-Tree一致性检查的开关 delete(first, last=None) 删除选中的文本。起始是first,last如果没有定义,则只删除当前字符。 dlineinfo(index) 计算包含有指定字符串的矩形范围。这个方法只有在文本控件刷新时才有效。
返回值:一个五元数组(x,y,width,height,baseline)。
x,y:窗口坐标
width,height:矩形的大小dump(index1, index2=None, command=None, **kw) 输出控件的内容。 edit(*args) 方法edit_modified, edit_redo, edit_reset, edit_separator和 edit_undo的统一入口 edit_modified(arg=None) 文本控件中,内容是否修改的标志。是一个Boolean类型的值 edit_redo() 执行redo edit_reset() 清空undo和redo堆栈中的内容 edit_separator() 在undo堆栈中,添加一个separator(分隔标识) edit_undo() 执行undo get(index1, index2=None) 获取指定的内容。Index1是起始索引,index2是结束索引(不包括index2本身指定的字符)。 image_cget(index, option) 返回index指定图片的属性 image_configure(index, **options) 修改index指定的图片的属性。属性包括:
align:对齐属性
image:图片对象
name:图片的名字
padx:水平内边距
pady:垂直内边距image_create(index, cnf={}, **kw) 在指定的位置插入一个图片。 image_names() 返回文本控件中所有图片的名字。 index(index) 返回index指定的字符串所在的行与列 insert(index, text, *tags) 在index指定的位置插入字符串。 mark_gravity(self, name, direction=None) 设定标识(mark)如何移动当有文本插入时。如果是LEFT,则标识不动。如果是RIGHT,则标识移动到插入文字的最后面。默认是RIGHT。 mark_names() 返回文本控件内的所有标识的名字。放在一个元组中返回。 mark_next(index) 返回index后面的第一个位置标识(mark)的名字 mark_previous(index) 返回index前面的第一个位置标识(mark)的名字 mark_set(name, index) 在index指定的位置,创建一个新的标识。 mark_unset(*name) 从文本控件中删除已经命名的标识。内置的标识INSERT和CURRENT是不能删除的。 search(pattern, index, stopindex=None, forwards=None, backwards=None, exact=None, regexp=None, nocase=None, count=None) 使用正则表达式来搜索字符。 see(index) 保证index指定的位置可见。 tag_add(tagName, index1, *args) 添加标签名字 tag_bind(tagName, sequence, func, add=None) 将特定事件绑定到标签上。 tag_cget(tagName, option) 获得标识tagName的配置选项 tag_config(tagName, cnf={}, **kw)
tag_configure(tagName, cnf={}, **kw)对用tagName标识的字符串进行设置 tag_delete(*tagNames) 删除一个标签 tag_lower(tagName, belowThis=None) 向下调整tag的优先级 tag_names(index=None) 返回所有的tag名字 tag_nextrange(tagName, index1, index2=None) 搜索tagName是否在index1和index2定义的区域内 tag_prevrange(tagName, index1, index2=None) 反向搜索tagName是否在index1和index2定义的区域内 tag_raise(tagName, aboveThis=None) 向上调整tag的优先级 tag_ranges(tagName) 返回tagName代表的所有区间 tag_remove(tagName, index1, index2=None) 从tagName中移除在区间[index1,index2]之间的字符。
注意:不是从文本控件中删除字符。tag_unbind(tagName, sequence, funcid=None) 解除与tagName有关的事件绑定 window_cget(index, option) 返回在index处的窗口的配置参数 window_config(index, **options) 配置index处的子控件属性。支持的属性有:
align
create
padx
pady
stretch
windowwindow_configure(index, cnf=None, **kw) 同上 window_create(index, **options) 在指定位置创建一个窗口 window_names() 返回所有的子控件的名字 xview(*what) 水平滚动文本控件内容 xview_moveto(fraction) 水平滚动文本控件内容 xview_scroll(number, what) 水平滚动文本控件内容 yview(*what) 垂直滚动文本控件内容 yview_moveto(fraction) 垂直滚动文本控件内容 yview_pickplace(*what) 垂直滚动文本控件内容 yview_scroll(number, what) 垂直滚动文本控件内容 文本控件的方法很多,主要是各种选择、设置、标识等等。下面逐个介绍这些方法。
10.3.1 bbox(index)
给出能够框住index代表的文字的4元组(x,y,width,height)。x,y是左上角的坐标点,而width和height分别是宽度和高度。有了这些信息就可以判断诸如鼠标指针是否位于该index代表的文字范围内。import tkinter as tk root=tk.Tk() root.geometry('300x240') b1=tk.Text(root,width=20,height=5) b1.pack() b3=tk.Label(root,text='bbox:') def bbox(): b3['text']="bbox:"+str(b1.bbox('2.4')) b2=tk.Button(root,text='bbox',command=bbox) b2.pack() b3.pack() root.mainloop()- 1
- 2
- 3
- 4
- 5
- 6
- 7
- 8
- 9
- 10
- 11
- 12
- 13
结果:

10.3.2 compare(index1, op, index2)
比较用index1和index2索引的大小,也就是位置的大小。注意此处比较的不是index1和index2代表的字符,而是索引本身。最常用的是比较一个’行.列’ 与tk.INSERT等的大小。可以判断出彼此的位置。代码如下:
text.compare(‘2.0’,‘<’,tk.INSERT)*10.3.3 count(index1, index2, args)
count方法是新增的。主要的功能是统计在标识index1与index2之间的有关数据。统计什么数据是由*args参数来决定的。包括:
(1)chars: 统计字符数。主要如果跨行,换行符也统计在内。
(2)displaychars:显示的字符数
(3)displayindices:显示的索引数
(4)displaylines:显示的行数,在有折行的情况下,会比lines增多。因为折行也被计算为行数。
(5)indices:索引数
(6)lines:行数(从0开始计数)
(7)xpixels: 水平方向上index1和index2之间的像素差
(8)ypixels:垂直方向上index1和index2之间的像素差
(9)update:更新。避免出现统计误差。import tkinter as tk root=tk.Tk() root.geometry('300x240') b1=tk.Text(root,width=20,height=5) b1.pack() b3=tk.Entry(root) b4=tk.Label(root,text='结果:') def count(): b1.count('1.1','2.5','update') b4['text']='结果:'+str\ (b1.count('1.1','2.5',b3.get())) b2=tk.Button(root,text='Count',command=count) b2.pack() b3.pack() b4.pack() root.mainloop()- 1
- 2
- 3
- 4
- 5
- 6
- 7
- 8
- 9
- 10
- 11
- 12
- 13
- 14
- 15
- 16
- 17
- 18
结果:

10.3.4 debug
设置debug开关。10.3.5 delete(first,last=NONE)
删除从first开始的到last之前的所有字符,last代表的字符并不删除。如果last没有指定,则只删除first代表的一个字符。import tkinter as tk root=tk.Tk() root.geometry('300x240') b1=tk.Text(root,width=20,height=5) b1.pack() def delete(): b1.delete('1.1','2.3') b2=tk.Button(root,text='Delete',command=delete) b2.pack() root.mainloop()- 1
- 2
- 3
- 4
- 5
- 6
- 7
- 8
- 9
- 10
- 11
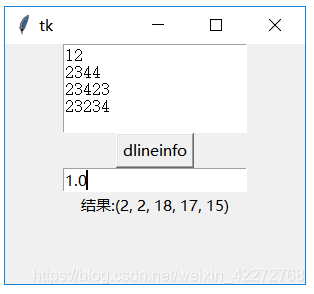
10.3.6 dlineinfo(index)
返回由index指定的字符所在的行的信息,结果是一个5元组:x:水平方向坐标,一般是2,因为文本与边框的距离默认值是2。
y:垂直方向坐标,一般是行数*(字符高度+行间距)+2(文本与边框的默认距离)
width:字符宽度*每一行的字符总数
height: 字符高度+行间距
baseline: 与字符大小有关的一个结果import tkinter as tk root=tk.Tk() root.geometry('300x240') #font=('Courier New',10,) b1=tk.Text(root,width=20,height=5,) b1.pack() b3=tk.Entry(root) b4=tk.Label(root,text='结果:') def dlineinfo(): b4['text']='结果:'+str\ (b1.dlineinfo(b3.get())) b2=tk.Button(root,text='dlineinfo', command=dlineinfo) b2.pack() b3.pack() b4.pack() root.mainloop()- 1
- 2
- 3
- 4
- 5
- 6
- 7
- 8
- 9
- 10
- 11
- 12
- 13
- 14
- 15
- 16
- 17
- 18
结果:

**10.3.7 dump(index1, index2=None, command=None, kw)返回标识index1和index2之间的内容。输入的参数为:
index1:起始标识
index2:结束标识。如果没有该参数,则只返回index1代表的字符信息。
command:用自定义函数处理返回的结果。在这种情况下,dump的返回结果是None。
**kw:定义返回何种类型的内容。可以选择的参数有:
all,image,mark,tag,text,window返回的参数是一个三元组,包括(key,value,index)。
import tkinter as tk root=tk.Tk() root.geometry('300x240') b1=tk.Text(root,width=20,height=5,) b1.pack() b4=tk.Label(root,text='结果:') def abc(*args): print(args) def dump(): b4['text']='结果:'+str(b1.dump('1.0','4.0')) b2=tk.Button(root,text='Dump',command=dump) b2.pack() b4.pack() root.mainloop()- 1
- 2
- 3
- 4
- 5
- 6
- 7
- 8
- 9
- 10
- 11
- 12
- 13
- 14
- 15
- 16

说明:返回的结果是一个三元组
key:是结果的类型,具体说明键输入类型部分
value:是文本控件中的内容
index:是索引。如果有多个结果,就用起始的字符的索引。
如果有command参数,则dump返回None。处理在command参数指定的函数中进行。指定的函数需要定义参数*args,或者用三个参数:key,value,index。*10.3.8 edit(args)
edit是一个新增的方法,主要就是把下面跟编辑有关的一些方法可以统一设置。*args 支持的参数有:
(1) canundo
(2) canredo,
(3) modified
“modified”选项对应edit_modified方法。用法如下:
Text.edit(‘modified’): 返回是否修改的标志值
Text.edit(‘modified’,True): 设置是否修改的标志值为True
Text.edit(‘modified’,False):设置是否修改的标志值为False(4) redo
(5) reset
(6) separator
(7) undo与此方法有关的方法有:edit_modified, edit_redo, edit_reset, edit_separator, edit_undo
10.3.9 edit_modified(arg=None)
设置或者获得文本控件中的内容是否改变的标志(Boolean类型)。如果arg没有设置,那么该方法返回标志的状态。如果arg有值,则改变标志的状态。
插入、删除、Undo、Redo都可能引起该标志的变化。import tkinter as tk root=tk.Tk() root.geometry('300x240') b1=tk.Text(root,width=20,height=5,) b1.pack() def edit_modified(): print(b1.edit_modified()) b2=tk.Button(root,text='edit_modified',command=edit_modified) b2.pack() root.mainloop()- 1
- 2
- 3
- 4
- 5
- 6
- 7
- 8
- 9
- 10
10.3.10 edit_redo()
执行redo操作。前提是undo=True以及redo堆栈不为空。10.3.11 edit_reset()
清空undo以及redo的堆栈内容。需要undo=True,否则该方法没有任何动作。10.3.12 edit_separator()
在undo堆栈中,插入一个separator标志。需要undo=True,否则该方法没有任何动作。10.3.13 edit_undo()
执行undo操作。前提是undo=True以及undo堆栈不为空10.3.14 get(index1, index2=None)
获取index1与index2(不包含)之间的内容。如果没有输入index2,只返回index1指定的字符。import tkinter as tk root=tk.Tk() root.geometry('300x240') b1=tk.Text(root,width=20,height=5,) b1.pack() b4=tk.Label(root,text='结果:') def get(): b4['text']='结果:'+str(b1.get('1.0','4.0')) b2=tk.Button(root,text='Get',command=get) b2.pack() b4.pack() root.mainloop()- 1
- 2
- 3
- 4
- 5
- 6
- 7
- 8
- 9
- 10
- 11
- 12
- 13
结果:

10.3.15 image_cget(self, index, option)
返回index指定的图片的选项。option支持的选项有:
align: 对齐方式
image: 图片内容
name: 图片的名字。可以自定义。
padx: 水平方向内边距
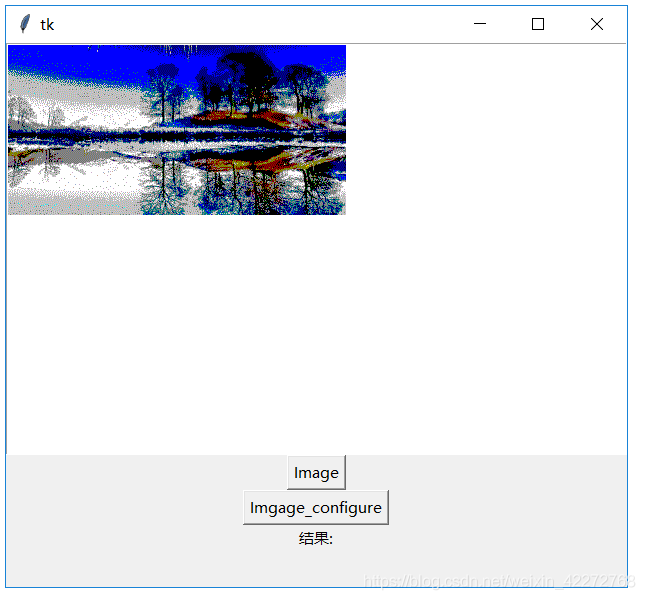
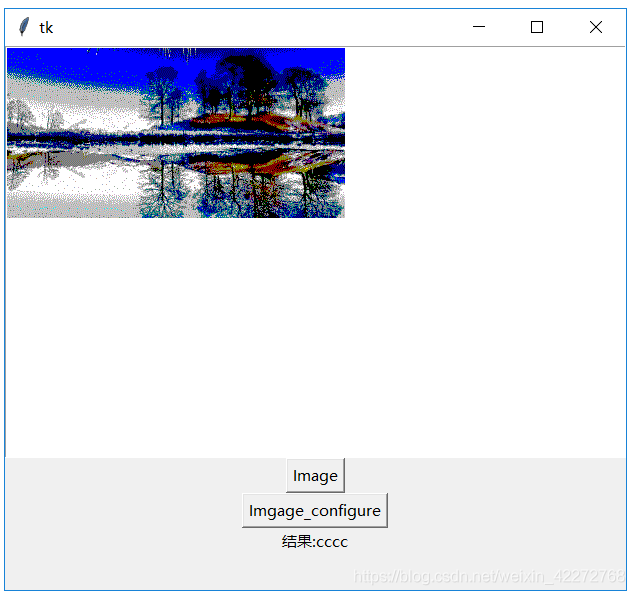
pady:垂直方向内边距**10.3.16 image_configure( index, cnf=None, kw)
配置index指定的图片。可配置的选项见10.3.15。import tkinter as tk root=tk.Tk() root.geometry('300x240') b1=tk.Text(root,) b1.pack() b4=tk.Label(root,text='结果:') p=tk.PhotoImage(file="ab.gif") def image(): b1.image_create(tk.END,image=p,name='helloabc') def config(): b1.image_configure('1.0',name='cccc') b4['text']='结果:'+str(b1.image_cget('1.0','name')) b2=tk.Button(root,text='Image',command=image) b5=tk.Button(root,text='Imgage_configure',command=config) b2.pack() b5.pack() b4.pack() root.mainloop()- 1
- 2
- 3
- 4
- 5
- 6
- 7
- 8
- 9
- 10
- 11
- 12
- 13
- 14
- 15
- 16
- 17
- 18
结果:
**10.3.17 image_create(self, index, cnf={}, kw)在index指定的地方创建一个图片。
import tkinter as tk root=tk.Tk() root.geometry('300x240') b1=tk.Text(root,) b1.pack() p=tk.PhotoImage(file="a.gif") def image(): b1.image_create(tk.END,image=p) b2=tk.Button(root,text='Image',command=image) b2.pack() root.mainloop()- 1
- 2
- 3
- 4
- 5
- 6
- 7
- 8
- 9
- 10
- 11
- 12
结果:

10.3.18 image_names()
返回文本控件所有图像的名字。import tkinter as tk root=tk.Tk() root.geometry('300x240') b1=tk.Text(root,height=15,width=35) b1.pack() b4=tk.Label(root,text='结果:') p=tk.PhotoImage(file="ab.gif") p2 = tk.PhotoImage(file="b.gif") def image(): b1.image_create('1.0',image=p,name='helloabc') b1.image_create('2.0',image=p2,name='image2') def names(): b4['text']='结果:'+str(b1.image_names()) b2=tk.Button(root,text='Image',command=image) b5=tk.Button(root,text='Imgage_names',command=names) b2.pack() b5.pack() b4.pack() root.mainloop()- 1
- 2
- 3
- 4
- 5
- 6
- 7
- 8
- 9
- 10
- 11
- 12
- 13
- 14
- 15
- 16
- 17
- 18
- 19
- 20
- 21
结果:


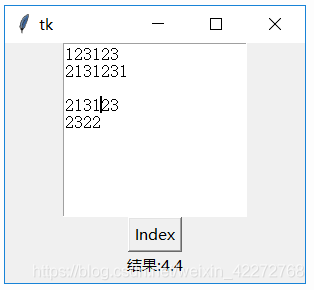
10.3.19 index(index)
返回以’行.列’形式的索引。比如把’tk.INSERT’,就是插入光标的位置索引转换为’行.列’的形式。import tkinter as tk root=tk.Tk() root.geometry('300x240') b1=tk.Text(root,height=10,width=20) b1.pack() b4=tk.Label(root,text='结果:') def index(): b4['text']='结果:'+str(b1.index(tk.INSERT)) b2=tk.Button(root,text='Index',command=index) b2.pack() b4.pack() root.mainloop()- 1
- 2
- 3
- 4
- 5
- 6
- 7
- 8
- 9
- 10
- 11
- 12
- 13
结果:
*10.3.20 insert(index, chars, args)
在index指定的位置插入字符串。可以通过*args设置插入字符串的tag。import tkinter as tk root=tk.Tk() root.geometry('300x240') b1=tk.Text(root,height=10,width=20) b1.pack() def insert(): b1.insert('2.3','test insert') b2=tk.Button(root,text='Insert',command=insert) b2.pack() root.mainloop()- 1
- 2
- 3
- 4
- 5
- 6
- 7
- 8
- 9
- 10
- 11
结果:


10.3.21 mark_gravity(markName, direction=None)
在markName指定的位置插入字符的时候,设置markName的位置是否变化。默认的方向是tk.RIGHT,markName的位置会始终在新插入字符的右侧,也就是会不断的变化。比如markName的位置在最开始是1.2,如果我们插入3个字符,那么mark Name的位置就是1.5。
如何保持markName的位置不变?设定方向为tk.LEFT就是可以了。这个时候markName的位置始终保持在设定的位置。所谓的不变化,指的是在markName指定的位置插入字符的时候。如果是在markName指定位置的前面,比如1.1的位置插入字符,markName的位置也会变化。import tkinter as tk root=tk.Tk() root.geometry('300x240') b1=tk.Text(root,height=10,width=20) b1.pack() for i in range(1,5): b1.insert('1.0',str(i)) b1.mark_set('mark1','1.2') b3=tk.Entry(root) def mark_gravity(): b1.mark_gravity('mark1',tk.LEFT) print(b1.mark_gravity('mark1')) print(b1.index('mark1')) b2=tk.Button(root,text='Mark_gracity',command=mark_gravity) b2.pack() b3.pack() root.mainloop()- 1
- 2
- 3
- 4
- 5
- 6
- 7
- 8
- 9
- 10
- 11
- 12
- 13
- 14
- 15
- 16
- 17
- 18
10.3.22 mark_names()
返回所有的位置标识(mark)的名称,包括tk.INSERT,tk.CURRENT和’tk::anchor1’。一般情况下,’tk::anchor1’指向最后一行的最后一个字符之后的位置,也就是最后一行的行尾。
10.3.23 mark_set(markName, index)
在index指定的位置之前设定一个位置标识(mark),用markName来标识。该位置标识(mark)的gravity默认值是tk.RIGHT。
可以在同一个index处设置不同名字的位置标识(mark)。如果在不同的index处设置同样名字的位置标识(mark),只会记录最新的index。import tkinter as tk root=tk.Tk() root.geometry('300x240') b1=tk.Text(root,height=10,width=20) b1.pack() b3=tk.Entry(root) b4=tk.Entry(root) def mark_set(): b1.mark_set(b3.get(),b4.get()) print(b1.mark_names()) print(b1.index('mark1')) b2=tk.Button(root,text='Mark_set',command=mark_set) b2.pack() b3.pack() b4.pack() root.mainloop()- 1
- 2
- 3
- 4
- 5
- 6
- 7
- 8
- 9
- 10
- 11
- 12
- 13
- 14
- 15
- 16
- 17
10.3.24 mark_next(index)
返回index后面的第一个位置标识(mark)的名字import tkinter as tk root=tk.Tk() root.geometry('300x240') b1=tk.Text(root,height=10,width=20) b1.pack() for i in range(1,11): b1.insert('1.0',str(i)) b1.mark_set('mark1','1.2') b1.mark_set('mark2','1.4') b1.mark_set('mark3','1.8') def mark_next(): n=b1.mark_next('mark2') print(n,b1.index(n)) print(b1.mark_names()) b2=tk.Button(root,text='Mark_next',command=mark_next) b2.pack() root.mainloop()- 1
- 2
- 3
- 4
- 5
- 6
- 7
- 8
- 9
- 10
- 11
- 12
- 13
- 14
- 15
- 16
- 17
- 18
- 19
10.3.25 mark_previous( index)
返回index前面的第一个位置标识(mark)的名字import tkinter as tk root=tk.Tk() root.geometry('300x240') b1=tk.Text(root,height=10,width=20) b1.pack() for i in range(1,11): b1.insert('1.0',str(i)) b1.mark_set('mark1','1.2') b1.mark_set('mark2','1.4') b1.mark_set('mark3','1.8') def mark_prev(): n=b1.mark_previous('mark2') print(n,b1.index(n)) print(b1.mark_names()) b2=tk.Button(root,text='Mark_prev',command=mark_prev) b2.pack() root.mainloop()- 1
- 2
- 3
- 4
- 5
- 6
- 7
- 8
- 9
- 10
- 11
- 12
- 13
- 14
- 15
- 16
- 17
- 18
- 19
- 20
*10.3.26 mark_unset( markNames)
删除markName指定的位置标识(mark)的名字。可以一次删除多个位置标识(mark),比如’mark1’,’mark2’等。import tkinter as tk root=tk.Tk() root.geometry('300x240') b1=tk.Text(root,height=10,width=20) b1.pack() for i in range(1,11): b1.insert('1.0',str(i)) b1.mark_set('mark1','1.2') b1.mark_set('mark2','1.4') b1.mark_set('mark3','1.8') print(b1.mark_names()) def mark_unset(): b1.mark_unset('mark1','mark2') print(b1.mark_names()) b2=tk.Button(root,text='Mark_unset',command=mark_unset) b2.pack() root.mainloop()- 1
- 2
- 3
- 4
- 5
- 6
- 7
- 8
- 9
- 10
- 11
- 12
- 13
- 14
- 15
- 16
- 17
- 18
- 19
*10.3.27 replace(index1, index2, chars, args)
将index1与index2之间的字符替换为chars代表的字符。*args可以用来定义标识(tag)。import tkinter as tk root=tk.Tk() root.geometry('300x240') b1=tk.Text(root,height=10,width=20) b1.pack() for i in range(1,11): b1.insert('1.0',str(i)) b1.mark_set('mark1','1.2') b1.mark_set('mark2','1.4') b1.mark_set('mark3','1.8') def replace(): b1.replace('1.2','1.5','replace') b2=tk.Button(root,text='Replace',command=replace) b2.pack() root.mainloop()- 1
- 2
- 3
- 4
- 5
- 6
- 7
- 8
- 9
- 10
- 11
- 12
- 13
- 14
- 15
- 16
结果:

10.3.28 search( )
此方法的详细定义为search(pattern, index, stopindex=None,
forwards=None, backwards=None, exact=None,
regexp=None, nocase=None, count=None, elide=None)查找字符串。这个方法比较复杂,参数比较多。下面一一介绍:
(1)pattern
定义要查找的内容。可以是字符串或者正则表达式。
(2)index
起始位置
(3)stopindex
结束位置。如果没有定义结束位置,会一直查找到末尾。如果stopindex的位置比index还要靠前,则返回空字符串。
(4)forwards
向前查找。(True 或者False)
(5)backwards
反向查找。(True 或者False)
(6)exact
是否精确匹配。(True 或者False)
(7)regexp
是否为正则表达式。(True 或者False)。
(8)nocase
是否区分大小写。默认是False,区分大小写。(True 或者False)
(9)count
匹配字符串的长度。需要设置IntVar变量来获取。这个选项对正则表达式的情况很有用。可以知道匹配正则的长度。如果没有使用正则,则返回的就是要寻找的字符串的长度。
(10)elideimport tkinter as tk root=tk.Tk() root.geometry('300x240') b1=tk.Text(root,height=10,width=20) b1.pack() def search(): a=tk.IntVar() s=b1.search('1*','1.0',count=a,regexp=True) print(s,a.get()) b2=tk.Button(root,text='Search',command=search) b2.pack() root.mainloop()- 1
- 2
- 3
- 4
- 5
- 6
- 7
- 8
- 9
- 10
- 11
- 12
- 13
- 14
- 15
10.3.29 see(index)
让index指定的字符在文本控件中可见。这个对于有很多文字内容的情况非常有用,可以让想看见的字符串立即可见,而不是使用滚动的方法。import tkinter as tk root=tk.Tk() root.geometry('300x240') b1=tk.Text(root,height=10,width=20) b1.pack() for i in range(1,20000): b1.insert(str(i)+".0",str(i)+"\n") def see(): b1.see('10000.0') b2=tk.Button(root,text='See',command=see) b2.pack() root.mainloop()- 1
- 2
- 3
- 4
- 5
- 6
- 7
- 8
- 9
- 10
- 11
- 12
- 13
- 14
*10.3.30 tag_add(tagName, index1, args)
增加一个tag标识。字符串起始位置是index1,结束位置在*args中定义。如果只有index1,则增加的tag只代表一个字符。10.3.31 tag_bind( tagName, sequence, func, add=None)
对tagName定义的文字区域绑定event。Event包括键盘输入、鼠标输入等。当有相应的输入的时候,定义的回调函数就会被触发。
(1)新建绑定事件
需要输入三个参数:tagName,sequence(需要绑定的事件),func(回调函数)。tagName在这种情况下
(2)添加绑定事件
前面三个参数与(1)的相同。需要第四个参数:add=’+’。也就是说,同一个tag和同一个sequence,可以绑定多个回调函数。
(3)判断某个绑定事件是否存在
需要输入2个参数:tagName和sequence以及None。会返回指定tagName的sequence事件是否已经绑定。如果已经绑定,会返回相应回调函数。
(4)返回所有的绑定事件
只输入tagName以及None和None,就会会返回与此tagName有关的所有绑定事件。返回值是一个列表,包括所有的绑定的事件。不过绑定函数并没有返回。要知道确切的绑定事件,还需要再调用方法上面(3)的方法。#新绑定鼠标事件 import tkinter as tk root=tk.Tk() root.geometry('300x240') b1=tk.Text(root,height=10,width=20) b1.pack() def tag_mouse(*args): print('mouse click',*args) def bind(): b1.tag_add('mouse1','1.0','1.5') b1.tag_bind('mouse1','<Button-1>',tag_mouse) b2=tk.Button(root,text='Tag_bind',command=bind) b2.pack() root.mainloop()- 1
- 2
- 3
- 4
- 5
- 6
- 7
- 8
- 9
- 10
- 11
- 12
- 13
- 14
- 15
- 16
说明:点击’Tag_bind’按钮后,会绑定鼠标左键,当在第一行的1~4个字符上按下鼠标左键,就会调用tag_mouse函数。
#添加绑定事件,判断某个事件是否存在以及返回所有绑定事件 #新绑定鼠标事件 import tkinter as tk root=tk.Tk() root.geometry('300x240') b1=tk.Text(root,height=10,width=20) b1.pack() def tag_mouse(*args): print('mouse click',*args) def ctrl(*args): print('Control_Left',*args) def add(): b1.tag_bind('mouse1','<Control_L>',ctrl) def bind(): b1.tag_add('mouse1','1.0','1.5') b1.tag_bind('mouse1','<Button-1>',tag_mouse) def list_events(): print(b1.tag_bind('mouse1',None,None)) def list_func(): print(b1.tag_bind('mouse1','<Button-1>',None)) print(b1.tag_bind('mouse1','<Control_L>',None)) b2=tk.Button(root,text='Tag_bind',command=bind) b2.pack() b3=tk.Button(root,text='Add_Event',command=add) b3.pack() b4=tk.Button(root,text='List_Events',command=list_events) b4.pack() b5=tk.Button(root,text='Liset_Func',command=list_func) b5.pack() root.mainloop()- 1
- 2
- 3
- 4
- 5
- 6
- 7
- 8
- 9
- 10
- 11
- 12
- 13
- 14
- 15
- 16
- 17
- 18
- 19
- 20
- 21
- 22
- 23
- 24
- 25
- 26
- 27
- 28
- 29
- 30
- 31
- 32
- 33
- 34
- 35
10.3.32 tag_unbind(tagName, sequence, funcid=None)
解除相关绑定。如果只输入tagName和sequence,则解除所有的与sequence有关的绑定函数。如果输入相应的funcid,可以只解除一个回调函数,其他的回调函数不受影响。
10.3.33 tag_cget(tagName, option)
获得标识tagName的配置选项。import tkinter as tk root=tk.Tk() root.geometry('300x240') b1=tk.Text(root,height=10,width=20) b1.pack() def tag(): b1.tag_add('second','2.1','2.2') b1.tag_configure('second',relief=tk.GROOVE) print(b1.tag_cget('second','relief')) b2=tk.Button(root,text='Tag',command=tag) b2.pack() root.mainloop()- 1
- 2
- 3
- 4
- 5
- 6
- 7
- 8
- 9
- 10
- 11
- 12
- 13
- 14
- 15
**10.3.34 tag_configure(tagName, cnf=None, kw)
对用tagName标识的字符串进行设置,支持的选项有:tag配置 描述 background 标识字符串背景颜色。不能使用缩写bg。 bgstipple 设置背景色的底纹。比如’gray75’,‘gray50’, ‘gray25’, 'gray12’等 borderwidth 围绕字符串的边框。默认是0。没有效果 fgstipple v 设置文字颜色的底纹。见bgstipple font 设置文本字体 foreground 文本的颜色。 justify 对齐方式。可以是tk.LEFT,tk.RIGHT,或者tk.CENTER lmargin1 第一行文字的缩进 lmargin2 如果有折行,其他行的缩进。如果不是tag标识的,就不起作用了。 offset 上下角标。就是文字向上或者向下的距离。 overstrike 在文字上画一道横线 relief 文本的3D背景效果。无效果 rmargin 右侧的空白 spacing1 见10.1节 spacing2 见10.1节 spacing3 见10.1节 tabs 见10.1节 underline 下划线 wrap 见10.1节 import tkinter as tk root=tk.Tk() root.geometry('300x240') b1=tk.Text(root,height=10,width=20) b1.pack() def tag(): b1.tag_add('second','2.0','2.10') b1.tag_configure('second',background='red') b2=tk.Button(root,text='Tag',command=tag) b2.pack() root.mainloop()- 1
- 2
- 3
- 4
- 5
- 6
- 7
- 8
- 9
- 10
- 11
- 12
- 13
结果:

#底纹代码 import tkinter as tk root=tk.Tk() root.geometry('300x240') b1=tk.Text(root,height=10,width=20) b1.pack() def tag(): b1.tag_add('second','2.0','2.10') b1.tag_configure('second',background='red',bgstipple='gray12') b2=tk.Button(root,text='Tag',command=tag) b2.pack() root.mainloop()- 1
- 2
- 3
- 4
- 5
- 6
- 7
- 8
- 9
- 10
- 11
- 12
- 13
#Font代码: import tkinter as tk root=tk.Tk() root.geometry('300x240') b1=tk.Text(root,height=10,width=20) b1.pack() def tag(): b1.tag_add('second','2.0','2.1') b1.tag_configure('second',font=('宋体',20,'bold')) b2=tk.Button(root,text='Tag',command=tag) b2.pack() root.mainloop()- 1
- 2
- 3
- 4
- 5
- 6
- 7
- 8
- 9
- 10
- 11
- 12
- 13
- 14
*10.3.35 tag_delete(tagNames)
删除相应的tag。tagName指定的所有tag都会被删除。
比如:
tag_delete(‘tag1’,’tag2’,’tag3’)会删除tag1,tag2和tag3标识。10.3.36 tag_lower(tagName, belowThis=None)
改变tag的优先级。实际上是改变tag在tag堆栈中的位置。如果输入了belowThis参数,那么会把tagName移动到belowThis代表的tag之下。如果没有belowThis参数,tagName会移动到tag堆栈的最底部。10.3.37 tag_names(index=None)
返回所有tag的名字。如果index不是None,则只返回index包含的tag名字。10.3.38 tag_nextrange(tagName, index1, index2=None)
搜索tagName是否在index1和index2定义的区域内。如果没有定义index2,则表示到文本控件的结尾。
如果tagName在该区域内,则返回tagName表示的[‘首字符’,’尾字符’]。如果tagName不在指定的区域,则返回空字符串。
只要有部分tagName代表的字符落在[index1,index2]的区域内,就满足搜索条件,返回tagName代表的首字符和尾字符。import tkinter as tk root=tk.Tk() root.geometry('300x240') b1=tk.Text(root,height=10,width=20) b1.pack() def tag(): b1.tag_add('second','2.2','2.5') print(b1.tag_nextrange('second','2.0','2.3')) b2=tk.Button(root,text='Tag',command=tag) b2.pack() root.mainloop()- 1
- 2
- 3
- 4
- 5
- 6
- 7
- 8
- 9
- 10
- 11
- 12
- 13
- 14
10.3.39 tag_prevrange(tagName, index1, index2=None)
与tag_nextrange()非常类似。不过是反向搜索,也就是说是向前查找的。搜索的起始位置是index1前面的字符,然后到index2的位置截至。如果没有定义index2,会一直查找到文本控件的开始的地方。
需要注意的是,由于匹配还是从tagName代表的字符串的起始位置,所以index2的位置一定要小于或者等于tagName的起始位置,否则返回的是空字符串,哪怕tagName代表的字符串有部分位于[index2,index1]定义的区间。比如,tagName代表的是[‘2.2’,’2.5’],那么index2一定要小于或者等于’2.2’。加入index2的值是’2.3’,返回就是空字符串。可以推测该方法的实现,是用tagName的起始位置和index2去比较,如果起始位置小于index2,就认为字符串不会被包含在[index2,index1]的区间内。import tkinter as tk root=tk.Tk() root.geometry('300x240') b1=tk.Text(root,height=10,width=20) b1.pack() def tag(): b1.tag_add('second','2.2','2.5') print(b1.tag_prevrange('second','2.4','2.3')) b2=tk.Button(root,text='Tag',command=tag) b2.pack() root.mainloop()- 1
- 2
- 3
- 4
- 5
- 6
- 7
- 8
- 9
- 10
- 11
- 12
- 13
10.3.40 tag_raise(tagName, aboveThis=None)
此方法与tag_lower()是相反,是提高tagName的优先级。也就是说,会把tagName移动到aboveThis的上面。如果没有定义aboveThis,就把tagName移动到堆栈的最顶部。
10.3.41 tag_ranges(tagName)
返回tagName代表的所有区间(range)。比如下面的例子:import tkinter as tk root=tk.Tk() root.geometry('300x240') b1=tk.Text(root,height=10,width=20) b1.pack() def tag(): b1.tag_add('second','2.2','2.5') b1.tag_add('second','3.2','3.3') print(b1.tag_ranges('second')) b2=tk.Button(root,text='Tag',command=tag) b2.pack() root.mainloop()- 1
- 2
- 3
- 4
- 5
- 6
- 7
- 8
- 9
- 10
- 11
- 12
- 13
说明:
返回值为:(<textindex object: ‘2.2’>, <textindex object: ‘2.5’>, <textindex object: ‘3.2’>, <textindex object: ‘3.3’>)10.3.42 tag_remove( tagName, index1, index2=None)
从tagName中移除在区间[index1,index2]之间的字符。如果没有定义index2,则只移除index1代表的单个字符。如果[index1,index2]是在tagName的中间,则会分割tagName代表的字符串为2个。
比如,tagName的起始区间是[‘2.2’,’2.8’],如果index1和index2分别是’2.3’和’2.5’,调用tag_remove之后,tagName的区间变为[‘2.2’,’2.3’]以及[‘2.5’,’2.8’]。也就是tagName代表的区间一分为二。
这里的移除字符,不是从文本控件中删除字符,而是从tagName代表的区间中去掉字符。
**10.3.43 window_create(index, cnf={}, kw)
创建窗口的用处是在文本控件中指定的位置创建嵌入式对象。比如,创建一个标签(Label)、输入框(Entry)等等。
创建嵌入式对象的方法有两种:
(1)先创建文本对象的子控件,但是不要使用pack或者grid让该子控件显示。而是作为一个参数,传递给window_create方法。比如下面代码中的:
b3=tk.Label(b1,text=‘abc’)
b1.window_create(‘1.2’,window=b3)(2)第二种方法是通过-create参数传递一个回调函数。在回调函数中创建文本控件的子控件。
其他的参数还包括:padx,pady,align,stretch
import tkinter as tk root=tk.Tk() root.geometry('300x240') b1=tk.Text(root,height=10,width=20) b1.pack() b3=tk.Label(b1,text='abc') for i in range(1,11): b1.insert('1.0',str(i)) def win(): b1.window_create('1.2',window=b3) print(b1.window_names()) b2=tk.Button(root,text='Window Create',command=win) b2.pack() root.mainloop()- 1
- 2
- 3
- 4
- 5
- 6
- 7
- 8
- 9
- 10
- 11
- 12
- 13
- 14
- 15
**10.3.44 window_configure(index, cnf=None, kw)
修改在index处创建的window配置。具体参数见10.3.43节。
10.3.45 window_cget(index, option)
返回在index处的窗口的配置参数。
10.3.46 window_names()
返回所有的创建窗口的名字。
10.3.47 xview(tk.MOVETO, fraction)
水平滚动文本控件内容,与水平滚动条的回调函数配合使用。见10.1.25节
fraction的值位于(0.0~1.0)之间。0.0表示最左边,1.0表示最右边。
10.3.48 xview(tk.SCROLL, n, what)
另外一种水平滚动文本控件内容方式。参数说明:
(1)What
定义移动的方式。可以是tk.UNITS或者tk.PAGES
(2)n
n取值表示移动多少个单位。正数表示向右移动,负数表示向左移动
10.3.49 .xview_moveto(fraction)
与xview(tk.MOVETO, fraction)作用一样
10.3.50 xview_scroll(n, what)
与xview(tk.SCROLL, n, what)的作用一样
10.3.51 yview(tk.MOVETO, fraction)
垂直滚动文本控件内容。使用方法与xview(tk.MOVETO, fraction)类似10.3.52 yview(tk.SCROLL, n, what)
与xview(tk.SCROLL, n, what)类似,不过是垂直滚动。并且what的取值只能是tk.UNITS,单位是行。10.3.53 yview_moveto(fraction)
与yview(tk.MOVETO, fraction)作用一样10.3.54 yview_scroll(n, what)
与yview(tk.SCROLL, n, what)的作用一样 -
相关阅读:
3.2-分类-Logistic回归
C#,入门教程——关于函数参数ref的一点知识与源程序
VSCode创建VUE前端项目
EasyV数字孪生流域|宁波智慧水利整体智治综合应用
jenkins安装
Java版企业电子招标采购系统源码Spring Cloud + Spring Boot +二次开发+ MybatisPlus + Redis
Rust 流程控制和循环控制
mac电脑识别不出来u盘?mac识别不了u盘怎么办
SVG: 可伸缩的矢量图形
今天你考ACP了没?备考指南即将上线!
- 原文地址:https://blog.csdn.net/weixin_42272768/article/details/100744524
