-
Docker入门

Docker 简介
Docker主要目标是Build,也就是通过对应组件的封装,分发,部署,运行等生命周期的管理,是web应用或者数据库等等,集运行环境能够做到一次封装,到处运行;
Docker的运行逻辑:
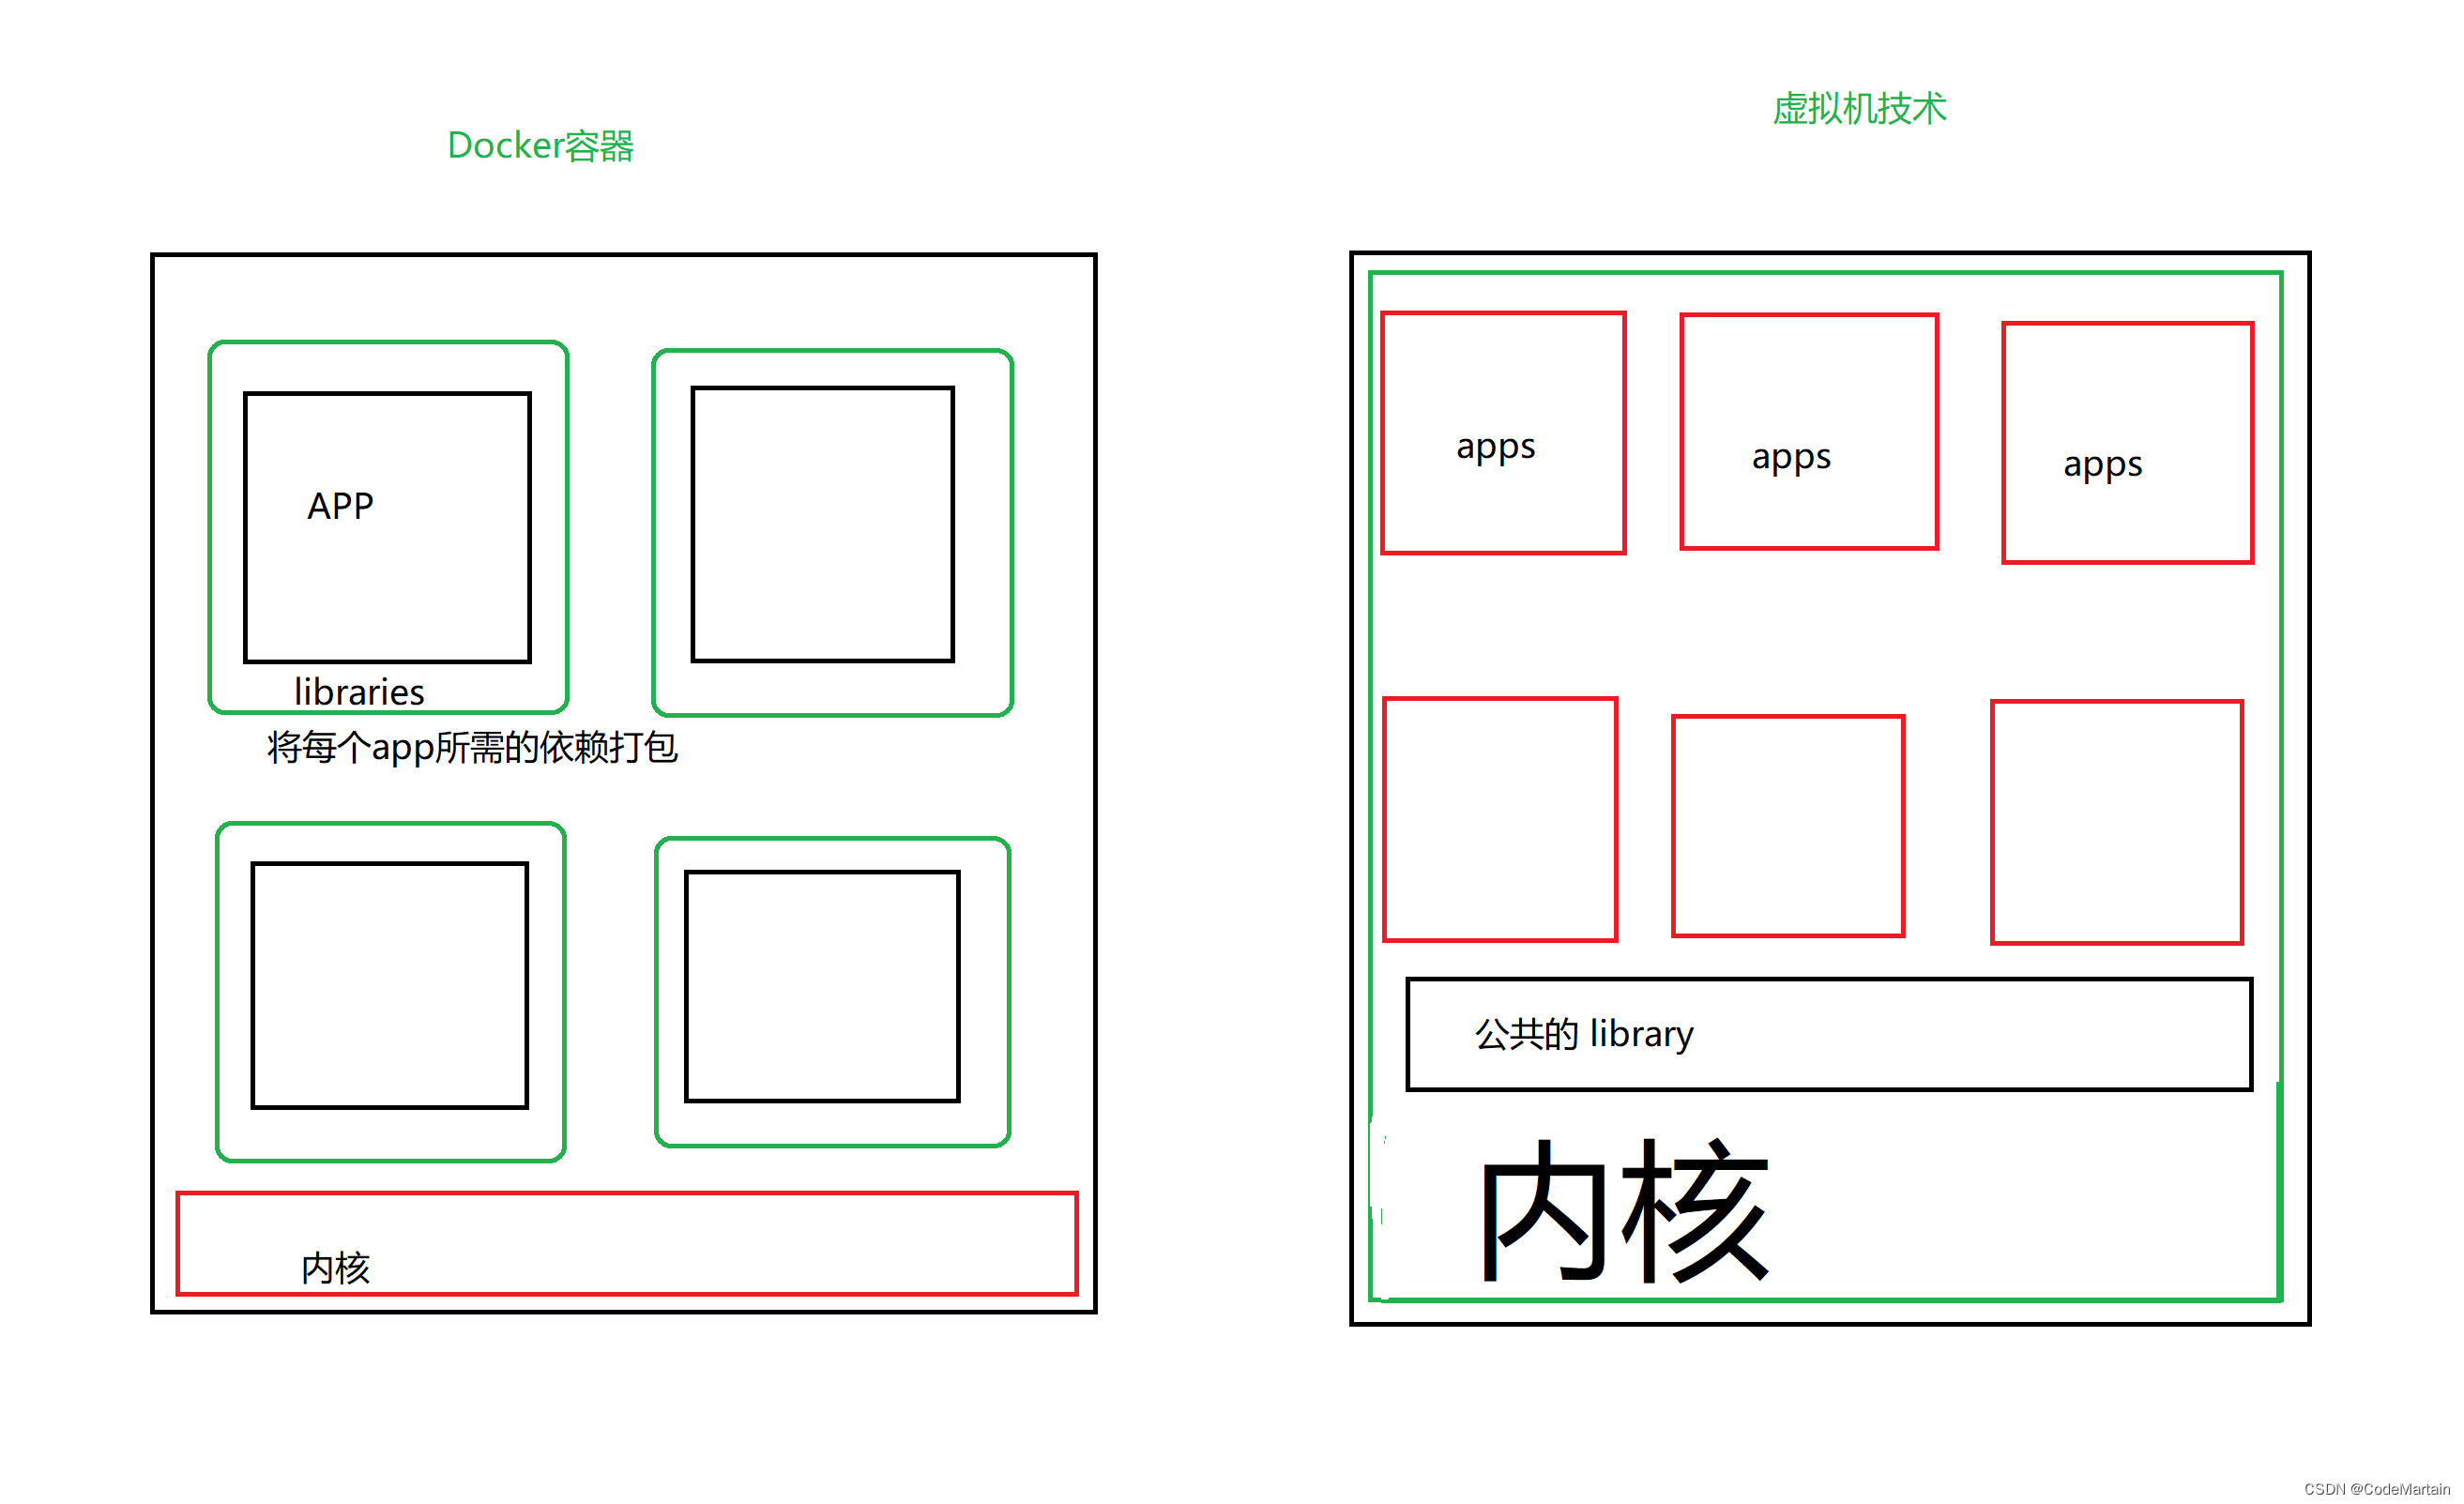
Docker 和传统虚拟化方式的不同之处:
- 传统虚拟机技术是虚拟出一套硬件后,在其上运行一个完整操作系统,在该系统上再运行所需应用
进程; - 而容器内的应用进程直接运行于宿主的内核,容器内没有自己的内核,而且也没有进行硬件虚拟。
因此容器要比传统虚拟机更为轻便。 - 每个容器之间互相隔离,每个容器有自己的文件系统 ,容器之间进程不会相互影响,能区分计算资
源
Docker 是一个开源的、轻量级的容器引擎,主要运行于 Linux 和 Windows,用于创建、管理和编排容器。
和 VMware 虚拟机相比,Docker 使用容器承载应用程序,而不使用操作系统,所以它的开销很少,性能很高。但是,Docker 对应用程序的隔离不如虚拟机彻底,所以它并不能完全取代 VMware。
Docker的好处:
一次构建,随处运行- 更快速的应用交付和部署
- 更便捷的升级和扩缩容
- 更简单的系统运维
- 更高效的计算资源利用
Docker跟vmware虚拟机一样都是运行于Linux 和 Windows 上的软件,用于创建、管理和编排容器。

Docker的安装
Windows安装Docker
配置要求:
Windows 10 Pro(专业版) / Enterprise(企业版) / Education(教育版)(1607 Anniversary Update、Build 14393 或者更新的版本)。Windows 必须是 64 位的版本。
需要启用 Windows 操作系统中的 Hyper-V 和容器特性。
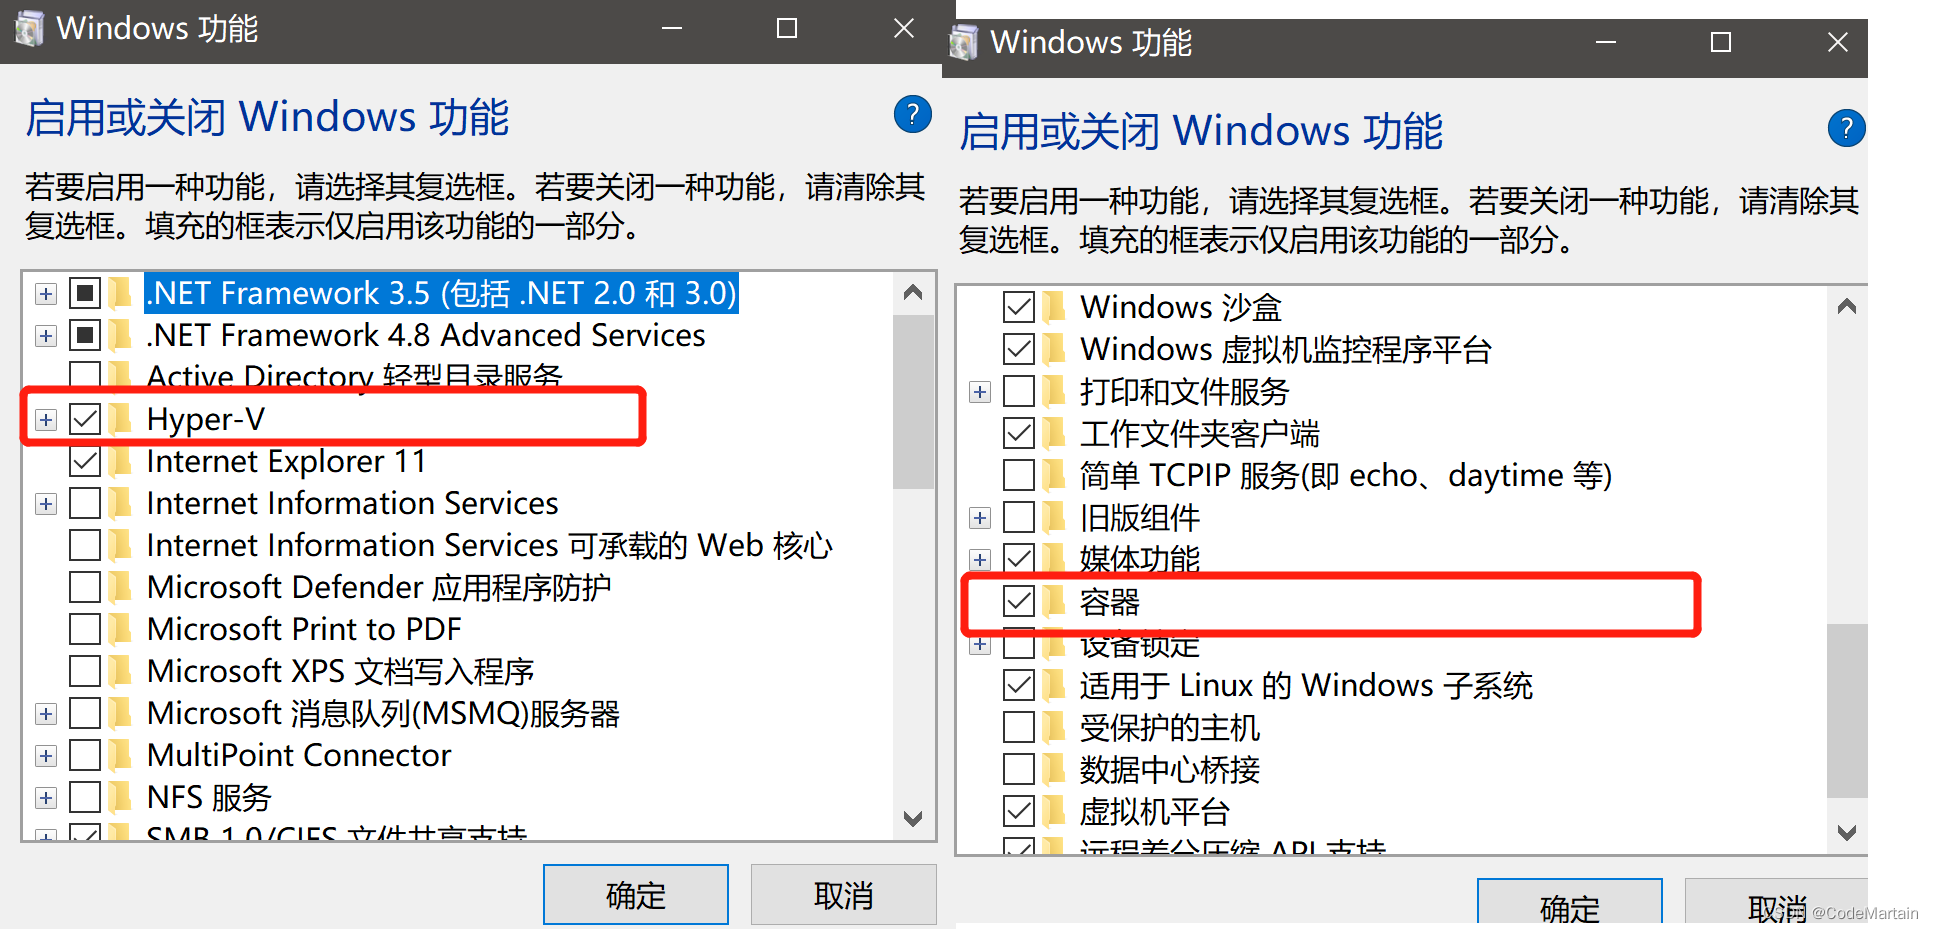
开启相应的功能后按需要重启系统;
Docker部署原理
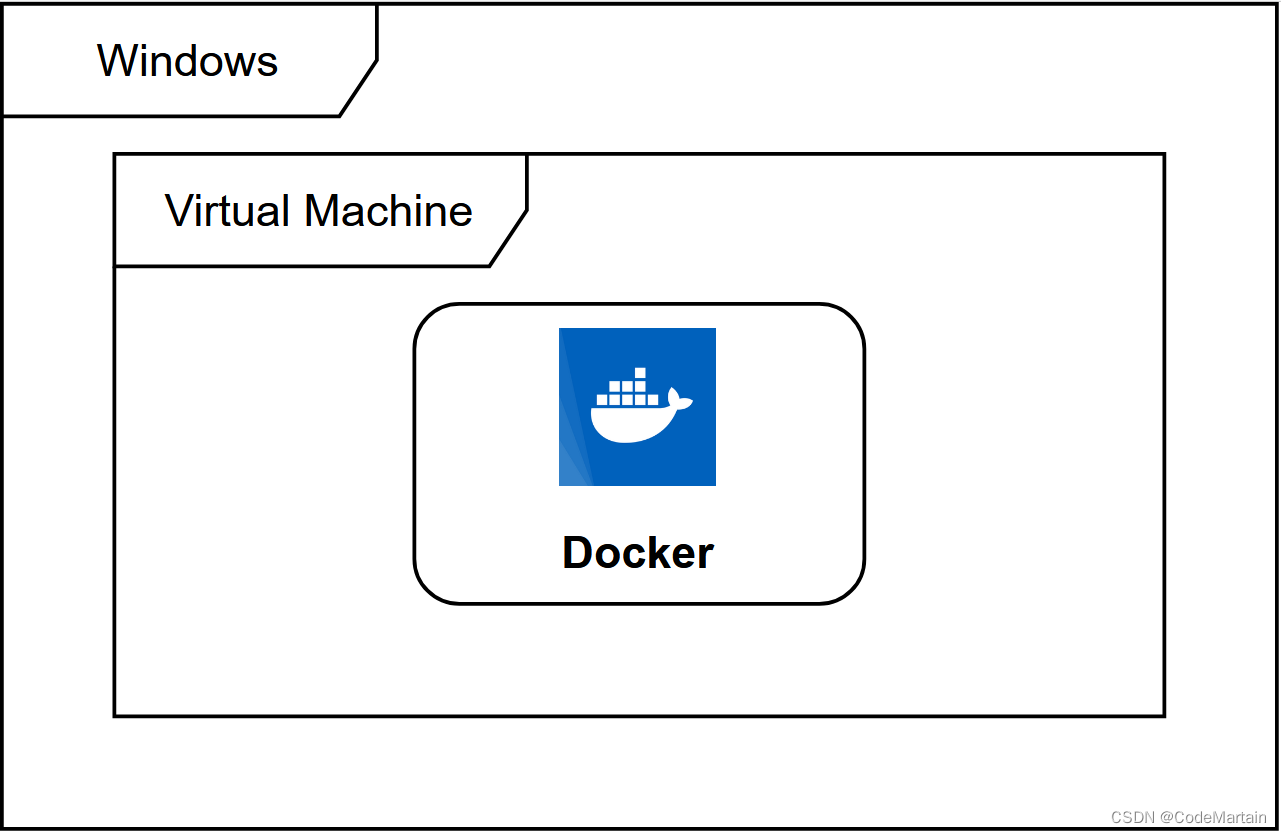
或者直接安装在window里面(这样会省去虚拟机的开销,同理linux)
安装结束后 cmd界面查看安装的信息;C:\Windows\system32>docker version Client: Cloud integration: v1.0.25 Version: 20.10.16 API version: 1.41 Go version: go1.17.10 Git commit: aa7e414 Built: Thu May 12 09:17:07 2022 OS/Arch: windows/amd64 #操作系统属性 Context: default Experimental: true Server: Docker Desktop 4.9.1 (81317) Engine: Version: 20.10.16 API version: 1.41 (minimum version 1.12) Go version: go1.17.10 Git commit: f756502 Built: Thu May 12 09:15:42 2022 OS/Arch: linux/amd64 #操作系统属性 Experimental: false containerd: Version: 1.6.4 GitCommit: 212e8b6fa2f44b9c21b2798135fc6fb7c53efc16 runc: Version: 1.1.1 GitCommit: v1.1.1-0-g52de29d docker-init: Version: 0.19.0 GitCommit: de40ad0- 1
- 2
- 3
- 4
- 5
- 6
- 7
- 8
- 9
- 10
- 11
- 12
- 13
- 14
- 15
- 16
- 17
- 18
- 19
- 20
- 21
- 22
- 23
- 24
- 25
- 26
- 27
- 28
- 29
- 30
- 31
可以看到Docker容器有两种容器,默认是运行在linux系统上的(因为开启了wsl功能—安装时也提示推荐在wsl2上运行)
如果没有开启wsl会优先运行在windows 中,

想要运行原生 Windows 容器(Native Windows Container),可以右击 Windows 通知栏中的 Docker 鲸鱼图标,并选择“切换到 Windows 容器”。
或者使用命令行来完成切换
C:\Program Files\Docker\Docker>.\dockercli -SwitchDaemon- 1
一些常用命令—
C:\Program Files\Docker\Docker>docker image ls #docker镜像 信息 REPOSITORY TAG IMAGE ID CREATED SIZE C:\Program Files\Docker\Docker>docker container ls # docker 容器信息 CONTAINER ID IMAGE COMMAND CREATED STATUS PORTS NAMES- 1
- 2
- 3
- 4
- 5
docker system info #docker 系统信息- 1

windows版本包括 Docker 引擎,Docker Compose ,Docker Machine,以及Docker Notary 命令行;验证各个模块已经安装成功---->>
C:\Program Files\Docker\Docker>docker --version #docker版本 Docker version 20.10.16, build aa7e414 C:\Program Files\Docker\Docker>docker-compose --version #docker构成版本 docker-compose version 1.29.2, build 5becea4c docker-py version: 5.0.0 CPython version: 3.9.0 OpenSSL version: OpenSSL 1.1.1g 21 Apr 2020- 1
- 2
- 3
- 4
- 5
- 6
- 7
- 8
- 9
- 10
- 11
Docker Machine 被废弃了,新版本出了DockerDeskTop便于管理容器
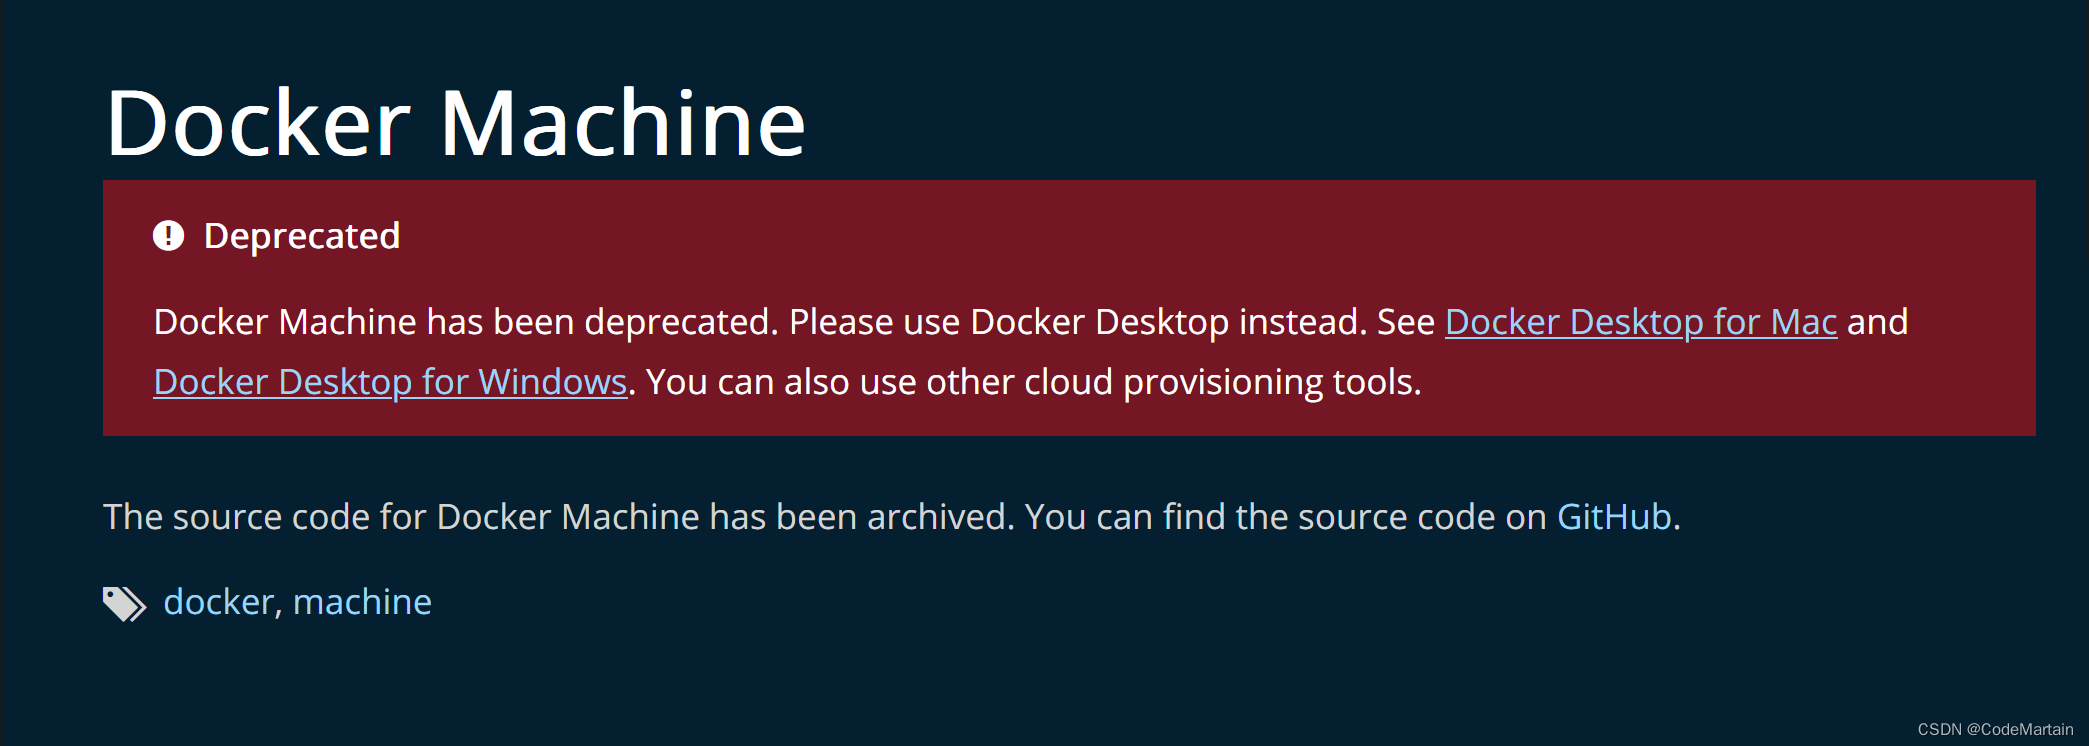
但是考虑到以前的版本,还是有必要了解一下的;docker-machine的工作模式—
(default) Creating VirtualBox VM… #创建虚拟环境
(default) Creating SSH key… # 使用ssh链接(设置中可以改为非SSH,但是这样不安全)
(default) Starting VM…$ docker-machine create -d virtualbox default Running pre-create checks... Creating machine... (default) Creating VirtualBox VM... (default) Creating SSH key... (default) Starting VM... Waiting for machine to be running, this may take a few minutes... Machine is running, waiting for SSH to be available... Detecting operating system of created instance... Detecting the provisioner... Provisioning with boot2docker... Copying certs to the local machine directory... Copying certs to the remote machine... Setting Docker configuration on the remote daemon... Checking connection to Docker... Docker is up and running! To see how to connect Docker to this machine, run: docker-machine env default $ docker-machine ls NAME ACTIVE DRIVER STATE URL SWARM DOCKER ERRORS default - virtualbox Running tcp://192.168.99.188:2376 v1.9.1 $ eval "$(docker-machine env default)" $ docker run busybox echo hello world Unable to find image 'busybox:latest' locally 511136ea3c5a: Pull complete df7546f9f060: Pull complete ea13149945cb: Pull complete 4986bf8c1536: Pull complete hello world $ docker-machine ls # 列出docker运行时的状态--包括运行的地址 端口 NAME ACTIVE DRIVER STATE URL SWARM DOCKER ERRORS default - virtualbox Running tcp://192.168.99.188:2376 v1.9.1 $ eval "$(docker-machine env default)" $ docker run busybox echo hello world Unable to find image 'busybox:latest' locally 511136ea3c5a: Pull complete df7546f9f060: Pull complete ea13149945cb: Pull complete 4986bf8c1536: Pull complete hello world #创建一个新容器 $ docker-machine create -d digitalocean --digitalocean-access-token=secret staging Creating SSH key... Creating Digital Ocean droplet... To see how to connect Docker to this machine, run: docker-machine env staging $ docker-machine ls NAME ACTIVE DRIVER STATE URL SWARM DOCKER ERRORS default - virtualbox Running tcp://192.168.99.188:2376 v1.9.1 staging - digitalocean Running tcp://203.0.113.81:2376 v1.9.1- 1
- 2
- 3
- 4
- 5
- 6
- 7
- 8
- 9
- 10
- 11
- 12
- 13
- 14
- 15
- 16
- 17
- 18
- 19
- 20
- 21
- 22
- 23
- 24
- 25
- 26
- 27
- 28
- 29
- 30
- 31
- 32
- 33
- 34
- 35
- 36
- 37
- 38
- 39
- 40
- 41
- 42
- 43
- 44
- 45
- 46
- 47
- 48
- 49
- 50
- 51
- 52
- 53
- 54
- 55
- 56
- 57
最新版的docker简化了我们命令行管理容器的成本,但是在服务器端环境基本都是命令行操作,所以 还是需要掌握使用的命令;
如果您主要在较旧的 Mac 或 Windows 笔记本电脑或台式机上工作,而这些笔记本电脑或台式机不符合新的 Docker for Mac 和 Docker for Windows 应用程序的要求,则需要 Docker Machine 在本地运行 Docker Engine。使用 Docker Toolbox 安装程序在 Mac 或 Windows 机箱上安装 Docker 计算机可使用 Docker 引擎预配本地虚拟机,使您能够连接它并运行命令。docker
命令有些多,可以查一下api看到一条 信息---->>
在WSL2上运行Docker的性能要比wsl1高,因为它是由 Microsoft 构建的完整 Linux 内核,允许 Linux 发行版运行而无需管理虚拟机。在 WSL 2 上运行 Docker Desktop,用户可以利用 Linux 工作区,避免同时维护 Linux 和 Windows 构建脚本。此外,WSL 2 还改进了文件系统共享和启动时间,并允许 Docker Desktop 用户访问一些很酷的新功能。
Docker Desktop 使用 WSL 2 中的动态内存分配功能,大大提高了资源消耗。这意味着,Docker Desktop 仅使用所需的 CPU 和内存资源,同时支持 CPU 和内存密集型任务(如构建容器)以更快地运行。
此外,在 WSL 2 中,在冷启动后启动 Docker 守护程序所需的时间要快得多。启动 Docker 守护程序只需不到 10 秒,而以前版本的 Docker Desktop 只需近一分钟。
这里重点以linux系统中的docker操作进行展开
Linux安装Docker
linux安装Docker Desktop系统配置要求:
- 64 位内核和 CPU 支持虚拟化
- KVM 虚拟化支持。按照 KVM 虚拟化支持说明检查是否启用了 KVM 内核模块以及如何提供对 kvm 设备的访问。
- QEMU 必须是版本 5.2 或更高版本。我们建议升级到最新版本。
- ,系统初始化系统。
- .Gnome 或 KDE 桌面环境。- 对于许多Linux发行版,Gnome环境不支持托盘图标。要添加对托盘图标的支持,您需要安装 Gnome 扩展。例如,AppIndicator)。
- 至少 4 GB 的内存。
这里以fedora35为例,有很多安装的方式,这里采用最便捷的方式
sudo yum install docker- 1
然后
查看安装的结果–>>
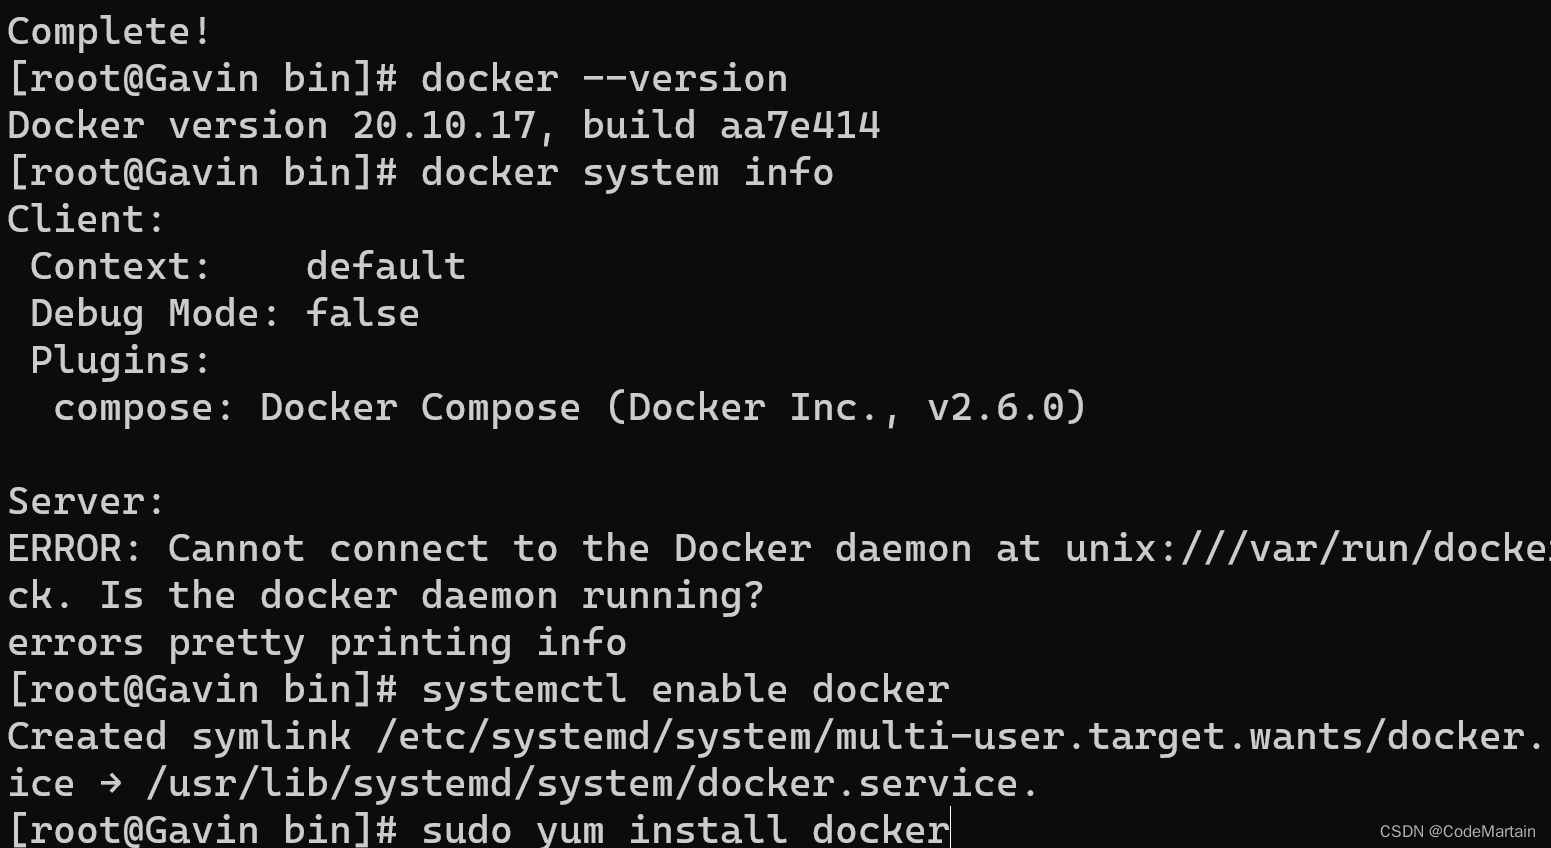
设置docker为开机自启动[root@Gavin bin]# systemctl enable docker Created symlink /etc/systemd/system/multi-user.target.wants/docker.service → /usr/lib/systemd/system/docker.service.- 1
- 2
安装最新版本的docker
这里说明一下为什么要安装最新版本—
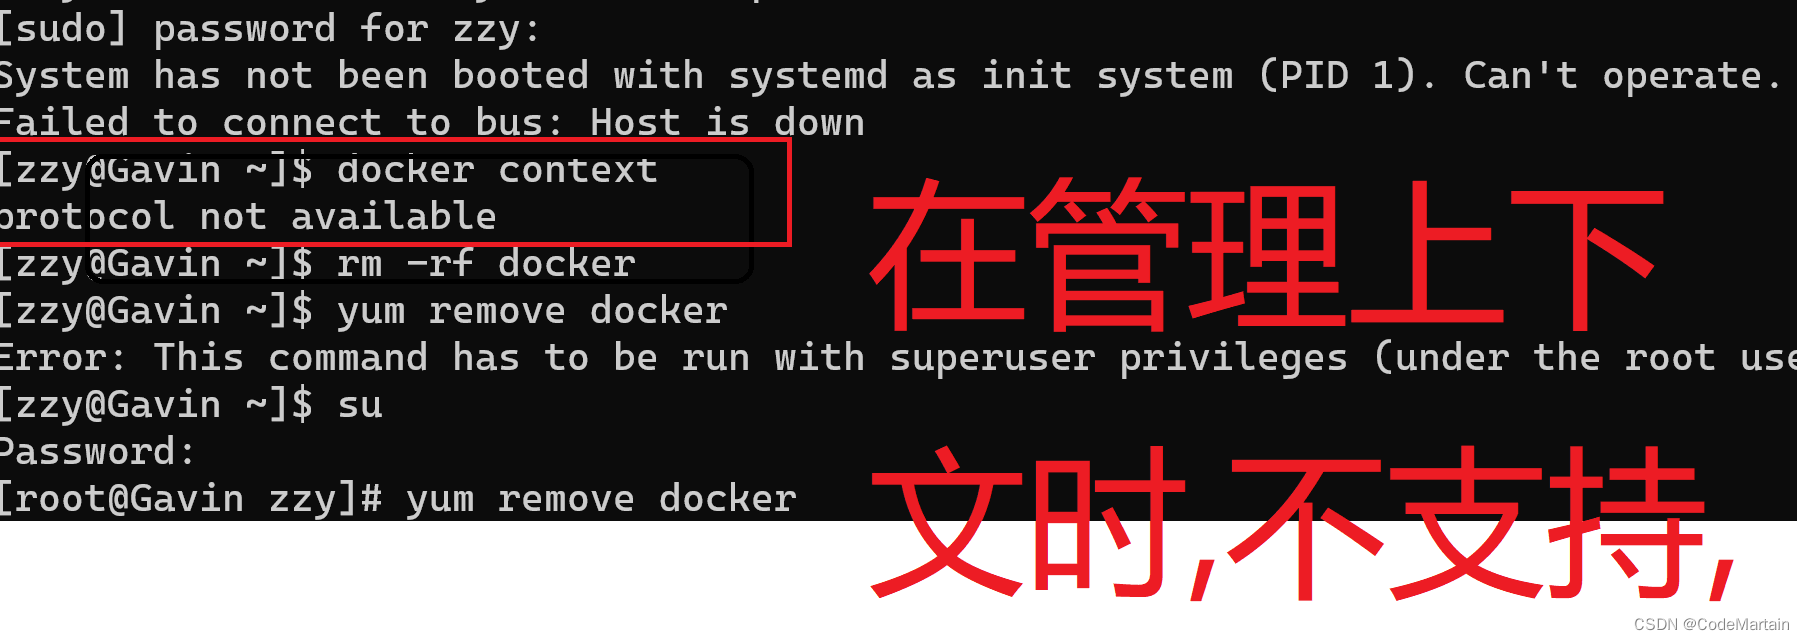
还是以fedora35为例- 设置存储库
sudo dnf -y install dnf-plugins-core- 1
sudo dnf config-manager \ --add-repo \ https://download.docker.com/linux/fedora/docker-ce.repo- 1
- 2
- 3
- 安装 Docker 引擎
sudo dnf install docker-ce docker-ce-cli containerd.io docker-compose-plugin- 1
这里没有弹出GPG密钥,如果其他版本的fedora弹出了,请验证是否匹配,如果是,请接受它。
060A 61C5 1B55 8A7F 742B 77AA C52F EB6B 621E 9F35- 1
此时docker应安装完毕,如果想要安装特定版本的,可以
[root@Gavin docker]# dnf list docker-ce --showduplicates | sort -r Installed Packages docker-ce.x86_64 3:20.10.17-3.fc35 docker-ce-stable docker-ce.x86_64 3:20.10.17-3.fc35 @docker-ce-stable docker-ce.x86_64 3:20.10.16-3.fc35 docker-ce-stable docker-ce.x86_64 3:20.10.15-3.fc35 docker-ce-stable docker-ce.x86_64 3:20.10.14-3.fc35 docker-ce-stable docker-ce.x86_64 3:20.10.13-3.fc35 docker-ce-stable docker-ce.x86_64 3:20.10.12-3.fc35 docker-ce-stable docker-ce.x86_64 3:20.10.11-3.fc35 docker-ce-stable docker-ce.x86_64 3:20.10.10-3.fc35 docker-ce-stable- 1
- 2
- 3
- 4
- 5
- 6
- 7
- 8
- 9
- 10
- 11
- 12
安装特定版本---->>
sudo dnf -y install docker-ce-3:20.10.17-3 docker-ce-cli-3:20.10.17-3 containerd.io docker-compose-plugin- 1
这里安装通用版本
检查默认上下文关系
[root@Gavin docker]# docker context inspect default [ { "Name": "default", "Metadata": { "StackOrchestrator": "swarm" }, "Endpoints": { "docker": { "Host": "unix:///var/run/docker.sock", "SkipTLSVerify": false } }, "TLSMaterial": {}, "Storage": { "MetadataPath": "\u003cIN MEMORY\u003e", "TLSPath": "\u003cIN MEMORY\u003e" } } ]- 1
- 2
- 3
- 4
- 5
- 6
- 7
- 8
- 9
- 10
- 11
- 12
- 13
- 14
- 15
- 16
- 17
- 18
- 19
- 20
Docker 容器:
Docker 利用容器(Container)独立运行的一个或一组应用。容器是用镜像创建的运行实例。它可
以被启动、开始、停止、删除。每个容器都是相互隔离的、保证安全的平台。可以把容器看做是一个简
易版的 Linux 环境(包括root用户权限、进程空间、用户空间和网络空间等)和运行在其中的应用程
序。容器的定义和镜像几乎一模一样,也是一堆层的统一视角,唯一区别在于容器的最上面那一层是可读可写的。Docker镜像源配置
docker的服务器在国外,如果拉取镜像的话会比较慢,国内有阿里云,网易云华为云等可以使用;
配置阿里云镜像源加速器
创建新的上下文
[root@Gavin docker]# docker context create docker-test --default-stack-orchestrator=swarm --docker host=unix://var/run/docker.sock docker-test Successfully created context "docker-test"- 1
- 2
- 3
注意:默认上下文的行为与手动创建的上下文不同。它没有配置文件,并且会根据当前配置动态更新。例如,如果您使用 切换当前的 Kubernetes 配置,则默认的 Docker 上下文会将自身动态更新到新的 Kubernetes 端点;
创建一个配置,其中 **Kubernetes 作为默认业务流程协调程序,**使用存储在 中的现有 kubeconfig。为此,您需要在 中提供一个有效的 kubeconfig 文件。如果您的 kubeconfig 有多个上下文,则将使用当前上下文;
使用不同的上下文
切换上下文
docker context use
[root@Gavin zzy]# docker context use docker-test docker-test Current context is now "docker-test"- 1
- 2
- 3
- 4
定义活动docker容器
以验证“docker-test”上下文现在是否为活动上下文。[root@Gavin zzy]# export DOCKER_CONTEXT=docker-test [root@Gavin zzy]# docker context ls NAME DESCRIPTION DOCKER ENDPOINT KUBERNETES ENDPOINT ORCHESTRATOR default Current DOCKER_HOST based configuration unix:///var/run/docker.sock swarm docker-test * unix://var/run/docker.sock swarm- 1
- 2
- 3
- 4
- 5
导入导出Docker上下文
导出docker上下文
docker context export docker-test- 1
检查导出文件的内容。
[root@Gavin zzy]# cat docker-test.dockercontext meta.json0000644000000000000000000000022200000000000011022 0ustar0000000000000000{"Name":"docker-test","Metadata":{"StackOrchestrator":"swarm"},"Endpoints":{"docker":{"Host":"unix://var/run/docker.sock","SkipTLSVerify":false}}}tls0000700000000000000000000000000000000000000007716 5ustar0000000000000000[root@Gavin zzy]#- 1
- 2
- 3
- 4
- 5
导入docker上下文
docker context import docker-test docker-test.dockercontext- 1
导出 Kubernetes 上下文
注意:仅当要导出的上下文配置了 Kubernetes 端点时,才能导出 Kubernetes 上下文。
dockerdesktop与docker Engine
由于最新版本的docker是以dockerdesktop可视化管理安装的,在这之前是通过docker Engine来管理 容器的;
虽然可以同时运行 Docker Desktop 和 Docker Engine,但在某些情况下,**同时运行这两个引擎可能会导致 映射容器的网络端口 冲突问题,**一般使用一种管理docker的工具即可;如果在同一台计算机上安装了 Docker Desktop 和 Docker Engine,则可以运行命令在 Docker Desktop 和 Docker 引擎上下文之间切换。
[zzy@Gavin ~]$ docker context ls NAME DESCRIPTION DOCKER ENDPOINT KUBERNETES ENDPOINT ORCHESTRATOR default * Current DOCKER_HOST based configuration unix:///var/run/docker.sock swarm desktop-linux npipe:./pipe/dockerDesktopLinuxEngine [zzy@Gavin ~]$ docker context use default default Current context is now "default" [zzy@Gavin ~]$ docker context use desktop-linux desktop-linux Current context is now "desktop-linux" [zzy@Gavin ~]$- 1
- 2
- 3
- 4
- 5
- 6
- 7
- 8
- 9
- 10
- 11
- 12
docker Context 命令:
单个 Docker CLI 可以有多个上下文。每个上下文都包含管理不同群集或节点所需的所有端点和安全信息。通过docker context该命令,可以轻松配置这些上下文并在它们之间切换;单个docker客户端可能配置了两个上下文,
dev-k8s 和 prod-swarm。dev-k8s 包含**端点数据和安全凭证,**用于开发环境中配置和管理kubernetes集群;
pro-swarm包含在生产环境中管理swarm集群所需的一切;
Docker的镜像运行
C:\Users\Gavin>docker run hello-world Hello from Docker! This message shows that your installation appears to be working correctly. To generate this message, Docker took the following steps: 1. The Docker client contacted the Docker daemon. 2. The Docker daemon pulled the "hello-world" image from the Docker Hub. (amd64) 3. The Docker daemon created a new container from that image which runs the executable that produces the output you are currently reading. 4. The Docker daemon streamed that output to the Docker client, which sent it to your terminal. To try something more ambitious, you can run an Ubuntu container with: $ docker run -it ubuntu bash Share images, automate workflows, and more with a free Docker ID: https://hub.docker.com/ For more examples and ideas, visit: https://docs.docker.com/get-started/- 1
- 2
- 3
- 4
- 5
- 6
- 7
- 8
- 9
- 10
- 11
- 12
- 13
- 14
- 15
- 16
- 17
- 18
- 19
- 20
- 21
- 22
- 23
- 24
Docker存储驱动的选择
每一个docker容器都有一个本地存储空间,用于保存层叠的镜像层,以及挂载的容器文件系统,默认请款下,容器的读写操作都发生在其镜像挂载的文件系统中,Docker在linux中有不同的存储驱动实现方式,每一种方式都采用不同的方法了镜像层和实现写时复制;
Docker在Linux中的可选存储驱动---->>
- AUFS
- Overlay2
- Device Mapper
- Btrfs
- ZFS
在Linux指定存储驱动
修改daemon.json文件;
例如:

{ "storage-driver": "devicemapper", "storage-opts": [ "dm.directlvm_device=/dev/xdf", "dm.thinp_percent=95", "dm.thinp_metapercent=1", "dm.thinp_autoextend_threshold=80", "dm.thinp_autoextend_percent=20", "dm.directlvm_device_force=false" ] }- 1
- 2
- 3
- 4
- 5
- 6
- 7
- 8
- 9
- 10
- 11
DeviceMapper—>>
大部分Linux存储驱动不需要或需要很少的配置。但是,Device Mapper通常需要合理配置之后才能表现出良好的性能。
配置解析—>>
dm.directlvm_device=/dev/xdf
设置块设备的位置,为了达到最佳性能,块设备应当位于本地高性能的RAID或者外部的RAID存储阵列上;
dm.thinp_percent=95
设置了镜像和容器允许的最大的使用空间占比—默认95%
dm.thinp_metapercent=1
元数据的存储空间占比默认1%
dm.thinp_autoextend_threshold=80
设置LVM自动扩展精简池的阈值,默认80%
dm.thinp_autoextend_percent=20
触发精简池自动扩容机制的时候,扩容的大小应当占有的空间比例;
dm.directlvm_device_force=false
允许用户决定是否将块设备格式化为新的文件系统;Docker在Win中的存储驱动---->>
windowsfilter

Docker 常用命令

C:\Users\Gavin>docker version #查看docker版本 Client: Cloud integration: v1.0.25 Version: 20.10.16 API version: 1.41 Go version: go1.17.10 Git commit: aa7e414 Built: Thu May 12 09:17:07 2022 OS/Arch: windows/amd64 Context: default Experimental: true Server: Docker Desktop 4.9.1 (81317) Engine: Version: 20.10.16 API version: 1.41 (minimum version 1.12) Go version: go1.17.10 Git commit: f756502 Built: Thu May 12 09:15:42 2022 OS/Arch: linux/amd64 Experimental: false containerd: Version: 1.6.4 GitCommit: 212e8b6fa2f44b9c21b2798135fc6fb7c53efc16 runc: Version: 1.1.1 GitCommit: v1.1.1-0-g52de29d docker-init: Version: 0.19.0 GitCommit: de40ad0 C:\Users\Gavin>docker --version #这个是查看docker client和dockerdesktop的版本 Docker version 20.10.16, build aa7e414- 1
- 2
- 3
- 4
- 5
- 6
- 7
- 8
- 9
- 10
- 11
- 12
- 13
- 14
- 15
- 16
- 17
- 18
- 19
- 20
- 21
- 22
- 23
- 24
- 25
- 26
- 27
- 28
- 29
- 30
- 31
- 32
- 33
查看 docker镜像
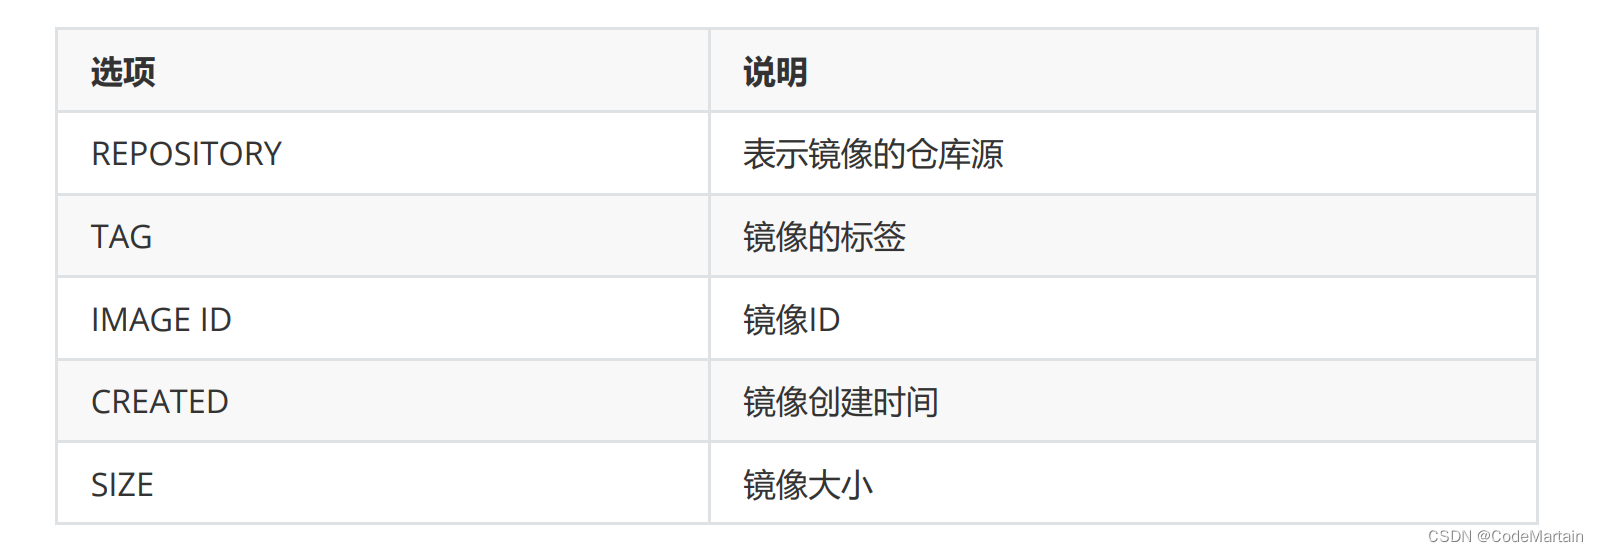
C:\Users\Gavin>docker images REPOSITORY TAG IMAGE ID CREATED SIZE alpine/git latest 620bef75a214 6 days ago 39.4MB redis latest 604d80444252 12 days ago 117MB hello-world latest feb5d9fea6a5 9 months ago 13.3kB C:\Users\Gavin>docker image ls REPOSITORY TAG IMAGE ID CREATED SIZE alpine/git latest 620bef75a214 6 days ago 39.4MB redis latest 604d80444252 12 days ago 117MB hello-world latest feb5d9fea6a5 9 months ago 13.3kB- 1
- 2
- 3
- 4
- 5
- 6
- 7
- 8
- 9
- 10
- 11
docker 镜像帮助命令
C:\Users\Gavin>docker images --help Usage: docker images [OPTIONS] [REPOSITORY[:TAG]] List images Options: -a, --all Show all images (default hides intermediate images) #查看镜像所有信息 --digests Show digests -f, --filter filter Filter output based on conditions provided --format string Pretty-print images using a Go template --no-trunc Don't truncate output #不截断查看完整信息 -q, --quiet Only show image IDs #只显示镜像id- 1
- 2
- 3
- 4
- 5
- 6
- 7
- 8
- 9
- 10
- 11
- 12
- 13
docker images --digests #查看镜像摘要信息
C:\Users\Gavin>docker images --digests REPOSITORY TAG DIGEST IMAGE ID CREATED SIZE alpine/git latest sha256:23dcd3edfd1d9c7cbb14f7823d07a4934716cfa4d4dbc402d37ee011c440a685 620bef75a214 6 days ago 39.4MB redis latest sha256:cfda0458239615720cc16d6edf6bae7905c31265f218d2033c43cdb40cd59792 604d80444252 12 days ago 117MB hello-world latest sha256:13e367d31ae85359f42d637adf6da428f76d75dc9afeb3c21faea0d976f5c651 feb5d9fea6a5 9 months ago 13.3kB C:\Users\Gavin>docker image ls --digests REPOSITORY TAG DIGEST IMAGE ID CREATED SIZE alpine/git latest sha256:23dcd3edfd1d9c7cbb14f7823d07a4934716cfa4d4dbc402d37ee011c440a685 620bef75a214 6 days ago 39.4MB redis latest sha256:cfda0458239615720cc16d6edf6bae7905c31265f218d2033c43cdb40cd59792 604d80444252 12 days ago 117MB hello-world latest sha256:13e367d31ae85359f42d637adf6da428f76d75dc9afeb3c21faea0d976f5c651 feb5d9fea6a5 9 months ago 13.3kB- 1
- 2
- 3
- 4
- 5
- 6
- 7
- 8
- 9
- 10
- 11
- 12
镜像命令

拉取镜像
C:\Users\Gavin>docker pull nginx 拉取 nginx镜像 Using default tag: latest latest: Pulling from library/nginx b85a868b505f: Already exists f4407ba1f103: Pull complete 4a7307612456: Pull complete 935cecace2a0: Pull complete 8f46223e4234: Pull complete fe0ef4c895f5: Pull complete Digest: sha256:10f14ffa93f8dedf1057897b745e5ac72ac5655c299dade0aa434c71557697ea Status: Downloaded newer image for nginx:latest docker.io/library/nginx:latest C:\Users\Gavin>docker pull --help #docker pull的使用帮助 Usage: docker pull [OPTIONS] NAME[:TAG|@DIGEST] Pull an image or a repository from a registry Options: -a, --all-tags Download all tagged images in the repository --disable-content-trust Skip image verification (default true) --platform string Set platform if server is multi-platform capable -q, --quiet Suppress verbose output C:\Users\Gavin>docker pull -a mysql 5: Pulling from library/mysql 824b15f81d65: Downloading [==============> ] 8.067MB/27.14MB c559dd1913db: Download complete e201c19614e6: Download complete f4247e8f6125: Downloading [===============================> ] 884.7kB/1.387MB dc9fefd8cfb5: Waiting- 1
- 2
- 3
- 4
- 5
- 6
- 7
- 8
- 9
- 10
- 11
- 12
- 13
- 14
- 15
- 16
- 17
- 18
- 19
- 20
- 21
- 22
- 23
- 24
- 25
- 26
- 27
- 28
- 29
- 30
- 31
- 32
- 33
- 34
docker 查找镜像
C:\Users\Gavin>docker search --help #查找镜像帮助信息 Usage: docker search [OPTIONS] TERM Search the Docker Hub for images Options: -f, --filter filter Filter output based on conditions provided --format string Pretty-print search using a Go template --limit int Max number of search results (default 25) --no-trunc Don't truncate output C:\Users\Gavin> C:\Users\Gavin>docker search tomcat --limit 2 NAME DESCRIPTION STARS OFFICIAL AUTOMATED tomcat Apache Tomcat is an open source implementati… 3344 [OK] tomee Apache TomEE is an all-Apache Java EE certif… 97 [OK] C:\Users\Gavin>docker search -f stars=5 tomcat --limit 2 NAME DESCRIPTION STARS OFFICIAL AUTOMATED tomcat Apache Tomcat is an open source implementati… 3344 [OK] tomee Apache TomEE is an all-Apache Java EE certif… 97 [OK]- 1
- 2
- 3
- 4
- 5
- 6
- 7
- 8
- 9
- 10
- 11
- 12
- 13
- 14
- 15
- 16
- 17
- 18
- 19
- 20
- 21
- 22
- 23
- 24
- 25
docker search -f stars=5 tomcat --limit 2
格式 key=value 这里是条件 之后收查找的镜像名, limit是限制显示的条数的;docker 删除镜像

C:\Users\Gavin>docker rmi redis -f #删除redis镜像 需要强制删除 Untagged: redis:latest Untagged: redis@sha256:cfda0458239615720cc16d6edf6bae7905c31265f218d2033c43cdb40cd59792 Deleted: sha256:604d80444252dd46a4b4d35bb0226fc16e1022efcd18bf5980650f72d1cf29e5 C:\Users\Gavin>docker rmi --help #移除镜像的帮助 Usage: docker rmi [OPTIONS] IMAGE [IMAGE...] Remove one or more images Options: -f, --force Force removal of the image --no-prune Do not delete untagged parents- 1
- 2
- 3
- 4
- 5
- 6
- 7
- 8
- 9
- 10
- 11
- 12
- 13
- 14
- 15
- 16
- 17
删除多个镜像:
docker rmi -f 镜像:标签 镜像:标签C:\Users\Gavin>docker rmi -f redis:latest nginx:latest Untagged: redis:latest Untagged: redis@sha256:d581aded52343c461f32e4a48125879ed2596291f- 1
- 2
- 3
还可以这么删除

C:\Users\Gavin>docker images -qa #找到所有的镜像id 55f4b40fe486 620bef75a214 4813a0e5f815 feb5d9fea6a5 5d0da3dc9764 #执行删除 C:\Users\Gavin>docker rmi -f $(dockers images -qa) # 就可以把所有的镜像删除掉 ```bash docker ps #----列举最近的容器 Usage: docker ps [OPTIONS] List containers Options: -a, --all Show all containers (default shows just running) -f, --filter filter Filter output based on conditions provided --format string Pretty-print containers using a Go template -n, --last int Show n last created containers (includes all states) (default -1) -l, --latest Show the latest created container (includes all states) --no-trunc Don't truncate output -q, --quiet Only display container IDs -s, --size Display total file sizes- 1
- 2
- 3
- 4
- 5
- 6
- 7
- 8
- 9
- 10
- 11
- 12
- 13
- 14
- 15
- 16
- 17
- 18
- 19
- 20
- 21
- 22
- 23
- 24
- 25
- 26
- 27
- 28

C:\Users\Gavin>docker ps CONTAINER ID IMAGE COMMAND CREATED STATUS PORTS NAMES 78b4e097b354 centos:latest "/bin/bash" 27 minutes ago Up 27 minutes heuristic_moore C:\Users\Gavin>docker ps -l #列出最近创建的容器 默认显示数量为 1 CONTAINER ID IMAGE COMMAND CREATED STATUS PORTS NAMES 78b4e097b354 centos:latest "/bin/bash" 28 minutes ago Up 28 minutes heuristic_moore C:\Users\Gavin>docker ps -n 2 #显示最近的创建的两个容器 CONTAINER ID IMAGE COMMAND CREATED STATUS PORTS NAMES 78b4e097b354 centos:latest "/bin/bash" 32 minutes ago Up 32 minutes heuristic_moore b021ff31b514 centos "/bin/bash" 34 minutes ago Exited (0) 34 minutes ago jovial_noyce C:\Users\Gavin>docker ps -n 2 -l 显示最近创建的两个容器 CONTAINER ID IMAGE COMMAND CREATED STATUS PORTS NAMES 78b4e097b354 centos:latest "/bin/bash" 33 minutes ago Up 33 minutes heuristic_moore b021ff31b514 centos "/bin/bash" 34 minutes ago Exited (0) 34 minutes ago jovial_noyce C:\Users\Gavin>docker ps -n 3 -l -q #显示最近创建的三个容器的编号 78b4e097b354 b021ff31b514 69807b0a68d4 C:\Users\Gavin>docker ps --no-trunc #不截断输出 CONTAINER ID IMAGE COMMAND CREATED STATUS PORTS NAMES 78b4e097b35438969832cd7c15aae13259f2e65cb0f14313a98ad575f1f16acf centos:latest "/bin/bash" 38 minutes ago Up 38 minutes heuristic_moore- 1
- 2
- 3
- 4
- 5
- 6
- 7
- 8
- 9
- 10
- 11
- 12
- 13
- 14
- 15
- 16
- 17
- 18
- 19
- 20
- 21
- 22
- 23
- 24
- 25
- 26
- 27
退出容器:
exitexit #退出docker 容器 C:\Users\Gavin>docker ps -a #查看容器的信息---都为exit CONTAINER ID IMAGE COMMAND CREATED STATUS PORTS NAMES 78b4e097b354 centos:latest "/bin/bash" 39 minutes ago Up 39 minutes heuristic_moore b021ff31b514 centos "/bin/bash" 41 minutes ago Exited (0) 40 minutes ago jovial_noyce 69807b0a68d4 604d80444252 "docker-entrypoint.s…" 7 days ago Exited (0) 7 days ago redis-p2Mg- 1
- 2
- 3
- 4
- 5
- 6
- 7
容器命令
有镜像才有容器,首先我们需要整一个系统镜像
拉取一个镜像
#docker pull centos C:\Users\Gavin>docker pull centos Using default tag: latest latest: Pulling from library/centos a1d0c7532777: Pull complete Digest: sha256:a27fd8080b517143cbbbab9dfb7c8571c40d67d534bbdee55bd6c473f432b177 Status: Downloaded newer image for centos:latest docker.io/library/centos:latest- 1
- 2
- 3
- 4
- 5
- 6
- 7
- 8
- 9
创建并启动容器
C:\Users\Gavin>docker run --help # 运行帮助 Usage: docker run [OPTIONS] IMAGE [COMMAND] [ARG...] Run a command in a new container Options: --add-host list Add a custom host-to-IP mapping (host:ip) -a, --attach list Attach to STDIN, STDOUT or STDERR --blkio-weight uint16 Block IO (relative weight), between 10 and 1000, or 0 to ......- 1
- 2
- 3
- 4
- 5
- 6
- 7
- 8
- 9
- 10
- 11
- 12
- 13
运行容器:
C:\Users\Gavin>docker run -it centos /bin/bash [root@af06251210bf /]# ls bin etc lib lost+found mnt proc run srv tmp var dev home lib64 media opt root sbin sys usr- 1
- 2
- 3
- 4
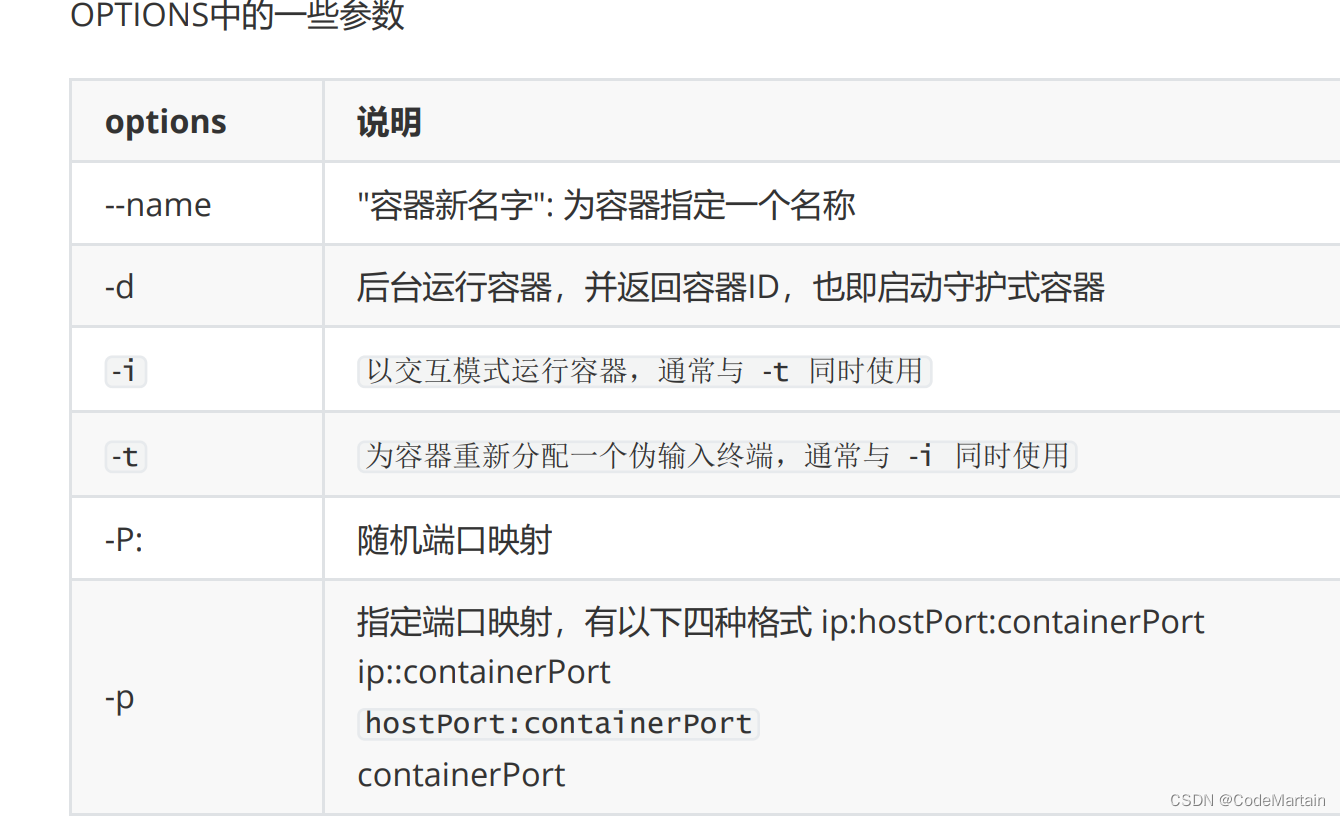
-i 交互模式运行
docker run -i centos /bin/bash- 1
- 2


-t 为容器重新分配一个伪输入终端,
C:\Users\Gavin>docker run -t centos /bin/bash [root@dafae7f76cc1 /]#- 1
- 2
- 3
-i -t的区别----->>>可以看出 -i像是在后台运行的,-t是前台运行 ,运行后直接进入了 centos,而 -i需要手动进入系统;

一般是两个一起使用
C:\Users\Gavin>docker run --name mycent -d centos:latest 5a8b70be3aec55556b10f5c9044ac30064f49fdfea84aa4d655b58c0079c992b# 返回id- 1
- 2
- 3
- 4
docker run --name 别名-d 镜像名:版本号
-d 表示后台运行
返回 idC:\Users\Gavin>docker run -d centos /bin/bash f5163c0a487f24e474ac6e7404d1b06536f0d36038fc634fe9b485942164e9c2- 1
- 2
但是实际结果是运行后立马就退出了,需要配合 -i -t 来使用
如下---->>C:\Users\Gavin>docker run -it -d centos:latest 78b4e097b35438969832cd7c15aae13259f2e65cb0f14313a98ad575f1f16acf- 1
- 2

结束contatiner的运行
docker stop dontatineridC:\Users\Gavin>docker stop --help Usage: docker stop [OPTIONS] CONTAINER [CONTAINER...] Stop one or more running containers Options: -t, --time int Seconds to wait for stop before killing it (default 10)- 1
- 2
- 3
- 4
- 5
- 6
- 7
- 8
需要知道容器的id
docker ps 命令来查看 container id
C:\Users\Gavin>docker ps CONTAINER ID IMAGE COMMAND CREATED STATUS PORTS NAMES 78b4e097b354 centos:latest "/bin/bash" 5 minutes ago Up 5 minutes heuristic_moore- 1
- 2
- 3
- 4
到这里我们可以发现每次启动容器都会启动一个新的image.如果想要启动以前的该怎么操作呢?
docker start CONTAINER ID
C:\Users\Gavin>docker ps -a CONTAINER ID IMAGE COMMAND CREATED STATUS PORTS NAMES 04198ad3d234 centos:latest "/bin/bash" 4 minutes ago Up 4 minutes gracious_bhaskara 78b4e097b354 centos:latest "/bin/bash" 45 minutes ago Exited (0) 4 minutes ago heuristic_moore b021ff31b514 centos "/bin/bash" 47 minutes ago Exited (0) 47 minutes ago jovial_noyce 69807b0a68d4 604d80444252 "docker-entrypoint.s…" 7 days ago Exited (0) 7 days ago redis-p2Mg #启动CONTAINER ID 为b021ff31b514 的 C:\Users\Gavin>docker start b021ff31b514 b021ff31b514 #返回镜像ID C:\Users\Gavin>docker ps -a # 再次查看,该容器已经启动了 CONTAINER ID IMAGE COMMAND CREATED STATUS PORTS NAMES 04198ad3d234 centos:latest "/bin/bash" 4 minutes ago Up 4 minutes gracious_bhaskara 78b4e097b354 centos:latest "/bin/bash" 46 minutes ago Exited (0) 4 minutes ago heuristic_moore b021ff31b514 centos "/bin/bash" 48 minutes ago Up 6 seconds jovial_noyce 69807b0a68d4 604d80444252 "docker-entrypoint.s…" 7 days ago Exited (0) 7 days ago redis-p2Mg- 1
- 2
- 3
- 4
- 5
- 6
- 7
- 8
- 9
- 10
- 11
- 12
- 13
- 14
- 15
- 16
- 17
- 18
- 19
容器停止运行—小结
exit docker stop containerid docker kill containerid- 1
- 2
- 3
移除容器
docker rm containeridC:\Users\Gavin>docker ps -a CONTAINER ID IMAGE COMMAND CREATED STATUS PORTS NAMES 04198ad3d234 centos:latest "/bin/bash" 31 minutes ago Exited (137) 24 seconds ago gracious_bhaskara 78b4e097b354 centos:latest "/bin/bash" About an hour ago Exited (0) 31 minutes ago heuristic_moore b021ff31b514 centos "/bin/bash" About an hour ago Exited (0) 3 seconds ago jovial_noyce 69807b0a68d4 604d80444252 "docker-entrypoint.s…" 7 days ago Exited (0) 7 days ago redis-p2Mg C:\Users\Gavin>docker rm 78b4 78b4 C:\Users\Gavin>docker ps -a CONTAINER ID IMAGE COMMAND CREATED STATUS PORTS NAMES 04198ad3d234 centos:latest "/bin/bash" 34 minutes ago Exited (137) 3 minutes ago gracious_bhaskara b021ff31b514 centos "/bin/bash" About an hour ago Exited (0) 2 minutes ago jovial_noyce 69807b0a68d4 604d80444252 "docker-entrypoint.s…" 7 days ago Exited (0) 7 days ago redis-p2Mg- 1
- 2
- 3
- 4
- 5
- 6
- 7
- 8
- 9
- 10
- 11
- 12
- 13
- 14
- 15
- 16
批量删除容器
docker rm $(docker ps -aq)- 1
- 传统虚拟机技术是虚拟出一套硬件后,在其上运行一个完整操作系统,在该系统上再运行所需应用
-
相关阅读:
查找算法【二叉查找树】 - 二叉查找树的删除
JS案例 轮播图(面向对象),最终版(注释全面)
十大排序 —— 桶排序
论文阅读——SqueezeSAM
2023年中国家用智能门锁市场发展概况分析:家用智能门锁线上市场销量290.4万套[图]
闲话 .NET(7):.NET Core 能淘汰 .NET FrameWork 吗?
Jtti:linux vim中文乱码如何解决
AWS SAA-C03 #146
重要功能丨支持1688API 接口对接一键跨境铺货及采购,解决跨境卖家货源烦恼!
多线程(一)线程与进程
- 原文地址:https://blog.csdn.net/weixin_54061333/article/details/125379906