-
走进 Java 接口测试之简单解决写接口脏数据问题

一、前言
“脏”数据指数据在被实际使用前,已经被进行了非预期的修改:
-
比如,我们在登录接口中使用事先创建好的用户进行测试,但这个用户的密码被之前的测试无意中修改了,导致测试用例执行时登录失败,也就不能顺利完成测试了。那么,此时这个测试用户数据就成为了“脏”数据。
-
再比如,我们在测试用例中使用事先创建的测试优惠券去完成订单操作,但是由于某种原因这张优惠券已经被使用过了,导致订单操作的失败,也就意味着测试用例执行失败。那么,此时这个测试优惠券数据也是“脏”数据。
由此可见,这些事先创建好的测试数据( Out-of-box ),在测试用例执行的那个时刻,是否依然可用其实是不一定的,因为这些数据很有可能在被使用前已经发生了非预期的修改。
而这些非预期的修改主要来自于以下三个方面:
-
其他测试用例,主要是写接口使用了这些事先创建好的测试数据,并修改了这些数据的状态;
-
执行手工测试时,因为直接使用了事先创建好的数据,很有可能就会修改了某些测试数据;
-
自动化测试用例的调试过程,修改了事先创建的测试数据;
为了解决这些“脏”数据,我们只能通过优化流程去控制数据的使用。本文主要针对解决第一种脏数据的情况,即针对所有写接口服务端公用的数据,首先统一提前准备,提供一键准备/恢复测试数据的方法,尽可能减少因为环境/数据准备造成的时间浪费。
二、解法
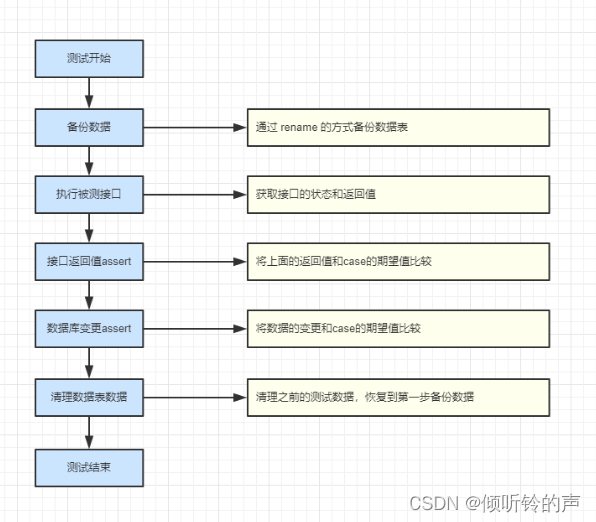
主要步骤:
-
测试开始;
-
备份数据库数据:执行写接口用例前,先把原有业务表通过 rename 的方式整表备份(前置动作);
-
执行被测接口:准备测试数据,发起对被测 API 的 request(测试中);
-
接口返回值 assert:验证返回结果的 response(测试中);
-
数据变更 assert:验证数据库变更结果(测试中);
-
清理数据表数据:清理产生的测试数据,恢复到前置动作备份的数据(后置动作)。
-
测试结束;
三、具体实现
这里从 0 到 1 我演示一个向业务表插入新记录的示例 demo。
1、开发环境
-
SUN JDK1.8 及以上
-
Maven 3.5.4 及以上
-
IntelliJ IDEA 2018 及以上
-
windows/macOS
-
MySQL 5.7 及以上
-
Navicat Premium 11.2.7 及以上 或 SQLyog 11.3 及以上
2、数据准备
这里我们选用 MySQL 数据库,首先需要构造一个测试表。
建表:
- drop table t_coffee if exists;
- create table t_coffee (
- id bigint not null auto_increment, # 自增字段
- name varchar(255),
- price bigint not null,
- create_time timestamp,
- update_time timestamp,
- primary key (id)
- );
插入数据:
- insert into t_coffee (name, price, create_time, update_time) values ('espresso', 2000, now(), now());
- insert into t_coffee (name, price, create_time, update_time) values ('latte', 2500, now(), now());
- insert into t_coffee (name, price, create_time, update_time) values ('capuccino', 2500, now(), now());
- insert into t_coffee (name, price, create_time, update_time) values ('mocha', 3000, now(), now());
- insert into t_coffee (name, price, create_time, update_time) values ('macchiato', 3000, now(), now());
初始化完成:

3、脚手架搭建
新建 Spring Boot 项目:

引包,配置 pom.xml:
- <dependencies>
- <!--MyBatis、数据库驱动、数据库连接池、logback-->
- <dependency>
- <groupId>org.mybatis.spring.boot</groupId>
- <artifactId>mybatis-spring-boot-starter</artifactId>
- <version>2.1.1</version>
- </dependency>
- <!--引入 testng 测试框架-->
- <dependency>
- <groupId>org.testng</groupId>
- <artifactId>testng</artifactId>
- <version>6.14.3</version>
- <scope>compile</scope>
- </dependency>
- <!--money类型-->
- <dependency>
- <groupId>org.joda</groupId>
- <artifactId>joda-money</artifactId>
- <version>LATEST</version>
- </dependency>
- <!--mysql 驱动-->
- <dependency>
- <groupId>mysql</groupId>
- <artifactId>mysql-connector-java</artifactId>
- <scope>runtime</scope>
- </dependency>
- <!--mybatis-generator生成器-->
- <dependency>
- <groupId>org.mybatis.generator</groupId>
- <artifactId>mybatis-generator-core</artifactId>
- <version>1.3.7</version>
- </dependency>
- <!--lombok 插件-->
- <dependency>
- <groupId>org.projectlombok</groupId>
- <artifactId>lombok</artifactId>
- <optional>true</optional>
- </dependency>
- <dependency>
- <groupId>org.springframework.boot</groupId>
- <artifactId>spring-boot-starter-test</artifactId>
- <scope>test</scope>
- <exclusions>
- <exclusion>
- <groupId>org.junit.vintage</groupId>
- <artifactId>junit-vintage-engine</artifactId>
- </exclusion>
- </exclusions>
- </dependency>
- </dependencies>
搭建代码骨架结构:
- ├─src
- │ ├─main
- │ │ ├─java
- │ │ │ └─com
- │ │ │ └─zuozewei
- │ │ │ └─SpringbootDataBackupRecoveryDemoApplication
- │ │ │ │ SpringbootDataBackupRecoveryDemoApplication.java # 启动类
- │ │ │ │
- │ │ │ ├─db
- │ │ │ │ ├─auto # 存放MyBatis Generator生成器生成的数据层代码,可以随时删除再生成
- │ │ │ │ │ ├─mapper # DAO 接口
- │ │ │ │ │ └─model # Entity 实体
- │ │ │ │ └─manual # 存放自定义的数据层代码,包括对MyBatis Generator自动生成代码的扩展
- │ │ │ │ ├─mapper # DAO 接口
- │ │ │ │ └─model # Entity 实体
- │ │ │ ├─handler # 数据转换
- │ │ │ └─service # 业务逻辑
- │ │ │ └─impl # 实现类
- │ │ │
- │ │ └─resources
- │ │ │ application.yml # 全局配置文件
- │ │ │ generatorConfig.xml # Mybatis Generator 配置文件
- │ │ ├─db
- │ │ ├─mapper
- │ │ │ └─com
- │ │ │ └─zuozewei
- │ │ │ └─SpringbootDataBackupRecoveryDemoApplication
- │ │ │ └─db
- │ │ │ ├─auto # 存放MyBatis Generator生成器生成的数据层代码,可以随时删除再生成
- │ │ │ │ └─mapper # 数据库 Mapping 文件
- │ │ │ │
- │ │ │ └─manual # 存放自定义的数据层代码,包括对MyBatis Generator自动生成代码的扩展
- │ │ │ └─mapper # 数据库 Mapping 文件
- │ │
- │ └─test
- │ └─java
- │ └─com
- │ └─zuozewei
- │ └─springbootdatadrivendemo
- │ └─demo # 测试用例
- ├─pom.xml
4、业务持久层
4.1、处理自定义类型
这里的 price 我们扩展了自定义类型,所以我们需要使用 TypeHandler 解决自定义类型预处理。因为 price 是
joda-money类型,数据库中却是 bigint 类型。MyBatis 为我们提供的方法即是 TypeHandler 来应对 Java 和 jdbc 字段类型不匹配的情况。MyBatis 中内置了不少的 TypeHandler,如果我们想要自己自定义一个 TypeHandler 可以实现 TypeHandler 接口,也可以继承 BaseTypeHandler 类。下面我们实现一个将 Java 中的joda-money类型利用我们自定义的 MoneyTypeHandler 来转换为 JDBC 的 bigint 类型。引包:
- !--money类型-->
- <dependency>
- <groupId>org.joda</groupId>
- <artifactId>joda-money</artifactId>
- <version>LATEST</version>
- </dependency>
新建一个 handler package,编写
MoneyTypeHandler.java:/*** 在 Money 与 Long 之间转换的 TypeHandler,处理 CNY 人民币*/public class MoneyTypeHandler extends BaseTypeHandler<Money> {/*** 设置非空参数* @param ps* @param i* @param parameter* @param jdbcType* @throws SQLException*/@Overridepublic void setNonNullParameter(PreparedStatement ps, int i, Money parameter, JdbcType jdbcType) throws SQLException {ps.setLong(i, parameter.getAmountMinorLong());}/*** 根据列名,获取可以为空的结果* @param rs* @param columnName* @return* @throws SQLException*/@Overridepublic Money getNullableResult(ResultSet rs, String columnName) throws SQLException {return parseMoney(rs.getLong(columnName));}/*** 根据列索引,获取可以为空的结果* @param rs* @param columnIndex* @return* @throws SQLException*/@Overridepublic Money getNullableResult(ResultSet rs, int columnIndex) throws SQLException {return parseMoney(rs.getLong(columnIndex));}/**** @param cs* @param columnIndex* @return* @throws SQLException*/@Overridepublic Money getNullableResult(CallableStatement cs, int columnIndex) throws SQLException {return parseMoney(cs.getLong(columnIndex));}/*** 处理 CNY 人民币* @param value* @return*/private Money parseMoney(Long value) {return Money.of(CurrencyUnit.of("CNY"), value / 100.0);}}4.2、使用 mybatis-generator
MyBatis Generator 是 MyBatis 的代码生成器,支持为 MyBatis 的所有版本生成代码。非常容易及快速生成 Mybatis 的 Java POJO 文件及数据库 Mapping 文件。
引包:
<!--mybatis-generator生成器--><dependency><groupId>org.mybatis.generator</groupId><artifactId>mybatis-generator-core</artifactId><version>1.3.7</version></dependency>配置
generatorConfig.xml:<?xml version="1.0" encoding="UTF-8"?><!DOCTYPE generatorConfigurationPUBLIC "-//mybatis.org//DTD MyBatis Generator Configuration 1.0//EN""http://mybatis.org/dtd/mybatis-generator-config_1_0.dtd"><generatorConfiguration><context id="MySQLTables" targetRuntime="MyBatis3"><!--支持流式 fluent 方法--><plugin type="org.mybatis.generator.plugins.FluentBuilderMethodsPlugin" /><!-- 自动生成toString方法 --><plugin type="org.mybatis.generator.plugins.ToStringPlugin" /><!-- 自动生成hashcode方法 --><plugin type="org.mybatis.generator.plugins.SerializablePlugin" /><!-- 分页插件 --><plugin type="org.mybatis.generator.plugins.RowBoundsPlugin" /><!--数据库连接信息--><jdbcConnection driverClass="com.mysql.cj.jdbc.Driver"connectionURL="jdbc:mysql://localhost:3306/zuozewei?useUnicode=true&characterEncoding=UTF-8&useJDBCCompliantTimezoneShift=true&useLegacyDatetimeCode=false&serverTimezone=UTC&useSSL=false"userId="zuozewei"password="123456"></jdbcConnection><!--模型生成器、Mapper生成器--><javaModelGenerator targetPackage="com.zuozewei.springbootdatabackuprecoverydemo.db.auto.model"targetProject="./src/main/java"><property name="enableSubPackages" value="true" /><property name="trimStrings" value="true" /></javaModelGenerator><sqlMapGenerator targetPackage="com.zuozewei.springbootdatabackuprecoverydemo.db.auto.mapper"targetProject="./src/main/resources/mapper"><property name="enableSubPackages" value="true" /></sqlMapGenerator><javaClientGenerator type="MIXEDMAPPER"targetPackage="com.zuozewei.springbootdatabackuprecoverydemo.db.auto.mapper"targetProject="./src/main/java"><property name="enableSubPackages" value="true" /></javaClientGenerator><!--表映射--><table tableName="t_coffee" domainObjectName="Coffee" ><generatedKey column="id" sqlStatement="SELECT LAST_INSERT_ID()" identity="true" /><columnOverride column="price" javaType="org.joda.money.Money" jdbcType="BIGINT"typeHandler="com.zuozewei.springbootdatabackuprecoverydemo.handler.MoneyTypeHandler"/></table></context></generatorConfiguration>注意:
-
id 是自增的;
-
price 字段需要映射到 MoneyTypeHandler。
4.3、启动方法
在工程启动类编写一个调用方法:
@Slf4j@SpringBootApplication@MapperScan("com.zuozewei.springbootdatabackuprecoverydemo.db")public class SpringbootDataBackupRecoveryDemoApplication implements ApplicationRunner {public static void main(String[] args) {SpringApplication.run(SpringbootDataBackupRecoveryDemoApplication.class, args);log.info("程序启动!");}@Overridepublic void run(ApplicationArguments args) throws Exception {generateArtifacts();log.info("启动generateArtifacts");}/*** 执行MyBatisGenerator* @throws Exception*/private void generateArtifacts() throws Exception {List<String> warnings = new ArrayList<>();ConfigurationParser cp = new ConfigurationParser(warnings);Configuration config = cp.parseConfiguration(this.getClass().getResourceAsStream("/generatorConfig.xml"));DefaultShellCallback callback = new DefaultShellCallback(true);MyBatisGenerator myBatisGenerator = new MyBatisGenerator(config, callback, warnings);myBatisGenerator.generate(null);}}启动工程:

检查配置文件指定路径是否生成文件:

4.4、实现 Service 方法
在 service package 下新建 Service 接口
CoffeeService.java:- /**
- * 描述: coffee Service
- *
- * @author zuozewei
- * @create 2019-11-21 18:00
- */
- public interface CoffeeService {
- // 插入
- int addCoffee(Coffee coffee);
- // 查询
- List selectCoffeeFromDs(CoffeeExample coffeeExample) throws InterruptedException;
- }
实现 CoffeeService 接口,新建
CoffeeServiceImpl.java:- /**
- * 描述: CoffeeService 实现类
- *
- * @author zuozewei
- * @create 2019-11-21 18:00
- */
- @Service
- public class CoffeeServiceImpl implements CoffeeService {
- @Resource
- private CoffeeMapper coffeeMapper;
- @Override
- public int addCoffee(Coffee coffee) {
- return coffeeMapper.insert(coffee);
- }
- @Override
- public List selectCoffeeFromDs(CoffeeExample coffeeExample) throws InterruptedException {
- return coffeeMapper.selectByExample(coffeeExample);
- }
- }
4.5、配置 mybatis
在
application.yml中配置 mybatis- spring:
- datasource:
- url: jdbc:mysql://localhost:3306/zuozewei?useUnicode=true&characterEncoding=UTF-8&useJDBCCompliantTimezoneShift=true&useLegacyDatetimeCode=false&serverTimezone=UTC&useSSL=false
- username: zuozewei
- password: 123456
- mybatis:
- type-aliases-package: com.zuozewei.springbootdatabackuprecoverydemo.db # 自动扫描实体类所在的包
- type-handlers-package: com.zuozewei.springbootdatabackuprecoverydemo.handler # 指定 TypeHandler 所在的包
- configuration:
- map-underscore-to-camel-case: true # 开启驼峰功能
- mapper-locations: classpath*:/mapper/**/*.xml # 扫描类路径下所有以xml文件结尾的文件
5、数据备份 &恢复开发
这里使用 MyBatis 实现对表进行 DML(insert, delete, update 等) 和 DDL(create, alter, drop)操作。
5.1、Mapper.xml
编写对应的 TestDataMapper.xml:
- <?xml version="1.0" encoding="UTF-8" ?>
- <!DOCTYPE mapper PUBLIC "-//mybatis.org//DTD Mapper 3.0//EN" "http://mybatis.org/dtd/mybatis-3-mapper.dtd" >
- <mapper namespace="com.zuozewei.springbootdatabackuprecoverydemo.db.manual.mapper.TestDataMapper" >
- <!--修改数据库的表名字-->
- <update id="alterTableName">
- alter table ${originalTableName} rename to ${newTableName}
- </update>
- <!--drop指定数据库表的数据-->
- <update id="dropTable">
- drop table ${tableName}
- </update>
- </mapper>
注意:
-
alterTableName:不同的数据库可能存在语法不一致的情况。
5.2、Dao 接口
dao 层增加 TestDataMapper.java:
- /**
- * 描述:
- * 执行数据库相关测试表的Mapper
- *
- * @author zuozewei
- * @create 2019-11-21
- */
- public interface TestDataMapper {
- /**
- * 修改数据库的表名字
- * @param originalTableName
- * @param newTableName
- * @return
- */
- int alterTableName(@Param("originalTableName") String originalTableName,
- @Param("newTableName") String newTableName);
- /**
- * drop指定数据库表的数据
- * @param tableName
- * @return
- */
- int dropTable(@Param("tableName") String tableName);
- /**
- * 根据传入的表明,创建新的表并且将原表的数据插入到新的表中
- * @param newTableName
- * @param originalTableName
- */
- void createNewTableAndInsertData(@Param("newTableName") String newTableName,
- @Param("originalTableName") String originalTableName);
- }
Service 的接口 TestDataService :
- /**
- * 描述: TestDataService
- *
- * @author zuozewei
- * @create 2019-11-21
- */
- public interface TestDataService {
- /**
- * 准备数据库数据
- * @param tableName
- */
- void createTableData(String tableName);
- /**
- * 清理数据库数据
- * @param tableName
- */
- void recycleTableData(String tableName);
- }
实现 Service 的接口调用方法:
- /**
- * 描述: TestDataService 实现类
- *
- * @author zuozewei
- * @create 2019-11-21
- */
- @Service
- public class TestDataServiceImpl implements TestDataService {
- @Resource
- private TestDataMapper testDataMapper;
- /**
- * 准备数据库数据
- * @param tableName
- */
- @Override
- public void createTableData(String tableName) {
- // 新表名
- String newTableName = tableName + "_bak";
- // 源表名
- String originalTableName = tableName;
- // 创建测试表并复制数据
- testDataMapper.createNewTableAndInsertData(newTableName,originalTableName);
- }
- /**
- * 清理数据库数据
- * @param tableName
- */
- @Override
- public void recycleTableData(String tableName) {
- // 新表名
- String newTableName = tableName ;
- // 源表名
- String originalTableName = tableName + "_bak";
- // 删除测试表
- testDataMapper.dropTable(tableName);
- // 恢复备份表
- testDataMapper.alterTableName(originalTableName,newTableName);
- }
- }
6、测试
新建一个测试类,TestMapperService:
- @SpringBootTest
- @Slf4j
- public class TestMapperService extends AbstractTestNGSpringContextTests {
- private String tableName = "t_coffee"; //表名
- @Autowired
- private CoffeeService coffeeService;
- @Autowired
- private TestDataService testDataService;
- @BeforeMethod(description = "备份及准备测试数据")
- public void beforeMethod() {
- testDataService.createTableData(tableName);
- }
- @Test(description = "测试demo")
- public void testSelect() throws InterruptedException {
- // 插入数据
- Coffee espresso = new Coffee()
- .withName("zuozewei")
- .withPrice(Money.of(CurrencyUnit.of("CNY"), 20.0))
- .withCreateTime(new Date())
- .withUpdateTime(new Date());
- coffeeService.addCoffee(espresso);
- CoffeeExample example = new CoffeeExample();
- // 指定查询条件
- example.createCriteria().andNameEqualTo("zuozewei");
- // 查询数据
- List<Coffee> list = coffeeService.selectCoffeeFromDs(example);
- list.forEach(e -> log.info("selectByExample: {}", e));
- // 筛选指定属性
- List<Money> moneys = list.stream().map(Coffee::getPrice).collect(Collectors.toList());
- log.info( moneys.get(0).toString() );
- // 断言结果
- Assert.assertEquals("CNY 20.00",moneys.get(0).toString());
- }
- @AfterMethod(description = "清理及恢复数据")
- public void afterMethod() {
- testDataService.recycleTableData(tableName);
- }
- }
注意:
-
SpringBoot中使用 TestNg 必须加上@SpringBootTest,并且继承AbstractTestNGSpringContextTests,如果不继承AbstractTestNGSpringContextTests,会导致@Autowired不能加载 Bean; -
@Test:测试逻辑地方;
-
数据备份及清理调用只能放在
@BeforeMethod / @AfterMethod注解。
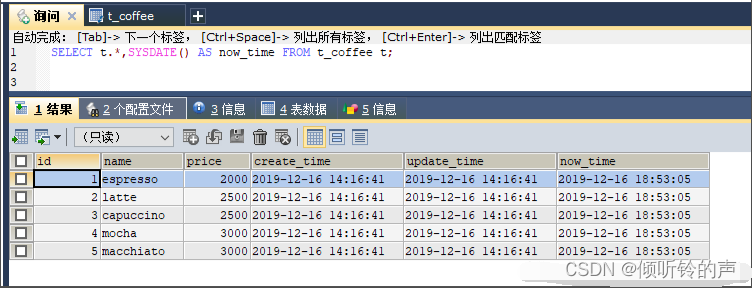
最后就是跑测了,我们先看下数据:
执行测试:
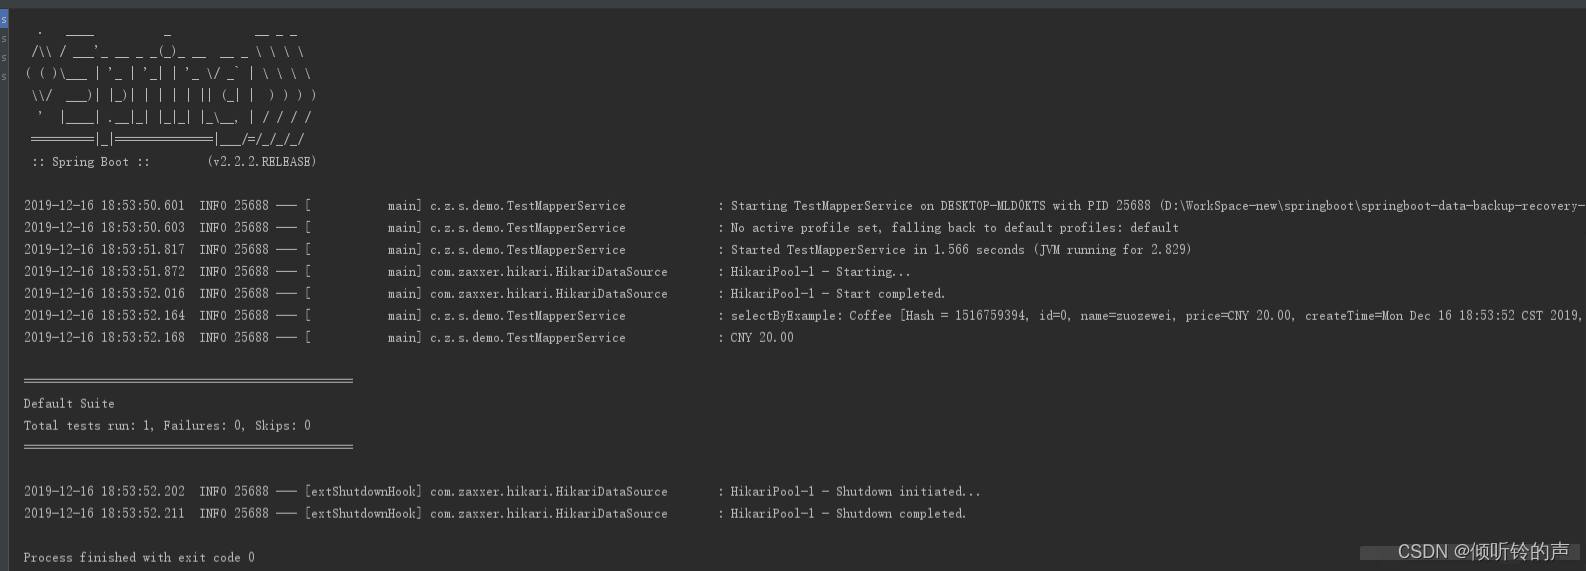
测试完成后,我们再检查下业务数据:

我们看到数据被成功恢复了。
四、小结
本文主要提出一种简单的解决方案,针对所有写接口服务端公用的数据,统一提前准备,跑测的时候提供一键准备/恢复测试数据的方法,尽可能减少因为环境/数据准备造成的时间浪费。
希望能都对你有所启发。

-
-
相关阅读:
Mysql JSON 类型 索引&查询 操作
蓝桥杯冲刺_二分(正在补题)
node笔记_koa框架是什么?
Redis学习(二)之 Redis Cluster集群
洛谷 P1967 [NOIP2013 提高组] 货车运输(最大生成树,最近公共祖先)
文件存储空间管理(空闲表法,空闲链表法,位示图法,成组链表法)
Unknown custom element: <el-image>无法使用该组件,升级element-ui版本后项目报错
Swin-Transformer详解
TouchGFX之后端通信
质量问题不是不爆,时候未到
- 原文地址:https://blog.csdn.net/m0_67698950/article/details/125448966