-
Spring Cloud框架学习-Spring Cloud Hystrix
1. 基本介绍
Spring Cloud Hystrix 是Spring Cloud Netflix 子项目的核心组件之一,Hystrix 叫做断路器/熔断器。在微服务架构中,服务与服务之间通过远程调用的方式进行通信,一旦某个被调用的服务发生了故障,其依赖服务也会发生故障,此时就会发生故障的蔓延,最终导致系统瘫痪。Hystrix实现了断路器模式,当某个服务发生故障时,通过断路器的监控,给调用方返回一个错误响应,而不是长时间的等待,这样就不会使得调用方由于长时间得不到响应而占用线程,从而防止故障的蔓延。Hystrix具备服务降级、服务熔断、线程隔离、请求缓存、请求合并及服务监控等强大功能。
2. @HystrixCommand使用
2.1 介绍
服务雪崩:多个微服务之间调用的时候,假设微服务A调用微服务B和微服务C,微服务B和微服务C又调用其他的微服务,这称为“扇出”。如果微服务A扇出的链路中某个微服务的调用响应时间过长,对微服务A的调用就会占用越来越多的系统资源,进而引起系统崩溃,这就出现了服务雪崩。
熔断机制是应对服务雪崩的一种微服务链路保护机制,当扇出链路的某个微服务出错不可用或者响应时间太长时,会进行服务降级,进而熔断该节点微服务的调用,快速返回错误的响应信息。当检测到该节点微服务调用响应正常后,恢复调用链路。Spring Cloud提供Hystrix组件实现熔断机制,Hystrix监控微服务之间的调用情况,当失败调用到一定阈值,就会启动熔断机制。其中核心注解就是@HystrixCommand注解。
服务熔断类比保险丝达到最大服务访问后,直接拒绝访问,然后调用服务降级的方法并返回友好的提示。
2.2 环境准备
首先准备注册中心服务eureka使用1111端口和服务提供者服务provider
首先创建一个新的 SpringBoot 模块,作为服务消费者consumer,依赖如下:
<dependencies> <dependency> <groupId>org.springframework.boot</groupId> <artifactId>spring-boot-starter-web</artifactId> </dependency> <dependency> <groupId>top.javahai</groupId> <artifactId>commons</artifactId> <version>1.0-SNAPSHOT</version> </dependency> <dependency> <groupId>org.springframework.cloud</groupId> <artifactId>spring-cloud-starter-netflix-eureka-client</artifactId> </dependency> <dependency> <groupId>org.springframework.cloud</groupId> <artifactId>spring-cloud-starter-netflix-hystrix</artifactId> </dependency> </dependencies>- 1
- 2
- 3
- 4
- 5
- 6
- 7
- 8
- 9
- 10
- 11
- 12
- 13
- 14
- 15
- 16
- 17
- 18
- 19
- 20
项目创建成功后,添加如下配置(服务名,端口,注册中心地址),将 Hystrix 注册到 Eureka 上:
spring.application.name=hystrix server.port=3000 #配置中心的url eureka.client.service-url.defaultZone=http://localhost:1111/eureka- 1
- 2
- 3
- 4
然后在项目启动类上添加注解@EnableCircuitBreaker,开启断路器功能,同时提供一个 RestTemplate 实例:
@SpringBootApplication //标识开启断路器 @EnableCircuitBreaker public class HystrixApplication { public static void main(String[] args) { SpringApplication.run(HystrixApplication.class, args); } //开启负载均衡 @Bean @LoadBalanced RestTemplate restTemplate(){ return new RestTemplate(); } }- 1
- 2
- 3
- 4
- 5
- 6
- 7
- 8
- 9
- 10
- 11
- 12
- 13
- 14
- 15
- 16
这样Hystrix的配置就算完成了,接下来提供Hystrix的接口
2.3 参数说明
@HystrixCommand中的常用参数:
- fallbackMethod:指定服务降级处理方法
- ignoreExceptions:忽略某些异常,不发生服务降级
- commandKey:命令名称,用于区分不同的命令
- groupKey:分组名称,Hystrix会根据不同的分组来统计命令的告警及仪表盘信息
- threadPoolKey:线程池名称,用于划分线程池
- commandProperties:命令属性,对应全局配置文件application.yml中配置全局的属性

涉及断路器的三个重要参数:
- 快照时间窗:断路器确定是否打开需要统计一些请求和错误数据,而统计的时间访问就是快照时间窗,默认为最近的10秒。
- 请求总数阈值:在快照时间窗内,必须满足请求总数阈值才会熔断,默认为20次。即10秒内如果该Hystrix命令的调用次数不足20次,即使所有的请求超时或者其他原因失败,断路器都不会打开
- 错误百分比阈值:当请求总数在快照时间窗内超过阈值,默认阈值为50%的错误百分比,断路器则会打开。比如发生了30次调用,如果在这30次调用中,有15次发生了超时异常,这就超过了50%的错误百分比,此时会打开断路器。
commandProperties能够配置的参数如下:
Command属性主要用来控制HystrixCommand命令的行为,它主要分下面的类别: 1、Execution:用来控制HystrixCommand.run()的执行 execution.isolation.strategy:该属性用来设置HystrixCommand.run()执行的隔离策略。默认为THREAD。 execution.isolation.thread.timeoutInMilliseconds:该属性用来配置HystrixCommand执行的超时时间,单位为毫秒。 execution.timeout.enabled:该属性用来配置HystrixCommand.run()的执行是否启用超时时间。默认为true。 execution.isolation.thread.interruptOnTimeout:该属性用来配置当HystrixCommand.run()执行超时的时候是否要它中断。 execution.isolation.thread.interruptOnCancel:该属性用来配置当HystrixCommand.run()执行取消时是否要它中断。 execution.isolation.semaphore.maxConcurrentRequests:当HystrixCommand命令的隔离策略使用信号量时,该属性用来配置信号量的大小。当最大并发请求达到该设置值时,后续的请求将被拒绝。 2、Fallback:用来控制HystrixCommand.getFallback()的执行 fallback.isolation.semaphore.maxConcurrentRequests:该属性用来设置从调用线程中允许HystrixCommand.getFallback()方法执行的最大并发请求数。当达到最大并发请求时,后续的请求将会被拒绝并抛出异常。 fallback.enabled:该属性用来设置服务降级策略是否启用,默认是true。如果设置为false,当请求失败或者拒绝发生时,将不会调用HystrixCommand.getFallback()来执行服务降级逻辑。 3、Circuit Breaker:用来控制HystrixCircuitBreaker的行为。 circuitBreaker.enabled:确定当服务请求命令失败时,是否使用断路器来跟踪其健康指标和熔断请求。默认为true。 circuitBreaker.requestVolumeThreshold:用来设置在滚动时间窗中,断路器熔断的最小请求数。例如,默认该值为20的时候,如果滚动时间窗(默认10秒)内仅收到19个请求,即使这19个请求都失败了,断路器也不会打开。 circuitBreaker.sleepWindowInMilliseconds:用来设置当断路器打开之后的休眠时间窗。休眠时间窗结束之后,会将断路器设置为“半开”状态,尝试熔断的请求命令,如果依然时候就将断路器继续设置为“打开”状态,如果成功,就设置为“关闭”状态。 circuitBreaker.errorThresholdPercentage:该属性用来设置断路器打开的错误百分比条件。默认值为50,表示在滚动时间窗中,在请求值超过requestVolumeThreshold阈值的前提下,如果错误请求数百分比超过50,就把断路器设置为“打开”状态,否则就设置为“关闭”状态。 circuitBreaker.forceOpen:该属性默认为false。如果该属性设置为true,断路器将强制进入“打开”状态,它会拒绝所有请求。该属性优于forceClosed属性。 circuitBreaker.forceClosed:该属性默认为false。如果该属性设置为true,断路器强制进入“关闭”状态,它会接收所有请求。如果forceOpen属性为true,该属性不生效。 4、Metrics:该属性与HystrixCommand和HystrixObservableCommand执行中捕获的指标相关。 metrics.rollingStats.timeInMilliseconds:该属性用来设置滚动时间窗的长度,单位为毫秒。该时间用于断路器判断健康度时需要收集信息的持续时间。断路器在收集指标信息时会根据设置的时间窗长度拆分成多个桶来累计各度量值,每个桶记录了一段时间的采集指标。例如,当为默认值10000毫秒时,断路器默认将其分成10个桶,每个桶记录1000毫秒内的指标信息。 metrics.rollingStats.numBuckets:用来设置滚动时间窗统计指标信息时划分“桶”的数量。默认值为10。 metrics.rollingPercentile.enabled:用来设置对命令执行延迟是否使用百分位数来跟踪和计算。默认为true,如果设置为false,那么所有的概要统计都将返回-1。 metrics.rollingPercentile.timeInMilliseconds:用来设置百分位统计的滚动窗口的持续时间,单位为毫秒。 metrics.rollingPercentile.numBuckets:用来设置百分位统计滚动窗口中使用桶的数量。 metrics.rollingPercentile.bucketSize:用来设置每个“桶”中保留的最大执行数。 metrics.healthSnapshot.intervalInMilliseconds:用来设置采集影响断路器状态的健康快照的间隔等待时间。 5、Request Context:涉及HystrixCommand使用HystrixRequestContext的设置。 requestCache.enabled:用来配置是否开启请求缓存。 requestLog.enabled:用来设置HystrixCommand的执行和事件是否打印到日志的HystrixRequestLog中。- 1
- 2
- 3
- 4
- 5
- 6
- 7
- 8
- 9
- 10
- 11
- 12
- 13
- 14
- 15
- 16
- 17
- 18
- 19
- 20
- 21
- 22
- 23
- 24
- 25
- 26
- 27
- 28
- 29
- 30
- 31
- 32
- 33
- 34
2.4 服务降级实现
下面使用@HystrixCommand注解实现服务降级,配置服务降级的方法。
@Service public class HelloService { @Autowired RestTemplate restTemplate; /** *方法中发起远程调用可能会出现调用失败 * 使用@HystrixCommand注解, * 1.配置fallbackMethod属性用于方法调用失败后的临时替代方法 * 2.配置ignoreException属性定义忽略多个异常,方法中发生被忽略的异常就不会进行服务降级,而是直接抛出 * @return */ @HystrixCommand(fallbackMethod = "error",ignoreExceptions ={NullPointerException.class}) public String hello(){ int i=1/0; return restTemplate.getForObject("http://provider/hello",String.class); } /** *这个方法的名字需要与fallbackMethod中一致。方法返回值也需要与注解所修饰的方法一致 * 通过参数Throwable获取在发生错误的方法中抛出的异常 * @return */ public String error(Throwable throwable){ return "error:"+throwable.toString(); } }- 1
- 2
- 3
- 4
- 5
- 6
- 7
- 8
- 9
- 10
- 11
- 12
- 13
- 14
- 15
- 16
- 17
- 18
- 19
- 20
- 21
- 22
- 23
- 24
- 25
- 26
- 27
- 28
编写HelloController
@RestController public class HelloController { @Autowired RestTemplate restTemplate; @Autowired HelloService helloService; @GetMapping("/hello") public String hello(){ return helloService.hello(); } }- 1
- 2
- 3
- 4
- 5
- 6
- 7
- 8
- 9
- 10
- 11
- 12
- 13
浏览器测试访问:

2.5 异步调用
/** * 通过注解方式实现请求的异步调用 * @return * @throws ExecutionException * @throws InterruptedException */ @GetMapping("/hello3") public String hello3() throws ExecutionException, InterruptedException { Future<String> stringFuture = helloService.hello2(); String result = stringFuture.get(); return result; } /** * 通过注解方式实现请求异步调用 */ @HystrixCommand(fallbackMethod = "error") public Future<String> hello2(){ return new AsyncResult<String>() { @Override public String invoke() { return restTemplate.getForObject("http://provider/hello",String.class); } }; }- 1
- 2
- 3
- 4
- 5
- 6
- 7
- 8
- 9
- 10
- 11
- 12
- 13
- 14
- 15
- 16
- 17
- 18
- 19
- 20
- 21
- 22
- 23
- 24
- 25
- 26
3. 请求命令
3.1 基本使用
请求命令就是以继承类的方式来替代前面的注解方式。定义一个HelloCommand:
/** * 以继承类的方式来代替前面的注解方式来进行远程调用和服务熔断与降级 * @author Hai * @date 2020/7/21 - 20:02 */ public class HelloCommand extends HystrixCommand<String> { RestTemplate restTemplate; protected HelloCommand(Setter setter, RestTemplate restTemplate) { super(setter); this.restTemplate=restTemplate; } @Override protected String run() throws Exception { int i=1/0; return restTemplate.getForObject("http://provider/hello",String.class); } }- 1
- 2
- 3
- 4
- 5
- 6
- 7
- 8
- 9
- 10
- 11
- 12
- 13
- 14
- 15
- 16
- 17
- 18
- 19
调用方法:
@RestController public class HelloController { @Autowired RestTemplate restTemplate; @Autowired HelloService helloService; /** * 请求命令, * 需要注意一次实例只能够执行一次 * 可以选择直接执行或者先入队后再执行 * @return */ @GetMapping("/hello2") public String hello2(){ //通过execute方法执行 HelloCommand helloCommand = new HelloCommand(HystrixCommand.Setter.withGroupKey(HystrixCommandGroupKey.Factory.asKey("hai")), restTemplate); String result01 = helloCommand.execute(); //异步执行,通过queue.get执行,先入队再执行 HelloCommand helloCommand1 = new HelloCommand(HystrixCommand.Setter.withGroupKey(HystrixCommandGroupKey.Factory.asKey("hai2")), restTemplate); Future<String> queue = helloCommand1.queue(); String result02=" "; try { result02 = queue.get(); } catch (InterruptedException e) { e.printStackTrace(); } catch (ExecutionException e) { e.printStackTrace(); } return result01+" "+result02; } }- 1
- 2
- 3
- 4
- 5
- 6
- 7
- 8
- 9
- 10
- 11
- 12
- 13
- 14
- 15
- 16
- 17
- 18
- 19
- 20
- 21
- 22
- 23
- 24
- 25
- 26
- 27
- 28
- 29
- 30
- 31
- 32
- 33
- 34
浏览器请求接口/hello2测试

3.2 服务容错
重写继承类HystrixCommand的getFallback方法实现
/** * 继承类的方式中实现服务的容错:重写getFallback()方法实现 * 方法调用失败时会调用该方法。通过getExecutionException()方法获取发生的异常 * @return */ @Override protected String getFallback() { return "Error-Extends:"+getExecutionException().toString(); }- 1
- 2
- 3
- 4
- 5
- 6
- 7
- 8
- 9
4. 异常处理
就是当发起服务调用时,如果不是 provider 的原因导致请求调用失败,而是 consumer 中本身代码有问题导致的请求失败,即 consumer 中抛出了异常,这个时候,也会自动进行服务降级,只不过这个时候降级,我们还需要知道到底是哪里出异常了。
如下示例代码,如果 hello 方法中,执行时抛出异常,那么一样也会进行服务降级,进入到 error 方法中,在 error 方法中,我们可以获取到异常的详细信息。
@Service public class HelloService { @Autowired RestTemplate restTemplate; /** *方法中发起远程调用可能会出现调用失败 * 使用@HystrixCommand注解, * 1.配置fallbackMethod属性用于方法调用失败后的临时替代方法 * 2.配置ignoreException属性定义忽略多个异常,方法中发生被忽略的异常就不会进行服务降级,而是直接抛出 * @return */ @HystrixCommand(fallbackMethod = "error",ignoreExceptions ={NullPointerException.class}) public String hello(){ int i=1/0; return restTemplate.getForObject("http://provider/hello",String.class); } /** *这个方法的名字需要与fallbackMethod中一致。方法返回值也需要与注解所修饰的方法一致 * 通过参数Throwable获取在发生错误的方法中抛出的异常 * @return */ public String error(Throwable throwable){ return "error:"+throwable.getMessage(); } }- 1
- 2
- 3
- 4
- 5
- 6
- 7
- 8
- 9
- 10
- 11
- 12
- 13
- 14
- 15
- 16
- 17
- 18
- 19
- 20
- 21
- 22
- 23
- 24
- 25
- 26
- 27
通过继承的方式实现熔断降级,在 getFallback 方法中,我们可以通过 getExecutionException 方法来获取执行的异常信息。
如果我们希望发生异常直接抛出,不做服务降级,在注解中添加配置即可。
配置ignoreException属性定义忽略多个异常,方法中发生被忽略的异常就不会进行服务降级,而是直接抛出
@HystrixCommand(fallbackMethod = "error",ignoreExceptions ={NullPointerException.class}) public String hello(){ int i=1/0; return restTemplate.getForObject("http://provider/hello",String.class); }- 1
- 2
- 3
- 4
- 5
这个配置表示当hello方法发生NullPointerException的时候,不进行服务降级处理,直接抛出异常。
5. 请求缓存
请求缓存就是在consumer中调用同一个接口,如果参数相同,则可以使用之前缓存下来的数据。
首先provider 中的 新增test_get接口,用来检测缓存配置是否生效:
@GetMapping("/test_get") public String hell02(String name){ System.out.println(new Date()+"-"+name); return "Hello "+name; }- 1
- 2
- 3
- 4
- 5
5.1 @CacheResult
在 Hystrix 的请求方法中,添加@CacheRequest注解。@CacheRequest注解表示该方法的请求结果会被缓存起来,默认情况下,缓存的key 就是方法的参数,缓存的value就是方法的返回值。
/** * 测试请求缓存 * @param name * @return */ @HystrixCommand(fallbackMethod = "error2") @CacheResult public String helloCache(String name){ String result01 = restTemplate.getForObject("http://provider/test_get?name={1}", String.class, name); return result01; }- 1
- 2
- 3
- 4
- 5
- 6
- 7
- 8
- 9
- 10
- 11
这个配置完成后,缓存并不会生效,一般来说,我们使用缓存,都有一个缓存生命周期这样一个概念。这里也一样,我们需要先初始化 HystrixRequestContext,初始化完成后,缓存开始生效。然后HystrixRequestContext的close方法之后,缓存会失效。
/** * 测试缓存 * 这里涉及缓存生命周期的概念 * 首先初始化HystrixRequestContext,初始化完成后,缓存开始生效 * 然后调用HystrixRequestContext缓存失效 * @return */ @GetMapping("/hello4") public String hello4(){ HystrixRequestContext hystrixRequestContext = HystrixRequestContext.initializeContext(); //第一次请求,缓存了结果 String s=helloService.helloCache("hai"); //再次发起请求,这次不会请求provider服务的接口,而是直接获取缓存中的结果 s=helloService.helloCache("hai"); //删除了数据同时删除了缓存中的数据 helloService.deleteUser("hai"); //再次发起请求 s=helloService.helloCache("hai"); hystrixRequestContext.close(); return s; }- 1
- 2
- 3
- 4
- 5
- 6
- 7
- 8
- 9
- 10
- 11
- 12
- 13
- 14
- 15
- 16
- 17
- 18
- 19
- 20
- 21
在ctx close 之前,缓存是有效的,close 之后,缓存就失效了。也就是说,访问一次 hello4 接口,provider 只会被调用一次(一次访问 hello4 接口第二次调用provider使用的缓存),如果再次调用 hello4 接口,之前缓存的数据是失效的。

查看provider的控制台输出,可以看到只收到了两次请求,说明第二次请求使用了缓存。
默认情况下,缓存的 key 就是所调用方法的参数,如果参数有多个,就是多个参数组合起来作为缓存的
key。例如如下方法:@HystrixCommand(fallbackMethod = "error2") @CacheResult public String hello3(String name,Integer age) { return restTemplate.getForObject("http://provider/hello2?name={1}", String.class, name); }- 1
- 2
- 3
- 4
- 5
- 6
此时缓存的 key 就是 name+age,但是,如果方法有多个参数,但是又只想使用其中一个作为缓存的 key,那么我们可以通过 @CacheKey 注解来解决。
5.2 @CacheKey
@CacheKey注解的作用,就是方法有多个参数时,默认是组合这些参数作为key,但可以使用@CacheKey注解来指定某个参数为key
@HystrixCommand(fallbackMethod = "error2") @CacheResult public String hello3(@CacheKey String name,Integer age) { return restTemplate.getForObject("http://provider/hello2?name={1}", String.class, name); }- 1
- 2
- 3
- 4
- 5
- 6
上面这个配置,虽然有两个参数,但是缓存时以 name 为准。也就是说,两次请求中,只要 name 一样,即使 age 不一样,第二次请求也可以使用第一次请求缓存的结果。另外还有一个注解叫做 @CacheRemove()。在做数据缓存时,如果有一个数据删除的方法,我们一般除了删除数据库中的数据,还希望能够顺带删除缓存中的数据,这个时候 @CacheRemove() 就派上用场了。
5.3 @CacheRemove
测试@CacheRemove,用于删除缓存中的数据,@CacheRemove() 在使用时必须指定 commandKey 属性,commandKey 其实就是缓存方法的方法名,指定了 commandKey,@CacheRemove 才能找到数据缓存在哪里了,进而才能成功删除掉数据。
例如如下方法定义删除缓存:
@HystrixCommand @CacheRemove(commandKey = "helloCache") public void deleteUser(String name){ System.out.println("删除了记录"+name); System.out.println("缓存清理"); }- 1
- 2
- 3
- 4
- 5
- 6
5.4 请求命令实现缓存
如果是继承的方式使用 Hystrix ,只需要重写 getCacheKey 方法即可:
/** * 以继承类的方式来代替前面的注解方式来进行远程调用和服务熔断与降级 * @author Hai * @date 2020/7/21 - 20:02 */ public class HelloCommand extends HystrixCommand<String> { RestTemplate restTemplate; String name; protected HelloCommand(Setter setter, RestTemplate restTemplate, String name) { super(setter); this.name = name; this.restTemplate=restTemplate; } @Override protected String run() throws Exception { return restTemplate.getForObject("http://provider/hello",String.class); } /** * 继承类的方式中实现服务的容错:重写getFallback()方法实现 * 方法调用失败时会调用该方法。通过getExecutionException()方法获取发生的异常 * @return */ @Override protected String getFallback() { return "Error-Extends:"+getExecutionException().toString(); } /** * 继承方式实现请求缓存 * @return */ @Override protected String getCacheKey() { return name; } }- 1
- 2
- 3
- 4
- 5
- 6
- 7
- 8
- 9
- 10
- 11
- 12
- 13
- 14
- 15
- 16
- 17
- 18
- 19
- 20
- 21
- 22
- 23
- 24
- 25
- 26
- 27
- 28
- 29
- 30
- 31
- 32
- 33
- 34
- 35
- 36
- 37
- 38
- 39
调用时候,在方法中一定要记得先初始化HystrixRequestContext
/** * 请求命令, * 需要注意一次实例只能够执行一次 * 可以选择直接执行或者先入队后再执行 * @return */ @GetMapping("/hello2") public String hello2(){ HystrixRequestContext hystrixRequestContext = HystrixRequestContext.initializeContext(); //通过execute方法执行 HelloCommand helloCommand = new HelloCommand(HystrixCommand.Setter.withGroupKey(HystrixCommandGroupKey.Factory.asKey("hai")), restTemplate,"test_cache"); String result01 = helloCommand.execute(); //通过queue.get执行,先入队再执行 HelloCommand helloCommand1 = new HelloCommand(HystrixCommand.Setter.withGroupKey(HystrixCommandGroupKey.Factory.asKey("hai2")), restTemplate,"test_cache"); Future<String> queue = helloCommand1.queue(); String result02=" "; try { result02 = queue.get(); } catch (InterruptedException e) { e.printStackTrace(); } catch (ExecutionException e) { e.printStackTrace(); } hystrixRequestContext.close(); return result01+" "+result02; }- 1
- 2
- 3
- 4
- 5
- 6
- 7
- 8
- 9
- 10
- 11
- 12
- 13
- 14
- 15
- 16
- 17
- 18
- 19
- 20
- 21
- 22
- 23
- 24
- 25
- 26
privider服务提供的接口:
@RestController public class HelloController { @Value("${server.port}") Integer port; @GetMapping("/hello") public String hello(){ System.out.println(new Date()); return "hello world port:"+port; } }- 1
- 2
- 3
- 4
- 5
- 6
- 7
- 8
- 9
- 10
- 11
- 12
浏览器请求localhost:3000/hello2接口可以发现只调用了provider服务/hello接口一次。

6. 请求合并
如果 consumer 中,频繁的调用 provider 中的同一个接口,在调用时,只是参数不一样,那么这样情
况下,我们就可以将多个请求合并成一个,这样可以有效提高请求发送的效率。6.1 请求命令方式
首先我们在provider服务中提供一个可以使用请求合并的接口,这个接口既可以处理合并之后的请求,也可以处理单个请求。
@RestController @RequestMapping("/user") public class UserController { @GetMapping("/{ids}") public List<User> getUsersByIds(@PathVariable String ids){ System.out.println("接收到请求:"+ids); String[] split = ids.split(","); List<User> users = new ArrayList<>(); for (String id : split) { User user = new User(); user.setId(Integer.parseInt(id)); users.add(user); } return users; } }- 1
- 2
- 3
- 4
- 5
- 6
- 7
- 8
- 9
- 10
- 11
- 12
- 13
- 14
- 15
- 16
然后,在 Hystrix 服务中,创建UserService:
@Service public class UserService { @Autowired RestTemplate restTemplate; public List<User> getUsersByIds(List<Integer> ids){ User[] users=restTemplate.getForObject("http://provider/user/",User[].class, StringUtils.join(ids,",")); return Arrays.asList(users); } }- 1
- 2
- 3
- 4
- 5
- 6
- 7
- 8
- 9
- 10
接下来创建 UserBatchCommand
public class UserBatchCommand extends HystrixCommand<List<User>> { private List<Integer> ids; private UserService userService; public UserBatchCommand(List<Integer> ids,UserService userService) { super(HystrixCommand.Setter.withGroupKey(HystrixCommandGroupKey.Factory.asKey("batchCmd")).andCommandKey(HystrixCommandKey.Factory.asKey("batchKey"))); this.ids=ids; this.userService=userService; } @Override protected List<User> run() throws Exception { return userService.getUsersByIds(ids); } }- 1
- 2
- 3
- 4
- 5
- 6
- 7
- 8
- 9
- 10
- 11
- 12
- 13
- 14
- 15
创建UserMergeCommand,定义请求合并的方法:
public class UserMergeCommand extends HystrixCollapser<List<User>, User,Integer> { private UserService userService; private Integer id; public UserMergeCommand(UserService userService, Integer id) { super(withCollapserKey(HystrixCollapserKey.Factory.asKey("UserCollapseCommand")) .andCollapserPropertiesDefaults(HystrixCollapserProperties.Setter().withTimerDelayInMilliseconds(200))); this.userService = userService; this.id = id; } /** * 请求参数 * * @return */ @Override public Integer getRequestArgument() { return id; } /** * 请求合并的方法 * * @param collection * @return */ @Override protected HystrixCommand<List<User>> createCommand(Collection<CollapsedRequest<User, Integer>> collection) { List<Integer> ids = new ArrayList<>(collection.size()); for (CollapsedRequest<User, Integer> userIntegerCollapsedRequest : collection) { ids.add(userIntegerCollapsedRequest.getArgument()); } return new UserBatchCommand(ids, userService); } /** * 请求结果分发 * * @param users * @param collection */ @Override protected void mapResponseToRequests(List<User> users, Collection<CollapsedRequest<User, Integer>> collection) { int count = 0; for (CollapsedRequest<User, Integer> request : collection) { request.setResponse(users.get(count++)); } } }- 1
- 2
- 3
- 4
- 5
- 6
- 7
- 8
- 9
- 10
- 11
- 12
- 13
- 14
- 15
- 16
- 17
- 18
- 19
- 20
- 21
- 22
- 23
- 24
- 25
- 26
- 27
- 28
- 29
- 30
- 31
- 32
- 33
- 34
- 35
- 36
- 37
- 38
- 39
- 40
- 41
- 42
- 43
- 44
- 45
- 46
- 47
- 48
- 49
- 50
- 51
- 52
- 53
最后浏览器请求http://localhost:3000/hello5测试调用


通过日志可以看到hystrix4次请求provider服务的user接口,合并为一个请求实际只请求了provider服务的user接口一次。6.2 注解方式
请求合并的核心注解是@HystrixCollapser,常用属性如下:
- batchMethod:用于设置请求合并的方法
- collapserProperties:请求合并属性,用于控制实例属性,有很多
- timerDelayInMilliseconds:collapserProperties中的属性,用于控制每隔多少时间合并一次请求
通过注解实现请求合并,这里的核心是 @HystrixCollapser 注解。在注解中,通过batchMethod属性指定批处理的方法即可。
@Service public class UserService { @Autowired RestTemplate restTemplate; @HystrixCollapser(batchMethod = "getUsersByIds", collapserProperties = {@HystrixProperty(name = "timerDelayInMilliseconds",value = "200")}) public Future<User> getUserById(Integer id) { return null; } @HystrixCommand public List<User> getUsersByIds(List<Integer> ids){ User[] users=restTemplate.getForObject("http://provider/user/{1}",User[].class, StringUtils.join(ids,",")); return Arrays.asList(users); } }- 1
- 2
- 3
- 4
- 5
- 6
- 7
- 8
- 9
- 10
- 11
- 12
- 13
- 14
- 15
- 16
定义/hello6接口,测试代码如下
@GetMapping("/hello6") public void hello6() throws ExecutionException, InterruptedException { HystrixRequestContext ctx = HystrixRequestContext.initializeContext(); Future<User> q1 = userService.getUserById(99); Future<User> q2 = userService.getUserById(98); Future<User> q3 = userService.getUserById(97); User u1 = q1.get(); User u2 = q2.get(); User u3 = q3.get(); System.out.println(u1); System.out.println(u2); System.out.println(u3); Thread.sleep(2000); Future<User> q4 = userService.getUserById(96); User u4 = q4.get(); System.out.println(u4); ctx.close(); }- 1
- 2
- 3
- 4
- 5
- 6
- 7
- 8
- 9
- 10
- 11
- 12
- 13
- 14
- 15
- 16
- 17
- 18
最后浏览器请求http://localhost:3000/hello6测试调用
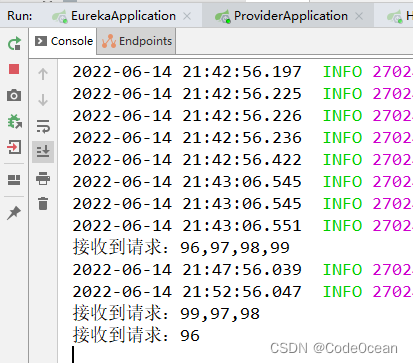
通过provider控制台输出可以看到请求合并生效了,只调用了provider服务的user接口两次。7. 常用配置
Hystrix常用的全局配置如下:
hystrix: command:#用于控制HystrixCommand的行为 default: execution: isolation: strategy:THREAD#控制HystrixCommand的隔离策略,THREAD->线程池隔离策略(默认),SEMAPHORE->信号量隔离策略 thread: timeoutInMilliseconds:1000#配置HystrixCommand执行的超时时间,执行超过该时间会进行服务降级处理 interruptOnTimeout:true#配置HystrixCommand执行超时的时候是否要中断 interruptOnCancel:true#配置HystrixCommand执行被取消的时候是否要中断 timeout: enabled:true#配置HystrixCommand的执行是否启用超时时间 semaphore: maxConcurrentRequests:10#当使用信号量隔离策略时,用来控制并发量的大小,超过该并发量的请求会被拒绝 fallback: enabled:true#用于控制是否启用服务降级 circuitBreaker:#用于控制HystrixCircuitBreaker的行为 enabled:true#用于控制断路器是否跟踪健康状况以及熔断请求 requestVolumeThreshold:20#超过该请求数的请求会被拒绝 forceOpen:false#强制打开断路器,拒绝所有请求 forceClosed:false#强制关闭断路器,接收所有请求 requestCache: enabled:true#用于控制是否开启请求缓存 collapser:#用于控制HystrixCollapser的执行行为 default: maxRequestsInBatch:100#控制一次合并请求合并的最大请求数 timerDelayinMilliseconds:10#控制多少毫秒内的请求会被合并成一个 requestCache: enabled:true#控制合并请求是否开启缓存 threadpool:#用于控制HystrixCommand执行所在线程池的行为 default: coreSize:10#线程池的核心线程数 maximumSize:10#线程池的最大线程数,超过该线程数的请求会被拒绝 maxQueueSize:-1#用于设置线程池的最大队列大小,-1采用SynchronousQueue,其他正数采用LinkedBlockingQueue queueSizeRejectionThreshold:5#用于设置线程池队列的拒绝阀值,由于LinkedBlockingQueue不能动态改版大小,使用时需要用该参数来控制线程数- 1
- 2
- 3
- 4
- 5
- 6
- 7
- 8
- 9
- 10
- 11
- 12
- 13
- 14
- 15
- 16
- 17
- 18
- 19
- 20
- 21
- 22
- 23
- 24
- 25
- 26
- 27
- 28
- 29
- 30
- 31
- 32
- 33
- 34
- 35
-
相关阅读:
如何用 GPT-4 帮你写游戏(以24点游戏举例)
shared_ptr & weak_ptr 源码分析
如何更换war和jar包中的文件
时间戳的理解
【智能优化算法-遗传算法】基于遗传算法求解单目标优化问题(实数编码)附matlab代码
【C语言_文件_进程_进程间通讯 常用函数/命令 + 实例】.md_update:23/10/27
Js逆向教程-06js逆向断点的种类及介绍
win10彻底禁用wsappx的方法
IceRPC之多路复用传输>快乐的RPC
github公钥设置
- 原文地址:https://blog.csdn.net/huangjhai/article/details/124808265