整体框架
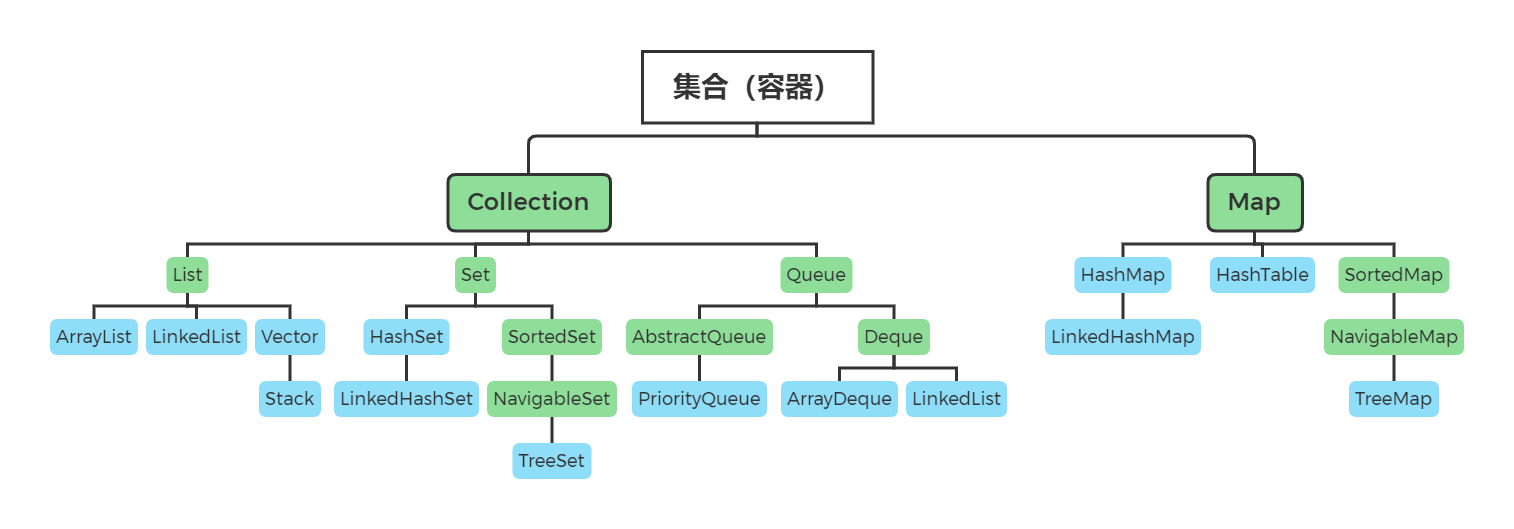
绿色代表接口/抽象类;蓝色代表类。
主要由两大接口组成,一个是「Collection」接口,另一个是「Map」接口。
前言
以前刚开始学习「集合」的时候,由于没有好好预习,也没有学好基础知识,接口,类,这些基础知识都没学好,所以学到这里还是懵懵懂懂的。第一次接触到「集合」,这两个字,在我的脑海中,只浮现出数学中学过的「集合」,所以当「集合」在编程语言中出现时,我就没有绕过来。不过以我现在的视角看,也是和数学中学过的「集合」这种概念是差不多的。
数学中的「集合」:
集合是
确定的一堆东西,集合里的东西则称为元素。现代的集合一般被定义为:由一个或多个确定的元素所构成的整体。
Java 中的「集合」:在我的理解中,集合可以说是存放 Java 对象的东西,这个东西有人称为集合,也有人称为容器,这也是为什么我的标题写的是 集合(容器)。存放在集合中的对象,人们称为元素。
为什么会有集合的出现呢?
是这样的,在某些情况下,我们需要创建许多 Java 对象,那么这些对象应该存放在哪里?
需求是这样的:
- 可以存放对象
- 可以存放不同数据类型
- 可以存放很多对象,没有限制
那么一开始会想到数组,数组可以存放对象,是的,没错,但是,数组有它的缺点,就是一旦创建后,那么数组长度是不可变的,而且存放的对象的数据类型是固定的,所以数组不满足这些条件。此时,集合就出现了。
Java 中的集合
从上面的框架图中可以看到,主要就两个接口,分别是 Collection 和 Map。
这两个接口都抽象了元素的存储方法,具体有什么区别呢?好吧,不说也知道,Collection 就是用来存储单一元素的,而 Map 是用来存储键值对的。
下面我将从这两个接口切入,进而开始好好地回炉重造,哈哈哈哈哈。
可以带着这些问题去回顾:
- Collection 是怎样的?Map 又是怎样的?
- 它们分别还有什么子接口?它们又有哪些实现类呢?
- 提供给我们的API又有哪些呢?具体的 API 用法和效果是怎样的呢?
Collection
Collection 是最基本的集合接口,一个 Collection 代表一组 Object类型的对象,Java 没有提供直接实现Collection 的类,只提供继承该接口的子接口(List、Set、Queue 这些)。该接口存储一组不唯一,无序的对象。这里强调不唯一、无序,那么集合的范围就很大,想要缩小,比如唯一、有序这些,就可以通过子接口来规定,刚好,它就是这样来定义子接口的。
- List 接口:元素不唯一且有序,说明可以存储多个相同的元素,但是存储是有顺序的,即有序可重复。
- Set 接口:元素唯一且无序,说明不能存储多个相同的元素,存储的元素没有顺序,即无序不可重复。
我们再来看看 Collection 接口它抽象出来的方法有哪些。
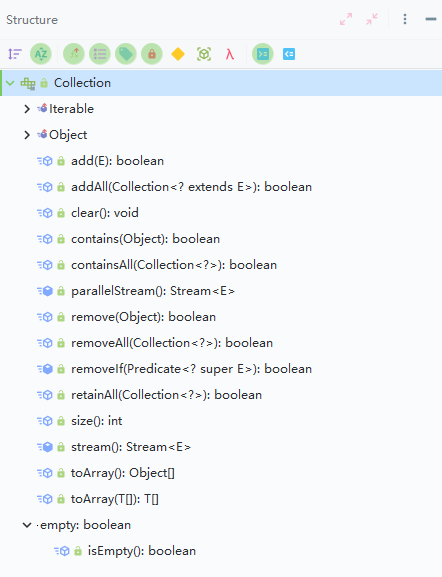
其中,还可以看到有个以 Iterable(可迭代的) 来分类的方法,主要就是 iterator() 这个方法,即迭代器。所谓迭代器,就是用来遍历集合元素的一个东西。
复制代码
- 1
- 2
- 3
- 4
- 5
- 6
- 7
- 8
- 9
    /**
     * Returns an iterator over the elements in this collection.  There are no
     * guarantees concerning the order in which the elements are returned
     * (unless this collection is an instance of some class that provides a
     * guarantee).
     *
     * @return an <tt>Iterator</tt> over the elements in this collection
     */
    Iterator<E> iterator();
iterator() 这个方法就是用来返回对此集合中元素的迭代器,也就是说获取该集合的迭代器。 这个抽象方法不保证迭代的顺序(除非此集合是某个提供保证的类的实例)。
再通俗一点,我们想要遍历集合的元素,那么就需要通过集合对象获取迭代器对象,通过迭代器对象来遍历集合中的元素,而且遍历的顺序是跟该集合有关的。
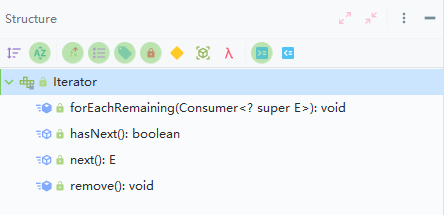
关于这个迭代器,后续再来讲吧。
下面开始说一下基本的接口实现类,基本的API,加上一些自己的见解,最主要是先回顾 API 的使用,毕竟还有好多知识,这些知识需要建立在我们会用的前提下,所以这里浅入浅出~
List 接口下的实现类
List 接口下的实现类有 ArrayList、LinkedList、Vector、Stack
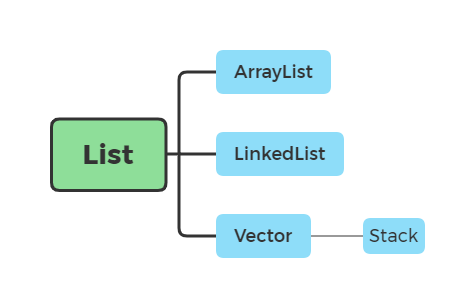
这里简要介绍下 List 接口,List 接口是一个有序的 Collection,使用此接口能够精确的控制每个元素插入的位置,能够通过「索引」(即元素在 List 中位置,类似于数组的下标,从0开始)来访问 List 中的元素。它存储一组不唯一、有序(插入顺序)的对象。
ArrayList
我们看下 ArrayList 源码,它是这样定义的:
复制代码
- 1
- 2
- 3
- 4
- 5
public class ArrayList<E> extends AbstractList<E>
        implements List<E>, RandomAccess, Cloneable, java.io.Serializable
{
    ...
}
可以看到,它
- 继承了
AbstractList - 实现了
List,RandomAccess,Cloneable,Serializable
ArrayList 是动态数组,所谓动态数组,即可以动态的修改,随时出入、删除元素,还可以动态扩容,也就是没有固定的容量限制,可以存放很多元素,直到你的内存爆炸。
初始化是这样的:
复制代码
- 1
- 2
- 3
- 4
// 1. 以多态的方式写,接口不能实例化,所以通过其实现类对接口实例化。
List<E> list = new ArrayList<>();
// 2. 直接ArrayList
ArrayList<E> list = new ArrayList<>();
这两种写法有什么区别呢?
第1种写法:此时的 List 的对象 list,可以通过这个对象调用 List 接口声明的方法,但是不能调用 ArrayList 独有的方法,换句话说,List 这个接口规定了一些抽象的方法,具体实现不关心,你可以直接调用。这里「具体实现不关心」就是说,你是使用 ArrayList 来实例化 List 接口或者使用 LinkedList 来实例化 List 接口,List 接口它都不关心,外界使用的时候,知道 List 提供这些 API 就够了。另一个角度理解,即该 list 对象拥有 List 的属性和方法,没有 ArrayList 独有的属性和方法。
第2种写法:此时 ArrayList 的对象 list,可以调用所有方法,毕竟 ArrayList 实现了 List 接口,那么 List 有的方法,ArrayList 的对象 list也有。
进入正题
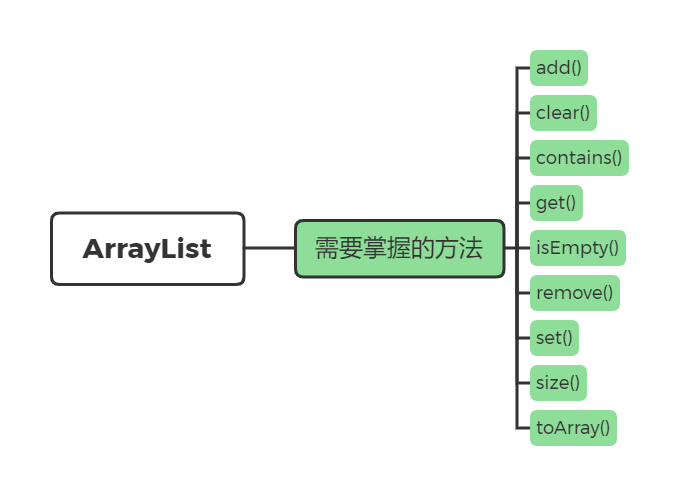
这些 API 的使用,需要熟悉,毕竟算法题也会用到。
复制代码
- 1
- 2
- 3
- 4
- 5
- 6
- 7
- 8
- 9
- 10
- 11
- 12
- 13
- 14
- 15
- 16
- 17
- 18
- 19
- 20
- 21
- 22
- 23
- 24
- 25
- 26
- 27
- 28
- 29
- 30
- 31
- 32
- 33
- 34
- 35
- 36
    public void apiOfArrayList() {
        int idx;
        List<Integer> list = new ArrayList<>();

        // 添加元素
        list.add(23);
        list.add(30);

        // 根据下标(索引)获取元素
        idx = list.get(0);
        idx = list.get(1);

        // 更新元素值,在某个位置重新赋值
        list.set(1, 32);

        List<String> list2 = new ArrayList<>();
        list2.add("god23bin");
        list2.add("LeBron");
        list2.add("I love Coding");

        // 移除下标(索引)为2的元素
        list2.remove(2);

        // 移除指定元素
        list2.remove("god23bin");

        // 获取集合长度,遍历会用到
        int len = list2.size();

        // 判断某个元素是否在集合中,算法题会用到的
        boolean flag = list2.contains("god23bin");

        // 判断集合是否为空,算法题会用到的
        boolean flag2 = list2.isEmpty();

    }
排序:
- ArrayList 中的 sort() 方法
复制代码
- 1
- 2
- 3
- 4
- 5
- 6
- 7
- 8
- 9
Random random = new Random();
List<Integer> numList = new ArrayList<>();
for (int i = 0; i < 10; ++i) {
    numList.add(random.nextInt(100));
}
// 将numList升序排序
numList.sort(Comparator.naturalOrder());
// 将numList降序排序
numList.sort(Comparator.reverseOrder());
- Collections 工具类的 sort() 方法
复制代码
- 1
- 2
// 将numList升序排序
Collections.sort(numList);
关于 Collections 工具类的排序
看看这两个方法,这两个方法都是泛型方法。
复制代码
- 1
- 2
- 3
- 4
- 5
- 6
- 7
public static <T extends Comparable<? super T>> void sort(List<T> list) {
    list.sort(null);
}

public static <T> void sort(List<T> list, Comparator<? super T> c) {
    list.sort(c);
}
第一个方法需要「待排序类」实现 Comparable 接口,这样才能使用这个方法。
第二个方法需要「待排序类」有一个比较器,即 Comparator,换句话说需要有一个比较器类实现 Comparator 接口,这样才能使用这个方法。
扯到 Comparable 和 Comparator
所以,如果你想要某个类的对象支持排序,那么你就需要让这个类实现 Comparable 接口,这个接口只有一个抽象方法 compareTo(),我们需要实现它,它的规则是:若 当前值 较大则返回正值,若相等则返回0,若 当前值 较小则返回负值。
这里我们可以看到,Collections 是可以对 numList 进行排序的,因为这个 numList 集合的元素类型是 Integer,为什么 Integer 类型的元素支持排序?我们可以从源码中看到 Integer 是实现了 Comparable 接口的,所以 Integer 类型的元素才支持排序。
复制代码
- 1
- 2
- 3
- 4
- 5
- 6
- 7
- 8
- 9
- 10
- 11
- 12
public final class Integer extends Number implements Comparable<Integer> {
    ...
    public int compareTo(Integer anotherInteger) {
        return compare(this.value, anotherInteger.value);
    }

    public static int compare(int x, int y) {
        return (x < y) ? -1 : ((x == y) ? 0 : 1);
    }
    ...
}
回到第一句话,如果你想要某个类的对象支持排序,那么你就需要让这个类实现 Comparable 接口,不然是不支持排序的。
下面,我这里就分别使用两种方式(实现 Comparable 或 Comparator)让某个类支持排序。
搞定 Comparable
举个栗子:我这里有一个 Game 类(待排序类,本身不支持排序,我们的任务是让 Game 具有可排序的能力),当你把多个 Game 对象放到集合中使用 Collections 这个工具类进行排序时,Collections 是不知道如何给 Game 排序的,直到 Game 实现了 Comparable 接口后,Collections 才知道 Game 该如何排序。
Game 类实现 Comparable 接口,重写 compareTo() 方法。
复制代码
- 1
- 2
- 3
- 4
- 5
- 6
- 7
- 8
- 9
- 10
- 11
- 12
- 13
- 14
- 15
- 16
- 17
public class Game implements Comparable<Game> {
public String name;
public Double price;
// 省略 getter setter 构造方法
public int compareTo(Game o) {
return comparePrice(this.price, o.price);
}
public int comparePrice(double p1, double p2) {
return p1 > p2 ? 1 : (p1 == p2 ? 0 : -1);
}
}
这样,我们就可以使用 Collections 对 Game 进行排序。
复制代码
- 1
- 2
- 3
- 4
- 5
- 6
List<Game> gameList = new ArrayList<>();
gameList.add(new Game("GTA", 58.0));
gameList.add(new Game("FC", 118.0));
gameList.add(new Game("2K", 199.0));
Collections.sort(gameList);		// 进行排序
System.out.println(gameList);	// 打印排序结果
搞定 Comparator
同理,我这里有一个 Game 类
复制代码
- 1
- 2
- 3
- 4
- 5
- 6
- 7
- 8
public class Game {

    public String name;
    public Double price;

    // 省略 getter setter 构造方法
}
写一个 Game 的比较器类 GameComparator,让这个类实现 Comparator 接口,重写 compare() 方法
复制代码
- 1
- 2
- 3
- 4
- 5
- 6
public class GameComparator implements Comparator<Game> {
public int compare(Game g1, Game g2) {
return g1.getPrice() - g2.getPrice();
}
}
这样,我们就可以使用 Collections 对 Game 进行排序。
复制代码
- 1
- 2
- 3
- 4
- 5
- 6
List<Game> gameList = new ArrayList<>();
gameList.add(new Game("GTA", 58.0));
gameList.add(new Game("FC", 118.0));
gameList.add(new Game("2K", 199.0));
Collections.sort(gameList, new GameComparator());		// 使用比较器进行排序
System.out.println(gameList);							// 打印排序结果
总结排序
你可以选择两种方式(实现 Comparable 或 Comparator)中的其中一个,让某个类支持排序。
- 选择 Comparable,那么该类需要实现该接口
- 选择 Comparator,那么需要定义一个比较器,实现该接口
最后通过 Collections.sort() 进行排序。
LinkedList
LinkedList 是链表,属于线性表,学过数据结构的我们也是知道的,有指针域和数据域,虽然说 Java 里没有指针,但是有指针的思想,这里我也说不太清楚,反正是可以按指针来理解的。(如有更好的描述,欢迎帮我补充啦!)
在 Java 中,这个 LinkedList 是 List 接口下面的实现类,也是很常用的一种集合容器,算法题也会用到它。
我们看下 LinkedList 源码,它是这样定义的:
复制代码
- 1
- 2
- 3
- 4
- 5
- 6
public class LinkedList<E>
    extends AbstractSequentialList<E>
    implements List<E>, Deque<E>, Cloneable, java.io.Serializable
{
    ...
}
可以看到,它
- 继承了
AbstractSequentialList - 实现了
List,Deque,Cloneable,Serializable
同样,LinkedList 需要掌握的方法和 ArrayList 差不多,可以说基本是一样的,只是底层实现不一样。
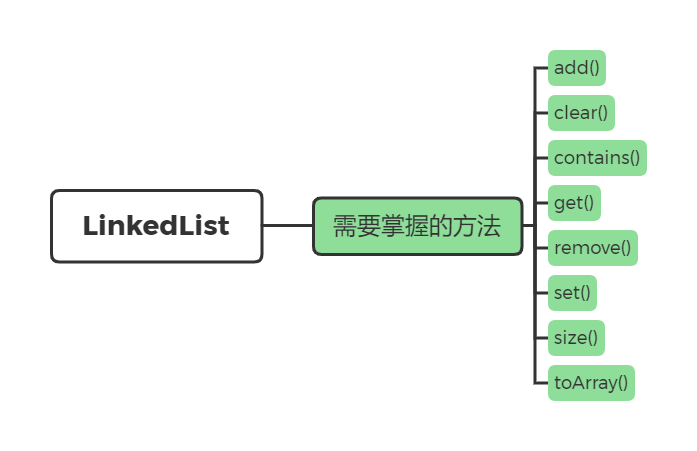
目前这里就不演示基本的使用方法了,你可以自己动手试试啦!
Vector
我们看下 Vector 源码,它是这样定义的:
复制代码
- 1
- 2
- 3
- 4
- 5
- 6
public class Vector<E>
    extends AbstractList<E>
    implements List<E>, RandomAccess, Cloneable, java.io.Serializable
{
    ...
}
可以看到,它
- 继承了
AbstractList - 实现了
List,RandomAccess,Cloneable,Serializable
这样一看,它和 ArrayList 的定义,简直是一模一样。那它们之间有什么区别吗?那当然是有啦!
区别就是 Vector 是线程安全的,在多线程操作下不会出现并发问题,因为 Vector 在每个方法上都加上了 synchronized 关键字,保证多个线程操作方法时是同步的。
Stack
Stack 顾名思义,就是栈,它是 Vector 的子类,实现了标准的栈这种数据结构。
复制代码
- 1
- 2
- 3
public class Stack<E> extends Vector<E> {
    ...
}
它里面包括了 Vector 的方法,也有自己的方法。
- empty():判断栈是否为空
- peek():查看栈顶元素
- push():入栈
- pop():出栈
- search():搜索元素,返回元素所在位置
复制代码
- 1
- 2
- 3
- 4
- 5
- 6
- 7
- 8
- 9
- 10
- 11
- 12
- 13
- 14
- 15
- 16
- 17
- 18
- 19
    public void apiOfStack() {
        Stack<Integer> stack = new Stack<>();
        // 入栈
        stack.push(1);
        stack.push(2);
        stack.push(3);
        stack.push(4);
        // 获取栈的大小 == 栈中元素个数 == 栈的长度
        int size = stack.size();
        // 查看(返回)栈顶元素
        Integer peek = stack.peek();
        // 出栈
        stack.pop();
        // 判断栈是否为空
        boolean empty = stack.empty();
        // 搜索 元素1 此时栈中元素为 1 2 3,栈顶是3,栈底是1
        // 从栈顶往下找,第一个元素的位置记为1
        int search = stack.search(1);
    }
但是目前这个已经官方不推荐使用了,而是选择使用 LinkedList 来用作栈。
这里就要扯到队列 Queue 啦!
Queue 接口
Java 中的 Queue 是一个接口,和上面的 Stack 不同,Stack 是类。
我们看下 Queue 接口源码,它是这样定义的:
复制代码
- 1
- 2
- 3
public interface Queue<E> extends Collection<E> {
    ...
}
这个接口就抽象了 6 个方法:
- add():入队,即队尾插入元素
- offer():入队,即队尾插入元素
- peek():查看队头元素
- poll():查看队头元素
- remove():出队,即移除队头元素
- element():出队,即移除队头元素
很大的疑问来了!这些方法有什么区别??我们看看源码怎么说的,这个源码说明也不怕,下面我有翻译~
add() 和 offer() 的区别
复制代码
- 1
- 2
- 3
- 4
- 5
- 6
- 7
- 8
- 9
- 10
- 11
- 12
- 13
- 14
- 15
- 16
- 17
- 18
- 19
- 20
- 21
- 22
- 23
- 24
- 25
- 26
- 27
- 28
- 29
- 30
- 31
- 32
- 33
- 34
- 35
- 36
- 37
- 38
- 39
- 40
- 41
- 42
- 43
- 44
- 45
- 46
- 47
    /**
     * Inserts the specified element into this queue if it is possible to do so
     * immediately without violating capacity restrictions, returning
     * {@code true} upon success and throwing an {@code IllegalStateException}
     * if no space is currently available.
     *
     * @param e the element to add
     * @return {@code true} (as specified by {@link Collection#add})
     * @throws IllegalStateException if the element cannot be added at this
     *         time due to capacity restrictions
     * @throws ClassCastException if the class of the specified element
     *         prevents it from being added to this queue
     * @throws NullPointerException if the specified element is null and
     *         this queue does not permit null elements
     * @throws IllegalArgumentException if some property of this element
     *         prevents it from being added to this queue
     */

    /**
     * 将指定的元素插入此队列(如果可以立即执行此操作而不违反容量限制),成功则返回 true
     * 如果容量不够,则失败,抛出 IllegalStateException
     */
    boolean add(E e);

    /**
     * Inserts the specified element into this queue if it is possible to do
     * so immediately without violating capacity restrictions.
     * When using a capacity-restricted queue, this method is generally
     * preferable to {@link #add}, which can fail to insert an element only
     * by throwing an exception.
     *
     * @param e the element to add
     * @return {@code true} if the element was added to this queue, else
     *         {@code false}
     * @throws ClassCastException if the class of the specified element
     *         prevents it from being added to this queue
     * @throws NullPointerException if the specified element is null and
     *         this queue does not permit null elements
     * @throws IllegalArgumentException if some property of this element
     *         prevents it from being added to this queue
     */
    /**
     * 如果可以在不违反容量限制的情况下立即将指定的元素插入到此队列中。
     * 使用容量受限的队列时,通常此方法是最好的入队方法 ,只有当引发异常时才可能无法插入元素。
     * 成功返回 true,失败返回 false
     */
    boolean offer(E e);
所以区别就是:在容量有限制的队列中,add() 超过限制会抛出异常,而 offer() 不会,只会返回 false
remove() 和 poll() 的区别
复制代码
- 1
- 2
- 3
- 4
- 5
- 6
- 7
- 8
- 9
- 10
- 11
- 12
- 13
- 14
- 15
- 16
- 17
- 18
- 19
- 20
- 21
- 22
- 23
- 24
- 25
- 26
    /**
     * Retrieves and removes the head of this queue.  This method differs
     * from {@link #poll poll} only in that it throws an exception if this
     * queue is empty.
     *
     * @return the head of this queue
     * @throws NoSuchElementException if this queue is empty
     */
	/**
     * 检索并删除此队列的队头元素。  这个方法与 poll 的区别仅仅是当队列为空时删除会抛出异常。
     */
    E remove();

    /**
     * Retrieves and removes the head of this queue,
     * or returns {@code null} if this queue is empty.
     *
     * @return the head of this queue, or {@code null} if this queue is empty
     */
	/**
     * 检索并删除此队列的队头元素。如果队空,则返回 null
     * or returns {@code null} if this queue is empty.
     *
     * @return the head of this queue, or {@code null} if this queue is empty
     */
    E poll();
所以区别是:当队空时删除元素,那么 remove() 会抛出异常, poll() 会返回null
element() 和 peek() 的区别
复制代码
- 1
- 2
- 3
- 4
- 5
- 6
- 7
- 8
- 9
- 10
- 11
- 12
- 13
- 14
- 15
- 16
- 17
- 18
- 19
- 20
- 21
- 22
- 23
    /**
     * Retrieves, but does not remove, the head of this queue.  This method
     * differs from {@link #peek peek} only in that it throws an exception
     * if this queue is empty.
     *
     * @return the head of this queue
     * @throws NoSuchElementException if this queue is empty
     */
    /**
     * 队列为空时会抛出异常
     */
    E element();

	/**
     * Retrieves, but does not remove, the head of this queue,
     * or returns {@code null} if this queue is empty.
     *
     * @return the head of this queue, or {@code null} if this queue is empty
     */
	/**
	 * 队列为空时会返回 null
     */
    E peek();
所以区别是:当队空查看队头元素时,那么 element() 会抛出异常, peek() 会返回null
总的来说,就是失败的区别:
| 抛出异常 | 返回特殊值 | |
|---|---|---|
| 入队 | add() | offer() 返回false |
| 出队 | remove() | poll() 返回 null |
| 查看队头元素 | element() | peek() 返回 null |
双端队列和优先级队列
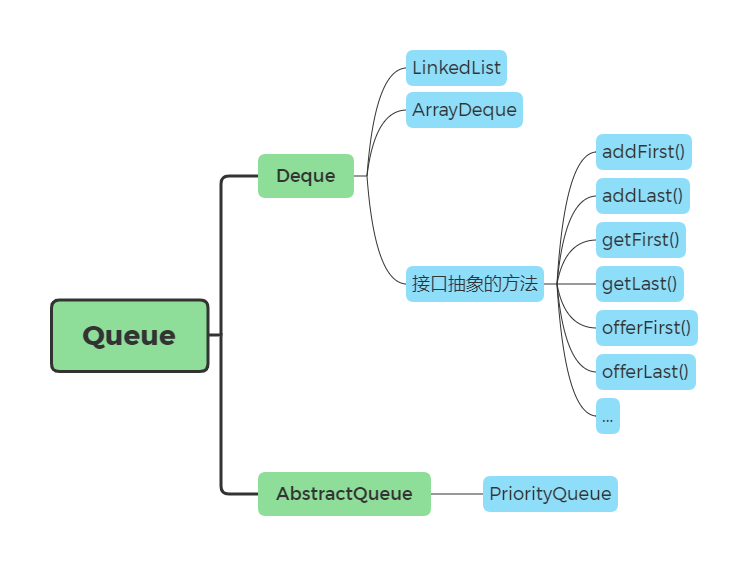
Queue 有个子接口 Deque,就是双端队列,需要掌握的 Deque 实现类为 LinkedList 和 ArrayDeque。然后我们可以发现 Deque 这个接口抽象出来的方法,在原有的 Queue 上,多出了 First、Last 这些方法,对应着就是从队列的头部和尾部进行操作(入队、出队等等)。
有个抽象类 AbstractQueue 实现了 Queue 接口,然后 PriorityQueue 继承了 AbstractQueue 。
演示下基本的 API,大部分操作都是大同小异。
复制代码
- 1
- 2
- 3
- 4
- 5
- 6
- 7
- 8
- 9
- 10
- 11
- 12
- 13
- 14
- 15
- 16
- 17
- 18
    public void apiOfDeque() {
        // 通过 LinkedList 创建 Deque 对象
        Deque<Integer> deque = new LinkedList<>();
        // 正常队尾入队 => 完成入队后 [1,2,3]
        deque.addLast(1);
        deque.addLast(2);
        deque.addLast(3);
        // 从队头入队 => [4,1,2,3]
        deque.addFirst(4);
        // 获取队头元素 => 4
        // 这里 get 和 peek 的区别就是,get 如果队空会抛出异常
        Integer first = deque.getFirst();
        // 使用 offer 入队 => [4,1,2,3,5]
        deque.offerLast(5);
        // 使用 poll 出队 => [1,2,3,5]
        Integer integer = deque.pollFirst();
        // 剩下的操作也是差不多的...
    }
至于优先级队列的呢?之后再写啦!这个坑等着后面补回来😥
Set 接口
对于 Set 接口,我们需要知道它的 3 个实现类,分别是 HashSet、LinkedHashSet、TreeSet。
HashSet 是基于 HashMap 的。
TreeSet 是基于 TreeMap 的。
至于 Map,后面再说啦。
HashSet 和 LinkedHashSet
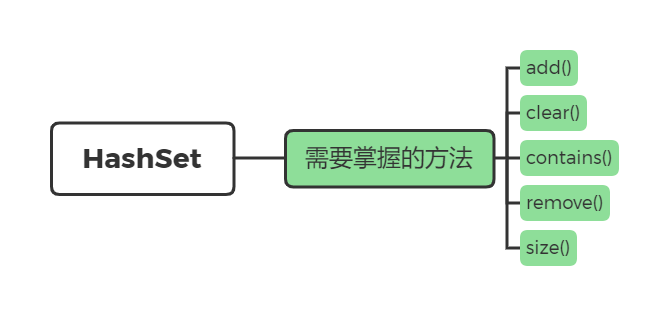
HashSet 和 LinkedHashSet 的API使用方法基本一模一样,你会一个,等于会两个,会两个,等于会好多,好吧,说实话,熟悉了 Collection 接口的方法,就会好多了好吧哈哈哈哈。
复制代码
- 1
- 2
- 3
- 4
- 5
- 6
- 7
- 8
- 9
- 10
- 11
- 12
- 13
- 14
- 15
- 16
- 17
- 18
- 19
- 20
- 21
- 22
- 23
- 24
- 25
- 26
- 27
- 28
- 29
- 30
- 31
- 32
- 33
- 34
- 35
    public void apiOfHashSet() {
        Set<Integer> hashSet = new HashSet<>();
        // 添加元素
        hashSet.add(1);
        hashSet.add(2);
        hashSet.add(3);
        // 获取集合大小
        int size = hashSet.size();
        // 判断是否包含某个元素
        if (hashSet.contains(3)) {
            System.out.println("包含3");
        }
        // 移除元素
        hashSet.remove(2);
        // 清空集合
        hashSet.clear();
    }

    public void apiOfLinkedHashSet() {
        Set<Integer> linkedHashSet = new LinkedHashSet<>();
        // 添加元素
        linkedHashSet.add(2);
        linkedHashSet.add(3);
        linkedHashSet.add(4);
        // 获取集合大小
        int size = linkedHashSet.size();
        // 判断是否包含某个元素
        if (linkedHashSet.contains(3)) {
            System.out.println("包含3");
        }
        // 移除元素
        linkedHashSet.remove(2);
        // 清空集合
        linkedHashSet.clear();
    }
TreeSet
这个坑等着后面补回来😥
Map
Map 接口,它提供了一种映射关系,用于存储具有映射关系的元素,以键值对的形式存储。键和值可以是任意类型的,以 Entry 对象存储。
看 Map 接口的源码,可以发现 Entry 是定义在 Map 接口里的一个「内部接口」。
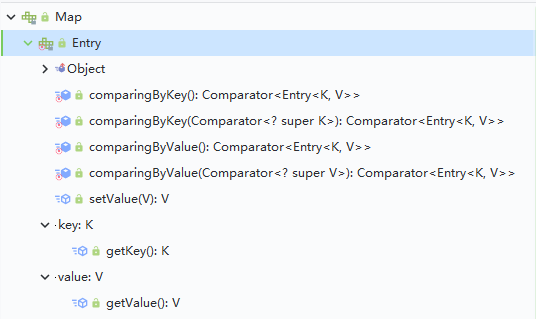
需要知道的是:
- Key 是不可以重复的,Value 是可以重复的。Key 和 Value 都可以为 null,不过只能有一个 Key 为 null
- Map 接口提供了分别返回 Key 值集合、Value 值集合以及 Entry(键值对)集合的方法
复制代码
- 1
- 2
- 3
- 4
- 5
- 6
// 返回 Key 值集合
Set<K> keySet();
// 返回 Value 值集合
Collection<V> values();
// 返回 Entry 集合
Set<Map.Entry<K, V>> entrySet();
看看完整的 Map 接口提供的抽象方法,当然,还是一样,并不需要全部掌握啦。
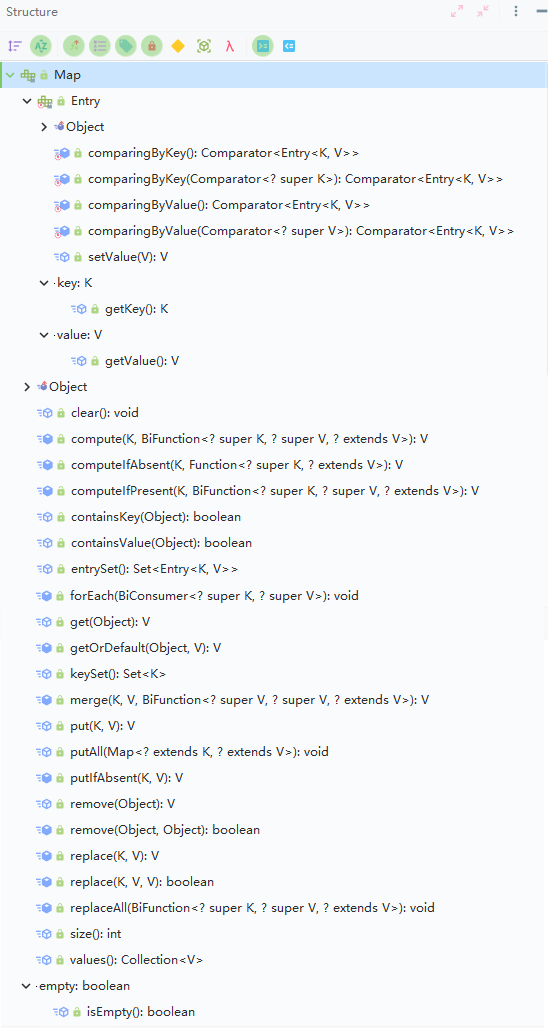
HashMap

HashMap,就是我们学过的哈希表的实现,是经常使用的一个数据结构,算法题也有它的影子。HashMap 中的Key 值和 Value值都可以为 null,但是一个 HashMap 只能有一个 Key 值为 null 的映射(Key 值不可重复)
还是一样,这里先回顾 API 的使用。
复制代码
- 1
- 2
- 3
- 4
- 5
- 6
- 7
- 8
- 9
- 10
- 11
- 12
- 13
- 14
- 15
- 16
- 17
- 18
- 19
- 20
- 21
- 22
- 23
- 24
- 25
- 26
- 27
- 28
- 29
- 30
- 31
- 32
- 33
- 34
- 35
- 36
- 37
    public void apiOfHashMap() {
        Map<Integer, String> hashMap = new HashMap<>();
        // 存储键值对
        hashMap.put(1, "LeBron");
        hashMap.put(2, "Chris");
        hashMap.put(3, "god23bin");
        // 根据Key获取Value
        String s = hashMap.get(3);
        // 获取某个键,如果没有这个键,那么获取默认值
        String defaultValue = hashMap.getOrDefault(4, "默认值");
        // 获取集合大小
        int size = hashMap.size();
        // 判断是否包含某个Key
        if (hashMap.containsKey(2)) {
            System.out.println("包含值为2的Key");
        }
        // 判断是否包含某个Value
        if (hashMap.containsValue("LeBron")) {
            System.out.println("包含值为LeBron的Value");
        }
        // 获取键集合
        Set<Integer> integers = hashMap.keySet();
        for (Integer key : integers) {
            System.out.println(key);
        }
        // 获取值集合
        Collection<String> values = hashMap.values();
        for (String val : values) {
            System.out.println(val);
        }
        // 获取键值对集合
        Set<Map.Entry<Integer, String>> entries = hashMap.entrySet();
        for (Map.Entry<Integer, String> entry : entries) {
            System.out.println(entry.getKey());
            System.out.println(entry.getValue());
        }
    }
LinkedHashMap
这个坑等着后面补回来😥
HashTable
这个坑等着后面补回来😥
TreeMap
这个坑等着后面补回来😥
最后
好吧,这方面还是不太会描述,给自己留下了好些坑,那就等着我后面补充吧!集合重造进度 20%!
最后的最后
由本人水平所限,难免有错误以及不足之处, 屏幕前的靓仔靓女们 如有发现,恳请指出!
最后,谢谢你看到这里,谢谢你认真对待我的努力,希望这篇博客对你有所帮助!
你轻轻地点了个赞,那将在我的心里世界增添一颗明亮而耀眼的星!