-
Pytorch实战[使用VGG16实现图片分类]
实现Pytorch完成类别分类
Object
- 基本掌握使用pytorch框架进行神经网络训练任务
- 使用Pycharm,Google Colab完成代码编写
- 本次实验只是来熟悉一下训练的流程,因此模型比较简单
1. 编写代码
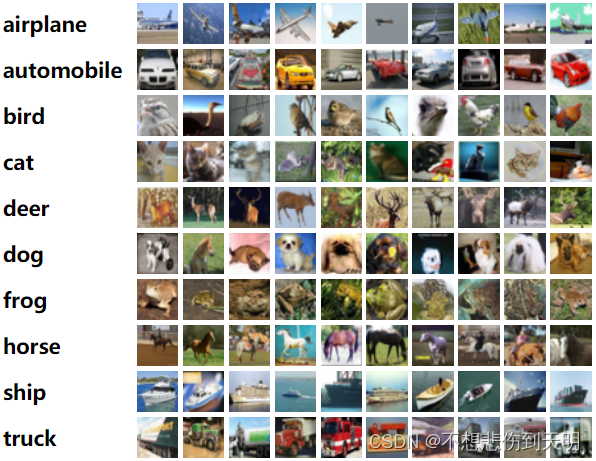
数据集介绍
CIFAR-10数据集包含6000张大小是(32,32)的图片数据,有10个类别。训练集有5000张,测试集1000张。

数据读取以及数据加载
# 创建一个transform transform = torchvision.transforms.Compose([ torchvision.transforms.ToTensor() ]) # 准备数据 # 参数 train=True 表示是训练数据 ,False是测试数据 train_data = torchvision.datasets.CIFAR10("./dataset", train=True, transform=transform, download=False) test_data = torchvision.datasets.CIFAR10("./pytorch/dataset", train=False, transform=transform, download=False) # 加载数据 train_dataloader = DataLoader(train_data, batch_size=64) test_dataloader = DataLoader(test_data, batch_size=64)- 1
- 2
- 3
- 4
- 5
- 6
- 7
- 8
- 9
- 10
- 11
- 12
- 13
- 14
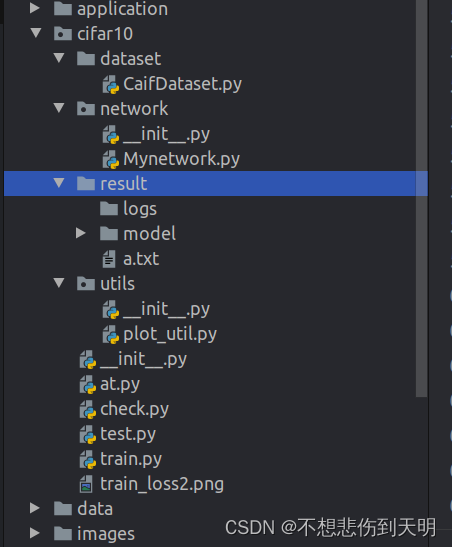
目录结构

- network是写的是vgg16的网络结构
VGG16的架构如下

代码
import torch from torch import nn # 定义网路结构 class VGG16(nn.Module): def __init__(self) -> None: super().__init__() self.model = nn.Sequential( nn.Conv2d(3, 32, 5, 1, 2), nn.MaxPool2d(2), nn.Conv2d(32, 32, 5, 1, 2), nn.MaxPool2d(2), nn.Conv2d(32, 64, 5, 1, 2), nn.MaxPool2d(2), nn.Flatten(), nn.Linear(1024, 64), nn.Linear(64, 10) ) def forward(self, input): output = self.model(input) return output if __name__ == '__main__': mymodel =VGG16() input = torch.ones((64,3,32,32)) output = mymodel(input) print(output.shape)- 1
- 2
- 3
- 4
- 5
- 6
- 7
- 8
- 9
- 10
- 11
- 12
- 13
- 14
- 15
- 16
- 17
- 18
- 19
- 20
- 21
- 22
- 23
- 24
- 25
- 26
- 27
- 28
- 29
plot_util.py
import matplotlib.pyplot as plt import seaborn as sns # 画出train图线 def plot(train_loss): # sns.set() sns.set_style("dark") # sns.despine() idx_list = [i for i in range(len(train_loss))] plt.figure(figsize=(10, 6)) plt.rcParams["font.size"] = 18 plt.grid(visible=True, which='major', linestyle='-') plt.grid(visible=True, which='minor', linestyle='--', alpha=0.5) # 显示小刻度 minorticks_off()不显示 plt.minorticks_on() plt.plot(idx_list, train_loss, 'o-', color='red', marker='*', linewidth=1, fillstyle='bottom') plt.title("traning loss") plt.xlabel("train times") plt.ylabel("train loss") plt.legend(["positive", "commend"]) plt.savefig("train_loss2.png") # plt.show() plt.close()- 1
- 2
- 3
- 4
- 5
- 6
- 7
- 8
- 9
- 10
- 11
- 12
- 13
- 14
- 15
- 16
- 17
- 18
- 19
- 20
- 21
- 22
- 23
- 24
- 25
- 26
- 27
训练
- 定义参数
- 加载模型
- 保存模型
- 画出train_loss函数
- 默认每次从model目录下加载出已经训练的模型.pth文件,并选择下标最大的加载
def train(model,maxepoch=20) : mynetwork = model # 定义损失函数 loss_fn = nn.CrossEntropyLoss().to(device) # 定义学习率 learning_rate = 0.01 # 优化器 optimizer = torch.optim.SGD(mynetwork.parameters(), learning_rate) # 设置训练网络的参数 total_train_step = 0 total_test_step = 0 # 训练轮数 epoch = 0 max_epoch = maxepoch train_loss = [] test_accuaacy = [] state = {'model':mynetwork.state_dict(), 'optimizer':optimizer.state_dict(), 'epoch':epoch } model_save_path = './result/model/' model_load_path = './result/model/' # 从加载model的路径下获取所有文件(如果是.pth后缀的文件) model_files = [file for file in os.listdir(model_load_path) if file.endswith('.pth') ] model_files.sort(key =lambda x :int((x.split('.')[0]).split('_')[1])) # maxx = int ((model_files[-1].split('.')[0]).split('_')[1]) # 如果大于0 ,就可以加载 if len(model_files) >0 : path = model_load_path+model_files[-1] checkpoint = torch.load(path) mynetwork.load_state_dict(checkpoint['model']) optimizer.load_state_dict(checkpoint['optimizer']) epoch = int ((model_files[-1].split('.')[0]).split('_')[1]) print('----load model -----') for i in range(epoch,max_epoch): print("[----------- {} epoch train ------------]".format(i + 1)) mynetwork.train() for data in train_dataloader: imgs, targets = data imgs = imgs.to(device) targets = targets.to(device) outputs = mynetwork(imgs) loss = loss_fn(outputs, targets) # 优化器 optimizer.zero_grad() loss.backward() optimizer.step() total_train_step += 1 if total_train_step % 100 == 0: print("the {} times train and loss : {} ".format(total_train_step, loss.item())) train_loss.append(loss.item()) # 保存训练模型 current_train_model_name = "model_{}.pth".format(i+1) torch.save(state,model_save_path+current_train_model_name) # 测试 mynetwork.eval() total_test_loss = 0 total_accuracy = 0 with torch.no_grad(): for data in test_dataloader: imgs, targets = data imgs = imgs.to(device) targets = targets.to(device) outputs = mynetwork(imgs) loss = loss_fn(outputs, targets) total_test_loss += loss.item() accuracy = (outputs.argmax(1) == targets).sum() total_accuracy += accuracy print("total loss in test : {} .".format(total_test_loss)) print("total accuracy in test : {}% ".format(total_accuracy / test_data_size * 100)) total_test_step += 1 plot(train_loss) if __name__ == '__main__': # 搭建神经网络 mynetwork = VGG16().to(device) parser = ArgumentParser() parser.add_argument('-e', '--maxepoch', help='train max epoch', default=40, type=int) parser.add_argument('-b', '--batch_size', help='Training batch size', default=64, type=int) args = parser.parse_args() train(mynetwork ,args.maxepoch) print("---over---")- 1
- 2
- 3
- 4
- 5
- 6
- 7
- 8
- 9
- 10
- 11
- 12
- 13
- 14
- 15
- 16
- 17
- 18
- 19
- 20
- 21
- 22
- 23
- 24
- 25
- 26
- 27
- 28
- 29
- 30
- 31
- 32
- 33
- 34
- 35
- 36
- 37
- 38
- 39
- 40
- 41
- 42
- 43
- 44
- 45
- 46
- 47
- 48
- 49
- 50
- 51
- 52
- 53
- 54
- 55
- 56
- 57
- 58
- 59
- 60
- 61
- 62
- 63
- 64
- 65
- 66
- 67
- 68
- 69
- 70
- 71
- 72
- 73
- 74
- 75
- 76
- 77
- 78
- 79
- 80
- 81
- 82
- 83
- 84
- 85
- 86
- 87
- 88
- 89
- 90
- 91
- 92
- 93
测试
import os import torch import torchvision from PIL import Image from torch import nn from network.Mynetwork import VGG16 classes = ('airplane', 'automobile', 'bird', 'cat', 'deer', 'dog', 'frog', 'horse', 'ship', 'truck') # 测试图片 img_path = "../images/horse.jpg" img = Image.open(img_path) # 由于png格式的图片格式不是3通道的需要转换成RGB格式 if img_path.endswith(".png"): img = img.convert('RGB') path = r'./result/model/' transform =torchvision.transforms.Compose([ torchvision.transforms.Resize((32,32)), torchvision.transforms.ToTensor() ]) # 将图片转化成大小是 (32,32)大小的,并转换成tensor张量格式 img = transform(img) # 获取所有的文件 files = [ file for file in os.listdir(path) if file.endswith('.pth') ] files.sort(key=lambda x :int((x.split('.')[0]).split('_')[1]) ) # 加载最大的 load_path = path +files[-1] checkpoint = torch.load(path+files[-1]) # model = torch.load(checkpoint['model']) model = VGG16() model.load_state_dict(checkpoint['model']) # (batch_size,channel,height,width) img = torch.reshape(img,(1,3,32,32)) model.eval() with torch.no_grad() : output = model(img) # print(output) print(classes[output.argmax(1)])- 1
- 2
- 3
- 4
- 5
- 6
- 7
- 8
- 9
- 10
- 11
- 12
- 13
- 14
- 15
- 16
- 17
- 18
- 19
- 20
- 21
- 22
- 23
- 24
- 25
- 26
- 27
- 28
- 29
- 30
- 31
- 32
- 33
- 34
- 35
- 36
- 37
- 38
- 39
- 40
输出 : horse
全部代码
链接: https://pan.baidu.com/s/1cAtTvj_8kYjmU-V42cAApg 密码: 53dv
pos
- 需要修改路径,dataset按照自己想要将CIFAR10下载地址修改
- 代码是在ubuntu环境下跑的
部署到 goolge cloab
- 由于要用到显卡训练,白票一下goolge的colab
- 如果有使用的可以下一个跑一下,没有的话用上面在Pycharm上跑
链接: https://pan.baidu.com/s/1u7ZYaFD3b-4Uu4KkQ4tsDA 密码: 2eur
-
相关阅读:
“蔚来杯“2022牛客暑期多校训练营10,签到题HFIE
09 C++设计模式之装饰(Decorator)模式
Shell脚本(二)
网络安全笔记-网络设备专场(路由器、交换机、防火墙)
Spring项目bean 无法注入问题--Thread中注入Bean无效-多线程下@Resource和@Autowired和@Value 注入为null
MySQL必知必会-笔记-Part6
Python里的引用与拷贝规律
nginx 开启 gzip_static on
如何在矩池云使用 Poetry 管理项目环境
Docker入门
- 原文地址:https://blog.csdn.net/qq_41661809/article/details/124972685