-
Spring Boot整合swagger
你可能尝试过写完一个接口后,自己去创建接口文档,或者修改接口后修改接口文档。多了之后,你肯定会发生一个操作,那就是忘记了修改文档或者创建文档(除非你们公司把接口文档和写接口要求得很紧密😓忘记写文档就扣工资?,否则两个分离的工作总是有可能遗漏的)。而swagger就是一个在你写接口的时候自动帮你生成接口文档的东西,只要你遵循它的规范并写一些接口的说明注解即可。
- 自动生成文档,只需要在接口中使用注解进行标注,就能生成对应的接口文档。
- 自动更新文档,由于是动态生成的,所以如果你修改了接口,文档也会自动对应修改(如果你也更新了注解的话)。这样就不会发送我修改了接口,却忘记更新接口文档的情况。
- 支持在线调试,swagger提供了在线调用接口的功能。
前端要接口,写文档
在springBoot项目中使用
1、导入依赖
springboot 版本有时候版本和swagger版本不兼容,但是我测试了一下,我们使用的springboot版本和2.9.12这个是兼容的
- <dependency>
- <groupId>io.springfox</groupId>
- <artifactId>springfox-swagger-ui</artifactId>
- <version>2.9.2</version>
- </dependency>
- <dependency>
- <groupId>io.springfox</groupId>
- <artifactId>springfox-swagger2</artifactId>
- <version>2.9.2</version>
- </dependency>
配置swagger配置类,也可以在springboot配置文件中配置,但是我定义了多个测试环境,就直接定义了自定义配置类
- package com.yy.config;
- import com.github.xiaoymin.swaggerbootstrapui.annotations.EnableSwaggerBootstrapUI;
- import org.springframework.context.annotation.Bean;
- import org.springframework.context.annotation.Configuration;
- import org.springframework.context.annotation.Profile;
- import org.springframework.core.env.Environment;
- import org.springframework.core.env.Profiles;
- import springfox.documentation.builders.ApiInfoBuilder;
- import springfox.documentation.builders.PathSelectors;
- import springfox.documentation.builders.RequestHandlerSelectors;
- import springfox.documentation.service.ApiInfo;
- import springfox.documentation.service.Contact;
- import springfox.documentation.spi.DocumentationType;
- import springfox.documentation.spring.web.plugins.Docket;
- import springfox.documentation.swagger2.annotations.EnableSwagger2;
- import java.util.ArrayList;
- @Configuration
- @EnableSwagger2
- @EnableSwaggerBootstrapUI // 开启SwaggerBootstrapUI
- //@Profile({"dev", "test"}) // 设置swagger的使用环境(防止prod环境api泄露)
- public class SwaggerConfig {
- @Bean
- public Docket docket(Environment environment){
- //指定在dev/test环境下使用swagger
- Profiles profiles = Profiles.of("dev","test");
- System.out.println(profiles);
- boolean flag = environment.acceptsProfiles(profiles);
- return new Docket(DocumentationType.SWAGGER_2)
- .groupName("第一个docker")// 如果配置多个文档的时候,那么需要配置groupName来分组标识
- .apiInfo(apiInfo()) // 用于生成API信息
- .enable(flag)//关闭swagger,默认是true
- .select() //select()函数返回一个ApiSelectorBuilder实例,用来控制接口被swagger做成文档
- //RequestHandlerSelectors:配置要扫描的方式,有basePackage("路径")、any():扫描全部,none():全部不扫描
- //RequestHandlerSelectors.withMethodAnnotation():扫描方法上的注解
- //.withClassAnnotation():扫描类上的注解
- .apis(RequestHandlerSelectors.basePackage("com.yy.controller"))//指定扫描的包
- //.withClassAnnotation(RestController.class) // 扫描带有指定注解的类下所有接口
- //.withMethodAnnotation(PostMapping.class) // 扫描带有指定注解的方法接口
- //.apis(RequestHandlerSelectors.any()) // 扫描所有
- .paths(PathSelectors.any()
- //.any() // 满足条件的路径,该断言总为true
- //.none() // 不满足条件的路径,该断言总为false(可用于生成环境屏蔽 swagger)
- //.ant("/user/**") // 满足字符串表达式路径
- // .regex("") // 符合正则的路径
- )//设置请求路径,这里是带有hello的请求路径
- .build();
- }
- private ApiInfo apiInfo(){
- //定义作者的姓名,网址,邮箱
- Contact contact = new Contact("大米饭", "http://t.csdnimg.cn/zEtOU", "224578908@qq.com");
- return new ApiInfoBuilder()
- .title("大米的项目API") // 可以用来自定义API的主标题
- .description("XX项目SwaggerAPI管理") // 可以用来描述整体的API
- .termsOfServiceUrl("https://www.baidu.com") // 用于定义服务的域名(跳转链接)
- .version("1.0") // 可以用来定义版本
- .license("Swagger-的使用教程")
- .licenseUrl("https://blog.csdn.net")
- .contact(contact)
- .build(); //
- }
- }
那既然是记录了接口文档,肯定不能在生产环境中使用 在swagger配置类中配置了在什么环境下可以查看接口及记录的接口文档

定义了3个环境的配置类,定义使用那个环境的配置类,模拟了一下只配置了端口,生产环境用的8081,在配置类中拿现在环境,进行判断,如果是生产环境关闭swagger

定义了两个controller类,用来测试接口
@ApiOperation(value = "测试方法",notes = "用户测试notes")相当于是一个分组,就像我们用rustful 工具时,先是一个controller类目录,然后,下面有post,get,put方法

 启动启动类
启动启动类在浏览器中输入:
查看没有使用uI的接口文档:http://localhost:8081/swagger-ui.html


@ApiOperation(value = "用户测试",notes = "用户测试notes")

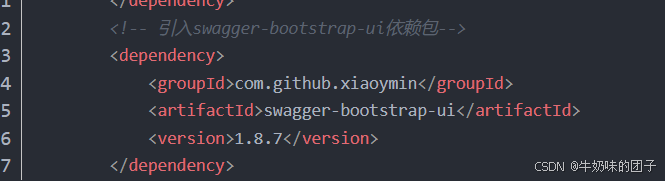
使用ui界面需要添加依赖
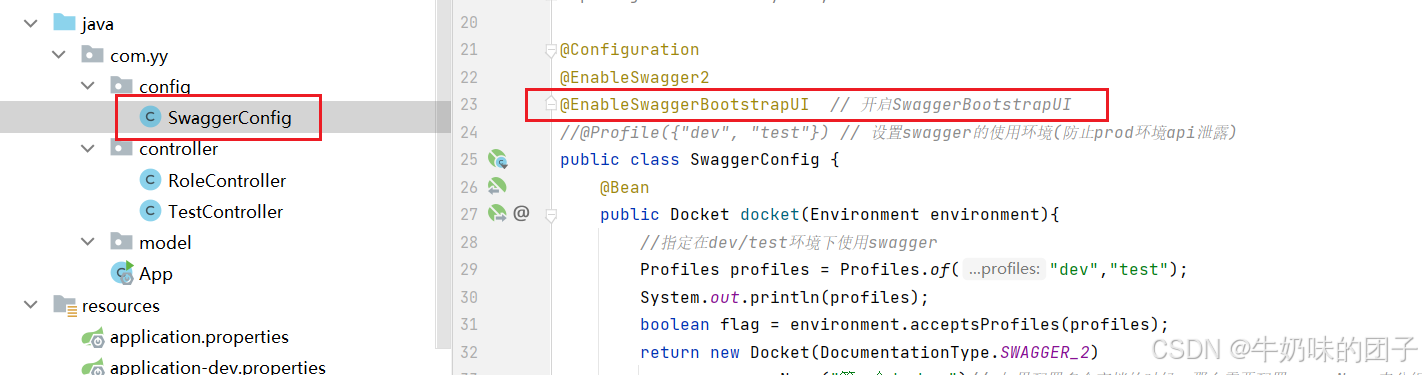
在配置文件上开启ui
启动启动类
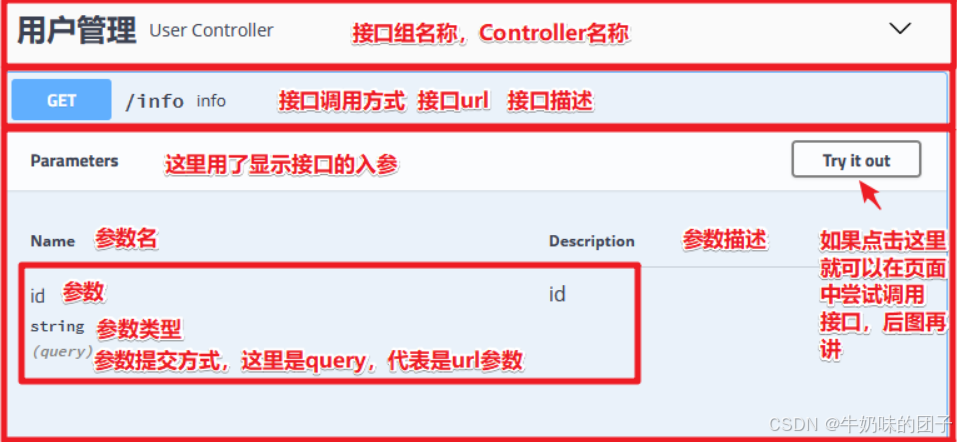
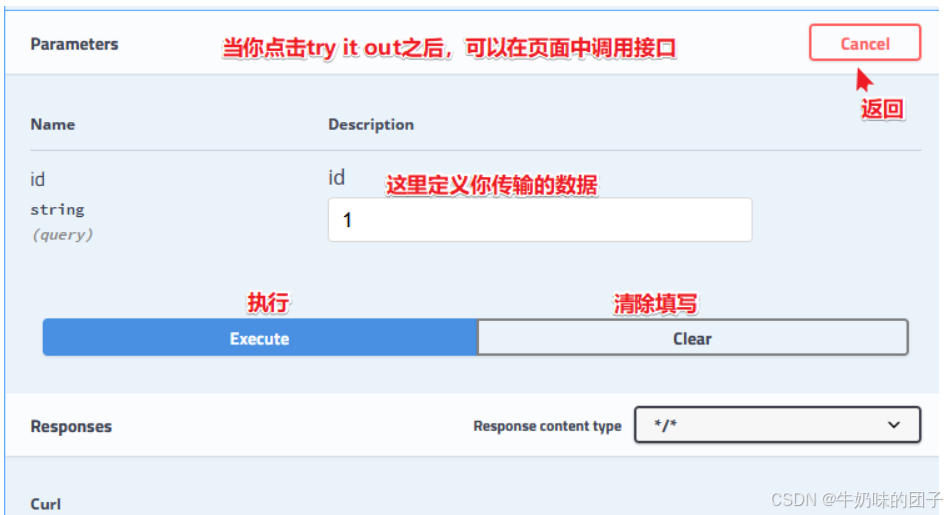
使用了uI的接口文档:
http://localhost:8081/doc.html,即可预览到基于bootstarp的Swagger UI界面他只能提供一个简单的在线调试,如果你想存储你的测试用例,不能像Postman或者YAPI这样保存了你的测试记录
没有接口文档更新管理,在文档有大的更新的时候可以提前导出一下文档
-
相关阅读:
分布式执行引擎ray入门--(2)Ray Data
羧基/羟基/氨基/巯基/环氧基/磺酸/胺基/苯基官能团化二氧化硅微球制备研究过程
博客自动化测试
codeforce 158B Taxi
spring boot集成mybatis
贪心算法——活动安排问题
企业上云原来如此简单,华为云带你体验云上风采
关于MySQL数据库中的索引
java面试题-并发编程基础
Drools规则引擎讲解
- 原文地址:https://blog.csdn.net/m0_74356429/article/details/140999475