-
HarmonyOS应用开发入门(五)
一、网络连接
网络管理模块主要提供以下功能:
- HTTP数据请求:通过HTTP发起一个数据请求。
- WebSocket连接:使用WebSocket建立服务器与客户端的双向连接。
- Socket连接:通过Socket进行数据传输。
1、Http请求数据
(1)导入http模块:
import http from '@ohos.net.http';(2)使用http模块发送请求,处理响应:
- // 创建一个http的请求对象,不可复用
- let httpRequest = http.createHttp()
- // 发起网络请求
- httpRequest.request(
- 'http://localhost:3000/users', // 请求URL路径
- {
- // 请求选项 HttpRequestOptions
- method: http.RequestMethod.GET,
- extraData: {'param1': 'value1'}
- }
- ) // Promise:存放未来会完成的结果
- // 处理响应结果
- .then((resp: http.HttpResponse) => {
- if (resp.responseCode === 200){
- // 请求成功
- }
- })
- .catch((err: Error) => {
- // 请求失败
- })
HttpRequestOptions 名称 类型 描述 method RequestMethod 请求方式,GET、POST、PUT、DELETE等 extraData string|Object 请求参数 header Object 请求头字段 connectTimeout number 连接超时时间,单位毫秒,默认60000ms readTimeout number 读取超时间,单位毫秒,默认60000ms HttpResponse 名称 类型 描述 responseCode ResponseCode 响应状态码 header Object 响应头 cookies string 响应返回的cookies result string|Object 响应体,默认是JSON字符串 resultType HttpDataType 返回值类型 npm install:安装服务端依赖;
npm start:启动服务端;
2、第三方库axios
第三方库学习地址:OpenHarmony三方库中心仓
(1)下载和安装ohpm
- 下载ohpm工具包,下载链接:DevEco Studio历史版本下载-华为开发者联盟 (huawei.com)
- 解压工具包,执行初始化命令;
- # windows环境
- init.bat
- # Linux和Mac环境
- ./init.sh
- 将ohpm配置到环境变量;
- # windows环境,直接在我的电脑配置即可
- #Linux或Mac环境,其中OHPM的路径请替换为ohpm的安装路径
- export OHPM_HOME=/xx/ohpm
- export PATH=${OHPM_HOME}/bin:${PATH}
- 安装完成之后,执行如下命令,终端输出为版本号,则表示安装成功。
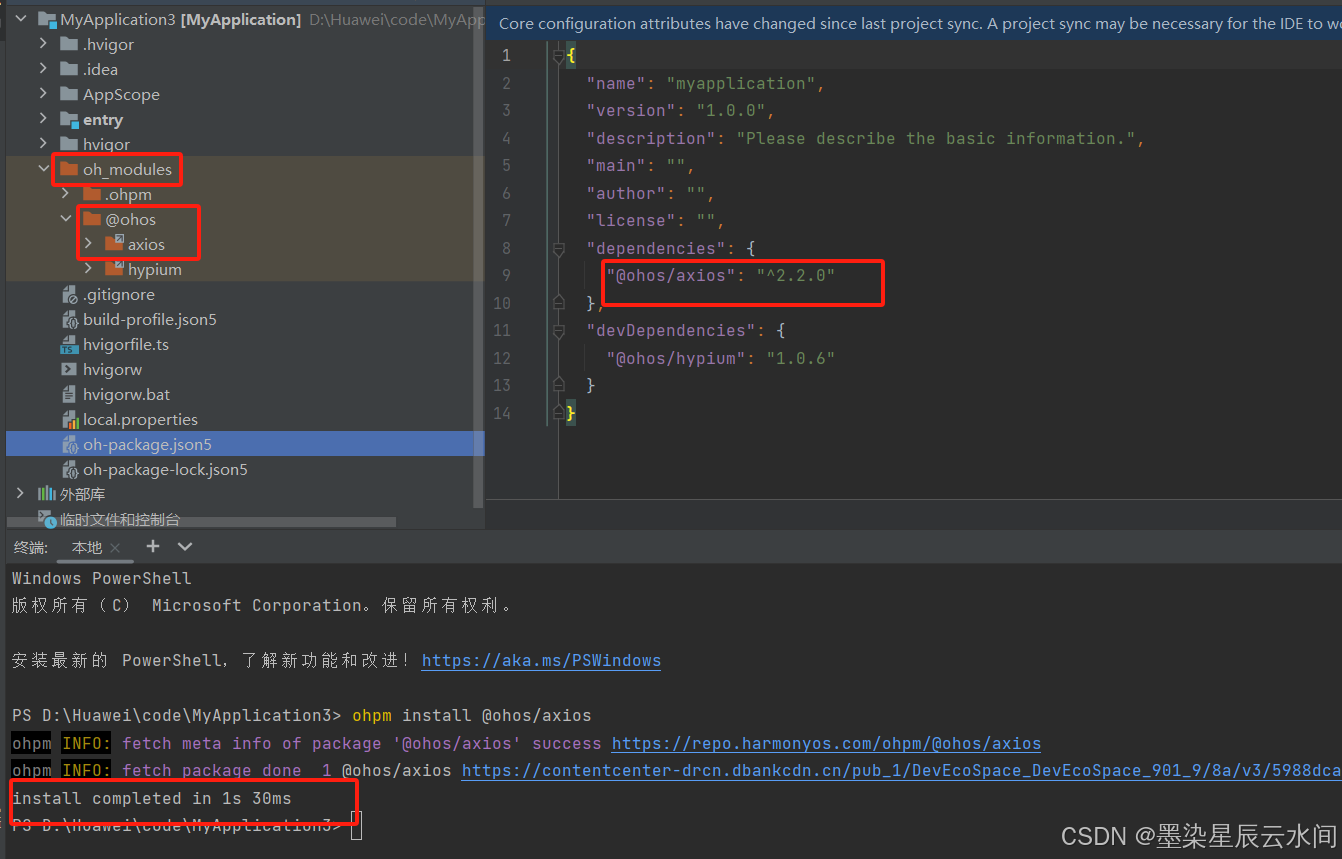
ohpm -v(2)下载和安装axios
- 下载axios:
- # 进入项目目录,然后输入下面命令
- ohpm install @ohos/axios
- 开放网络权限:在模块的module.json5文件中配置网络权限。
安装成功:
(3)使用axios
- 导入axios:
- // 导入axios模块
- import axios from '@ohos/axios'
- 发送请求并处理响应:
- axios.get( // 请求方式
- 'url', // 请求路径
- {
- params:{ 'param1':'value1' }, // 请求选项
- data:{ 'param1':'value1' }
- }
- )
- .then(response => { // 响应结果,AxiosResponse
- if(response.status !== 200){
- console.log('查询失败')
- }
- console.log('查询成功')
- })
- .catch(error => {
- console.log('查询失败',JSON.stringify(error))
- })
- }
AxiosResponse 名称 类型 描述 status number 响应状态码 header Object 响应头 data any 服务端返回的响应体 二、数据库
1、用户首选项
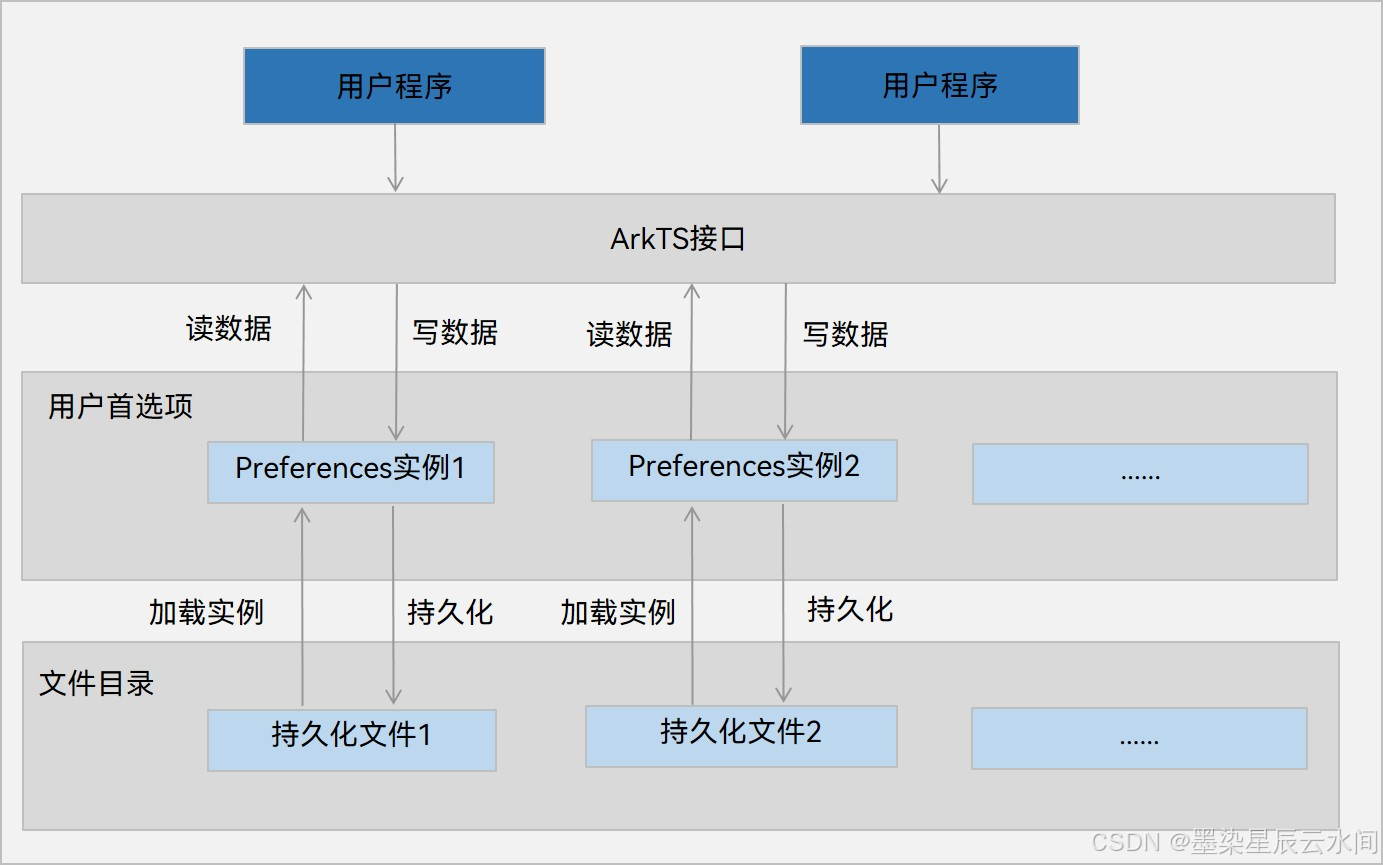
用户首选项(Preferences)为应用提供Key-Value键值型的数据处理能力,支持应用持久化轻量级数据,并对其修改和查询。属于非关系型数据库:不保证遵循ACID(Atomic、Consistence、Isolation、Durability),不采用关系模型组织数据,数据间无关系。
- Key为string类型,非空,字符长度不超过80个字节;
- Value为string类型时,可以为空,字符长度不超过8192字节;
- Preferences实例会加载到内存中,建议数据不超过1万条,并及时清理不再使用的实例,减少内存开销;
用户首选项运作机制:
(1)导入首选项模块:
import dataPreference from '@ohos.data.preferences'(2)获取首选项实例,读取指定文件:
- dataPreference.getPreferences(this.context, 'MyAppPreference')
- .then(preferences => {
- // 获取成功
- })
- .catch(reason => {
- // 获取失败
- })
(3)数据操作:
- 写入数据,如果已经存在则会覆盖,可利用.has()判断是否存在:
- preferences.put('key',val)
- .then(() => preferences.flush()) // 刷到磁盘
- .catch(reason => {}) // 处理异常
- 删除数据:
- preferences.delete('key')
- .then(() => {})
- .catch(reason => {})
- 查询数据
- preferences.get('key','defaultValue')
- .then(value => console.log('查询成功'))
- .catch(reason => console.log('查询失败'))
2、关系型数据库
关系型数据库(RDB)基于SQLite组件提供的本地数据库,适用于存储包含复杂关系数据的场景。
(1)初始化数据库
- 导入关系型数据库模块:
import relationalStore from '@ohos.data.relationalStore';- 初始化数据库表:
- // rdb配置
- const config = {
- name: 'MyApplication.db', // 数据库文件名
- securityLevel: relationalStore.SecurityLevel.S1 // 数据库安全级别
- }
- // 初始化表的SQL
- const sql = `CREATE TABLE IF NOT EXISTS TASK(
- ID INTEGER PRIMARY KEY...)`
- // 获取rdb
- relationalStore.getRdbStore(this.context,config,(err,rdbStore) => {
- // 执行SQL,后续的所有增删改查都使用rdbStore对象
- rdbStore.executeSql(sql)
- })
(2)增、删、改数据
- 新增数据:
- // 准备数据
- let task = {id: 1,name:'任务'}
- // 新增
- this.rdbStore.insert(this.tableName,task)
- 修改:
- // 要更新的数据
- let task = {'finished': true};
- // 查询条件,RdbPredicates就是条件谓词
- let predicates = new relationalStore.RdbPredicates(this.tableName)
- predicates.equalTo('ID',id)
- // 执行更新
- this.rdbStore.updata(task, predicates)
- 删除:
- // 查询条件,RdbPredicates就是条件谓词
- let predicates = new relationalStore.RdbPredicates(this.tableName)
- predicates.equalTo('ID',id)
- // 执行删除
- this.rdbStore.delete(predicates)
(3)查询数据
- 查询数据:
- // 查询条件
- let predicates = new relationalStore.RdbPredicates(this.tableName)
- // 执行查询
- let result = await this.rdbStore.query(predicates,['ID','NAME','FINISHED'])
- 解析结果:
- // 准备数组保存结果
- let tasks: any[] = []
- // 循环遍历结果集,判断结果是否遍历到最后一行
- while (!result.isAtLastRow){
- // 指针移动到下一行数据
- result.goToNextRow()
- // 根据字段名获取字段index,从而获取字段值
- let id = result.getLong(result.getColumnIndex('ID'));
- let name = result.getString(result.getColumnIndex('NAME'));
- tasks.push({id,name})
- }
三、通知
1、基础通知
应用可以通过通知接口发送通知消息,提醒用户关注应用中的变化。用户可以在通知栏查看和操作通知内容。
(1)导入notification模块:
import notification from '@ohos.notification';(2)发布通知:
- // 构建通知请求
- let request: notificationManager.NotificationRequest = {
- id: 10,
- content: {
- // 通知内容:...
- },
- deliverTime: new Data().getTime(), // 显示时间
- showDeliveryTime: true,
- groupName: 'xxx', // 分组名称
- slotType: notify.SlotType.SOCIAL_COMMUNICATION,
- }
- // 发布通知
- notificationManager.publish(request)
- .then(() => console.log('发送通知成功'))
- .catch(reason => console.log('发送通知失败',JSON.stringify(reason)))
SlotType枚举类型设置通知的类型, SOCIAL_COMMUNICATION有状态栏图标,有提示音,有横幅,SERVICE_INFORMATION没有横幅,CONTENT_INFORMATION只有状态栏图标,OTHER_TYPES什么都没有。
内容类型(contentType):
类型 描述 NOTIFICATION_CONTENT_BASIC_TEXT 普通文本类型 NOTIFICATION_CONTENT_LONG_TEXT 长文本类型 NOTIFICATION_CONTENT_MULTILINE 多行文本类型 NOTIFICATION_CONTENT_PICTURE 图片类型 对于content中的属性设置以NOTIFICATION_CONTENT_BASIC_TEXT为例:
- content: {
- contentType: notificationManager.ContentType.NOTIFICATION_CONTENT_BASIC_TEXT,
- normal: {
- title: '通知标题',
- text: '通知内容详情',
- additionalText: '通知附加内容'
- }
- }
类似的,对于NOTIFICATION_CONTENT_LONG_TEXT,第二个属性参数为longText,其在normal的基础上加入了“longText”(通知中的长文本)、“briefText”(通知概要和总结)、“expandedTitle”(通知展开时的标题);对于NOTIFICATION_CONTENT_MULTILINE,第二个属性参数为multiline,其在normal的基础上加入了“briefText”(通知概要和总结)、“longTitle”(展开时的标题)、“lines”([多行]);对于NOTIFICATION_CONTENT_PICTURE,第二个属性参数为picture,,其在normal的基础上加入了“additionalText”(通知附加内容)、“briefText”(通知概要和总结)、“expandedTitle”(通知展开时的标题)、以及“picture”(picture: this.pixel)。
对于图片的获取:
- async aboutToAppear(){
- // 获取资源管理器
- let rm = getContext(this).resourceManager;
- // 读取图片
- let file = await rm.getMediaContent($r('app.media.icon'))
- // 创建PixelMap
- image.createImageSource(file.buffer).createPixelMap()
- .then(value => this.pixel = value)
- .catch(reason => console.log('testTag','加载图片异常',JSON.stringify(reason)))
- }
(3)取消通知:
- // 取消指定id的通知
- notificationManager.cancel(id)
- // 取消当前应用所以通知
- notificationManager.cancelAll()
2、进度条通知
展示一个动态的进度条,主要应用于文件下载、事务处理进度显示。
(1)判断当前系统是否支持进度条模板:
- this.isSupport = await notificationManager.isSupportTemplate('downloadTemplate')
- if(!this.isSupport){
- return
- }
(2)定义通知请求:
- // 通知模板
- let template = {
- name: 'downloadTemplate' // 模板名称,必须是downloadTemplate
- data:{
- progressValue: this.progressValue // 进度条当前进度
- progressMaxValue: 100 // 进度条最大值
- }
- }
- // 通知请求
- let request: notificationManager.NotificationRequest = {
- id: 999,
- template: template,
- content: {
- contentType: notify.ContentType.NOTIFICATION_CONTENT_BASIC_TEXT,
- normal: {
- title: this.filename + ':' + this.state,
- text: '',
- additionalText: `${this.progressValue}%`
- }
- }
- }
3、通知意图
当发布通知时,如果期望用户可以通过点击通知栏拉起目标应用组件或发布公共事件,可以通过Ability Kit申请WantAgent封装至通知消息中。
- // 意图行为信息
- let wantInfo = {
- wants: [
- {
- deviceId: '',
- bundleName: 'com.example.myapplication',
- abilityName: 'EntryAbility',
- action: '',
- entities: [],
- }
- ],
- operationType: wantAgent.OperationType.START_ABILITY,
- requestCode: 0,
- wantAgentFlags:[wantAgent.WantAgentFlags.CONSTANT_FLAG]
- };
- // 创建wantAgent实例
- let wantAgentInstance = await wantAgent.getWantAgent(wantInfo)
- // 通知请求
- let request: notify.NotificationRequest = {
- id: 999,
- template: template,
- wantAgent: this.wantAgentInstance, // 设置通知意图
- content: {
- // ...
- }
- }
-
相关阅读:
正则匹配语法学习
数据链路层具体协议
Arcgis提取点数据经纬度
计算机毕设 基于生成对抗网络的照片上色动态算法设计与实现 - 深度学习 opencv python
“千方百计“测病毒
鸿蒙开发接口定制管理:【@ohos.enterpriseDeviceManager (企业设备管理)】
Python电梯楼层数字识别
设计模式之门面模式
47个“企业数字化转型”常见术语合集,看完秒懂~
前端提高代码质量-提升代码的可维护性
- 原文地址:https://blog.csdn.net/weixin_52554463/article/details/140425044