-
RabbitMQ入门基础篇
安装 / 部署 RabbitMQ
如果有
mq.tar的话, 直接就在docker里加载镜像 就行docker load -i mq.tar或者直接拉去mq的docker
docker pull rabbitmq:3.8-management创建网络
docker network create mq-net接下来就是创建mq容器
docker run --restart=always \
 -e RABBITMQ_DEFAULT_USER=adminovo \
 -e RABBITMQ_DEFAULT_PASS=123321 \
 -v mq-plugins:/plugins \
 --name mq \
 --hostname mq \
 -p 15672:15672 \
 -p 5672:5672 \
 --network mq-net\
 -d \
 rabbitmq:3.8-management
docker run \ -e RABBITMQ_DEFAULT_USER=guest \ -e RABBITMQ_DEFAULT_PASS=guest \ --name mq \ --hostname localhost \ -p 15672:15672 \ -p 5672:5672 \ -d \ rabbitmq注意更改账号和密码, 还有docker的网络network
快速入门
- publisher直接发送消息到队列
- 消费者监听并处理队列中的消息
为了方便测试,我们现在控制台新建一个队列:simple.queue


交换机就起到一个放大喇叭的效果。
队列需要绑定交换机才能成功发送。
每一个项目添加一个自己的虚拟主机。消息发送

控制台创建消息队列

首先配置MQ地址,在publi sher服务的application.yml中添加配置:spring: rabbitmq: host: 192.168.164.128 # 你的虚拟机IP port: 5672 # 端口 virtual-host: /hmall # 虚拟主机 username: itheima # 用户名 password: 123321 # 密码然后在publisher服务中编写测试类SpringAmqpTest,并利用RabbitTemplate实现消息发送:
package com.itheima.publisher; import org.junit.jupiter.api.Test; import org.springframework.amqp.rabbit.core.RabbitTemplate; import org.springframework.beans.factory.annotation.Autowired; import org.springframework.boot.test.context.SpringBootTest; /** * @author Ccoo * 2024/1/20 */ @SpringBootTest public class SpringAmqpTest { @Autowired private RabbitTemplate rabbitTemplate; @Test public void testSimpleQueue() { // 队列名称 String queueName = "simple.queue"; // 消息 String message = "hello, spring amqp!"; // 发送消息 rabbitTemplate.convertAndSend(queueName, message); } }消息接收
首先配置MQ地址,在consumer服务的application.yml中添加配置:
spring: rabbitmq: host: 192.168.164.128 # 你的虚拟机IP port: 5672 # 端口 virtual-host: /hmall # 虚拟主机 username: itheima # 用户名 password: 123321 # 密码然后在consumer服务的com.itheima.consumer.listener包中新建一个类SpringRabbitListener:
package com.itheima.consumer.listener; import lombok.extern.slf4j.Slf4j; import org.springframework.amqp.rabbit.annotation.RabbitListener; import org.springframework.stereotype.Component; /** * @author Ccoo * 2024/1/20 */ @Slf4j @Component public class SpringRabbitListener { // 利用RabbitListener来声明要监听的队列信息 // 将来一旦监听的队列中有了消息,就会推送给当前服务,调用当前方法,处理消息。 // 可以看到方法体中接收的就是消息体的内容 @RabbitListener(queues = "simple.queue") public void listenSimpleQueueMessage(String msg) throws InterruptedException { System.out.println("spring 消费者接收到消息:【" + msg + "】"); } }WorkQueues模型

消息发送
@Test public void testWorkQueue() throws InterruptedException { // 队列名称 String queueName = "work.queue"; // 消息 String message = "hello, message_"; for (int i = 0; i < 50; i++) { // 发送消息,每20毫秒发送一次,相当于每秒发送50条消息 rabbitTemplate.convertAndSend(queueName, message + i); Thread.sleep(20); } }消息接收
@RabbitListener(queues = "work.queue") public void listenWorkQueue1(String msg) throws InterruptedException { System.out.println("消费者1接收到消息:【" + msg + "】" + LocalTime.now()); Thread.sleep(20); } @RabbitListener(queues = "work.queue") public void listenWorkQueue2(String msg) throws InterruptedException { System.err.println("消费者2........接收到消息:【" + msg + "】" + LocalTime.now()); Thread.sleep(200); }由于两个队列处理消息的能力不一致, 导致有一个消息队列会处在空闲阶段
能者多劳
spring: rabbitmq: listener: simple: prefetch: 1 # 每次只能获取一条消息,处理完成才能获取下一个消息正所谓能者多劳,这样充分利用了每一个消费者的处理能力,可以有效避免消息积压问题。
总结
- 多个消费者绑定到一个队列,同一条消息只会被一个消费者处理
- 通过设置prefetch来控制消费者预取的消息数量
交换机类型

- Publisher:生产者,不再发送消息到队列中,而是发给交换机
- Exchange:交换机,一方面,接收生产者发送的消息。另一方面,知道如何处理消息,例如递交给某个特别队列、递交给所有队列、或是将消息丢弃。到底如何操作,取决于Exchange的类型。
- Queue:消息队列也与以前一样,接收消息、缓存消息**。不过队列一定要与交换机绑定。**
- Consumer:消费者,与以前一样,订阅队列,没有变化
Exchange(交换机)只负责转发消息,不具备存储消息的能力,因此如果没有任何队列与Exchange绑定,或者没有符合路由规则的队列,那么消息会丢失!
交换机的类型有四种:
- Fanout:广播,将消息交给所有绑定到交换机的队列。我们最早在控制台使用的正是Fanout交换机
- Direct:订阅,基于RoutingKey(路由key)发送给订阅了消息的队列
- Topic:通配符订阅,与Direct类似,只不过RoutingKey可以使用通配符
- Headers:头匹配,基于MQ的消息头匹配,用的较少。
Fanout交换机


- 1) 可以有多个队列
- 2) 每个队列都要绑定到Exchange(交换机)
- 3) 生产者发送的消息,只能发送到交换机
- 4) 交换机把消息发送给绑定过的所有队 列
- 5) 订阅队列的消费者都能拿到消息
操作:
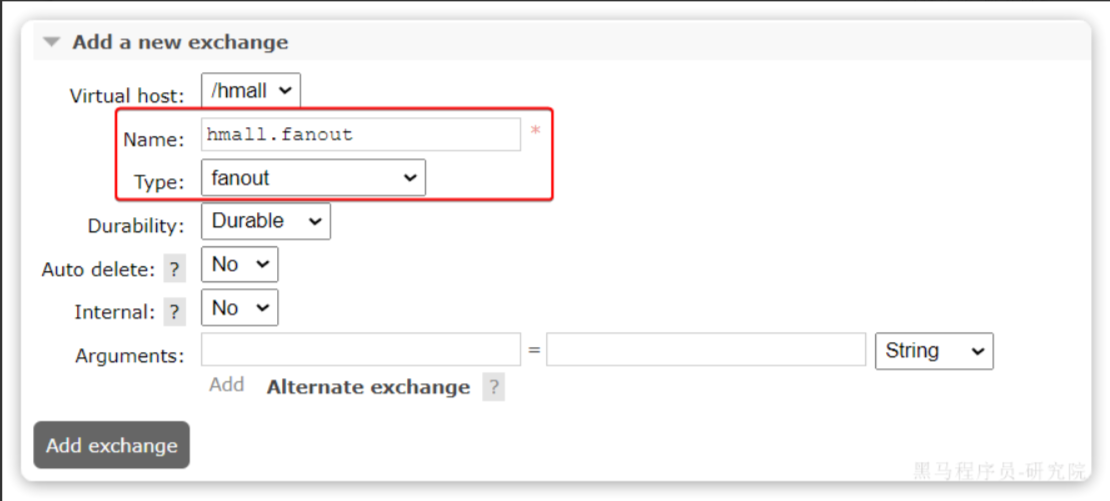
- 创建一个名为 hmall.fanout的交换机,类型是Fanout
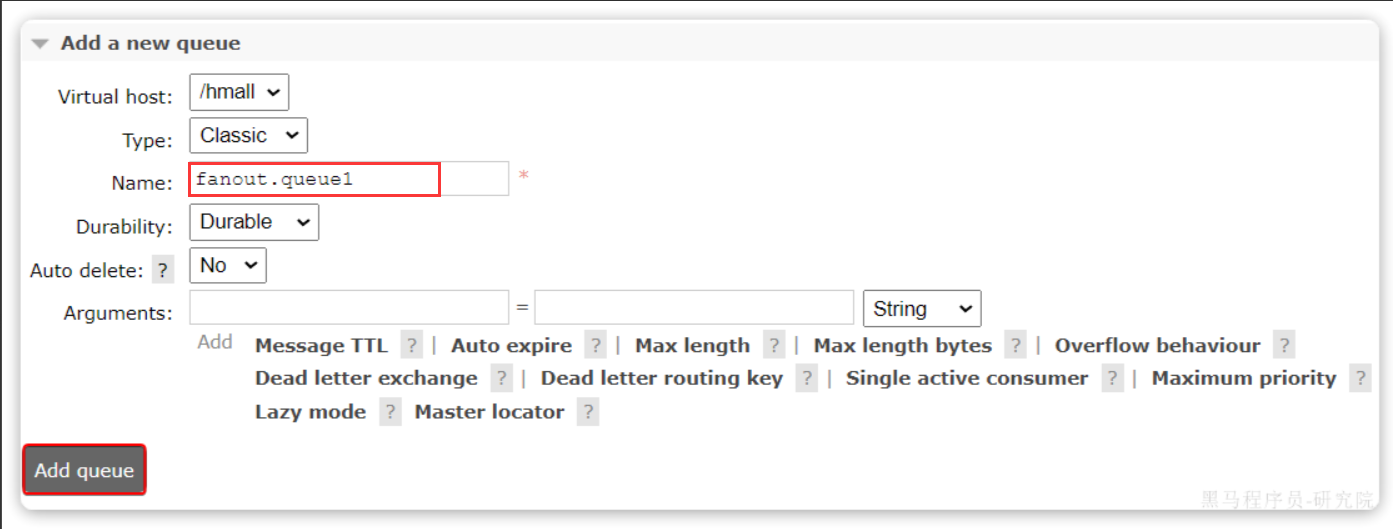
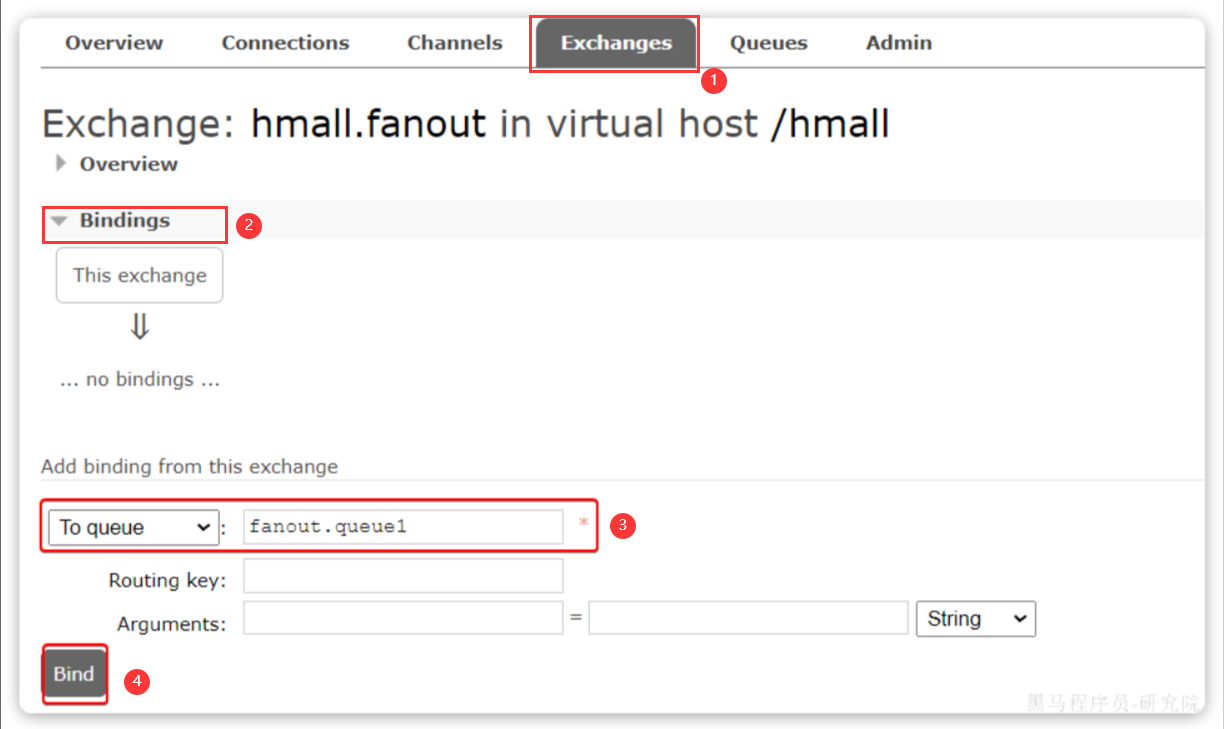
- 创建两个队列fanout.queue1和fanout.queue2,绑定到交换机hmall.fanout
声明队列和交换机
绑定队列到交换机
消息发送
@Test public void testSendFanout() { // 队列名称 String exchangeName = "hmall.fanout"; // 消息 String message = "hello, everyone!"; // 发送消息 rabbitTemplate.convertAndSend(exchangeName, null, message); }消息接收
@RabbitListener(queues = "fanout.queue1") public void listenFanoutQueue1(String msg) throws InterruptedException { System.out.println("fanout1接收到消息:【" + msg + "】" + LocalTime.now()); } @RabbitListener(queues = "fanout.queue2") public void listenFanoutQueue2(String msg) throws InterruptedException { System.out.println("fanout2........接收到消息:【" + msg + "】" + LocalTime.now()); }总结
- 接收publisher发送的消息
- 将消息按照规则路由到与之绑定的队列
- 不能缓存消息,路由失败,消息丢失
- FanoutExchange的会将消息路由到每个绑定的队列
Direct交换机

- 队列与交换机的绑定,不能是任意绑定了,而是要指定一个RoutingKey(路由key)
- 消息的发送方在 向 Exchange发送消息时,也必须指定消息的 RoutingKey。
- Exchange不再把消息交给每一个绑定的队列,而是根据消息的Routing Key进行判断,只有队列的Routingkey与消息的 Routing key完全一致,才会接收到消息
操作:

- 声明一个名为hmall.direct的交换机
- 声明队列direct.queue1,绑定hmall.direct,bindingKey为blud和red
- 声明队列direct.queue2,绑定hmall.direct,bindingKey为yellow和red
- 在consumer服务中,编写两个消费者方法,分别监听direct.queue1和direct.queue2
- 在publisher中编写测试方法,向hmall.direct发送消息
声明队列和交换机


为队列绑定相应的key


消息接收
@RabbitListener(queues = "direct.queue1") public void listenDirectQueue1(String msg) throws InterruptedException { System.out.println("direct1接收到消息:【" + msg + "】" + LocalTime.now()); } @RabbitListener(queues = "direct.queue2") public void listenDirectQueue2(String msg) throws InterruptedException { System.out.println("direct2........接收到消息:【" + msg + "】" + LocalTime.now()); }消息发送
@Test public void testSendDirect() { // 队列名称 String exchangeName = "hmall.direct"; // 消息 String message = "Red!"; // 发送消息 rabbitTemplate.convertAndSend(exchangeName, "red", message); }测试结果:

@Test public void testSendDirect() { // 队列名称 String exchangeName = "hmall.direct"; // 消息 String message = "BLUE!"; // 发送消息 rabbitTemplate.convertAndSend(exchangeName, "blue", message); }
Topic交换机
Topic类型的Exchange与Direct相比,都是可以根据RoutingKey把消息路由到不同的队列。
只不过Topic类型Exchange可以让队列在绑定BindingKey 的时候使用通配符!通配符规则:
- #:匹配一个或多个词
- *:匹配不多不少恰好1个词
举例:
- item.#:能够匹配item.spu.insert 或者 item.spu
- item.*:只能匹配item.spu

绑定队列

消息接收
@RabbitListener(queues = "topic.queue1") public void listenTopicQueue1(String msg){ System.out.println("消费者1接收到topic.queue1的消息:【" + msg + "】"); } @RabbitListener(queues = "topic.queue2") public void listenTopicQueue2(String msg){ System.out.println("消费者2接收到topic.queue2的消息:【" + msg + "】"); }消息发送
/** * topicExchange */ @Test public void testSendTopicExchange() { // 交换机名称 String exchangeName = "hmall.topic"; // 消息 String message = "喜报!孙悟空大战哥斯拉,胜!"; // 发送消息 rabbitTemplate.convertAndSend(exchangeName, "china.news", message); }总结
- Topic交换机接收的消息RoutingKey必须是多个单词,以 . 分割
- Topic交换机与队列绑定时的bindingKey可以指定通配符
- #:代表0个或多个词
- *:代表1个词
Java声明队列和交换机

fanout示例
package com.itheima.consumer.config; import org.springframework.amqp.core.Binding; import org.springframework.amqp.core.BindingBuilder; import org.springframework.amqp.core.FanoutExchange; import org.springframework.amqp.core.Queue; import org.springframework.context.annotation.Bean; import org.springframework.context.annotation.Configuration; @Configuration public class FanoutConfig { /** * 声明交换机 * @return Fanout类型交换机 */ @Bean public FanoutExchange fanoutExchange(){ // ExchangeBuilder.fanoutExchange("").build(); return new FanoutExchange("hmall.fanout"); } /** * 第1个队列 */ @Bean public Queue fanoutQueue1(){ // QueueBuilder.durable("ff").build(); durable:持久化 return new Queue("fanout.queue1"); } /** * 绑定队列和交换机 */ @Bean public Binding bindingQueue1(Queue fanoutQueue1, FanoutExchange fanoutExchange){ return BindingBuilder.bind(fanoutQueue1).to(fanoutExchange); } /** * 第2个队列 */ @Bean public Queue fanoutQueue2(){ return new Queue("fanout.queue2"); } /** * 绑定队列和交换机 */ @Bean public Binding bindingQueue2(Queue fanoutQueue2, FanoutExchange fanoutExchange){ return BindingBuilder.bind(fanoutQueue2).to(fanoutExchange); } }direct示例
package com.itheima.consumer.config; import org.springframework.amqp.core.*; import org.springframework.context.annotation.Bean; import org.springframework.context.annotation.Configuration; @Configuration public class DirectConfig { /** * 声明交换机 * @return Direct类型交换机 */ @Bean public DirectExchange directExchange(){ return ExchangeBuilder.directExchange("hmall.direct").build(); } /** * 第1个队列 */ @Bean public Queue directQueue1(){ return new Queue("direct.queue1"); } /** * 绑定队列和交换机 */ @Bean public Binding bindingQueue1WithRed(Queue directQueue1, DirectExchange directExchange){ return BindingBuilder.bind(directQueue1).to(directExchange).with("red"); } /** * 绑定队列和交换机 */ @Bean public Binding bindingQueue1WithBlue(Queue directQueue1, DirectExchange directExchange){ return BindingBuilder.bind(directQueue1).to(directExchange).with("blue"); } /** * 第2个队列 */ @Bean public Queue directQueue2(){ return new Queue("direct.queue2"); } /** * 绑定队列和交换机 */ @Bean public Binding bindingQueue2WithRed(Queue directQueue2, DirectExchange directExchange){ return BindingBuilder.bind(directQueue2).to(directExchange).with("red"); } /** * 绑定队列和交换机 */ @Bean public Binding bindingQueue2WithYellow(Queue directQueue2, DirectExchange directExchange){ return BindingBuilder.bind(directQueue2).to(directExchange).with("yellow"); } }基于注解声明
Direct:
@RabbitListener(bindings = @QueueBinding( value = @Queue(name = "direct.queue1"), exchange = @Exchange(name = "hmall.direct", type = ExchangeTypes.DIRECT), key = {"red", "blue"} )) public void listenDirectQueue1(String msg){ System.out.println("消费者1接收到direct.queue1的消息:【" + msg + "】"); } @RabbitListener(bindings = @QueueBinding( value = @Queue(name = "direct.queue2"), exchange = @Exchange(name = "hmall.direct", type = ExchangeTypes.DIRECT), key = {"red", "yellow"} )) public void listenDirectQueue2(String msg){ System.out.println("消费者2接收到direct.queue2的消息:【" + msg + "】"); }Topic:
@RabbitListener(bindings = @QueueBinding( value = @Queue(name = "topic.queue1"), exchange = @Exchange(name = "hmall.topic", type = ExchangeTypes.TOPIC), key = "china.#" )) public void listenTopicQueue1(String msg){ System.out.println("消费者1接收到topic.queue1的消息:【" + msg + "】"); } @RabbitListener(bindings = @QueueBinding( value = @Queue(name = "topic.queue2"), exchange = @Exchange(name = "hmall.topic", type = ExchangeTypes.TOPIC), key = "#.news" )) public void listenTopicQueue2(String msg){ System.out.println("消费者2接收到topic.queue2的消息:【" + msg + "】"); }消息转换器

测试默认转换器:

一堆乱码,采用的是JDK序列话方式配置JSON转换器:
在publisher和consumer两个服务中都引入依赖:com.fasterxml.jackson.dataformat jackson-dataformat-xml 2.9.10 注意,如果项目中引入了spring-boot-starter-web依赖,则无需再次引入Jackson依赖。
配置消息转换器,在publisher和consumer两个服务的启动类中添加一个Bean即可:
@Bean public MessageConverter messageConverter(){ // 1.定义消息转换器 Jackson2JsonMessageConverter jackson2JsonMessageConverter = new Jackson2JsonMessageConverter(); // 2.配置自动创建消息id,用于识别不同消息,也可以在业务中基于ID判断是否是重复消息 jackson2JsonMessageConverter.setCreateMessageIds(true); return jackson2JsonMessageConverter; }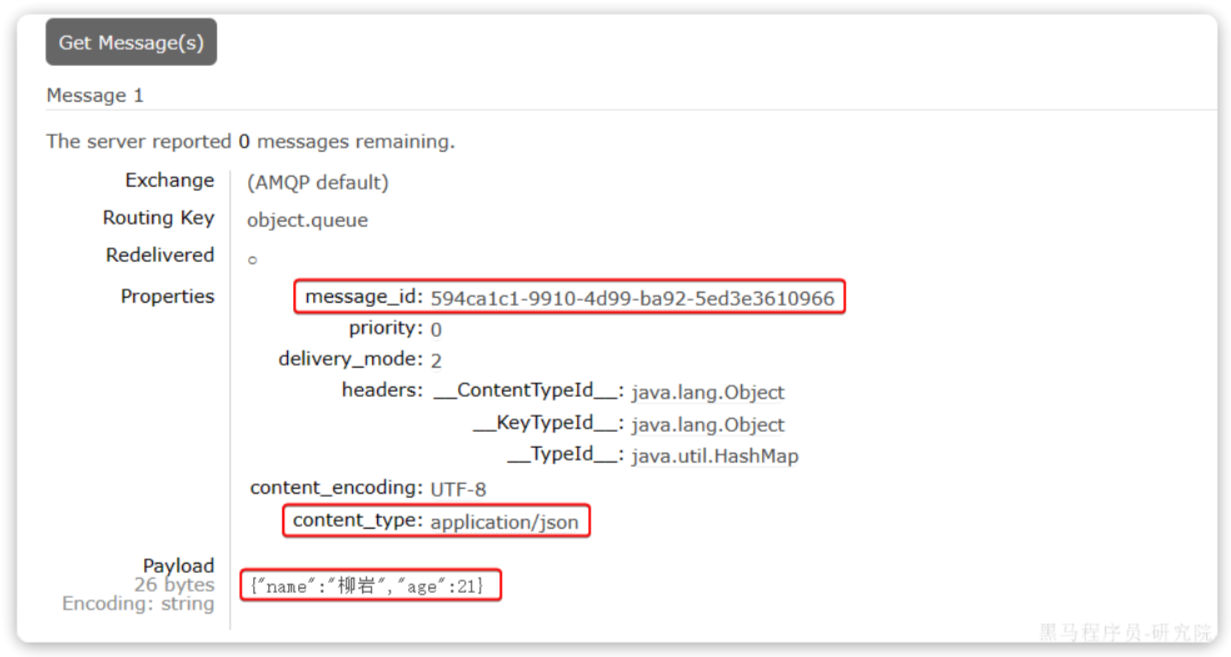
消费者接收Object:
可以使用之前的消费者, 也可以另外定义一个接收Map的消费者@RabbitListener(queues = "object.queue") public void listenSimpleQueueMessage(Map实战运用-hmall

配置MQ
不管是生产者还是消费者,都需要配置MQ的基本信息, 添加依赖
<dependency> <groupId>org.springframework.bootgroupId> <artifactId>spring-boot-starter-amqpartifactId> dependency>配置MQ地址:
spring: rabbitmq: host: 192.168.164.128 # 你的虚拟机IP port: 5672 # 端口 virtual-host: /hmall # 虚拟主机 username: itheima # 用户名 password: 123321 # 密码 listener: simple: prefetch: 1 # 每次只能获取一条消息,处理完成才能获取下一个消息配置消息转换器

接收消息
在trade-service服务中定义一个消息监听类:

/**
 * @author Ccoo
 * 2024/1/21
 */
@Component
@RequiredArgsConstructor
public class PayStatusListener {

	private final IOrderService orderService;

	@RabbitListener(bindings = @QueueBinding(
			value = @Queue(name = "mark.order.pay.queue", durable = "true"),
			exchange = @Exchange(name = "pay.topic", type = ExchangeTypes.TOPIC),
			key = "pay.success"
	))
	public void listenPaySuccess(Long orderId){
		orderService.markOrderPaySuccess(orderId);
	}
}
绑定队列与交换机
/**
 * @author Ccoo
 * 2024/2/12
 */
@Configuration
public class MqConfig {
	@Bean
	public MessageConverter jackson2MessageConverter() {
		return new Jackson2JsonMessageConverter();
	}

	@Bean
	public TopicExchange topicExchange(){
		return new TopicExchange(MqConstants.USER_ORDER_EXCHANGE, true, false);
	}
	@Bean
	public Queue insertQueue(){
		return new Queue(MqConstants.USER_ORDER_INSERT_QUEUE, true);
	}
	@Bean
	public Queue deleteQueue(){
		return new Queue(MqConstants.USER_ORDER_DELETE_QUEUE, true);
	}
	@Bean
	public Binding insertQueueBinding(){
		return BindingBuilder.bind(insertQueue()).to(topicExchange()).with(MqConstants.USER_ORDER_INSERT_KEY);
	}
	@Bean
	public Binding deleteQueueBinding(){
		return BindingBuilder.bind(deleteQueue()).to(topicExchange()).with(MqConstants.USER_ORDER_DELETE_KEY);
	}
}
发送消息
// 5.修改订单状态
    // tradeClient.markOrderPaySuccess(po.getBizOrderNo());
    try {
        rabbitTemplate.convertAndSend(exchange:"pay.topic", routingkey:"pay.success", po.getBizOrderNo());
    } catch (Exception e) {
        log.error("支付成功的消息发送失败,支付单id:{}, 交易单id:{}", po.getId(), po.getBizOrderNo(), e);
    }
记得注入rabbitTemplate
-
相关阅读:
dbExpress Driver for Oracle
正规矩阵(normal matrix)
【电力系统】CJAYA算法优化光伏模型SDM参数附matlab代码
如何搭建普罗米修斯 Prometheus
【axios】封装axios
移知丨一个芯片工程师的ADC学习笔记 (一)
volatile关键字理解
Linu性能调优:面对DDOS攻击,我们如何缓解局面?
Gumbel-Softmax完全解析
LeetCode 162. 寻找峰值
- 原文地址:https://blog.csdn.net/apple_74262176/article/details/139870328