-
SpringMVC

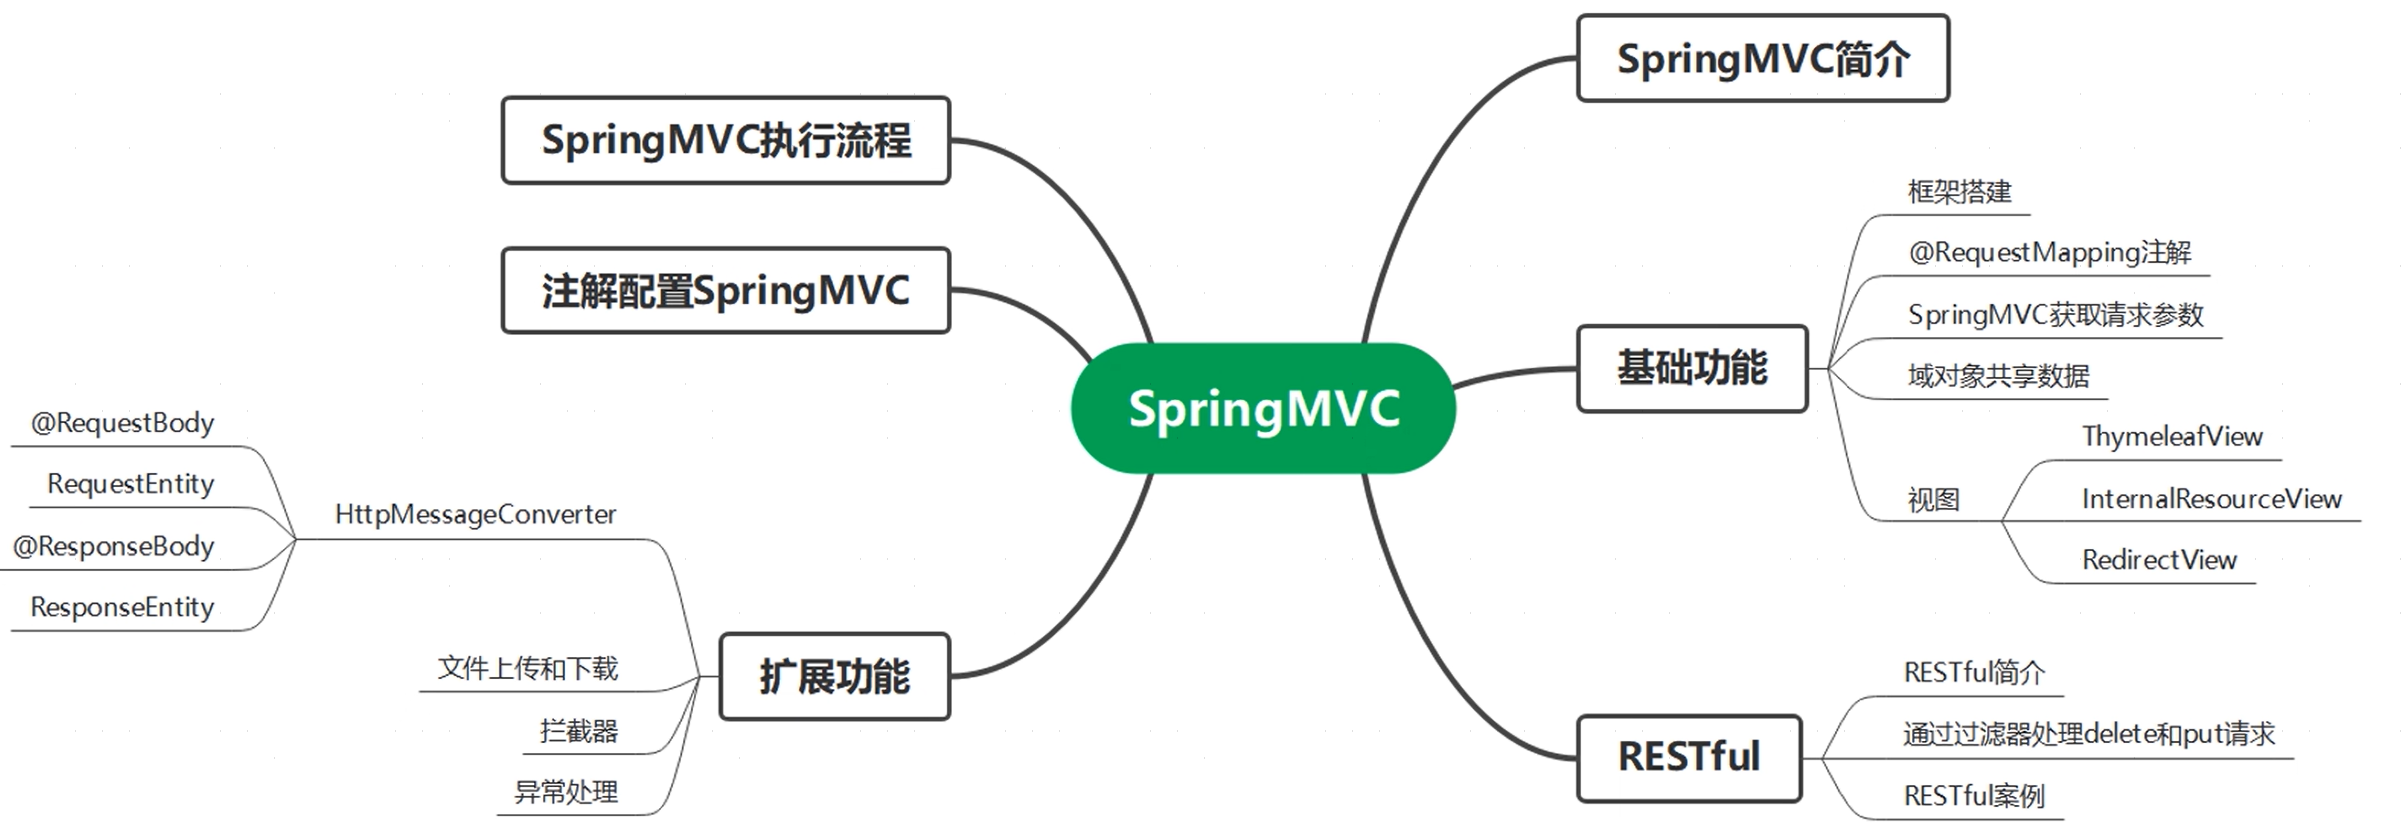
一、SpringMVC简介
1.1什么是MVC

1.2什么是SpringMVC

SpringMVC具有以下特点:

1.3入门程序
开发环境:
- IDEA:2023.2.2
- 构建工具:maven3.9.4
- 服务器:tomcat7
- Spring版本:5.3.1
1.3.1创建Maven工程
创建项目SpringMVC,在其内创建子模块
springmvc-demo1作为Web模块,打包方式为war,并引入依赖:<project xmlns="http://maven.apache.org/POM/4.0.0" xmlns:xsi="http://www.w3.org/2001/XMLSchema-instance" xsi:schemaLocation="http://maven.apache.org/POM/4.0.0 http://maven.apache.org/xsd/maven-4.0.0.xsd"> <modelVersion>4.0.0modelVersion> <parent> <groupId>org.examplegroupId> <artifactId>springMVCProjectartifactId> <version>1.0-SNAPSHOTversion> parent> <artifactId>springmvc-demo1artifactId> <packaging>warpackaging> <properties> <maven.compiler.source>8maven.compiler.source> <maven.compiler.target>8maven.compiler.target> <project.build.sourceEncoding>UTF-8project.build.sourceEncoding> properties> <dependencies> <dependency> <groupId>org.springframeworkgroupId> <artifactId>spring-webmvcartifactId> <version>5.3.1version> dependency> <dependency> <groupId>ch.qos.logbackgroupId> <artifactId>logback-classicartifactId> <version>1.2.3version> dependency> <dependency> <groupId>javax.servletgroupId> <artifactId>javax.servlet-apiartifactId> <version>3.1.0version> <scope>providedscope> dependency> <dependency> <groupId>org.thymeleafgroupId> <artifactId>thymeleaf-spring5artifactId> <version>3.0.12.RELEASEversion> dependency> dependencies> project>1.3.2在工程中加入web模块
手动在main目录下创建webapp目录,之后在
项目结构中为该目录创建相应的web.xml文件并存放在webapp\WEB-INF目录下:

1.3.3配置web.xml
- 默认配置方式:
<web-app xmlns="http://xmlns.jcp.org/xml/ns/javaee" xmlns:xsi="http://www.w3.org/2001/XMLSchema-instance" xsi:schemaLocation="http://xmlns.jcp.org/xml/ns/javaee http://xmlns.jcp.org/xml/ns/javaee/web-app_4_0.xsd" version="4.0"> <servlet> <servlet-name>SpringMVCservlet-name> <servlet-class>org.springframework.web.servlet.DispatcherServletservlet-class> servlet> <servlet-mapping> <servlet-name>SpringMVCservlet-name> <url-pattern>/url-pattern> servlet-mapping> web-app>- 扩展配置方式:通过
init-param标签(初始化参数)设置SpringMVC配置文件的位置和名称,通过load-on-startup标签设置SpringMVC前端控制器的初始化时间。
<web-app xmlns="http://xmlns.jcp.org/xml/ns/javaee" xmlns:xsi="http://www.w3.org/2001/XMLSchema-instance" xsi:schemaLocation="http://xmlns.jcp.org/xml/ns/javaee http://xmlns.jcp.org/xml/ns/javaee/web-app_4_0.xsd" version="4.0"> <servlet> <servlet-name>SpringMVCservlet-name> <servlet-class>org.springframework.web.servlet.DispatcherServletservlet-class> <init-param> <param-name>contextConfigLocationparam-name> <param-value>classpath:springMVC.xmlparam-value> init-param> <load-on-startup>1load-on-startup> servlet> <servlet-mapping> <servlet-name>SpringMVCservlet-name> <url-pattern>/url-pattern> servlet-mapping> web-app>并在resources目录下创建Spring配置文件
SpringMVC.xml:<beans xmlns="http://www.springframework.org/schema/beans" xmlns:xsi="http://www.w3.org/2001/XMLSchema-instance" xsi:schemaLocation="http://www.springframework.org/schema/beans http://www.springframework.org/schema/beans/spring-beans.xsd"> beans>1.3.4创建控制器
创建控制器组件类:
package org.example.controller;
import org.springframework.stereotype.Controller;
@Controller//声明IoC容器的Controller组件
public class HelloController {
}
修改配置文件springMVC.xml:
<beans xmlns="http://www.springframework.org/schema/beans"
       xmlns:xsi="http://www.w3.org/2001/XMLSchema-instance"
       xmlns:context="http://www.springframework.org/schema/context"
       xmlns:mvc="http://www.springframework.org/schema/mvc"
       xsi:schemaLocation="http://www.springframework.org/schema/beans
       http://www.springframework.org/schema/beans/spring-beans.xsd
       http://www.springframework.org/schema/context
       https://www.springframework.org/schema/context/spring-context.xsd http://www.springframework.org/schema/mvc https://www.springframework.org/schema/mvc/spring-mvc.xsd">

    <context:component-scan base-package="org.example.controller"/>

    <bean id="viewResolver" class="org.thymeleaf.spring5.view.ThymeleafViewResolver">

        <property name="order" value="1"/>
        <property name="characterEncoding" value="UTF-8"/>

        <property name="templateEngine">

            <bean class="org.thymeleaf.spring5.SpringTemplateEngine">
                <property name="templateResolver">

                    <bean class="org.thymeleaf.spring5.templateresolver.SpringResourceTemplateResolver">

                        <property name="prefix" value="/WEB-INF/templates/"/>

                        <property name="suffix" value=".html"/>
                        <property name="templateMode" value="HTML5"/>
                        <property name="characterEncoding" value="UTF-8"/>
                    bean>
                property>
            bean>
        property>
    bean>

    <mvc:default-servlet-handler/>

    <mvc:annotation-driven>
        <mvc:message-converters>

            <bean class="org.springframework.http.converter.StringHttpMessageConverter">
                <property name="defaultCharset" value="UTF-8"/>
                <property name="supportedMediaTypes">
                    <list>
                        <value>text/htmlvalue>
                        <value>application/jsonvalue>
                    list>
                property>
            bean>
        mvc:message-converters>
    mvc:annotation-driven>
beans>
新建目录
WEB-INF/templates,得到项目结构:

1.3.5访问首页
在
src/main/webapp/WEB-INF/templates下创建index.html文件:DOCTYPE html> <html lang="en" xmlns:th="http://www.thymeleaf.org"> <head> <meta charset="UTF-8"> <title>Titletitle> head> <body> <h1>Hello Worldh1> body> html>在请求控制器中创建处理请求的方法:
package org.example.controller;

import org.springframework.stereotype.Controller;
import org.springframework.web.bind.annotation.RequestMapping;

@Controller//声明IoC容器的Controller组件
public class HelloController {
    //访问/WEB-INF/templates/index.html
    @RequestMapping(value="/")//创建请求与控制器方法的映射关系,当浏览器访问value对应的路径值会自动执行控制器方法
    public String index(){
        return "index";//返回视图名称,加上视图解析器前、后缀即可得到页面路径:/WEB-INF/templates/index.html
    }
}
配置本地服务器:

注意,Tomcat服务器的下载、环境配置不再赘述,本文使用版本为8.5.100,运行结果:

日志内容:17:23:34.784 [http-nio-8080-exec-1] DEBUG org.thymeleaf.TemplateEngine - [THYMELEAF] TEMPLATE ENGINE INITIALIZED 17:23:34.913 [http-nio-8080-exec-1] DEBUG org.springframework.web.servlet.DispatcherServlet - Completed 200 OK 17:23:35.196 [http-nio-8080-exec-4] DEBUG org.springframework.web.servlet.DispatcherServlet - GET "/springmvc/", parameters={} 17:23:35.197 [http-nio-8080-exec-4] DEBUG org.springframework.web.servlet.mvc.method.annotation.RequestMappingHandlerMapping - Mapped to org.example.controller.HelloController#index() 17:23:35.206 [http-nio-8080-exec-4] DEBUG org.springframework.web.servlet.DispatcherServlet - Completed 200 OKGET "/springmvc/", parameters={}:发出的是GET请求,请求路径为/springmvc/,无请求参数。RequestMappingHandlerMapping - Mapped to org.example.controller.HelloController#index():RequestMappingHandlerMapping是请求映射处理器对象,映射到了Mapped to org.example.controller.HelloController下的index()方法。
1.3.6访问指定页面
在首页中加入超链接:
DOCTYPE html>
<html lang="en" xmlns:th="http://www.thymeleaf.org">
<head>
    <meta charset="UTF-8">
    <title>Titletitle>
head>
<body>
<h1>Hello Worldh1>

<a th:href="@{/target}">访问目标页面target.htmla>
body>
html>
在
src/main/webapp/WEB-INF/templates下创建target.html:DOCTYPE html> <html lang="en" xmlns:th="http://www.thymeleaf.org"> <head> <meta charset="UTF-8"> <title>Titletitle> head> <body> <h1>targeth1> body> html>在控制器中加入相应的方法:
@RequestMapping(value = "/target")
public String toTarget(){
    return "target";
}
同样可在控制台看到请求信息:17:44:06.415 [http-nio-8080-exec-11] DEBUG org.springframework.web.servlet.DispatcherServlet - Completed 200 OK 17:44:09.091 [http-nio-8080-exec-7] DEBUG org.springframework.web.servlet.DispatcherServlet - GET "/springmvc/target", parameters={} 17:44:09.092 [http-nio-8080-exec-7] DEBUG org.springframework.web.servlet.mvc.method.annotation.RequestMappingHandlerMapping - Mapped to org.example.controller.HelloController#toTarget() 17:44:09.098 [http-nio-8080-exec-7] DEBUG org.springframework.web.servlet.DispatcherServlet - Completed 200 OK1.3.7总结

1.4JavaWeb项目结构
核心目录结构:
- Web Root(也称为Web Content):Web模块根目录,一般命名为
webapp,是Web应用对外暴露的部分,其中的内容可以直接被客户端浏览器访问,常见资源有:- 网页资源:.html、.jsp、.jspx等动态或静态网页文件。
- 静态资源:如:.css、.js、图片文件 (.png, .jpg, .gif) 等。
- WEB-INF:位于Web应用根目录(Web Root)下,但其内部的内容不能被客户端直接访问。常见文件有:
- classes: 存放编译后的Java类文件 (.class),这些是项目中所有Java源代码经过编译后产生的字节码文件。
- lib:存放项目所需的第三方库文件,一般是jar、war包。
- web.xml:Java Web应用程序的部署描述符文件,定义Servlet、Filter、Listener等组件的配置以及初始化参数、安全约束等内容。
在项目结构中查看一个简单的Web模块:

IDEA特定结构:- .idea:IntelliJ IDEA项目相关配置文件目录。
- out:IntelliJ IDEA的编译输出目录。
- src:源代码目录,包含Java源代码文件及可能的资源文件。
- .iml:IntelliJ IDEA的模块文件,记录模块配置信息。
- pom.xml:如果是Maven项目,则会有此文件来管理项目依赖、构建过程等。
Maven项目结构:对于使用Maven构建工具的Java Web项目,除了上述核心Web目录结构外,还有:
- src/main/java:存放Java源代码。
- src/main/resources:存放资源配置文件,如.properties, .xml等。
- src/main/webapp:对应Web应用的Web Root目录。
- pom.xml:Maven项目的核心配置文件。
二、@RequestMapping
@RequestMapping注解用于将请求与处理请求的控制器方法相关联,建立映射关系。SpringMVC在接收到指定请求后,就会来找到在映射关系中对应的控制器方法来处理这个请求。2.1@RequestMapping的标注位置
查看
@RequestMapping源码:@Target({ElementType.TYPE, ElementType.METHOD})@RequestMapping可标识在类、方法上。2.1.1多个方法对应同一个请求的情况
当存在多个
RequestMapping处理的请求地址相同时,就会出现报错:


2.1.2方法
@RequestMapping标识在方法上时,该方法会与浏览器发出的请求发生关联,即,用于设置映射请求请求路径的具体信息:package org.example.controller; import org.springframework.stereotype.Controller; import org.springframework.web.bind.annotation.RequestMapping; @Controller public class RequestMappingController { @RequestMapping("/") public String index(){ return "index"; } }创建资源文件
src/main/webapp/WEB-INF/templates/index.html:DOCTYPE html> <html lang="en" xmlns:th="http://www.thymeleaf.org"> <head> <meta charset="UTF-8"> <title>Titletitle> head> <body> <h1>index.htmlh1> body> html>之后直接通过地址
http://localhost:8080/springmvc/进行访问,实际即为上下文路径。2.1.2类
当
@RequestMapping标识在类上时,用于设置映射请求的请求路径的初始信息,之后访问资源时需先访问初始信息路径再访问其他资源。package org.example.controller; import org.springframework.stereotype.Controller; import org.springframework.web.bind.annotation.RequestMapping; @Controller @RequestMapping("/RequestMapping") public class RequestMappingController { @RequestMapping("/") public String index(){ return "index"; } }此时需通过
http://localhost:8080/springmvc/RequestMapping/才可访问到之前的index.html,并且之后访问该资源时都应加上/RequestMapping。例如,在RequestMappingController类中加入方法:@RequestMapping("/testRequestMapping") public String success(){ return "success"; }src/main/webapp/WEB-INF/templates/success.html:DOCTYPE html> <html lang="en" xmlns:th="http://www.thymeleaf.org"> <head> <meta charset="UTF-8"> <title>Titletitle> head> <body> <h1>首页h1> <a th:href="@{/RequestMapping/">返回index.htmla> body> html>通过
http://localhost:8080/springmvc/RequestMapping/testRequestMapping访问该页面:

同理,不允许多类上@RequestMapping的值相同,否则同2.1.1而报错。2.2@RequestMapping的属性
2.2.1value属性
@AliasFor("path") String[] value() default {};@RequestMapping的value属性通过请求的请求地址匹配映射,本身是一个字符串类型的数组,表示该请求映射能匹配多个请求地址所对应的请求。注意,value必须被设置。在设置多个请求地址后,当前请求映射就可处理多个请求,多请求地址通过以下方式赋值多个请求地址:package org.example.controller; import org.springframework.stereotype.Controller; import org.springframework.web.bind.annotation.RequestMapping; @Controller public class RequestMappingController { @RequestMapping(value={"/","/toPage1","toPage2"}) public String index(){ return "index"; } @RequestMapping("/Page1") public String Page1(){ return "Page1"; } @RequestMapping("/Page2") public String Page2(){ return "Page2"; } }
此时可通过:http://localhost:8080/springmvc/http://localhost:8080/springmvc/toPage1http://localhost:8080/springmvc/toPage2
实现对index.html的访问,并可从index.html跳转到Page1.html、Page2.html。
2.2.2method属性
@RequestMapping注解的method属性通过请求的请求方式(GET或POST)匹配请求映射,本质是一个RequestMethod类型的数组,表示该请求映射能匹配多种请求方式的请求。而若当前请求的请求地址满足请求映射的value属性,但不满足method属性,则浏览器报错 405 : R e q u e s t m e t h o d ′ P O S T ′ n o t s u p p o r t e d 405:Request method 'POST' not supported 405:Requestmethod′POST′notsupported。当不设置method属性,则默认两种请求方式均可接受。其中,RequestMethod是枚举类型:package org.springframework.web.bind.annotation; public enum RequestMethod { GET,HEAD,POST,PUT,PATCH,DELETE,OPTIONS,TRACE; private RequestMethod() { } }案例:
package org.example.controller;
import org.springframework.stereotype.Controller;
import org.springframework.web.bind.annotation.RequestMapping;
import org.springframework.web.bind.annotation.RequestMethod;

@Controller
public class RequestMappingController {
    @RequestMapping(value="/")
    public String index(){
        return "index";
    }
    //只能通过GET访问
    @RequestMapping(value = "/Page1",method = RequestMethod.GET)
    public String Page1(){
        return "Page1";
    }
    //只能通过POST访问
    @RequestMapping(value = "/Page2",method = RequestMethod.POST)
    public String Page2(){
        return "Page2";
    }
}
index.html
DOCTYPE html>
<html lang="en" xmlns:th="http://www.thymeleaf.org">
<head>
    <meta charset="UTF-8">
    <title>Titletitle>
head>
<body>
<h1>index.htmlh1>
//使用GET访问,与method不冲突
<form th:action="@{/Page1}" method="get">
    <input type="submit" value="GET方式,跳转至Page1.html">
form>
//使用GET访问,与method冲突
<form th:action="@{/Page2}" method="get">
    <input type="submit" value="GET方式,跳转至Page2.html">
form>
body>
html>
2.2.3派生注解
对于处理指定请求方式的控制器方法,SpringMVC提供了
@RequestMapping的派生注解:@GetMapping:处理GET请求的映射。@PostMapping:处理POST请求的映射。@PutMapping:处理PUT请求的映射。DeleteMapping:处理DELETE请求的映射。
常见的请求方式有
get、post、put、delete,但目前浏览器只支持get、post,若在form表单提交时为method设置了其他请求方式的字符串,如put、delete,则按照默认的请求方式get处理。而若要发送put、delete请求,则需通过spring提供的HiddenHttpMethodFilter。测试form表单能否发送
put、delete请求:package org.example.controller; import org.springframework.stereotype.Controller; import org.springframework.web.bind.annotation.RequestMapping; import org.springframework.web.bind.annotation.RequestMethod; @Controller public class RequestMappingController { @RequestMapping(value="/") public String index(){ return "index"; } @RequestMapping(value = "/Page1",method = RequestMethod.PUT) public String Page1(){ return "Page1"; } }index.html
DOCTYPE html>
<html lang="en" xmlns:th="http://www.thymeleaf.org">
<head>
    <meta charset="UTF-8">
    <title>Titletitle>
head>
<body>
<h1>index.htmlh1>
<form th:action="@{/Page1}" method="put">
    <input type="submit" value="PUT方式,跳转至Page1.html">
form>
form>
body>
html>
点击按钮后报错:

虽然form表单选择按put方式请求,但仍发出浏览器默认的get请求方式,该方式不能被请求映射所处理,故报错 405 405 405。2.2.4Params属性
Params属性通过请求的请求参数匹配请求映射,本质是一个字符串类型的数组,可通过四种表达式设置请求参数和请求映射的匹配关系:
param:要求请求映射所匹配的请求必须携带param请求参数。!param:要求请求映射所匹配的请求不能携带param请求参数。param=value:要求请求映射所匹配的请求必须携带param请求参数,且param=value。!param=value:要求请求映射所匹配的请求必须携带param请求参数,但param!=value。
例如:
params={"username"}:请求必须携带username请求参数。params={"!username"}:请求不能携带username请求参数。params={"username=admin"}:请求必须携带username属性,且值为admin。params={"username!=admin"}:请求必须携带username属性,但值不能是admin。
有GET、POST两种方式传递请求参数,前者可在请求地址后拼接参数,而后者必须有form表单。例:
package org.example.controller;
import org.springframework.stereotype.Controller;
import org.springframework.web.bind.annotation.RequestMapping;
import org.springframework.web.bind.annotation.RequestMethod;

@Controller
public class RequestMappingController {
    @RequestMapping(value="/")
    public String index(){
        return "index";
    }
    @RequestMapping(value = "/Page1",params={"username=admin"})
    public String Page1(){
        return "Page1";
    }
}
DOCTYPE html> <html lang="en" xmlns:th="http://www.thymeleaf.org"> <head> <meta charset="UTF-8"> <title>Titletitle> head> <body> <h1>index.htmlh1> <a th:href="@{/Page1?username=admin}">跳转Page1a>body> html> 
2.2.5headers属性
@RequestMapping注解的headers属性通过请求的请求头信息匹配请求映射,本质是一个字符串类型的数组,可通过四种表达式设置请求头信息和请求映射的匹配关系。header:要求请求映射所匹配的请求必须携带header请求头信息。!header:要求请求映射所匹配的请求不能携带header请求头信息。header=value:要求请求映射所匹配的请求必须携带header请求头信息,且header=value。header!=value:要求请求映射所匹配的请求必须携带header请求头信息,且header!=value。
若当前请求满足
@RequestMapping的value和method属性,但不满足headers属性,此时页面显示404错误,即资源未找到。package org.example.controller; import org.springframework.stereotype.Controller; import org.springframework.web.bind.annotation.RequestMapping; @Controller public class RequestMappingController { @RequestMapping(value="/",headers = "Connection=keep-alive")//此时请求头中必须有键值对Connection=keep-alive public String index(){ return "index"; } }
总结:- 1.若请求没有与value属性匹配,则报错404.
- 2.若请求没有与method属性匹配,则报错405.
- 3.若请求没有与params属性匹配,则报错400.
- 4.若请求没有与headers属性匹配,则报错404.
2.3路径风格
2.3.1SpringMVC支持ant风格的路径
ant风格的路径相当于是一种支持模糊匹配的路径,此时可使用:
?:表示任意的单个字符。*:表示任意0个或多个字符。/**/表示任意一层或多层目录。
注意,使用
**时只能使用/**/xxx的方式。例1:使用
?package org.example.controller; import org.springframework.stereotype.Controller; import org.springframework.web.bind.annotation.RequestMapping; @Controller public class RequestMappingController { @RequestMapping(value= {"/","/inde?x"}) public String index(){ return "index"; } }
例2:使用*package org.example.controller; import org.springframework.stereotype.Controller; import org.springframework.web.bind.annotation.RequestMapping; @Controller public class RequestMappingController { @RequestMapping(value= {"/","/inde*x"}) public String index(){ return "index"; } }
例3:使用/**/package org.example.controller; import org.springframework.stereotype.Controller; import org.springframework.web.bind.annotation.RequestMapping; @Controller public class RequestMappingController { @RequestMapping(value= {"/","/**/index"}) public String index(){ return "index"; } }
注意,**前后不可以乱加东西,不然就不是任意目录了。比如/a**b,就是两个单独的*,跟一个*的效果一样。2.3.2restful风格路径占位符的使用
传统传参方式为:
/login?username=admin&password=123456事实上,还有一种rest传参方式:
/login/admin/123456SpringMVC路径中的占位符常用于restful风格中,当请求路径中将某些数据通过路径的方式传输到服务器中时(即rest传参方式),可通过对
@RequestMapping注解的value属性设置占位符{xxx}获取传输的数据,再通过在参数列表中使用@PathVariable注解,将占位符所表示的数据作为控制器方法的形参进行使用。步骤为:- 在
@RequestMapping注解的value属性设置占位符{xxx}获取传输的数据。 - 在参数列表中使用
@PathVariable注解将数据作为参数传递给控制器方法。
package org.example.controller;
import org.springframework.stereotype.Controller;
import org.springframework.web.bind.annotation.PathVariable;
import org.springframework.web.bind.annotation.RequestMapping;

@Controller
public class RequestMappingController {
    @RequestMapping(value= {"/index/{username}/{password}"})
    public String index(@PathVariable("username") String username,@PathVariable("password")String password){
        System.out.println("username="+username+",password="+password);
        return "index";
    }
}

不提供参数时,会报错404:

而若想要接受Integer类型参数,但传入String类型参数:package org.example.controller; import org.springframework.stereotype.Controller; import org.springframework.web.bind.annotation.PathVariable; import org.springframework.web.bind.annotation.RequestMapping; @Controller public class RequestMappingController { @RequestMapping(value= {"/index/{username}/{password}"}) public String index(@PathVariable("username") String username,@PathVariable("password")Integer password){ System.out.println("username="+username+",password="+password); return "index"; } }
三、SpringMVC获取请求参数
在学习JavaWeb时,获取请求参数的流程大致为创建自定义的
servlet类、继承HttpServlet,之后重写doGet、doPost方法,再通过形参HttpServletRequest req调用getParameter()获取单个唯一的请求参数或使用getParameterValues()获取多个同名的请求参数:

而在SpringMVC中提供了多种获取请求参数的方法。3.1通过ServletAPI获取请求参数
在
JavaWeb中,我们得实现Servlet接口,或者继承HttpServlet类(该类已实现了Servlet接口),然后再到配置文件中去注册这个Servlet才能使用。而使用@RequestMapping注解标注的方法会被自动注册为Servlet,同样可通过设置形参HttpServletRequest req来获取请求参数。package org.example.controller; import org.springframework.stereotype.Controller; import org.springframework.web.bind.annotation.RequestMapping; import javax.servlet.http.HttpServletRequest; @Controller public class RequestMappingController { @RequestMapping(value= {"/index"}) public String index(HttpServletRequest request){ //获取请求参数 String username=request.getParameter("username"); String password=request.getParameter("password"); System.out.println("username="+username+",password="+password); return "index"; } }通过路径进行访问:
http://localhost:8080/springmvc/index?username=admin?password=123456:

3.2通过控制器方法的形参获取请求参数
事实上,在控制器方法的形参列表设置相同参数名的形参就可直接获取传递的参数:
package org.example.controller;
import org.springframework.stereotype.Controller;
import org.springframework.web.bind.annotation.RequestMapping;

@Controller
public class RequestMappingController {
    @RequestMapping(value= {"/index"})
    public String index({
        return "index";
    }
    @RequestMapping(value = "/Page1")
    public String Page1(String username,String password,String hobby){
        System.out.println("username="+username+",password="+password+",hobby="+hobby);
        return "Page1";
    }
}
DOCTYPE html> <html lang="en" xmlns:th="http://www.thymeleaf.org"> <head> <meta charset="UTF-8"> <title>Titletitle> head> <body> <h1>index.htmlh1> <form th:action="@{/Page1}" method="get"> 用户名:<input type="text" name="username"><br> 密码:<input type="password" name="password"><br> 爱好:<input type="checkbox" name="hobby" value="a">a <input type="checkbox" name="hobby" value="b">b <input type="checkbox" name="hobby" value="c">c<br> <input type="submit" value="设置形参获取请求参数"> form> body> html>
可见,参数通过http://localhost:8080/springmvc/Page1?username=admin&password=123456&hobby=a&hobby=b&hobby=c的方式进行传递,并且对于重名参数hobby会自动使用,进行拼接为字符串。事实上,也可通过字符串数组进行接收:package org.example.controller; import org.springframework.stereotype.Controller; import org.springframework.web.bind.annotation.RequestMapping; @Controller public class RequestMappingController { @RequestMapping(value= {"/index"}) public String index(){ return "index"; } @RequestMapping(value = "/Page1") public String Page1(String username,String password,String[] hobby){ System.out.println("username="+username+",password="+password); System.out.println("hobby="+hobby[0]); System.out.println("hobby="+hobby[1]); System.out.println("hobby="+hobby[2]); return "Page1"; } }
- 若请求所传输的请求参数中有多个同名请求参数,此时可在控制器方法的形参中设置字符串数组或字符串类型的形参接收此参数。
- 若使用字符串数组类型的形参,则可通过索引访问形参。
- 若使用字符串类型的形参,则此参数的值为每个数据中间使用逗号拼接的结果。
3.3@RequestParam、@RequestHeader、@CookieValue
@RequestParam注解是将请求参数和控制器方法的形参创建映射关系的注解。他一共有三个属性:value:指定请求参数名。required:设置是否必须传输此请求参数,默认值为true。defaultValue:不管required属性为true或false,当value所指定的请求参数没有传输或传输内容为空时,则使用默认值为形参赋值。
package org.example.controller;
import org.springframework.stereotype.Controller;
import org.springframework.web.bind.annotation.RequestMapping;
import org.springframework.web.bind.annotation.RequestParam;

@Controller
public class RequestMappingController {
    @RequestMapping(value= {"/index"})
    public String index(@RequestParam(value = "user_name", required = false, defaultValue = "张三") String username){
        System.out.println("username="+username);
        return "index";
    }
}
通过
http://localhost:8080/springmvc/index?user_name=admin进行访问:

@CookieValue、@RequestHeader属性与用法和@RequestParam相同,不同的是@RequestHeader注解是将请求头信息和控制器方法的形参创建映射关系,而@CookieValue注解是将cookie数据和控制器方法的形参创建映射关系。3.4通过POJO获取请求参数
可以在控制器方法的形参位置设置一个实体类类型的形参,此时若浏览器传输的请求参数的参数名和实体类中的属性名一致,那么请求参数就会为此属性赋值。
index.htmlDOCTYPE html> <html lang="en" xmlns:th="http://www.thymeleaf.org"> <head> <meta charset="UTF-8"> <title>POJO测试title> head> <body> <form th:action="@{/Page1}" method="post"> 用户名:<input type="text" name="username"> <br> 密 码:<input type="password" name="password"> <br> 性 别:<input type="radio" name="gender" value="boy">男 <input type="radio" name="gender" value="girl">女 <br> 年 龄:<input type="number" name="age"> <br> 邮 箱:<input type="text" name="email"> <br> <input type="submit" value="提交"> form> body> html>User.java
package org.example.Pojo;

public class User {
    private String username;
    private String password;
    private String gender;
    private Integer age;
    private String email;

    public User() {
    }

    public User(String username, String password, String gender, Integer age, String email) {
        this.username = username;
        this.password = password;
        this.gender = gender;
        this.age = age;
        this.email = email;
    }

    public String getUsername() {
        return username;
    }

    public void setUsername(String username) {
        this.username = username;
    }

    public String getPassword() {
        return password;
    }

    public void setPassword(String password) {
        this.password = password;
    }

    public String getGender() {
        return gender;
    }

    public void setGender(String gender) {
        this.gender = gender;
    }

    public Integer getAge() {
        return age;
    }

    public void setAge(Integer age) {
        this.age = age;
    }

    public String getEmail() {
        return email;
    }

    public void setEmail(String email) {
        this.email = email;
    }

    @Override
    public String toString() {
        return "User{" +
                "username='" + username + '\'' +
                ", password='" + password + '\'' +
                ", gender='" + gender + '\'' +
                ", age=" + age +
                ", email='" + email + '\'' +
                '}';
    }
}
package org.example.controller; import org.example.Pojo.User; import org.springframework.stereotype.Controller; import org.springframework.web.bind.annotation.RequestMapping; import org.springframework.web.bind.annotation.RequestParam; @Controller public class RequestMappingController { @RequestMapping(value= {"/index"}) public String index(@RequestParam(value = "user_name", required = false, defaultValue = "张三") String username){ System.out.println("username="+username); return "index"; } @RequestMapping(value = "/Page1") public String Page1(User user){ System.out.println(user); return "Page1"; } }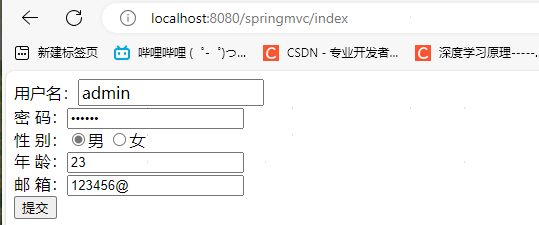

3.5CharacterEncodingFilter处理请求参数乱码问题
在输入中文时会出现乱码问题:


此时可在web.xml中配置过滤器:<filter> <filter-name>CharacterEncodingFilterfilter-name> <filter-class>org.springframework.web.filter.CharacterEncodingFilterfilter-class> <init-param> <param-name>encodingparam-name> <param-value>UTF-8param-value> init-param> <init-param> <param-name>forceResponseEncodingparam-name> <param-value>trueparam-value> init-param> filter> <filter-mapping> <filter-name>CharacterEncodingFilterfilter-name> <url-pattern>/*url-pattern> filter-mapping>使用
Ctrl+左键查看CharacterEncodingFilter源码四、域对象共享数据
4.1request域对象
4.1.1使用servletAPI向request域对象共享数据
使用servletAPI可获取请求参数,也同样可向request域对象共享数据。
package org.example.controller;

import org.springframework.stereotype.Controller;
import org.springframework.web.bind.annotation.RequestMapping;
import javax.servlet.http.HttpServletRequest;

@Controller
public class ScopeController {
    //使用servletAPI向request域对象共享数据
    @RequestMapping("/testRequestByServletAPI")
    public String testRequestByServletAPI(HttpServletRequest request){
        request.setAttribute("testRequestScope","hello,ServletAPI");
        return "index";
    }
}
index.html
DOCTYPE html>
<html lang="en" xmlns:th="http://www.thymeleaf.org">
<head>
    <meta charset="UTF-8">
    <title>POJO测试title>
head>
<body>
index.html<br>

<p th:text="${testRequestScope}"/>
body>
html>
访问页面
http://localhost:8080/springmvc/testRequestByServletAPI:

4.1.2使用ModelAndView向request域对象共享数据
ModelAndView有Model和View的功能:Model:向请求域共享数据。View:设置视图,实现页面跳转。
注意,此方式的方法返回值必须是
ModelAndView类型,当前端控制器接收到该对象后才能进行解析。package org.example.controller; import org.springframework.stereotype.Controller; import org.springframework.web.bind.annotation.RequestMapping; import org.springframework.web.servlet.ModelAndView; @Controller public class ScopeController { @RequestMapping("/testModelAndView") public ModelAndView testModelAndView(){ ModelAndView modelAndView=new ModelAndView(); modelAndView.addObject("testRequestScope","hello,ModelAndView"); //由控制器设置视图名称,由视图解析器根据名称找到视图 modelAndView.setViewName("index"); return modelAndView; } }访问页面
http://localhost:8080/springmvc/testModelAndView:

4.1.3使用Model向request域对象共享数据
package org.example.controller;
import org.springframework.stereotype.Controller;
import org.springframework.ui.Model;
import org.springframework.web.bind.annotation.RequestMapping;

@Controller
public class ScopeController {
    @RequestMapping("/testModel")
    public String testModel(Model model){
        model.addAttribute("testRequestScope","hello,Model");
        return "index";
    }
}
4.1.4使用map向request域对象共享数据
package org.example.controller;
import org.springframework.stereotype.Controller;
import org.springframework.web.bind.annotation.RequestMapping;
import java.util.Map;

@Controller
public class ScopeController {
    @RequestMapping("/testMap")
    public String testMap(Map<String,Object>map){
        map.put("testRequestScope","hello,Map");
        return "index";
    }
}
4.1.5使用ModelMap向request域对象共享数据
package org.example.controller;
import org.springframework.stereotype.Controller;
import org.springframework.ui.ModelMap;
import org.springframework.web.bind.annotation.RequestMapping;

@Controller
public class ScopeController {
    @RequestMapping("/testModelMap")
    public String testModelMap(ModelMap modelMap){
        modelMap.addAttribute("testRequestScope","hello,ModelMap");
        return "index";
    }
}
4.1.6Model、ModelMap、Map之间的关系
打印三个模型对象:
package org.example.controller;

import org.springframework.stereotype.Controller;
import org.springframework.ui.Model;
import org.springframework.ui.ModelMap;
import org.springframework.web.bind.annotation.RequestMapping;
import org.springframework.web.servlet.ModelAndView;
import java.util.Map;

@Controller
public class ScopeController {
    @RequestMapping("/testModel")
    public String testModel(Model model){
        model.addAttribute("testRequestScope","hello,Model");
        System.out.println(model);
        return "index";
    }
    @RequestMapping("/testMap")
    public String testMap(Map<String,Object>map){
        map.put("testRequestScope","hello,Map");
        System.out.println(map);
        return "index";
    }
    @RequestMapping("/testModelMap")
    public String testModelMap(ModelMap modelMap){
        modelMap.addAttribute("testRequestScope","hello,ModelMap");
        System.out.println(modelMap);
        return "index";
    }
}
依次访问三个页面得到输出:
{testRequestScope=hello,Map}
{testRequestScope=hello,Model}
{testRequestScope=hello,ModelMap}
可见,三者输出基本一致。事实上,这三种方式使用的是同一个对象。使用
.getClass().getName(),发现三者对应的类相同:org.springframework.validation.support.BindingAwareModelMap查看
ModelMap源码,其继承了LinkedHashMap(实现了Map接口),也相当于是Map接口的实现类。在ModelMap类下可找到子类RedirectAttributesModelMap,该类有子类BindingAwareModelMap,故BindingAwareModelMap同样可创建ModelMap对象、Model对象、Map对象。事实上,Model、ModelMap、Map类型的参数本质上都是BindingAwareModelMap类型。public interface Model{} public class ModelMap extends LinkedHashMap<String,Object>{} public class ExtendedModelMap extends ModelMap implementes Model{} public class BindingAwareModelMap extends ExtendedModelMap{}4.2向session域共享数据
通常用法是使用servletAPI进行共享:
package org.example.controller;
import org.springframework.stereotype.Controller;
import org.springframework.web.bind.annotation.RequestMapping;
import javax.servlet.http.HttpSession;

@Controller
public class ScopeController {
    @RequestMapping("/testSession")
    public String testSession(HttpSession session){
        session.setAttribute("testSessionScope","hello,session");
        return "index";
    }
}
index.html
DOCTYPE html>
<html lang="en" xmlns:th="http://www.thymeleaf.org">
<head>
    <meta charset="UTF-8">
    <title>测试title>
head>
<body>
index.html<br>

<p th:text="${session.testSessionScope}"/>
body>
html>
4.3向application域共享数据
package org.example.controller;
import org.springframework.stereotype.Controller;
import org.springframework.web.bind.annotation.RequestMapping;
import javax.servlet.ServletContext;
import javax.servlet.http.HttpSession;

@Controller
public class ScopeController {
    @RequestMapping("/testApplication")
    public String testApplication(HttpSession session){
        //获取context对象
        ServletContext context= session.getServletContext();
        context.setAttribute("testApplicationScope","hello,application");
        return "index";
    }
}
index.html
DOCTYPE html>
<html lang="en" xmlns:th="http://www.thymeleaf.org">
<head>
    <meta charset="UTF-8">
    <title>测试title>
head>
<body>
index.html<br>

<p th:text="${application.testApplicationScope}"/>
body>
html>
五、SpringMVC的视图
SpringMVC的视图是View接口,用于渲染数据并将模型Model中的数据展示给用户。SpringMVC视图的种类有很多,默认有转发视图InternalResourceView和重定向视图RedirectView,当工程引入jstl的依赖时,转发视图会自动转换为jstlView。若使用的视图技术为Thymeleaf,并在SpringMVC配置文件中配置了Thymeleaf的视图解析器,则此视图解析器解析之后得到的是ThymeleafView。5.1ThymeleafView
当控制器方法中所设置的视图名称没有任何前缀时,此时视图名称会被SpringMVC配置文件中所配置的视图解析器解析,由视图名称拼接视图前缀和视图后缀得到最终路径,并通过转发方式实现跳转。
package org.example.controller; import org.springframework.stereotype.Controller; import org.springframework.web.bind.annotation.RequestMapping; @Controller public class ViewController { @RequestMapping("/testThymeleafView") public String testThymeleafView(){ //没有任何前缀,会被SpringMVC.xml中的ThymeleafViewResolver解析器解析,生成ThymeleafView return "index"; } } -
相关阅读:
go io.Copy 实现 端口转发 SSH 代理
这些「误区」99%的研发都踩过
吴恩达深度学习deeplearning.ai——第一门课:神经网络与深度学习——第一节:深度学习概论
第一个 Go 程序“hello,world“ 与 main 函数
038-JTable控件应用案例讲解
【推荐】智元兔AI:一款集写作、问答、绘画于一体的全能工具!
SQL SERVER数据库服务器CPU不能全部利用原因分析
C语言对10个数进行排序,使用快速排序算法
含文档+PPT+源码等]精品基于Uniapp+SSM实现的新闻APP[包运行成功]计算机毕业设计安卓项目源码
Excel画图
- 原文地址:https://blog.csdn.net/qq_51976293/article/details/139770794