前面,本示例实现了折线连接线,简述了实现的思路和原理,也已知了一些缺陷。本章将处理一些缺陷的同时,实现支持连接点的自定义,一个节点可以定义多个连接点,最终可以满足类似图元接线的效果。
请大家动动小手,给我一个免费的 Star 吧~
大家如果发现了 Bug,欢迎来提 Issue 哟~
一些调整
- 把示例素材从 src 转移至 public 目录,拖入画布的素材改为异步加载
- 移除部分示例素材
- 一些开发过程中的测试用例可以在线加载
此前有些朋友说导入、导出有异常,估计是线上版本和线下版本的构建示例素材的文件 hash 后缀不一样,跨环境导入、导出无法加载图片导致的。现在调整后就应该正常了。
自定义连接点
先说明一下定义:
// src/Render/types.ts

export interface AssetInfoPoint {
  x: number
  y: number
  direction?: 'top' | 'bottom' | 'left' | 'right' // 人为定义连接点属于元素的什么方向
}

export interface AssetInfo {
  url: string
  points?: Array<AssetInfoPoint>
}
// src/Render/draws/LinkDraw.ts

// 连接点
export interface LinkDrawPoint {
  id: string
  groupId: string
  visible: boolean
  pairs: LinkDrawPair[]
  x: number
  y: number
  direction?: 'top' | 'bottom' | 'left' | 'right' // 人为定义连接点属于元素的什么方向
}
一个素材除了原来的 url 信息外,增加了一个 points 的连接点数组,每个 point 除了记录了它的相对于素材的位置 x、y,还有方向的定义,目的是说明该连接点出入口方向,例如:

做这个定义的原因是,连接方向不可以预知,是与图元的含义有关。
不设定 direction 的话,就代表连接线可以从上下左右4个方向进出,如:

最佳实践应该另外实现一个连接点定义工具(也许后面有机会实现一个),多多支持~
// src/App.vue

// 从 public 加载静态资源 + 自定义连接点
const assetsModules: Array<Types.AssetInfo> = [
  { "url": "./img/svg/ARRESTER_1.svg", points: [{ x: 101, y: 1, direction: 'top' }, { x: 101, y: 199, direction: 'bottom' }] },
  { "url": "./img/svg/ARRESTER_2.svg", points: [{ x: 101, y: 1, direction: 'top' }, { x: 101, y: 199, direction: 'bottom' }] },
  { "url": "./img/svg/ARRESTER_2_1.svg", points: [{ x: 101, y: 1, direction: 'top' }, { x: 101, y: 199, direction: 'bottom' }] },
  { "url": "./img/svg/BREAKER_CLOSE.svg", points: [{ x: 100, y: 1, direction: 'top' }, { x: 100, y: 199, direction: 'bottom' }] },
  { "url": "./img/svg/BREAKER_OPEN.svg", points: [{ x: 100, y: 1, direction: 'top' }, { x: 100, y: 199, direction: 'bottom' }] },
  // 略
 ]
素材拖入之前,需要携带 points 信息:
// src/App.vue

function onDragstart(e: GlobalEventHandlersEventMap['dragstart'], item: Types.AssetInfo) {
  if (e.dataTransfer) {
    e.dataTransfer.setData('src', item.url)
    e.dataTransfer.setData('points', JSON.stringify(item.points)) // 传递连接点信息
    e.dataTransfer.setData('type', item.url.match(/([^./]+)\.([^./]+)$/)?.[2] ?? '')
  }
}
拖入之后,需要解析 points 信息:
// src/Render/handlers/DragOutsideHandlers.ts

      drop: (e: GlobalEventHandlersEventMap['drop']) => {
        const src = e.dataTransfer?.getData('src')

        // 接收连接点信息
        let morePoints: Types.AssetInfoPoint[] = []
        const morePointsTxt = e.dataTransfer?.getData('points') ?? '[]'

        try {
          morePoints = JSON.parse(morePointsTxt)
        } catch (e) {
          console.error(e)
        }

        // 略

              // 默认连接点
              let points: Types.AssetInfoPoint[] = [
                // 左
                { x: 0, y: group.height() / 2, direction: 'left' },
                // 右
                {
                  x: group.width(),
                  y: group.height() / 2,
                  direction: 'right'
                },
                // 上
                { x: group.width() / 2, y: 0, direction: 'top' },
                // 下
                {
                  x: group.width() / 2,
                  y: group.height(),
                  direction: 'bottom'
                }
              ]

              // 自定义连接点 覆盖 默认连接点
              if (Array.isArray(morePoints) && morePoints.length > 0) {
                points = morePoints
              }

              // 连接点信息
              group.setAttrs({
                points: points.map(
                  (o) =>
                    ({
                      ...o,
                      id: nanoid(),
                      groupId: group.id(),
                      visible: false,
                      pairs: [],
                      direction: o.direction // 补充信息
                    }) as LinkDrawPoint
                )
              })

              // 连接点(锚点)
              for (const point of group.getAttr('points') ?? []) {
                group.add(
                  new Konva.Circle({
                    name: 'link-anchor',
                    id: point.id,
                    x: point.x,
                    y: point.y,
                    radius: this.render.toStageValue(1),
                    stroke: 'rgba(0,0,255,1)',
                    strokeWidth: this.render.toStageValue(2),
                    visible: false,
                    direction: point.direction // 补充信息
                  })
                )
              }

              // 略
      }
如果没有自定义连接点,这里会给予之前一样的 4 个默认连接点。
出入口修改
原来的逻辑就不能用了,需要重写一个。目标是计算出:沿着当前连接点的方向 与 不可通过区域其中一边的相交点,上图:

关注的就是这个绿色点(出入口):
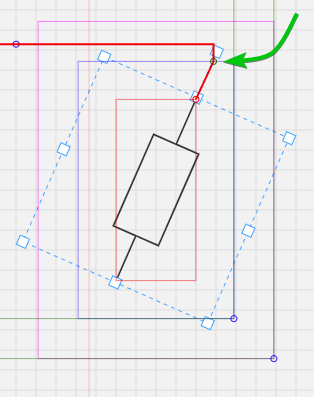
就算这个点,用的是三角函数:

这里边长称为 offset,角度为 rotate,计算大概如下:
const offset = gap * Math.atan(((90 - rotate) * Math.PI) / 180)
不同角度范围,计算略有不同,是根据多次测试得出的,有兴趣的朋友可以在优化精简一下。
完整方法有点长,四个角直接赋值,其余按不同角度范围计算:
  // 连接出入口(原来第二个参数是 最小区域,先改为 不可通过区域)
  getEntry(anchor: Konva.Node, groupForbiddenArea: Area, gap: number): Konva.Vector2d {
    // stage 状态
    const stageState = this.render.getStageState()

    const fromPos = anchor.absolutePosition()

    // 默认为 起点/终点 位置(无 direction 时的值)
    let x = fromPos.x - stageState.x,
      y = fromPos.y - stageState.y

    const direction = anchor.attrs.direction

    // 定义了 direction 的时候
    if (direction) {
      // 取整 连接点 锚点 旋转角度(保留 1 位小数点)
      const rotate = Math.round(anchor.getAbsoluteRotation() * 10) / 10

      // 利用三角函数,计算按 direction 方向与 不可通过区域 的相交点位置(即出/入口 entry)
      if (rotate === -45) {
        if (direction === 'top') {
          x = groupForbiddenArea.x1
          y = groupForbiddenArea.y1
        } else if (direction === 'bottom') {
          x = groupForbiddenArea.x2
          y = groupForbiddenArea.y2
        } else if (direction === 'left') {
          x = groupForbiddenArea.x1
          y = groupForbiddenArea.y2
        } else if (direction === 'right') {
          x = groupForbiddenArea.x2
          y = groupForbiddenArea.y1
        }
      } else if (rotate === 45) {
        if (direction === 'top') {
          x = groupForbiddenArea.x2
          y = groupForbiddenArea.y1
        } else if (direction === 'bottom') {
          x = groupForbiddenArea.x1
          y = groupForbiddenArea.y2
        } else if (direction === 'left') {
          x = groupForbiddenArea.x1
          y = groupForbiddenArea.y1
        } else if (direction === 'right') {
          x = groupForbiddenArea.x2
          y = groupForbiddenArea.y2
        }
      } else if (rotate === 135) {
        if (direction === 'top') {
          x = groupForbiddenArea.x2
          y = groupForbiddenArea.y2
        } else if (direction === 'bottom') {
          x = groupForbiddenArea.x1
          y = groupForbiddenArea.y1
        } else if (direction === 'left') {
          x = groupForbiddenArea.x2
          y = groupForbiddenArea.y1
        } else if (direction === 'right') {
          x = groupForbiddenArea.x1
          y = groupForbiddenArea.y2
        }
      } else if (rotate === -135) {
        if (direction === 'top') {
          x = groupForbiddenArea.x1
          y = groupForbiddenArea.y2
        } else if (direction === 'bottom') {
          x = groupForbiddenArea.x2
          y = groupForbiddenArea.y1
        } else if (direction === 'left') {
          x = groupForbiddenArea.x2
          y = groupForbiddenArea.y2
        } else if (direction === 'right') {
          x = groupForbiddenArea.x1
          y = groupForbiddenArea.y1
        }
      } else if (rotate > -45 && rotate < 45) {
        const offset = gap * Math.tan((rotate * Math.PI) / 180)
        if (direction === 'top') {
          x = fromPos.x - stageState.x + offset
          y = groupForbiddenArea.y1
        } else if (direction === 'bottom') {
          x = fromPos.x - stageState.x - offset
          y = groupForbiddenArea.y2
        } else if (direction === 'left') {
          x = groupForbiddenArea.x1
          y = fromPos.y - stageState.y - offset
        } else if (direction === 'right') {
          x = groupForbiddenArea.x2
          y = fromPos.y - stageState.y + offset
        }
      } else if (rotate > 45 && rotate < 135) {
        const offset = gap * Math.atan(((90 - rotate) * Math.PI) / 180)
        if (direction === 'top') {
          x = groupForbiddenArea.x2
          y = fromPos.y - stageState.y - offset
        } else if (direction === 'bottom') {
          x = groupForbiddenArea.x1
          y = fromPos.y - stageState.y + offset
        } else if (direction === 'left') {
          x = fromPos.x - stageState.x - offset
          y = groupForbiddenArea.y1
        } else if (direction === 'right') {
          x = fromPos.x - stageState.x + offset
          y = groupForbiddenArea.y2
        }
      } else if ((rotate > 135 && rotate <= 180) || (rotate >= -180 && rotate < -135)) {
        const offset = gap * Math.tan((rotate * Math.PI) / 180)
        if (direction === 'top') {
          x = fromPos.x - stageState.x - offset
          y = groupForbiddenArea.y2
        } else if (direction === 'bottom') {
          x = fromPos.x - stageState.x + offset
          y = groupForbiddenArea.y1
        } else if (direction === 'left') {
          x = groupForbiddenArea.x2
          y = fromPos.y - stageState.y + offset
        } else if (direction === 'right') {
          x = groupForbiddenArea.x1
          y = fromPos.y - stageState.y - offset
        }
      } else if (rotate > -135 && rotate < -45) {
        const offset = gap * Math.atan(((90 + rotate) * Math.PI) / 180)
        if (direction === 'top') {
          x = groupForbiddenArea.x1
          y = fromPos.y - stageState.y - offset
        } else if (direction === 'bottom') {
          x = groupForbiddenArea.x2
          y = fromPos.y - stageState.y + offset
        } else if (direction === 'left') {
          x = fromPos.x - stageState.x - offset
          y = groupForbiddenArea.y2
        } else if (direction === 'right') {
          x = fromPos.x - stageState.x + offset
          y = groupForbiddenArea.y1
        }
      }
    }

    return { x, y } as Konva.Vector2d
  }
原来的算法起点、终点 与 连接点一一对应,科室现在新的计算方法得出的出入口x、y坐标与连接点不再总是存在同一方向一致(因为被旋转),所以现在把算法的起点、终点改为出入口对应:
              // 出口、入口 -> 算法 起点、终点

              if (columns[x] === fromEntry.x && rows[y] === fromEntry.y) {
                matrix[y][x] = 1
                matrixStart = { x, y }
              }

              if (columns[x] === toEntry.x && rows[y] === toEntry.y) {
                matrix[y][x] = 1
                matrixEnd = { x, y }
              }
上面提到没有定义 direction 的连接点可以从不同方向出入,所以会进行下面处理:
              // 没有定义方向(给于十字可通过区域)
              // 如,从:
              // 1 1 1
              // 1 0 1
              // 1 1 1
              // 变成:
              // 1 0 1
              // 0 0 0
              // 1 0 1
              if (!fromAnchor.attrs.direction) {
                if (columns[x] === fromEntry.x || rows[y] === fromEntry.y) {
                  if (
                    x >= columnFromStart &&
                    x <= columnFromEnd &&
                    y >= rowFromStart &&
                    y <= rowFromEnd
                  ) {
                    matrix[y][x] = 1
                  }
                }
              }
              if (!toAnchor.attrs.direction) {
                if (columns[x] === toEntry.x || rows[y] === toEntry.y) {
                  if (x >= columnToStart && x <= columnToEnd && y >= rowToStart && y <= rowToEnd) {
                    matrix[y][x] = 1
                  }
                }
              }
最后在绘制连线的时候,补上连接点(起点、终点)即可:
            this.group.add(
              new Konva.Line({
                name: 'link-line',
                // 用于删除连接线
                groupId: fromGroup.id(),
                pointId: fromPoint.id,
                pairId: pair.id,
                //
                points: _.flatten([
                  [
                    this.render.toStageValue(fromAnchorPos.x),
                    this.render.toStageValue(fromAnchorPos.y)
                  ], // 补充 起点
                  ...way.map((o) => [
                    this.render.toStageValue(columns[o.x]),
                    this.render.toStageValue(rows[o.y])
                  ]),
                  [this.render.toStageValue(toAnchorPos.x), this.render.toStageValue(toAnchorPos.y)] // 补充 终点
                ]),
                stroke: 'red',
                strokeWidth: 2
              })
            )
测试一下

已知缺陷
从 Issue 中得知,当节点进行说 transform rotate 旋转的时候,对齐就会出问题。大家多多支持,后面抽空研究处理一下(-_-)。。。
More Stars please!勾勾手指~