-
JUC 笔记 8
1. Semaphore
信号量
基本使用
[ˈsɛməˌfɔr] 信号量,用来限制能同时访问共享资源的线程上限。public static void main(String[] args) { // 1. 创建 semaphore 对象 Semaphore semaphore = new Semaphore(3); // 2. 10个线程同时运行 for (int i = 0; i < 10; i++) { new Thread(() -> { // 3. 获取许可 try { semaphore.acquire(); } catch (InterruptedException e) { e.printStackTrace(); } try { log.debug("running..."); sleep(1); log.debug("end..."); } finally { // 4. 释放许可 semaphore.release(); } }).start(); } }结果
07:35:15.485 c.TestSemaphore [Thread-2] - running...
07:35:15.485 c.TestSemaphore [Thread-1] - running...
07:35:15.485 c.TestSemaphore [Thread-0] - running...
07:35:16.490 c.TestSemaphore [Thread-2] - end...
07:35:16.490 c.TestSemaphore [Thread-0] - end...
07:35:16.490 c.TestSemaphore [Thread-1] - end...
07:35:16.490 c.TestSemaphore [Thread-3] - running...
07:35:16.490 c.TestSemaphore [Thread-5] - running...
07:35:16.490 c.TestSemaphore [Thread-4] - running...
07:35:17.490 c.TestSemaphore [Thread-5] - end...
07:35:17.490 c.TestSemaphore [Thread-4] - end...
07:35:17.490 c.TestSemaphore [Thread-3] - end...
07:35:17.490 c.TestSemaphore [Thread-6] - running...
07:35:17.490 c.TestSemaphore [Thread-7] - running...
07:35:17.490 c.TestSemaphore [Thread-9] - running...
07:35:18.491 c.TestSemaphore [Thread-6] - end...
07:35:18.491 c.TestSemaphore [Thread-7] - end...
07:35:18.491 c.TestSemaphore [Thread-9] - end...
07:35:18.491 c.TestSemaphore [Thread-8] - running...
07:35:19.492 c.TestSemaphore [Thread-8] - end...
* Semaphore 应用 (实现简单连接池)
● 使用 Semaphore 限流,在访问高峰期时,让请求线程阻塞,高峰期过去再释放许可,当然它只适合限制单机线程数量,并且
仅是限制线程数,而不是限制资源数(例如连接数,请对比 Tomcat LimitLatch 的实现)
● 用 Semaphore 实现简单连接池,对比『享元模式』下的实现(用wait notify),性能和可读性显然更好,注意下面的实现中线程数和数据库连接数是相等的@Slf4j(topic = "c.Pool") class Pool { // 1. 连接池大小 private final int poolSize; // 2. 连接对象数组 private Connection[] connections; // 3. 连接状态数组 0 表示空闲, 1 表示繁忙 private AtomicIntegerArray states; private Semaphore semaphore; // 4. 构造方法初始化 public Pool(int poolSize) { this.poolSize = poolSize; // 让许可数与资源数一致 this.semaphore = new Semaphore(poolSize); this.connections = new Connection[poolSize]; this.states = new AtomicIntegerArray(new int[poolSize]); for (int i = 0; i < poolSize; i++) { connections[i] = new MockConnection("连接" + (i+1)); } } // 5. 借连接 public Connection borrow() {// t1, t2, t3 // 获取许可 try { semaphore.acquire(); // 没有许可的线程,在此等待 } catch (InterruptedException e) { e.printStackTrace(); } for (int i = 0; i < poolSize; i++) { // 获取空闲连接 if(states.get(i) == 0) { if (states.compareAndSet(i, 0, 1)) { log.debug("borrow {}", connections[i]); return connections[i]; } } } // 不会执行到这里 return null; } // 6. 归还连接 public void free(Connection conn) { for (int i = 0; i < poolSize; i++) { if (connections[i] == conn) { states.set(i, 0); log.debug("free {}", conn); semaphore.release(); break; } } } }public static void main(String[] args) { Pool pool = new Pool(2); for (int i = 0; i < 5; i++) { new Thread(() -> { Connection conn = pool.borrow(); try { Thread.sleep(1000); } catch (InterruptedException e) { e.printStackTrace(); } pool.free(conn); }).start(); } }结果
已连接到地址为 ''127.0.0.1:14924',传输: '套接字'' 的目标虚拟机
10:34:36.915 c.Pool [Thread-0] - borrow MockConnection{name='连接1'}
10:34:36.915 c.Pool [Thread-2] - borrow MockConnection{name='连接2'}
10:34:37.927 c.Pool [Thread-2] - free MockConnection{name='连接2'}
10:34:37.927 c.Pool [Thread-0] - free MockConnection{name='连接1'}
10:34:37.928 c.Pool [Thread-1] - borrow MockConnection{name='连接1'}
10:34:37.928 c.Pool [Thread-3] - borrow MockConnection{name='连接2'}
10:34:38.936 c.Pool [Thread-1] - free MockConnection{name='连接1'}
10:34:38.936 c.Pool [Thread-3] - free MockConnection{name='连接2'}
10:34:38.936 c.Pool [Thread-4] - borrow MockConnection{name='连接1'}
10:34:39.945 c.Pool [Thread-4] - free MockConnection{name='连接1'}
已与地址为 ''127.0.0.1:14924',传输: '套接字'' 的目标虚拟机断开连
* Semaphore 原理
- 加锁解锁流程
Semaphore 有点像一个停车场,permits 就好像停车位数量,当线程获得了 permits 就像是获得了停车位,然后 停车场显示空余车位减一
刚开始,permits(state)为 3,这时 5 个线程来获取资源
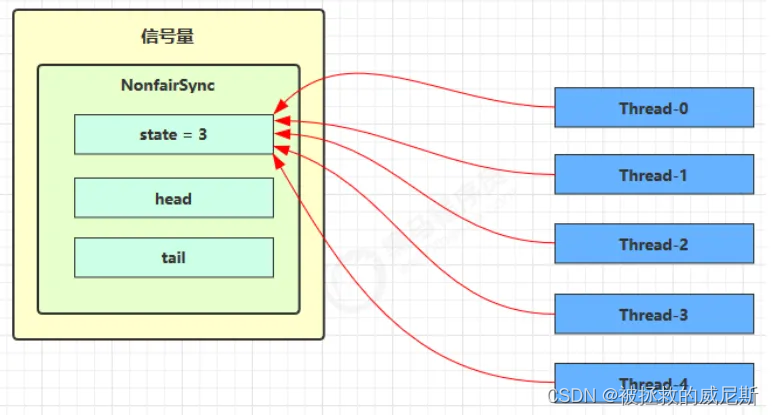
假设其中 Thread-1,Thread-2,Thread-4 cas 竞争成功,而 Thread-0 和 Thread-3 竞争失败,进入 AQS 队列park 阻塞

这时 Thread-4 释放了 permits,状态如下
接下来 Thread-0 竞争成功,permits 再次设置为 0,设置自己为 head 节点,断开原来的 head 节点,unpark 接下来的 Thread-3 节点,但由于 permits 是 0,因此 Thread-3 在尝试不成功后再次进入 park 状态

2. 源码分析
static final class NonfairSync extends Sync {
    private static final long serialVersionUID = -2694183684443567898L;
    NonfairSync(int permits) {
        // permits 即 state
        super(permits);
    }

    // Semaphore 方法, 方便阅读, 放在此处
    public void acquire() throws InterruptedException {
        sync.acquireSharedInterruptibly(1);
    }
    // AQS 继承过来的方法, 方便阅读, 放在此处
    public final void acquireSharedInterruptibly(int arg)
        throws InterruptedException {
        if (Thread.interrupted())
            throw new InterruptedException();
        if (tryAcquireShared(arg) < 0)
            doAcquireSharedInterruptibly(arg);
    }

    // 尝试获得共享锁
    protected int tryAcquireShared(int acquires) {
        return nonfairTryAcquireShared(acquires);
    }

    // Sync 继承过来的方法, 方便阅读, 放在此处
    final int nonfairTryAcquireShared(int acquires) {
        for (;;) {
            int available = getState();
            int remaining = available - acquires;
            if (
                // 如果许可已经用完, 返回负数, 表示获取失败, 进入 doAcquireSharedInterruptibly
                remaining < 0 ||
                // 如果 cas 重试成功, 返回正数, 表示获取成功
                compareAndSetState(available, remaining)
            ) {
                return remaining;
            }
        }
    }

    // AQS 继承过来的方法, 方便阅读, 放在此处
    private void doAcquireSharedInterruptibly(int arg) throws InterruptedException {
        final Node node = addWaiter(Node.SHARED);
        boolean failed = true;
        try {
            for (;;) {
                final Node p = node.predecessor();
                if (p == head) {
                    // 再次尝试获取许可
                    int r = tryAcquireShared(arg);
                    if (r >= 0) {
                        // 成功后本线程出队(AQS), 所在 Node设置为 head
                        // 如果 head.waitStatus == Node.SIGNAL ==> 0 成功, 下一个节点 unpark
                        // 如果 head.waitStatus == 0 ==> Node.PROPAGATE
                        // r 表示可用资源数, 为 0 则不会继续传播
                        setHeadAndPropagate(node, r);
                        p.next = null; // help GC
                        failed = false;
                        return;
                    }
                }
                // 不成功, 设置上一个节点 waitStatus = Node.SIGNAL, 下轮进入 park 阻塞
                if (shouldParkAfterFailedAcquire(p, node) &&
                    parkAndCheckInterrupt())
                    throw new InterruptedException();
            }
        } finally {
            if (failed)
                cancelAcquire(node);
        }
    }

    // Semaphore 方法, 方便阅读, 放在此处
    public void release() {
        sync.releaseShared(1);
    }

    // AQS 继承过来的方法, 方便阅读, 放在此处
    public final boolean releaseShared(int arg) {
        if (tryReleaseShared(arg)) {
            doReleaseShared();
            return true;
        }
        return false;
    }

    // Sync 继承过来的方法, 方便阅读, 放在此处
    protected final boolean tryReleaseShared(int releases) {
        for (;;) {
            int current = getState();
            int next = current + releases;
            if (next < current) // overflow
                throw new Error("Maximum permit count exceeded");
            if (compareAndSetState(current, next))
                return true;
        }
    }
}
3. 为什么要有 PROPAGATE
早期有 bug
● releaseShared 方法public final boolean releaseShared(int arg) { if (tryReleaseShared(arg)) { Node h = head; if (h != null && h.waitStatus != 0) unparkSuccessor(h); return true; } return false; }doAcquireShared 方法
private void doAcquireShared(int arg) {
    final Node node = addWaiter(Node.SHARED);
    boolean failed = true;
    try {
        boolean interrupted = false;
        for (;;) {
            final Node p = node.predecessor();
            if (p == head) {
                int r = tryAcquireShared(arg);
                if (r >= 0) {
                    // 这里会有空档
                    setHeadAndPropagate(node, r);
                    p.next = null; // help GC
                    if (interrupted)
                        selfInterrupt();
                    failed = false;
                    return;
                }
            }
            if (shouldParkAfterFailedAcquire(p, node) &&
                parkAndCheckInterrupt())
                interrupted = true;
        }
    } finally {
        if (failed)
            cancelAcquire(node);
    }
}
setHeadAndPropagate 方法
private void setHeadAndPropagate(Node node, int propagate) { setHead(node); // 有空闲资源 if (propagate > 0 && node.waitStatus != 0) { Node s = node.next; // 下一个 if (s == null || s.isShared()) unparkSuccessor(node); } }- 假设存在某次循环中队列里排队的结点情况为head(-1)->t1(-1)->t2(-1)
- 假设存在将要信号量释放的 T3 和 T4,释放顺序为先 T3 后 T4

产生bug的情况
修复前版本执行流程-
- T3 调用 releaseShared(1),直接调用了 unparkSuccessor(head),head 的等待状态从 -1 变为 0
-
- T1 由于 T3 释放信号量被唤醒,调用 tryAcquireShared,假设返回值为 0(获取锁成功,但没有剩余资源 量)
-
- T4 调用 releaseShared(1),此时 head.waitStatus 为 0(此时读到的 head 和 1 中为同一个head),不满足条件,因此不调用 unparkSuccessor(head)
-
- T1 获取信号量成功,调用 setHeadAndPropagate 时,因为不满足 propagate > 0(2 的返回值也就是propagate(剩余资源量) == 0),从而不会唤醒后继结点, T2 线程得不到唤醒
bug 修复后
private void setHeadAndPropagate(Node node, int propagate) {
    Node h = head; // Record old head for check below
    // 设置自己为 head
    setHead(node);
    // propagate 表示有共享资源(例如共享读锁或信号量)
    // 原 head waitStatus == Node.SIGNAL 或 Node.PROPAGATE
    // 现在 head waitStatus == Node.SIGNAL 或 Node.PROPAGATE
    if (propagate > 0 || h == null || h.waitStatus < 0 ||
        (h = head) == null || h.waitStatus < 0) {
        Node s = node.next;
        // 如果是最后一个节点或者是等待共享读锁的节点
        if (s == null || s.isShared()) {
            doReleaseShared();
        }
    }
}

private void doReleaseShared() {
    // 如果 head.waitStatus == Node.SIGNAL ==> 0 成功, 下一个节点 unpark
    // 如果 head.waitStatus == 0 ==> Node.PROPAGATE
    for (;;) {
        Node h = head;
        if (h != null && h != tail) {
            int ws = h.waitStatus;
            if (ws == Node.SIGNAL) {
                if (!compareAndSetWaitStatus(h, Node.SIGNAL, 0))
                    continue; // loop to recheck cases
                unparkSuccessor(h);
            }
            else if (ws == 0 &&
                     !compareAndSetWaitStatus(h, 0, Node.PROPAGATE))
                continue; // loop on failed CAS
        }
        if (h == head) // loop if head changed
            break;
    }
}
-
- T3 调用 releaseShared(),直接调用了 unparkSuccessor(head),head 的等待状态从 -1 变为 0
-
- T1 由于 T3 释放信号量被唤醒,调用 tryAcquireShared,假设返回值为 0(获取锁成功,但没有剩余资源量)
-
- T4 调用 releaseShared(),此时 head.waitStatus 为 0(此时读到的 head 和 1 中为同一个 head),调用 doReleaseShared() 将等待状态置为 PROPAGATE(-3)
-
- T1 获取信号量成功,调用 setHeadAndPropagate 时,读到 h.waitStatus < 0,从而调用 doReleaseShared() 唤醒 T2
- 加锁解锁流程
-
相关阅读:
C++ 练气期之一文看懂字符串
Java入门实操复习心得(全)
virtio-net 实现机制【一】(图文并茂)
如何使用API进行大规模数据收集和分析
win共享文件进不去
股票魔法师第二阶段趋势模板选股公式,寻找上涨趋势
红黑树实现
(附源码)计算机毕业设计SSM建筑工地环保监控系统研究
JAVA 18 新特性详解
抓包分析RST报文
- 原文地址:https://blog.csdn.net/gkqstd/article/details/139338907