-
RabbitMQ-发布/订阅模式
RabbitMQ-默认读、写方式介绍
RabbitMQ-直连交换机(direct)使用方法目录
1、发布/订阅模式介绍
在普通的生产者、消费者模式,rabbitmq会将消息依次传递给每一个消费者,一个worker一个,平均分配,这就是Round-robin调度方式,为了实现更加复杂的调度,我们就需要使用发布/订阅的方式。
2、交换机(exchange)
RabbitMQ中,消息模型的核心理念就是,生产者从来不能直接将消息发送到队列,甚至生产者都不知道消息要被发送到队列中。
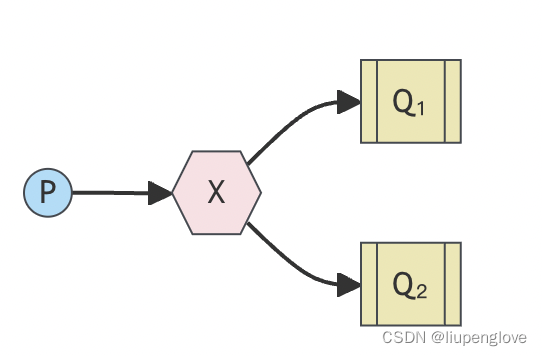
相反,生产者只能将消息发送到交换机中,交换机一侧从生产者接收消息,一侧将消息发送到队列中,交换机需要知道如何处理接收到的消息,是发送给一个队列还是多个队列?这是由交换机的类型决定的。

交换机共分为四类:
direct,topic,headersandfanout. 本章节以扇形交换机为例说明rabbitmq的使用。3、fanout交换机的使用方式
扇形交换机,就像你猜测的那样,他可以将他接收到的全部消息广播到所有队列里。
3.1 声明交换机
首先声明一个扇形交换机,type参数设置为『fanout』
- err = ch.ExchangeDeclare(
- "logs", // name
- "fanout", // type
- true, // durable
- false, // auto-deleted
- false, // internal
- false, // no-wait
- nil, // arguments
- )
3.2 发送消息到交换机
交换机设定完成后,就可以往该交换机发送消息:
- body := "Hello World!"
- err = ch.Publish("logs", "", false, false, amqp.Publishing{
- ContentType: "text/plain",
- Body: []byte(body),
- })
如果要在rabbitmq的页面上查看发送的消息,需要提前创建一个队列,并绑定到该交换机[logs]上,就可以查看发送的消息:

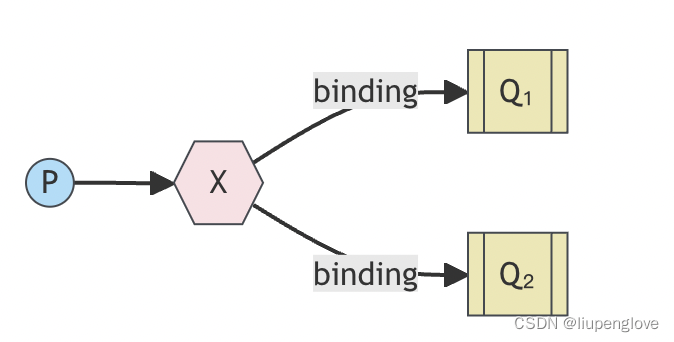
扇形交换机的特性,就是他会将收到的消息广播给所有绑定到该交换机的队列,我们可以创建多个队列,并绑定到该交换机上,我们发送一次消息,就会看到,所有绑定到该交换机的队列中都会有一条消息,先创建三个队列,并分别绑定到logs交换机:

之后运行脚本,发送两次消息:
 可以看到,三个队列当中都有两条消息。
3.2 扇形交换机发送消息代码
- package main
- import (
- "fmt"
- amqp "github.com/rabbitmq/amqp091-go"
- )
- func main() {
- conn, err := amqp.Dial("amqp://guest:guest@localhost:5672/")
- if err != nil {
- fmt.Println("Failed to connect to RabbitMQ")
- return
- }
- defer conn.Close()
- ch, err := conn.Channel()
- if err != nil {
- fmt.Println("Failed to open a channel")
- return
- }
- err = ch.ExchangeDeclare("logs", "fanout", true, false, false, false, nil)
- if err != nil {
- fmt.Println("Failed to declare an exchange")
- return
- }
- body := "Hello World!"
- err = ch.Publish("logs", "", false, false, amqp.Publishing{
- ContentType: "text/plain",
- Body: []byte(body),
- })
- if err != nil {
- fmt.Println("Failed to publish a message")
- return
- }
- }
3.2 声明队列,用于接收消息
- q, err := ch.QueueDeclare(
- "", // name
- false, // durable
- false, // delete when unused
- true, // exclusive
- false, // no-wait
- nil, // arguments
- )
声明队列时,没有指定队列名称,这时,系统会返回一个随机名称存储在q变量中。
3.3 binding
队列声明完成后,需要将该队列绑定到交换机上,这样交换机才能把消息广播给该队列:

绑定代码:
- err = ch.QueueBind(
- q.Name, // queue name
- "", // routing key
- "logs", // exchange
- false,
- nil,
- )
消费者侧全部代码如下:
- package main
- import (
- "fmt"
- amqp "github.com/rabbitmq/amqp091-go"
- )
- func main() {
- conn, err := amqp.Dial("amqp://guest:guest@localhost:5672/")
- if err != nil {
- fmt.Println("Failed to connect to RabbitMQ")
- return
- }
- defer conn.Close()
- ch, err := conn.Channel()
- if err != nil {
- fmt.Println("Failed to open a channel")
- return
- }
- err = ch.ExchangeDeclare("logs", "fanout", true, false, false, false, nil)
- if err != nil {
- fmt.Println("Failed to declare an exchange")
- return
- }
- q, err := ch.QueueDeclare(
- "", // name
- false, // durable
- false, // delete when unused
- true, // exclusive
- false, // no-wait
- nil, // arguments
- )
- err = ch.QueueBind(
- q.Name, // queue name
- "", // routing key
- "logs", // exchange
- false,
- nil,
- )
- msgs, err := ch.Consume(
- q.Name, // queue
- "", // consumer
- true, // auto-ack
- false, // exclusive
- false, // no-local
- false, // no-wait
- nil, // args
- )
- var forever chan struct{}
- go func() {
- for d := range msgs {
- fmt.Printf(" [x] %s\n", d.Body)
- }
- }()
- fmt.Printf(" [*] Waiting for logs. To exit press CTRL+C")
- <-forever
- }
程序启动后,控制台上会增加一个随机命名的队列。
 运行【3.2】的生产者程序,发送消息到扇形交换机,这个时候消费者就会同步消费到消息,并进行打印:
4、总结
关于扇形交换机,核心的一点需要我们记住,发送到扇形交换机的消息,他会将消息广播给所有绑定到该交换机的队列上,无脑广播,所有队列会同时接受到交换机上全部的消息。
-
相关阅读:
【密评】商用密码应用安全性评估从业人员考核题库(五)
Nanodet训练自己的数据集
基于Spring Boot的ERP仓储管理信息系统设计与实现毕业设计源码150958
React 如何清空 Input 和时间输入框,单独使用不含 FormItem
C语言笔记22 •结构体•
C语言2:说心里话
Docker学习_存储篇
ESP32学习笔记(50)——搭建环境、编译烧写(Windows+Espressif-IDE)
qt使用AES加密、解密字符串
【JVM】10 道不得不会的 JVM 面试题
- 原文地址:https://blog.csdn.net/liupenglove/article/details/139218852