-
1.1 Mediapipe随手简记(一)
为了后续项目展开,需要Python、C++、Linux、OpenCV、Mediapipe、ROS知识。
最后面有手势识别(数字)精准案例,项目会用到。
Mediapipe学习篇1
Mediapipe 是一个开源的跨平台框架,它提供了大量的解决方案,用于构建高性能、跨平台的计算机视觉应用。Mediapipe 使用计算图(Calculation Graph)来表示算法的执行流程,可以轻松地组合和扩展不同的算法模块。
1. Mediapipe 简介
1.1 Mediapipe 的起源和发展
Mediapipe 由 Google Research 于 2020 年推出,旨在为计算机视觉研究人员和开发者提供一个易于使用、高性能的框架。Mediapipe 提供了多种预训练模型和算法,涵盖了人脸检测、手势识别、姿态估计等领域。
1.2 Mediapipe 的特点和优势
- 易于使用:Mediapipe 的 API 设计简洁易懂,易于学习和使用。
- 高性能:Mediapipe 使用计算图优化算法的执行流程,可以实现高性能的实时处理。
- 跨平台:Mediapipe 支持多种操作系统,包括 Windows、Linux、Mac OS、Android 和 iOS。
- 模块化:Mediapipe 的算法模块是可插拔的,可以轻松地组合和扩展不同的算法。
2. Mediapipe 安装和配置
2.1 Mediapipe 安装
Mediapipe 可以通过 pip 包管理工具进行安装:
pip install mediapipe2.2 Mediapipe 配置
安装 Mediapipe 后,你需要在代码中导入
mediapipe模块才能使用其功能。3. Mediapipe 基础
3.1 计算图 (Calculation Graph)
计算图是 Mediapipe 的核心概念,它用于表示算法的执行流程。计算图由节点 (Node) 和边 (Edge) 组成,节点表示算法模块,边表示数据流。 示例(非完全):
- # 创建计算图
- mp_drawing = mp.solutions.drawing_utils
- mp_hands = mp.solutions.hands
- # 创建 Hand 类实例
- hands = mp_hands.Hands()
- # 读取图像
- img = cv2.imread('image.jpg')
- # 将图像转换为 RGB 格式
- img_rgb = cv2.cvtColor(img, cv2.COLOR_BGR2RGB)
- # 处理图像
- results = hands.process(img_rgb)
- # 绘制手势关键点
- if results.multi_hand_landmarks:
- for hand_landmarks in results.multi_hand_landmarks:
- mp_drawing.draw_landmarks(
- img,
- hand_landmarks,
- mp_hands.HAND_CONNECTIONS,
- )
- # 显示图像
- cv2.imshow('Image', img)
- cv2.waitKey(0)
- cv2.destroyAllWindows()
3.2 节点 (Node)
节点是计算图中的基本单元,它表示一个算法模块。每个节点都可以接收输入数据,并生成输出数据。 示例:
- # 创建 Hand 类实例
- hands = mp_hands.Hands()
3.3 边 (Edge)
边是连接节点的数据流,它表示节点之间的数据传递关系。 示例:
- # 读取图像
- img_rgb = cv2.cvtColor(img, cv2.COLOR_BGR2RGB)
- # 处理图像
- results = hands.process(img_rgb)
3.4 数据流
数据流是节点之间传递的数据,它可以是图像、关键点、检测框等。在 Mediapipe 中,数据流通常使用
NormalizedLandmarkList、Detection、Landmarks等数据结构来表示。 示例(非完全):- # 创建 Hand 类实例
- hands = mp_hands.Hands()
- # 读取图像
- img_rgb = cv2.cvtColor(img, cv2.COLOR_BGR2RGB)
- # 处理图像
- results = hands.process(img_rgb)
- # 获取手势关键点
- if results.multi_hand_landmarks:
- for hand_landmarks in results.multi_hand_landmarks:
- # hand_landmarks 是一个 NormalizedLandmarkList 对象
- # 它包含手部的 21 个关键点的位置信息
- for landmark in hand_landmarks.landmark:
- # landmark 是一个 Landmark 对象
- # 它包含关键点的 x, y, z 坐标
- x = landmark.x
- y = landmark.y
- z = landmark.z
数据结构说明:
- NormalizedLandmarkList:表示一组归一化的关键点,其中每个关键点的坐标值都在 0 到 1 之间。
- Detection:表示一个检测框,包含检测框的位置、置信度等信息。
- Landmarks:表示一组关键点,包含关键点的坐标信息。
4. Mediapipe 常用算法模块
4.1 人脸检测
Mediapipe 提供了人脸检测模块,可以用于检测图像或视频中的 faces。 示例(非完全):
- mp_face_detection = mp.solutions.face_detection
- # 创建 FaceDetection 类实例
- face_detection = mp_face_detection.FaceDetection()
- # 读取图像
- img_rgb = cv2.cvtColor(img, cv2.COLOR_BGR2RGB)
- # 检测图像中的人脸
- results = face_detection.process(img_rgb)
- # 绘制人脸矩形框
- if results.detections:
- for detection in results.detections:
- mp_drawing.draw_detection(img, detection)
4.2 手势识别
Mediapipe 提供了手势识别模块,可以用于识别图像或视频中的手势。 示例(非完全):
- mp_hands = mp.solutions.hands
- # 创建 Hand 类实例
- hands = mp_hands.Hands()
- # 读取图像
- img_rgb = cv2.cvtColor(img, cv2.COLOR_BGR2RGB)
- # 处理图像
- results = hands.process(img_rgb)
- # 绘制手势关键点
- if results.multi_hand_landmarks:
- for hand_landmarks in results.multi_hand_landmarks:
- mp_drawing.draw_landmarks(
- img,
- hand_landmarks,
- mp_hands.HAND_CONNECTIONS,
- )
4.3 姿态估计
Mediapipe 提供了姿态估计模块,可以用于估计图像或视频中的姿态。 示例(非完全):
- mp_pose = mp.solutions.pose
- # 创建 Pose 类实例
- pose = mp_pose.Pose()
- # 读取图像
- img_rgb = cv2.cvtColor(img, cv2.COLOR_BGR2RGB)
- # 处理图像
- results = pose.process(img_rgb)
- # 绘制姿态关键点
- if results.pose_landmarks:
- mp_drawing.draw_landmarks(
- img,
- results.pose_landmarks,
- mp_pose.POSE_CONNECTIONS,
- )
4.4 目标跟踪
Mediapipe 提供了目标跟踪模块,可以用于跟踪图像或视频中的目标。 示例(非完全):
- mp_objectron = mp.solutions.objectron
- # 创建 Objectron 类实例
- objectron = mp_objectron.Objectron()
- # 读取图像
- img_rgb = cv2.cvtColor(img, cv2.COLOR_BGR2RGB)
- # 处理图像
- results = objectron.process(img_rgb)
- # 获取目标信息
- if results.multi_object_detections:
- for detection in results.multi_object_detections:
- # detection 是一个 Detection 对象
- # 它包含目标的检测框、置信度等信息
- bounding_box = detection.bounding_box
- score = detection.score
示例(非完全):
- mp_objectron = mp.solutions.objectron
- # 创建 Objectron 类实例
- objectron = mp_objectron.Objectron()
- # 读取图像
- img_rgb = cv2.cvtColor(img, cv2.COLOR_BGR2RGB)
- # 处理图像
- results = objectron.process(img_rgb)
- # 获取目标信息
- if results.multi_object_detections:
- for detection in results.multi_object_detections:
- # detection 是一个 Detection 对象
- # 它包含目标的检测框、置信度等信息
- bounding_box = detection.bounding_box
- score = detection.score
4.5 人体姿态估计
Mediapipe 提供了人体姿态估计模块,可以用于估计图像或视频中的姿态。 示例(非完全):
- mp_pose = mp.solutions.pose
- # 创建 Pose 类实例
- pose = mp_pose.Pose()
- # 读取图像
- img_rgb = cv2.cvtColor(img, cv2.COLOR_BGR2RGB)
- # 处理图像
- results = pose.process(img_rgb)
- # 获取姿态关键点
- if results.pose_landmarks:
- # results.pose_landmarks 是一个 Landmarks 对象
- # 它包含人体姿态的 33 个关键点的位置信息
- for landmark in results.pose_landmarks.landmark:
- # landmark 是一个 Landmark 对象
- # 它包含关键点的 x, y, z 坐标
- x = landmark.x
- y = landmark.y
- z = landmark.z
4.6 表情识别
Mediapipe 提供了表情识别模块,可以用于识别图像或视频中的表情。 示例(非完全):
- mp_face_mesh = mp.solutions.face_mesh
- # 创建 FaceMesh 类实例
- face_mesh = mp_face_mesh.FaceMesh()
- # 读取图像
- img_rgb = cv2.cvtColor(img, cv2.COLOR_BGR2RGB)
- # 处理图像
- results = face_mesh.process(img_rgb)
- # 获取面部关键点
- if results.multi_face_landmarks:
- for face_landmarks in results.multi_face_landmarks:
- # face_landmarks 是一个 Landmarks 对象
- # 它包含面部 478 个关键点的位置信息
- for landmark in face_landmarks.landmark:
- # landmark 是一个 Landmark 对象
- # 它包含关键点的 x, y, z 坐标
- x = landmark.x
- y = landmark.y
- z = landmark.z
5. Mediapipe 高级功能
5.1 自定义模型
Mediapipe 支持自定义模型,允许开发者使用自己的模型进行图像处理、计算机视觉和机器学习等任务。这可以通过以下步骤实现:
- 训练模型:使用如 TensorFlow、PyTorch 等深度学习框架训练你的模型。
- 导出模型:将训练好的模型导出为 ONNX 或 TF Lite 等格式。
- 加载模型:在 Mediapipe 中加载导出的模型。
- 使用模型:在处理图像时,使用加载的模型进行预测。
示例:
- # 加载自定义模型
- model = load_model('path_to_custom_model')
- # 使用自定义模型处理图像
- predictions = model.predict(img)
5.2 性能优化
Mediapipe 提供了多种性能优化工具,可以帮助开发者提高算法的执行效率。以下是一些性能优化的方法:
- CPU/GPU 加速:Mediapipe 可以使用 CPU 或 GPU 进行加速,提高算法的执行效率。在构建计算图时,可以通过指定
.with_cpu()或.with_gpu()方法来选择使用 CPU 或 GPU。- # 使用 CPU 进行加速
- hands = mp_hands.Hands(static_image_mode=True, max_num_hands=2, min_detection_confidence=0.5, min_tracking_confidence=0.5)
- # 使用 GPU 进行加速
- hands = mp_hands.Hands(static_image_mode=True, max_num_hands=2, min_detection_confidence=0.5, min_tracking_confidence=0.5, model_complexity=1)
- 量化模型:Mediapipe 支持量化模型,可以减小模型的体积,提高模型的执行速度。在构建计算图时,可以通过指定
.with_default_model_complexity()方法来选择模型复杂度,从而实现量化。- # 选择模型复杂度为 1,进行量化
- hands = mp_hands.Hands(static_image_mode=True, max_num_hands=2, min_detection_confidence=0.5, min_tracking_confidence=0.5, model_complexity=1)
- 模型剪枝:Mediapipe 支持模型剪枝,可以去除模型中不必要的参数,提高模型的执行速度。在构建计算图时,可以通过指定
.with_default_model_complexity()方法来选择模型复杂度,从而实现模型剪枝。- # 选择模型复杂度为 1,进行模型剪枝
- hands = mp_hands.Hands(static_image_mode=True, max_num_hands=2, min_detection_confidence=0.5, min_tracking_confidence=0.5, model_complexity=1)
5.3 跨平台支持
Mediapipe 支持多种操作系统,包括 Windows、Linux、Mac OS、Android 和 iOS。这使得开发者可以轻松地将 Mediapipe 应用到不同的平台上。
6. Mediapipe 数据结构
Mediapipe 中的数据结构用于存储和传递计算图中的数据。以下是 Mediapipe 中一些常用的数据结构:
6.1 NormalizedLandmarkList
NormalizedLandmarkList是一个数据结构,用于存储归一化的关键点坐标。每个关键点坐标都是相对于输入图像的尺寸归一化的。- class NormalizedLandmarkList:
- num_landmarks: int
- landmark: List[NormalizedLandmark]
其中,
num_landmarks是关键点的数量,landmark是一个包含所有关键点的列表,每个关键点是一个NormalizedLandmark对象。6.2 Detection
Detection是一个数据结构,用于存储检测框的位置、置信度等信息。- class Detection:
- bounding_box: BoundingBox
- score: float
- classification: Classification
其中,
bounding_box是检测框的位置,score是置信度,classification是分类信息。6.3 Landmarks
Landmarks是一个数据结构,用于存储关键点的坐标信息。- class Landmarks:
- num_landmarks: int
- landmark: List[Landmark]
其中,
num_landmarks是关键点的数量,landmark是一个包含所有关键点的列表,每个关键点是一个Landmark对象。6.4 BoundingBox
BoundingBox是一个数据结构,用于存储检测框的位置。- class BoundingBox:
- origin: Origin
- size: Size
其中,
origin是检测框的左上角坐标,size是检测框的尺寸。6.5 Classification
Classification是一个数据结构,用于存储分类信息。- class Classification:
- label: str
- score: float
其中,
label是分类标签,score是置信度。6.6 Origin
Origin是一个数据结构,用于存储位置信息。- class Origin:
- x: float
- y: float
其中,
x和y是位置坐标。6.7 Size
Size是一个数据结构,用于存储尺寸信息。- class Size:
- width: float
- height: float
其中,
width和height是尺寸大小。 通过这些数据结构,Mediapipe 可以有效地存储和传递计算图中的数据,使得开发者可以轻松地构建和运行复杂的计算机视觉应用。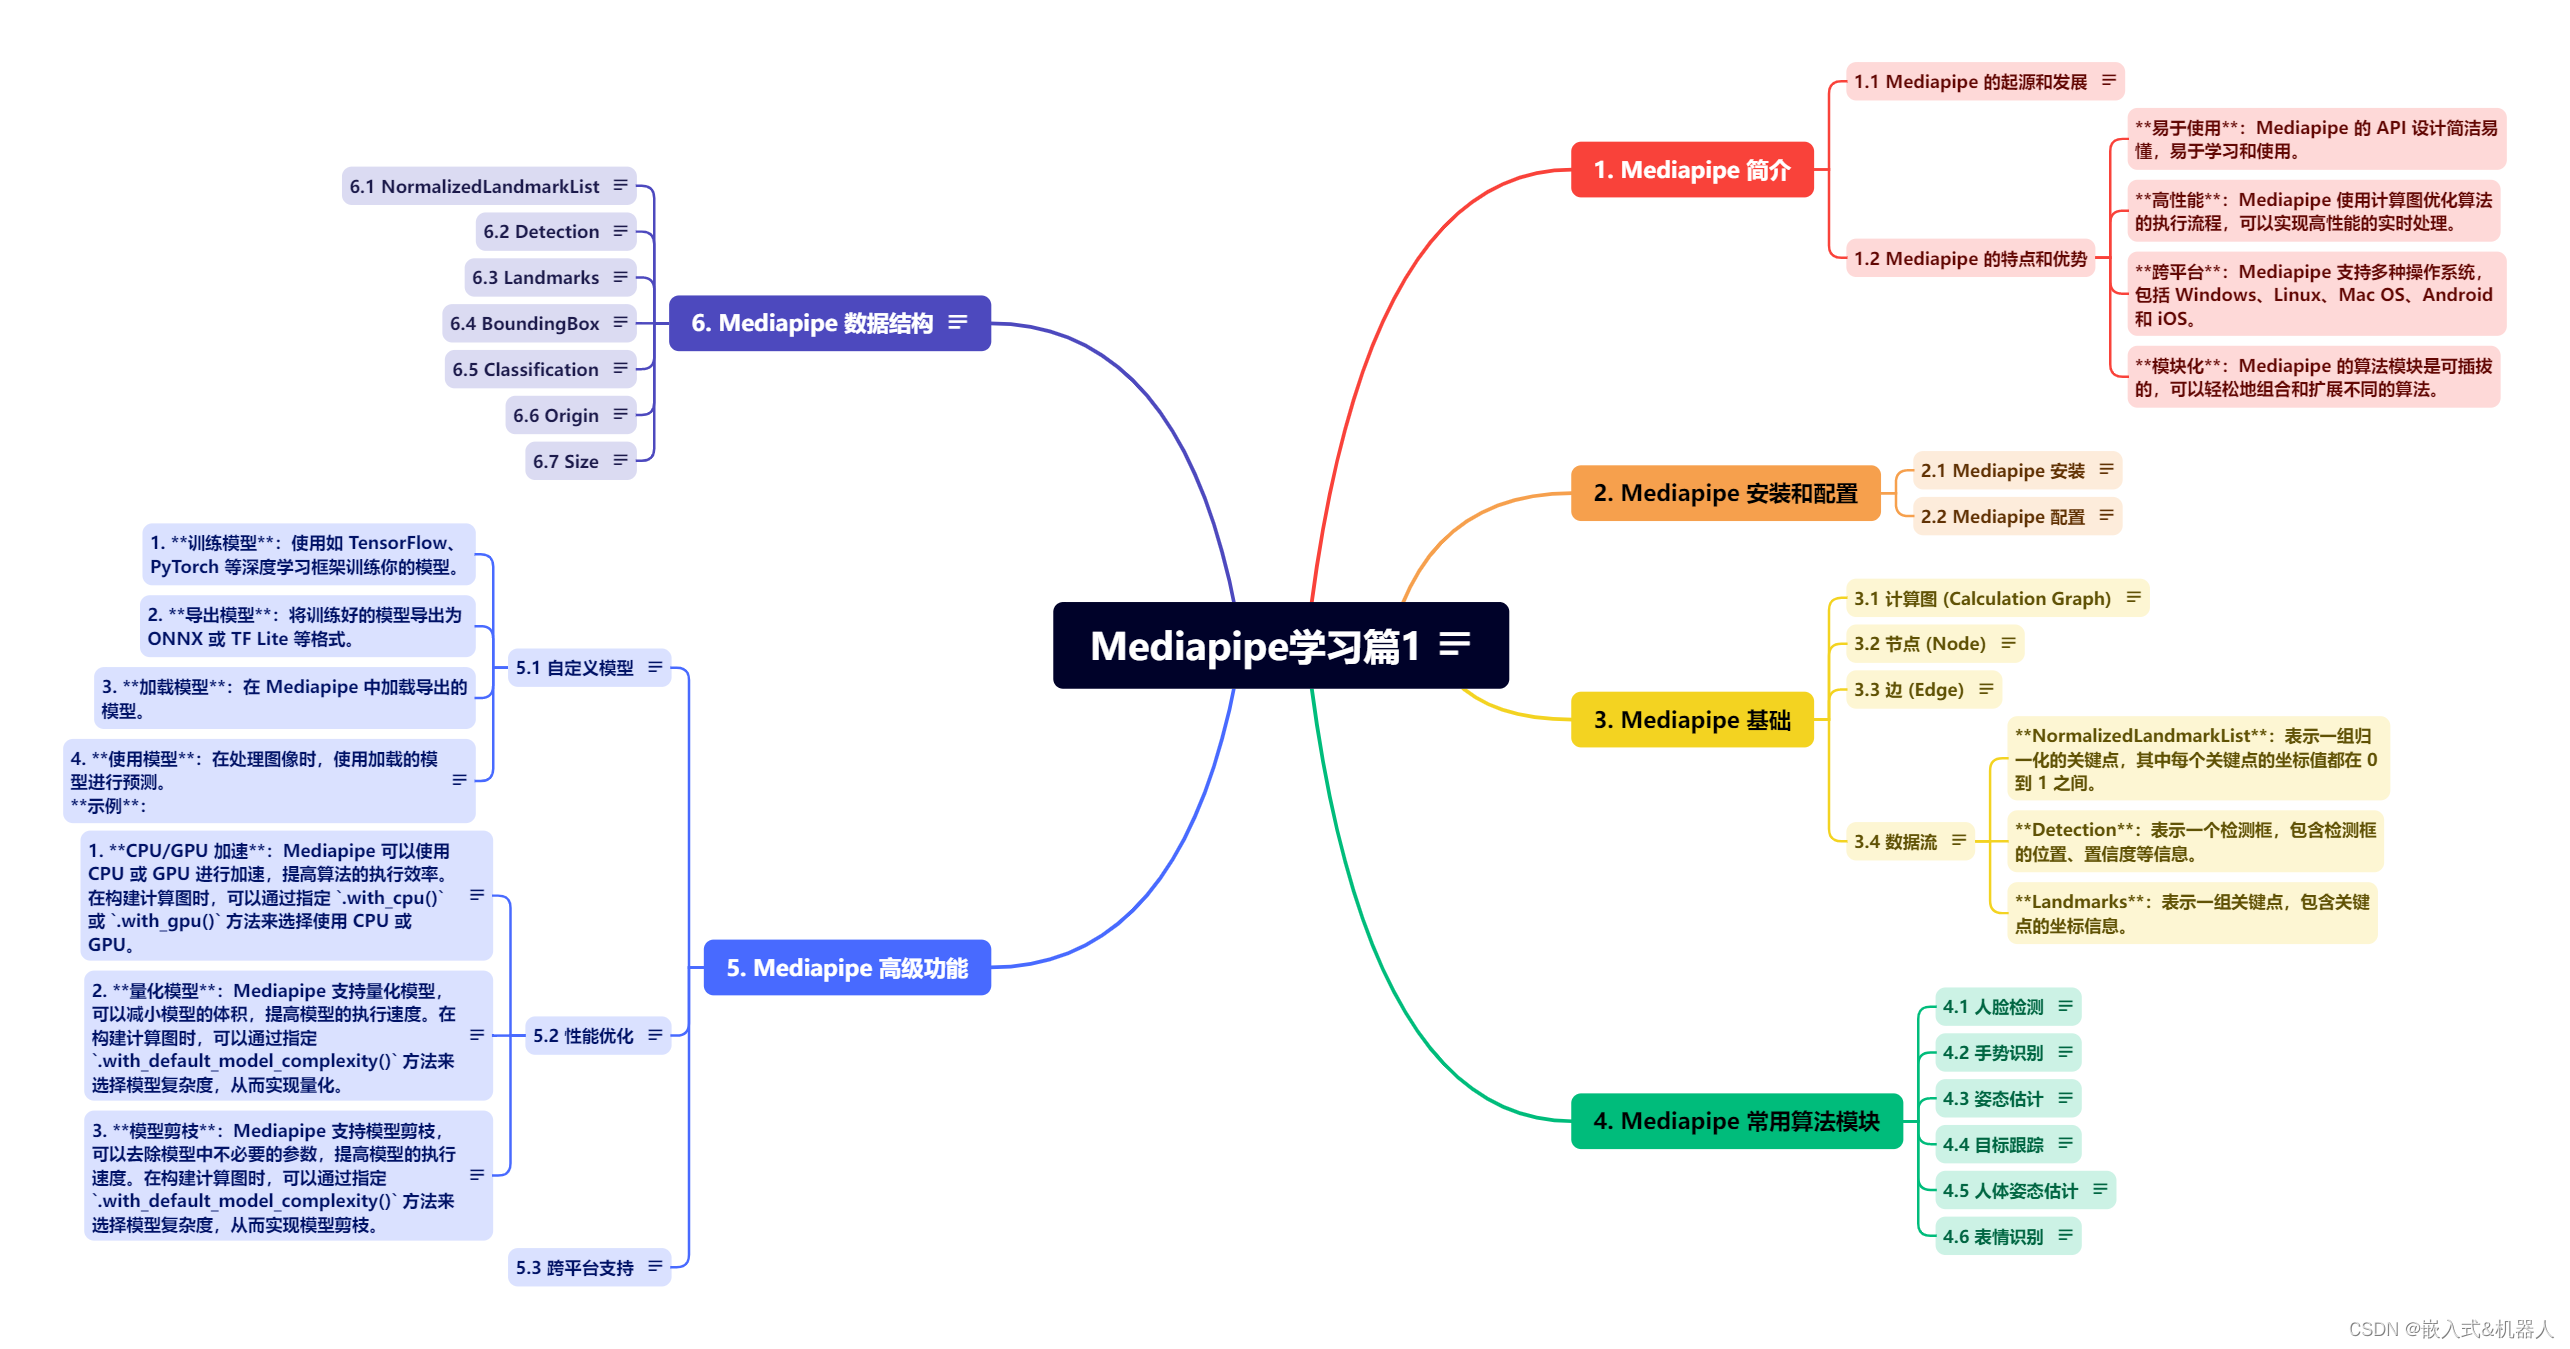
手势识别代码案例(精准)
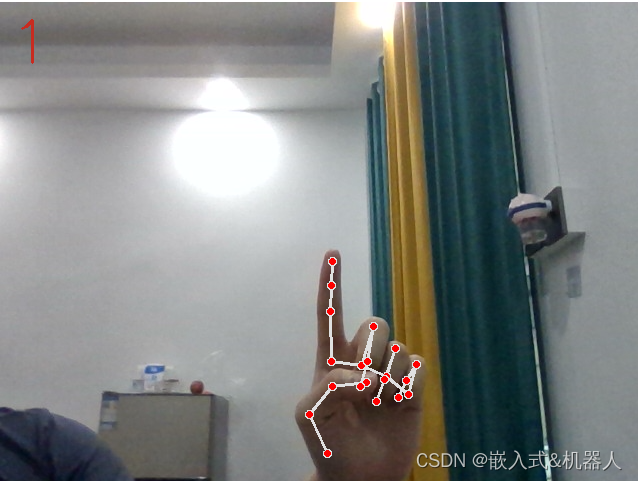
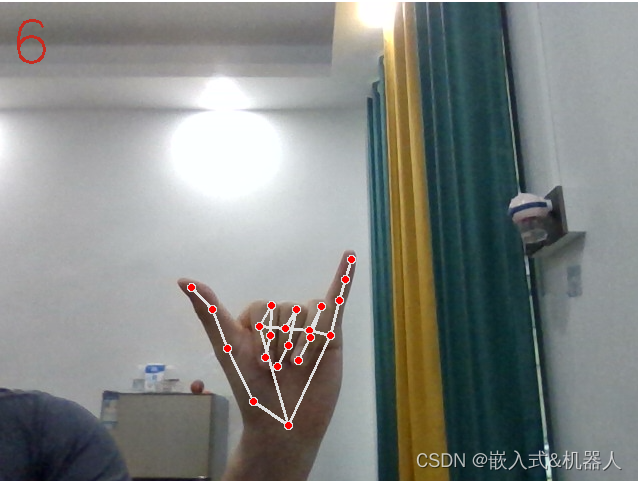

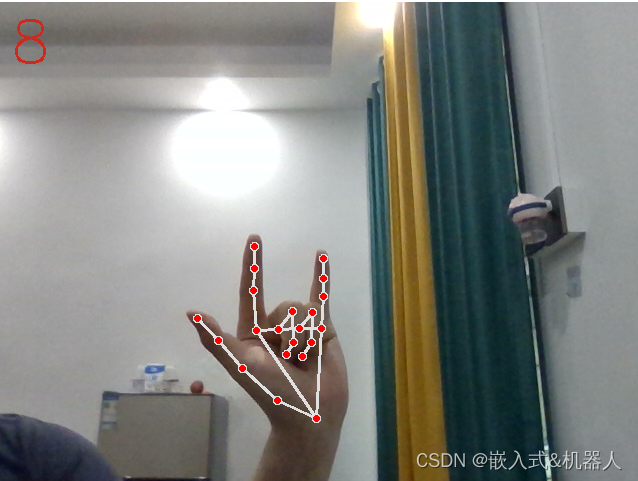
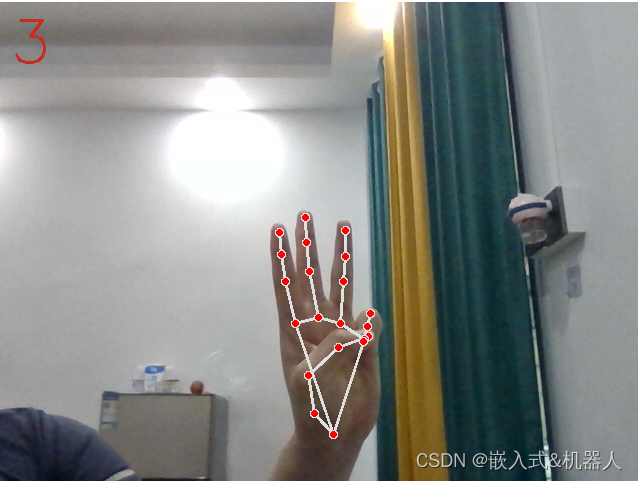
代码地址:Mediapipe_hand_detect: 这份代码是使用Mediapipe进行手势识别,超精准
-
相关阅读:
【Rust日报】2022-08-31 RustDesk 跻身 Rust 开源项目 Top 10 第九名
Vue模板语法
天工杂志天工杂志社天工编辑部2022年第25期目录
DMPE-PEG-Mal 二肉豆蔻酰磷脂酰乙醇胺-聚乙二醇-马来酰亚胺避光储藏
【Python零基础入门笔记 | 12】程序员为什么自嘲面向Bug编程?
如何在Spring Boot应用中使用Nacos实现动态更新数据源
前端性能优化方法与实战04 指标采集:首屏时间指标采集具体办法
javafx-自动下载文章并将doc转换为docx
tomcat
archlinux解决fcitx5光标不跟随
- 原文地址:https://blog.csdn.net/SSS465/article/details/139373859