-
intel深度相机D455的使用
一、D455介绍
Intel RealSense D455 是RealSense D400系列的一部分,这个系列的设备以其高精度和可靠性而闻名。D455相比于之前的型号(如D415和D435),提供了更远的感知范围和更高的精度。

二、使用代码
我们先定义一下相关的函数,主要是要将我们拍摄的图片和深度信息保存地址的创建好,以及获取我们的深度相机的一些参数。
# utils.py
import os
import datetime
import pyrealsense2 as rs

def get_depth_camera_info(profile):
    """
    获取深度相机的内参信息和深度值比例因子

    参数:
        pipeline: pipeline对象,已经初始化的深度相机

    返回值:
        depth_scale: 深度值的比例因子
        intrinsics: 深度图像的内参信息
    """
    depth_sensor = profile.get_device().first_depth_sensor()
    depth_stream = profile.get_stream(rs.stream.depth)
    depth_intrinsics = depth_stream.as_video_stream_profile().get_intrinsics()
    depth_scale = depth_sensor.get_depth_scale()
    print("Depth Scale is: ", depth_scale)
    print("Depth intrinsics:")
    print(f"Width: {depth_intrinsics.width}")
    print(f"Height: {depth_intrinsics.height}")
    print(f"PPX (principal point x): {depth_intrinsics.ppx}")
    print(f"PPY (principal point y): {depth_intrinsics.ppy}")
    print(f"FX (focal length x): {depth_intrinsics.fx}")
    print(f"FY (focal length y): {depth_intrinsics.fy}")
    print(f"Distortion model: {depth_intrinsics.model}")
    print(f"Distortion coefficients: {depth_intrinsics.coeffs}")

def create_camera_save_path(save_path=None):
    """
    创建保存并返回 D455 图像和深度信息的路径
    Args:
        save_path: 自定义路径, default=None, 默认运行文件的当前目录下

    Returns:
        color图存储路径, depth信息存储路径
    """
    if save_path is None:
        save_path = os.getcwd()
    time_path = f"{datetime.datetime.now():%Y_%m_%d_%H_%M_%S}".replace(":", "_")
    color_path = os.path.join(save_path, time_path, 'rgb')
    depth_path = os.path.join(save_path, time_path, 'depth')

    os.makedirs(color_path, exist_ok=True)
    os.makedirs(depth_path, exist_ok=True)
    return color_path, depth_path
这就是打印出来的信息
Depth Scale is: 0.0010000000474974513
Depth intrinsics:
Width: 640
Height: 480
PPX (principal point x): 321.67352294921875
PPY (principal point y): 237.27777099609375
FX (focal length x): 387.3067321777344
FY (focal length y): 387.3067321777344
Distortion model: distortion.brown_conrady
Distortion coefficients: [0.0, 0.0, 0.0, 0.0, 0.0]下面是我们运行的主代码
# main.py
import pyrealsense2 as rs
import os
import cv2
import numpy as np
from Depth_camera.utils import get_depth_camera_info, create_camera_save_path


saved_count = 0
extend_num = 3
width = 640
height = 480
fps = 30

color_path, depth_path = create_camera_save_path()
pipeline = rs.pipeline()
config = rs.config()
config.enable_stream(rs.stream.depth, width, height, rs.format.z16, fps)
config.enable_stream(rs.stream.color, width, height, rs.format.bgr8, fps)

profile = pipeline.start(config)
get_depth_camera_info(profile)

try:
    while True:
        frames = pipeline.wait_for_frames()
        depth_frame = frames.get_depth_frame()
        color_frame = frames.get_color_frame()

        depth_image = np.asanyarray(depth_frame.get_data())
        color_image = np.asanyarray(color_frame.get_data())

        # 获取深度信息,以米为单位
        depth_scale = profile.get_device().first_depth_sensor().get_depth_scale()
        depth_image_in_meters = depth_image * depth_scale

        # 将无效的深度值设置为NaN
        depth_image_in_meters[depth_image == 0] = np.nan

        depth_colormap = cv2.applyColorMap(cv2.convertScaleAbs(depth_image, alpha=0.03), cv2.COLORMAP_JET)
        images = np.hstack((color_image, depth_colormap))
        cv2.namedWindow('RealSense', cv2.WINDOW_AUTOSIZE)
        cv2.imshow('RealSense', images)
        key = cv2.waitKey(1)

        if key & 0xFF == ord('s'):
            saved_count += 1
            print(f"{saved_count} 已保存图像至 {color_path} 和 {depth_path}")
            cv2.imwrite(os.path.join(color_path, "{}.png".format(saved_count)), color_image)
            # 深度信息保存为 .npy 格式,单位为米
            np.save(os.path.join(depth_path, "{}.npy".format(saved_count)), depth_image_in_meters)
        elif key & 0xFF == ord('q') or key == 27:
            cv2.destroyAllWindows()
            break

finally:
    pipeline.stop()
正常显示
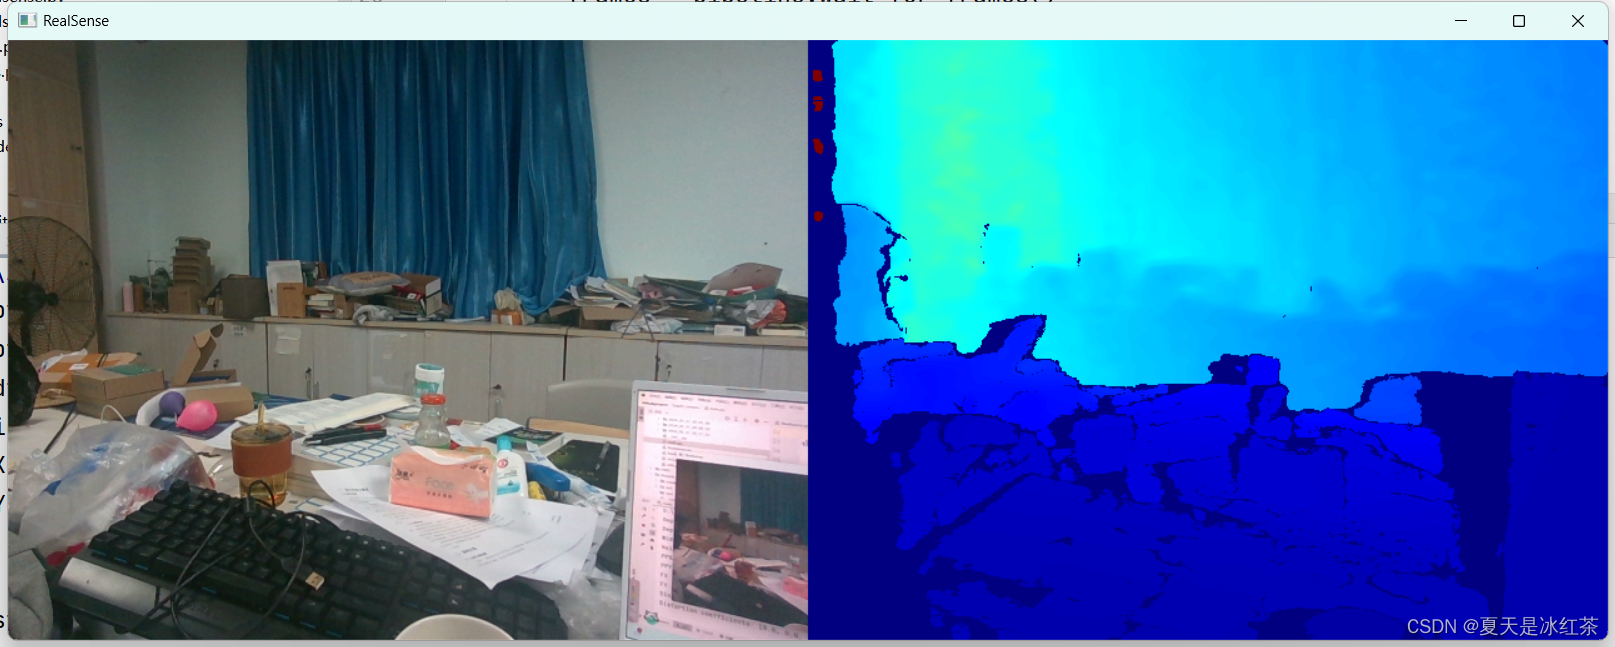
这段代码通过按下‘s’键对图片和深度信息进行保存,通过按下ESC键和‘q’键退出。
需要注意的是这里获取的深度信息,是以米为单位的。
在保存深度信息时候,如果保存的是颜色映射后的,它的通道数是3,这里保存的是单通道的。
现在我们来查看一下我们的深度图情况吧
import cv2
import numpy as np

if __name__ == "__main__":
    color_image = cv2.imread(r"D:\PythonProject\Githubproject\Depth_camera\2024_05_31_21_29_23\rgb\1.png")
    depth_image = np.load(r"D:\PythonProject\Githubproject\Depth_camera\2024_05_31_21_29_23\depth\1.npy")
    print(depth_image.shape)
    cv2.imshow("color", color_image)
    x = 1
    y = 1
    truth_depth = depth_image[x, y]
    print(truth_depth)  # 出现了nan说明没有检测到深度信息
    cv2.imshow("color", depth_image)
    cv2.waitKey(0)
在上面显示的时候我们就发现物体边缘部分有偏深的部分,那部分就是相机没有检测到深度信息,在读取了npy文件后的效果是下面这样的

无效的深度区域是一个常见的问题,尤其是在使用深度相机时。三、参考文章
https://blog.csdn.net/weixin_45303602/article/details/133683403
https://blog.csdn.net/weixin_50508111/article/details/126646903 -
相关阅读:
webrtc学习--websocket服务器
C++智能指针之shared_ptr
推荐一个分布式单点登录框架XXL-SSO!
Java实践-物联网loT入门-MQTT传输协议
【GPU原理】1.线程和缓存的关系
linux下最全抓包命令使用方式学习和拓展
JavaEE-多线程(基础篇三)线程安全
划片机新手教程:从准备工作到注意事项全解析!
语音芯片基础知识 什么是语音芯 他有什么作用 发展趋势是什么
js数组方法复习汇总
- 原文地址:https://blog.csdn.net/m0_62919535/article/details/139380973