-
区块链安全应用-------压力测试
基于已有的链进行测试(build_chain默认建的链 四个节 点):
第一步:搭链
1. 安装依赖 在ubuntu操作系统中,操作步骤如下:
sudo apt install -y openssl curl
2. 创建操作目录, 下载安装脚本
- ## 创建操作目录
- cd ~ && mkdir -p fisco && cd fisco
- ## 下载脚本
- curl -LO https://github.com/FISCO-BCOS/FISCO-BCOS/releases/download/v2.7.1/build_chain.sh
- chmod +x build_chain.sh
- #搭链
- bash build_chain.sh -l 127.0.0.1:4 -p 30300,20200,8545 –e ./fisco-bcos


3. 启动链
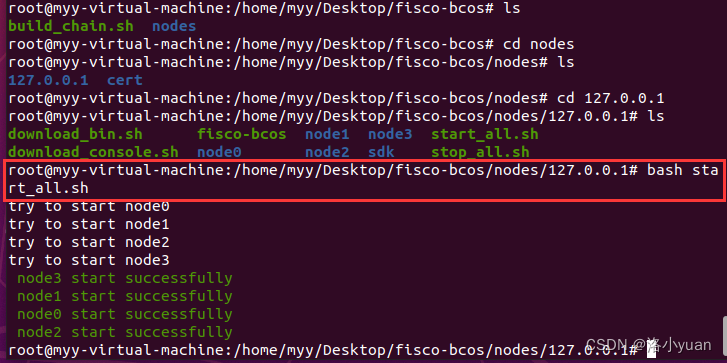
bash nodes/127.0.0.1/start_all.sh

第二步:配置网络配置文件
在networks/fisco-bcos/test/创建fisco-bcos2.json配置网络适配文件:
- {
- "caliper": {
- "blockchain": "fisco-bcos"
- },
- "fisco-bcos": {
- "config": {
- "privateKey": "bcec428d5205abe0f0cc8a734083908d9eb8563e31f943d760786edf42ad67dd",
- "account": "0x0ff8981ebc130c7874ac7093a4d0c0e3d4f36b08"
- },
- "network": {
- "nodes": [
- {
- "ip": "127.0.0.1",
- "rpcPort": "8545",
- "channelPort": "20200"
- },
- {
- "ip": "127.0.0.1",
- "rpcPort": "8546",
- "channelPort": "20201"
- },
- {
- "ip": "127.0.0.1",
- "rpcPort": "8547",
- "channelPort": "20202"
- },
- {
- "ip": "127.0.0.1",
- "rpcPort": "8548",
- "channelPort": "20203"
- }
- ],
- "authentication": {
- "key":"/home/myy/Desktop/fisco-bcos/nodes/127.0.0.1/sdk/sdk.key",
- "cert": "/home/myy/Desktop/fisco-bcos/nodes/127.0.0.1/sdk/sdk.crt",
- "ca": "/home/myy/Desktop/fisco-bcos/nodes/127.0.0.1/sdk/ca.crt"
- },
- "groupID": 1,
- "timeout": 100000
- },
- "smartContracts": [
- {
- "id": "helloworld",
- "path": "src/fisco-bcos/helloworld/HelloWorld.sol",
- "language": "solidity",
- "version": "v0"
- }
- ]
- },
- "info": {
- "Version": "2.0.0",
- "Size": "4 Nodes",
- "Distribution": "Single Host"
- }
- }


第三步,对本地四节点链进行测试
npx caliper benchmark run --caliper-workspace caliper-benchmarks --caliper-benchconfig benchmarks/samples/fisco-bcos/helloworld/config.yaml --caliper-networkconfig networks/fisco-bcos/test/fisco-bcos2.json

测试和进程资源状态都可以监测,但在本地监测中,无法监测每个节点的资源状态。
第四步:停止节点
bash nodes/127.0.0.1/stop_all.sh
如何改成预编译的智能合约进行测试?
测试文件参数介绍 参数 含义
- test.name 要在报告中显示的benchmark的短名称。
- test.description 要在报告中显示的benchmark的详细说明。
- test.workers 与工作线程相关的对象的配置。
- test.workers.type (暂未投入使用)
- test.workers.number 指定用于执行工作负载的工作进程数。
- test.rounds 对象回合数组,一个数组下可以有多轮不同的测试任务。
- test.rounds[i].label 该轮测试的名称,通常对应于该轮要提交的测试的类型。
- test.rounds[i].txNumber应在该轮任务提交的任务数。
- test.rounds[i].txDuration 该轮提交任务数的用时(单位,秒)。
- test.rounds[i].rateControl 描述该轮的速率控制策略。
- test.rounds[i].workload 描述该轮的工作负载模块。
- test.rounds[i].workload.module 该轮基准测试工作负载模块实现的路径。
- test.rounds[i].workload.arguments 作为配置,传递给该轮工作负载模块的参数
通过Java SDK进行压力测试
配置工程链基本环境后,介绍具体测试步骤和要点。
- 1. 编写合约:HelloWorld合约。
- 2. 编译智能合约,将其转为Java文件,从上述WeBASE-Front中,也能编译并导出Java文件。
- 3. 将编译生成的Java文件导入工程中,如HelloWorld.java。
- 4. 基于上述文件,调用合约功能和接口,编写相关测试案例,例如:ContractTest。
- 5. 基于Spring提供的gradle插件,我们可以通过”./gradlew test”命令来运行所有测试案例。
- 6. 如果需要持续集成,可以在配置和初始化FISCO BCOS后,将步骤5命令加入自动化脚本中。
第一步:安装JDK
- # 安装open JDK 11
- sudo apt install openjdk-11-jdk
- # 验证Java版本
- java --version
- # 输出以下内容:
- #openjdk 11.0.22 2024-01-16
- #OpenJDK Runtime Environment (build 11.0.22+7-post-Ubuntu-0ubuntu220.04.1)
- #OpenJDK 64-Bit Server VM (build 11.0.22+7-post-Ubuntu-0ubuntu220.04.1, mixed
- mode, sharing)

第二步:编译源码
- # 下载源码
- git clone https://github.com/FISCO-BCOS/java-sdk-demo
- cd java-sdk-demo
- git checkout main-2.0
- # 编译源码
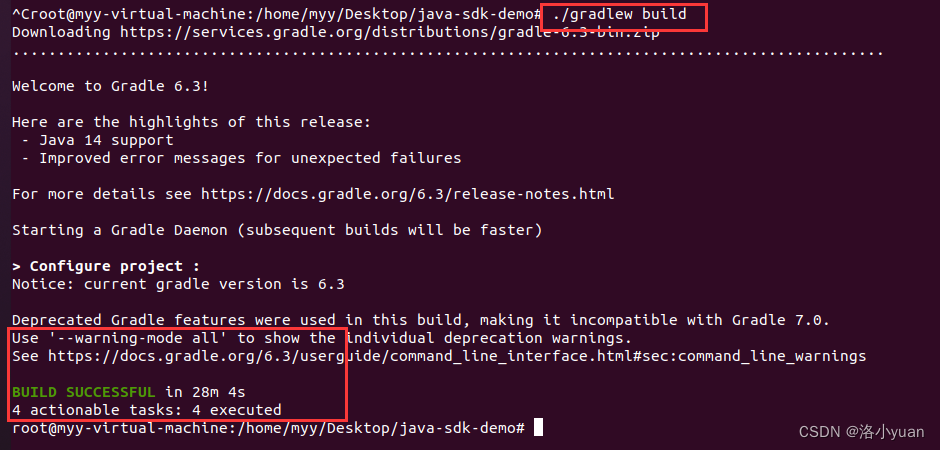
- ./gradlew build


第三步. 配置Demo
使用Java SDK Demo之前,需要首先要Java SDK,包括证书拷贝以及端口配置,详细请参考这里
- # 拷贝证书(假设SDK证书位于~/fisco/nodes/127.0.0.1/sdk目录,请根据实际情况更改路径)
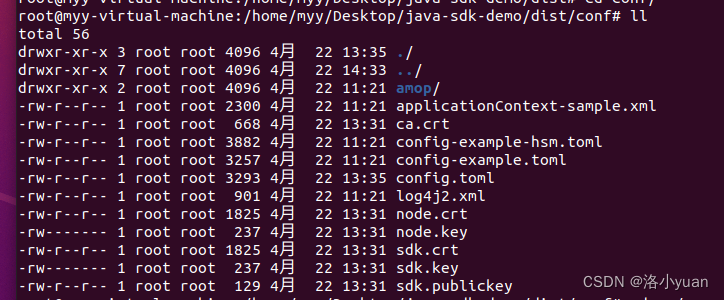
- cd dist
- cp -r /root/fisco/nodes/127.0.0.1/sdk/* conf
- # 拷贝配置文件
- # 注:
- # 默认搭建的FISCO BCOS区块链系统Channel端口是20200,若修改了该端口,请同步修改config.toml中的[network.peers]配置选项
- $ cp conf/config-example.toml conf/config.toml
- #由于我的区块链环境具有四个节点,所以应该修改java-sdk-demo/dist/conf/config.toml下的network.peers配置
- peers=["127.0.0.1:20200", "127.0.0.1:20201","127.0.0.1:20202","127.0.0.1:20203"]


第四步. 执行示例压力测试程序
Java SDK Demo提供了一系列压测程序,包括串行转账合约压测、并行转账合约压测、AMOP压测等, 具体使用方法如下:
- # 进入dist目录
- $ cd dist
- mkdir -p contracts/solidity
- # 将需要转换为java代码的sol文件拷贝到dist/contracts/solidity路径下
- # 转换sol, 其中${packageName}是生成的java代码包路径
- # 生成的java代码位于 /dist/contracts/sdk/java目录下
- $ java -cp "apps/*:lib/*:conf/" org.fisco.bcos.sdk.demo.codegen.DemoSolcToJava
- ${packageName}
- # 压测串行转账合约:
- # count: 压测的交易总量
- # tps: 压测QPS
- # groupId: 压测的群组ID
- java -cp 'conf/:lib/*:apps/*' org.fisco.bcos.sdk.demo.perf.PerformanceOk [count]
- [tps] [groupId]
- # 压测并行转账合约
- # --------------------------
- # 基于Solidity并行合约parallelok添加账户:
- # groupID: 压测的群组ID
- # count: 压测的交易总量
- # tps: 压测QPS
- # file: 保存生成账户的文件名
- $ java -cp 'conf/:lib/*:apps/*' org.fisco.bcos.sdk.demo.perf.ParallelOkPerf
- [parallelok] [groupID] [add] [count] [tps] [file]
- # 基于Precompiled并行合约precompiled添加账户
- # (参数含义同上)
- java -cp 'conf/:lib/*:apps/*' org.fisco.bcos.sdk.demo.perf.ParallelOkPerf
- [precompiled] [groupID] [add] [count] [tps] [file]
- # --------------------------
- # 基于Solidity并行合约parallelok发起转账交易压测
- # groupID: 压测的群组ID
- # count: 压测的交易总量
- # tps: 压测的QPS
- # file: 转账用户文件
- $ java -cp 'conf/:lib/*:apps/*' org.fisco.bcos.sdk.demo.perf.ParallelOkPerf
- [parallelok] [groupID] [transfer] [count] [tps] [file]
- # 基于Precompiled并行合约Precompiled发起转账压测
- $ java -cp 'conf/:lib/*:apps/*' org.fisco.bcos.sdk.demo.perf.ParallelOkPerf
- [precompiled] [groupID] [transfer] [count] [tps] [file]
- # CRUD合约压测
- # 压测CRUD insert
- # count: 压测的交易总量
- # tps: 压测QPS
- # groupId: 压测群组
- $ java -cp 'conf/:lib/*:apps/*' org.fisco.bcos.sdk.demo.perf.PerformanceTable
- [insert] [count] [tps] [groupId]
- # 压测CRUD update
- # (参数解释同上)
- $ java -cp 'conf/:lib/*:apps/*' org.fisco.bcos.sdk.demo.perf.PerformanceTable
- [update] [count] [tps] [groupId]
- # 压测CRUD remove
- # (参数解释同上)
- $ java -cp 'conf/:lib/*:apps/*' org.fisco.bcos.sdk.demo.perf.PerformanceTable
- [remove] [count] [tps] [groupId]
- # 压测CRUD query
- # (参数解释同上)
- $ java -cp 'conf/:lib/*:apps/*' org.fisco.bcos.sdk.demo.perf.PerformanceTable
- [query] [count] [tps] [groupId]
以上对压测合约进行解释,如已经生成配置文件了,就可以直接运行下面的代码

然后下面是对合约进行运行
- cd ~/java-sdk-demo/dist
- java -cp 'conf/:lib/*:apps/*' org.fisco.bcos.sdk.demo.perf.PerformanceOk [count]
- [tps] [groupId]
- java -cp 'conf/:lib/*:apps/*' org.fisco.bcos.sdk.demo.perf.PerformanceOk 10000 1000 1
- #200000代表总测试量为10000 1000代表每秒向区块链系统发送1000次请求 1代表区块链系统的groupId

出现以下错误是因为搭链没有启动要先启动链

bash start_all.sh
自定义压测代码
压测自定义合约的开发均在Java SDK Demo中进行,我们需要开发三个文件,分别是: 待压测的智能合约:HelloWorld.sol
待压测的智能合约所编译出的Java类:HelloWorld.java
压力测试程序:PerformanceHelloWorld.java
项目的存放路径

首先编译Helloworld.sol文件
创建 contracts/solidity文件
- cd ~/java-sdk-demo/dist
- mkdir -p contracts/solidity

生成Helloworld.sol文件
- cd contracts/solidity
- vim HelloWorld.sol
- #生成以上Helloworld智能合约完成简单的获取和设置name功能
- pragma solidity >=0.4.24 <0.6.11;
- contract HelloWorld {
- string public name;
- constructor() public {
- name = "Hello, World!";
- }
- function get() public view returns (string memory) {
- return name;
- }
- function set(string memory n) public {
- name = n;
- }
- }
-
相关阅读:
深度学习——使用卷积神经网络改进识别鸟与飞机模型
python程序编写
mac-“准备安装时发生错误,请尝试重新运行此应用程序” + mac未能安装所需的固件更新
Vue ref 和 v-for 结合(ref 源码解析)
day58:ARMday5,GPIO流水灯实验
躲避雪糕刺客?通过爬虫爬取雪糕价格
thinkPHP基于php的衡水游泳馆管理系统-计算机毕业设计
AXI4协议与AXI3协议区别
OpenMMLab之Registry机制
Flutter与原生通信(上)
- 原文地址:https://blog.csdn.net/2201_76041915/article/details/138066843
