-
SpringBoot学习(四)NoSQL、接口文档、远程调用、消息服务、Web安全、可观测性、AOT
NoSQL
Redis整合
场景整合
- 依赖
<dependency> <groupId>org.springframework.bootgroupId> <artifactId>spring-boot-starter-data-redisartifactId> dependency>- 1
- 2
- 3
- 4
- 配置
spring.data.redis.host=192.168.200.100 spring.data.redis.password=AbC123!@!- 1
- 2
- 数据类型
k/v:value可以为许多类型
sring:普通字符串:redisTemplate.opsForValue()
list:列表:redisTemplate.opsForList()
set:集合:redisTemplate.opsForSet()
zset:有序集合:redisTemplate.opsForZSse()
hash:map结构:redisTemplate.opsForHash()
自动配置原理
META-INF/spring/org.springframework.boot.autoconfigure.AutoConfiguration.imports中导入RedisAutoConfiguration、RedisReactiveAutoConfiguration和RedisRepositoriesAutoCOnfiguration,所有属性绑定RedisPropertiesRedisReactiveAutoConfiguration属于响应式编程,RedisRepositoriesAutoCOnfiguration属于JPA操作,两者无需主动处理RedisAutoConfiguration配置了:
LettuceConnectionConfiguration:向容器中注入连接工厂LettuceConnectionFactory和操作redis的客户端DefaultClientResourcesRedisTemplate:可给redis中存储任意对象,会使用jdk默认序列化方式StringRedisTemplate:给redis中存储字符串,若要存储对象,则需使用者自行序列化,key-value都以字符串形式进行操作
定制化
序列化机制
@Configuration public class AppRedisConfiguration { /** *允许Object类型的key-value都能够转换为json存储 *@param redisConnectionFactory自动配置好连接工厂 *@return */ @Bean public RedisTemplate<Object, Object> redisTemplate(RedisConnectionFactory redisconnectionFactory) { RedisTemplate<Object, Object> template = new RedisTemplate<>(); template.setConnectionFactory(redisConnectionFactory); template.setDefaultSerializer(new GenericJackson2JsonRedisSerializer()); return template; } }- 1
- 2
- 3
- 4
- 5
- 6
- 7
- 8
- 9
- 10
- 11
- 12
- 13
- 14
- 15
redis客户端
RedisTemplate、StringRedisTemplate:操作redis的工具类- 要从redis连接工厂获取连接才能操作redis
- redis客户端:
- Lettuce:默认
- Jedis:可以使用以下依赖切换
<dependency> <groupId>org.springframework.bootgroupId> <artifactId>spring-boot-starter-data-redisartifactId> <exclusions> <exclusion> <groupId>io.lettucegroupId> <artifactId>lettuce-coreartifactId> exclusion> exclusions> dependency> <dependency> <groupId>redis.clientsgroupId> <artifactId>jedisartifactId> dependency>- 1
- 2
- 3
- 4
- 5
- 6
- 7
- 8
- 9
- 10
- 11
- 12
- 13
- 14
- 15
接口文档
Swagger快速生成实时接口文档,便于前后开发人员进行协调沟通,遵循OpenAPI规范
OpenAPI3架构

整合
- 导入依赖
<dependency> <groupId>org.springdocgroupId> <artifactId>springdoc-openapi-starter-webmvc-uiartifactId> <version>2.1.0version> dependency>- 1
- 2
- 3
- 4
- 5
- 配置
springdoc.api-docs.path=/api-docs springdoc.swagger-ui.path=/swagger-ui.html springdoc.show-actuator=true- 1
- 2
- 3
使用
常用注解
注解 标注位置 作用 @Tagcontroller类 标识controller作用 @Parameter参数 标识参数作用 @Parameters参数 参数多重说明 @Schemamodel层的JavaBean 描述模型作用及每个属性 @Operation方法 描述方法作用 @ApiResponse方法 描述响应状态码等 Docket配置
- 若有多个Docket
@Bean public GroupedOpenApi publicApi() { return GroupedOpenApi.builder() .group("springshop-public") .pathsToMatch("/public/**") .build(); } @Bean public GroupedOpenApi adminApi() { return GroupedOpenApi.builder() .group("springshop-admin") .pathsToMatch("/admin/**") .addMethodFilter(method->method.isAnnotationPresent(Admin.class)) .build(); }- 1
- 2
- 3
- 4
- 5
- 6
- 7
- 8
- 9
- 10
- 11
- 12
- 13
- 14
- 15
- 若只有一个Docket
springdoc.packageToScan=package1, package2 springdoc.pathToMatch=/v1,/api/balance/**- 1
- 2
远程调用
- RPC(Remote Procedure Call)
- 本地过程调用:不同方法在同一个JVM上运行
远程过程调用:
- 服务提供者
- 服务消费者
- 通过连接对方服务器进行请求/相应交互,实现调用效果
WebClient
非阻塞、响应式HTTP客户端
创建与配置
- 发送请求
- 请求方式:
GETPOSTDELETEXXX - 请求路径:
/xxx - 请求参数:
aa=bb&cc=dd&xxx - 请求头:
aa=bbcc=dd - 请求体
- 创建:
WebClient.create()WebClient(String baseUrl)
- 使用
WebClient.builder()配置参数项
uriBuilderFactorydefaultUriVariables默认uri变量defaultHeader每个请求默认头defaultCookie每个请求默认cookiedefaultRequest-Consumer自定义每个请求filter过滤client发送的每个请求exchangeStrategies自定义HTTP消息reader/writerclientConnectorHTTPclient库设置
WebClient client = WebClient.create("https://example.org");- 1
获取响应
retrieve()方法用于声明如何提取响应数据//获取响应完整信息 WebClient client = WebClient.create("https://example.org"); Mono<ResponseEntity<Person>> result = client.get() .uri("/persons/{id}",id) .accept(MediaType.APPLICATION_JSON) .retrieve() .toEntity(Person.class); //只获取body WebClient client = WebClient.create("https://example.org"); Mono<Person> result = client.get() .uri("/persons/{id}",id) .accept(MediaType.APPLICATION_JSON) .retrieve() .bodyToMono(Person.class); //stream数据 Flux<Quoto> result = client.get() .uri("/quotes") .accept(MediaType.TEXT_EVENT_STREAM) .retrieve() .bodyToFlux(Quoto.class); //定义错误处理 Mono<Person> result = client.get() .uri("/persons/{id}",id) .accept(MediaType.APPLICATION_JSON) .retrieve() .onStatus(HttpStatus::is4xxClientError,response->...) .onStatus(HttpStatus::is5xxClientError,response->...) .bodyToMono(Person.class);- 1
- 2
- 3
- 4
- 5
- 6
- 7
- 8
- 9
- 10
- 11
- 12
- 13
- 14
- 15
- 16
- 17
- 18
- 19
- 20
- 21
- 22
- 23
- 24
- 25
- 26
- 27
- 28
定义请求体
- 响应式-单个数据
Mono<Person> personMono = ...; Mono<Void> result = client.post() .uri("/persons/{id}",id) .contentType(MediaType.APPLICATION_JSON) .body(personMono, Person.class) .retrieve() .bodyToMono(Void.class);- 1
- 2
- 3
- 4
- 5
- 6
- 7
- 响应式-多个数据
Flux<Person> personFlux = ...; Mono<Void> result = client.post() .uri("/persons/{id}",id) .contentType(MediaType.APPLICATION_STREAM_JSON) .body(personFlux, Person.class) .retrieve() .bodyToMono(Void.class);- 1
- 2
- 3
- 4
- 5
- 6
- 7
- 普通对象
Person person = ...; Mono<Void> result = client.post() .uri("/persons/{id}",id) .contentType(MediaType.APPLICATION_JSON) .bodyValue(person) .retrieve() .bodyToMono(Void.class);- 1
- 2
- 3
- 4
- 5
- 6
- 7
HTTP interface
Spring允许通过定义接口的方式,向任意位置发送http请求,实现远程调用。可用来简化HTTP远程访问,需在
webflux场景下导入依赖
<dependency> <groupId>org.springframework.bootgroupId> <artifactId>spring-boot-starter-webfluxartifactId> dependency>- 1
- 2
- 3
- 4
定义接口
public class BingService { @GetExchange(url = "/search") String search(@RequestParam("q") String keyword); }- 1
- 2
- 3
- 4
创建代理&测试
@SpringBootTest class ApplicationTest { @Test void contextLoad() throws InterruptedException { //创建客户端 WebClient client = WebClient.builder() .baseUrl("https://cn.bing.com") .codecs(clientCodeConfigurer->{ clientCodeConfigurer .defaultCodecs() .maxInMemorySize(256*1024*1024); }) .build(); //创建工厂 HttpServiceProxyFactory factory = HttpServiceProxyFactory .builder(WebClientAdapter.forClient(client)).build(); //获取代理对象 BingService bingService = factory.createClient(BingService.class); //测试调用 Mono<String> search = bingService.search("xxx"); System.out.println("---------"); search.subscribe(str->System.out.println(str)); Thread.sleep(10000); } }- 1
- 2
- 3
- 4
- 5
- 6
- 7
- 8
- 9
- 10
- 11
- 12
- 13
- 14
- 15
- 16
- 17
- 18
- 19
- 20
- 21
- 22
- 23
- 24
- 25
消息服务
消息队列-场景
异步

解耦
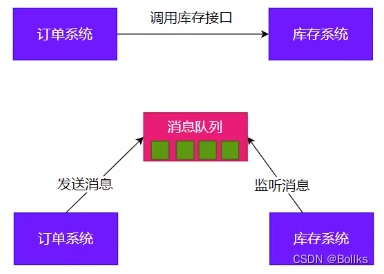
削峰

缓冲

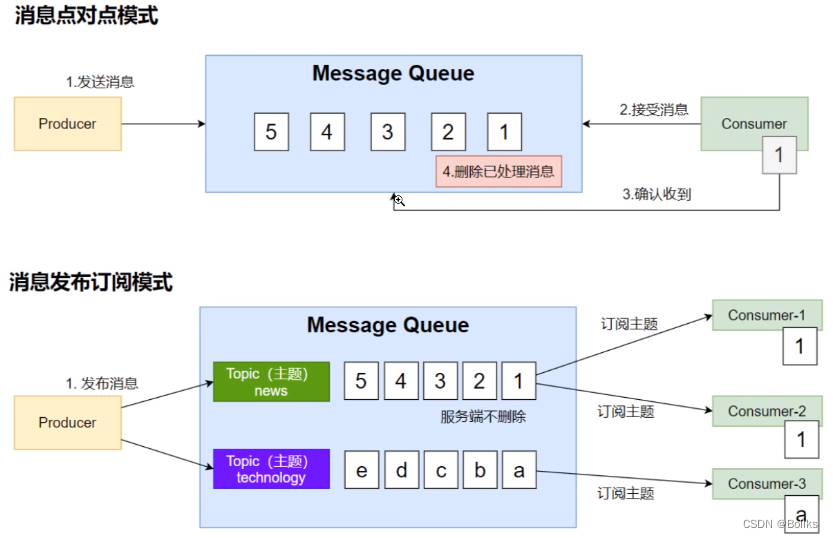
消息队列-Kafka
消息模式
Kafka工作原理

SpringBoot整合
- 导入依赖
<dependency> <groupId>org.springfrramework.kafkagroupId> <artifactId>spring-kafkaartifactId> dependency>- 1
- 2
- 3
- 4
- 配置
#服务器公网IP:本机端口号 spring.kafka.bootstrap-servers=172.20.128.1:9002- 1
- 2
- host
C:\Windows\System32\drivers\etc\hosts文件配置x.x.x.x(IP地址) kafka(主机名)
消息发送
@SpringBootTest class KafkaTest { @Autowired KafkaTemplate kafkaTemplate; @Test void contextLoads() throws ExecutionException, InterruptedException { StopWatch watch = new StopWatch(); watch.start(); CompletableFuture[] futures = new CompletableFuture[10000]; for (int i = 0; i < 10000; i++) { CompletableFuture send = kafkaTemplate.send("order", "order.create."+i, "订单"+i); futures[i] = send; } CompletableFuture.allof(futures).join(); watch.stop(); System.out.println(watch.getTotalTimeMillis()); } }- 1
- 2
- 3
- 4
- 5
- 6
- 7
- 8
- 9
- 10
- 11
- 12
- 13
- 14
- 15
- 16
- 17
- 18
@Component public class MyBean { private final KafkaTemplate<String, String> kafkaTemplate; public MyBean(KafkaTemplate<String, String> kafkaTemplate) { this.kafkaTemplate = kafkaTemplate; } public void someMethod() { this.kafkaTemplate.send("someTopic", "Hello"); } }- 1
- 2
- 3
- 4
- 5
- 6
- 7
- 8
- 9
- 10
消息监听
@Component public class OrderMsgListener { @KafkaListener(topics = "order", groupId = "order-service") public void listen(ConsumerRecord record) { System.out.println("收到"+record); } @KafkaListener(groupId = "order-service-2", topicPartitions = { @TopicPartition(topic = "order", partitionOffsets = { @PartitionOffset(partition = "0", initialOffset = "0") }) }) public void listenAll(ConsumerRecord record) { System.out.println("收到" + record); } }- 1
- 2
- 3
- 4
- 5
- 6
- 7
- 8
- 9
- 10
- 11
- 12
- 13
- 14
- 15
参数配置
KafkaAutoConfiguration- kafka的所有配置都以
spring.kafka.开头
bootstrapServers:kafka集群的所有服务器地址properties:参数设置consumer:消费者producer:生产者
@EnableKafka:开启kafka的注解驱动功能KafkaTemplate:收发消息KafkaAdmin:维护主题等@EnableKafka+@KafkaListener接收消息
- 消费者来接受消息,须有
group-id - 收消息使用
@KafkaListener+ConsumerRecord spring.kafka.开始的所有配置
Web安全
- Apache Shiro
- Spring Security(使用)
安全架构
认证:
Authentication登录系统、用户系统
- 身份
授权:
Authorization权限管理、用户授权
- 权限
攻击防护
- XSS(Cross-site scripting)
- CSRF(Cross-site request forgery)
- CORS(Cross-Origion Resource Sharing)
- SQL注入
- …
权限模型
- RBAC(Role Based Access Controll)
- 用户
- 角色
- 权限
- ACL(Access Controll List)
- 用户
- 用户_权限【N-N关系需要中间表】
- 权限
Spring Security原理
过滤器链架构

FilterChainProxy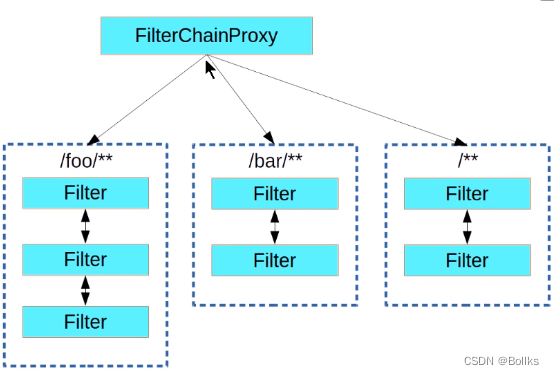
SecurityFilterChain
使用
HttpSecurity@Configuration @Order(SecurityProperties.BASIC_AUTH_ORDER - 10) public class ApplicationConfigurerAdapter extends WebSecurityConfigurerAdapter { @Override protected void configure(HttpSecurity http) throws Exception { http.antMatcher("/match1/**") .authorizeRequests() .antMatchers("/match1/user"),hasRole("USER") .antMatchers("/match1/spam").hasRole("SPAM") .anyRequest().isAuthenticated(); } }- 1
- 2
- 3
- 4
- 5
- 6
- 7
- 8
- 9
- 10
- 11
- 12
MethodSecurity@SpringBootApplication @EnableGlobalMethodSecurity(securedEnabled = true) public class SamleSecureApplication {...} @Service public class MyService { @Secured("ROLE_USER") public String secure() { return "Security"; } }- 1
- 2
- 3
- 4
- 5
- 6
- 7
- 8
- 9
- 10
核心
WebSecurityConfigurerAdapter@EnableGlobalMethodSecurity:开启全局方法安全配置
@Secured@PreAuthorize@PostAuthorize
UserDetailDervice:向数据库查询用户详细信息的Service
实际应用
- 引入依赖
<dependency> <groupId>org.springframework.bootgroupId> <artifactId>spring-boot-starter-securityartifactId> dependency>- 1
- 2
- 3
- 4
- Security场景的自动配置类
SecurityAutoConfigurationSpringBootWebSecurityConfigurationSecurityFilterAutoConfiguration
- security所有配置在
SecurityProperties中以spring.security.开头 - 默认
SecurityFilterChain组件
- 所有请求都要求认证(登录)
- 开启表单登录:spring security提供默认登录页,所有请求都要求登录
- httpbasic方式登录
@EnableWebSecurity生效
WebSecurityConfiguration生效:web安全配置HttpSecurityConfiguration生效:http安全配置@EnableGlobalAuthentication生效:全局认证生效AuthenticationConfiguration:认证配置
可观测性
Observability
- 健康状况(组件状态、存活状态)
- 运行指标(cpu、内存、垃圾回收、吞吐量、相应成功率)
- 链路追踪
- …
SpringBoot Actuator
实战
引入依赖
<dependency> <groupId>org.springframework.bootgroupId> <artifactId>spring-boot-starter-actuatorartifactId> <dependency>- 1
- 2
- 3
- 4
暴露指标
management: endpoints: enabled-by-default:true #暴露所有站点信息 web: exposure: include:'*' #以web方式暴露- 1
- 2
- 3
- 4
- 5
- 6
访问数据
访问
http://localhost:8080:/actuator展示出所有可用的监控端点http://localhost:8080:/actuator/beanshttp://localhost:8080:/actuatorconfigpropshttp://localhost:8080:/actuator/metricshttp://localhost:8080:/actuatormetrics/jvm.gc.pausehttp://localhost:8080:/actuator/endpointName/detailPath
Endpoint
常用端点
ID 描述 auditevents暴露当前应用程序的审核事件。需要一个 AuditEventRepository组件beans显示应用程序中所有SpringBean的完整列表 caches暴露可用缓存 conditions显示自动配置的所有条件信息,包括匹配或不匹配的原因 configprops显示所有 @ConfigurationPropertiesenv暴露Spring的属性 ConfigurableEnviromentflyway显示已应用的所有Flyway数据库迁移。需要一个或多个Flyway组件 health显示应用程序运行状况信息 httptrace显示HTTP跟踪信息(默认情况下,最近的100个HTTP请求-响应)。需要一个 HttpTraceRepository组件info显示应用程序信息 integrationgraph显示Spring Integrationgraph。需要spirng-integration-core依赖loggers显示和修改应用程序中日志的配置 liquibase显示已应用的所有Liquibase数据库迁移。需要一个或多个Liquibase组件 metrics显示当前应用程序的“指标”信息 mappings显示所有 @RequestMapping路径列表scheduletasks显示应用程序中的计划任务 sessions允许从Spring Session支持的会话存储中检索和删除用户会话。需要使用Spring Session中基于Servlet的Web应用程序 shutdown使应用程序正常关闭。默认禁用 startup显示由 ApplicationStartup收集的启动步骤数据。需要使用SpringApplication进行配置BufferingApplicationStartupthreaddump执行线程转储 heapdump返回 hprof堆转储文件jolokia通过HTTP暴露JMX bean。需要引入 jolokia-core依赖,不适用于WebFluxlogfile返回日志文件的内容(若已设置 logging.file.name或logging.file.path属性)。支持使用HTTPRange标头来检索部分日志文件的内容prometheus以Prometheus服务器可抓取的格式公开指标。需要 micrometer-registry-prometheus依赖定制端点
- 健康监控:返回存活、死亡
- 指标监控:次数、率
- HealthEndpoint
@Component public class MyHealthIndicator implements HealthIndicator { @Override public Health health() { int errorCode = check(); if (errorCode != 0) { return Health.downI(); } return Health.up().build(); } }- 1
- 2
- 3
- 4
- 5
- 6
- 7
- 8
- 9
- 10
- 11
- MetricsEndpoint
class MyService { Counter counter; public MyService(MeterRegistry meterRegistry){ counter = meterResgistry.counter" } public void hello() { counter.increment(); } }- 1
- 2
- 3
- 4
- 5
- 6
- 7
- 8
- 9
监控案例
安装Prometheus+Grafana
# Prometheus:时序数据库 docker run -p 9090:9090 -d\ -v pc:/etc/prometheus # grafana:默认账号密码admin:admin docker run -d --name = grafana -p 3000: 3000 grafana/grafana- 1
- 2
- 3
- 4
- 5
导入依赖
<dependency> <groupId>org.springframewokr.bootgroupId> <artifactId>spring-boot-starter-actuatorartifactId> <dependency> <dependency> <groupId>io.micrometergroupId> <artifactId>micrometer-registry-prometheusartifactId> <version>1.10.6version> <dependency>- 1
- 2
- 3
- 4
- 5
- 6
- 7
- 8
- 9
management: endpoints: web: exposure: #暴露所有监控哨点 include: '*'- 1
- 2
- 3
- 4
- 5
配置Prometheus拉取数据
scrape_configs: - job_name:'spring-boot-actuator-exporter' metrics_path:'/actuator/prometheus'# 抓取指定路径 static_configs: - targets:['192.168.200.1:8001'] labels: nodename:'app_demo'- 1
- 2
- 3
- 4
- 5
- 6
- 7
AOT
AOT与JIT
- AOT(Ahead-of-Time,提前编译)程序执行前,全部被编译成机器码
- JIT(Just in Time,即时编译)程序边编译,边运行
Complier与Interpreter
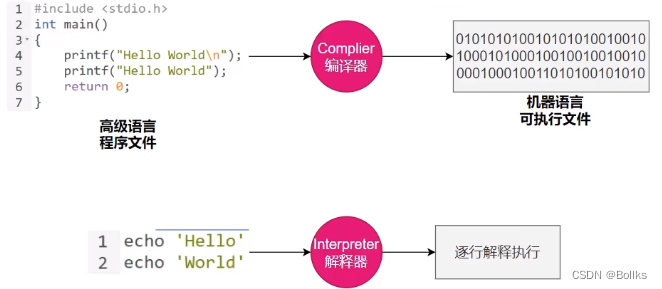
对比项 编译器 解释器 机器执行效率 快,源代码只需转换一次 慢,每行代码都需要被解释才能执行 开发效率 慢,编译耗时长 快,无需等待生成目标代码,更快的开发与测试 调试 难以调试编译器生成的目标代码 易于调试源代码 可移植性 不同平台需要编译对应代码 同一份源码可跨平台执行,仅需切换对应平台解释器 学习难度 较高,额外了解源代码、编译器及目标机器的知识 较低,无需了解机器细节 错误检查 编译器可在编译阶段检查错误 解释器只在执行时检查错误 运行时增强 无 可动态增强 AOT与JIT对比
对比项 AOT JIT 优点 1.速度快,优化运行时编译时间和内存消耗
2.程序初期就能达到最高性能
3.加快程序启动速度1.具备适时调整能力
2.生成最优机器指令
3.根据代码运行情况优化内存占用缺点 1.程序第一次编译占时长
2.牺牲高级语言部分特性1.运行期间编译速度慢
2.初始编译不能达到最高性能JVM架构
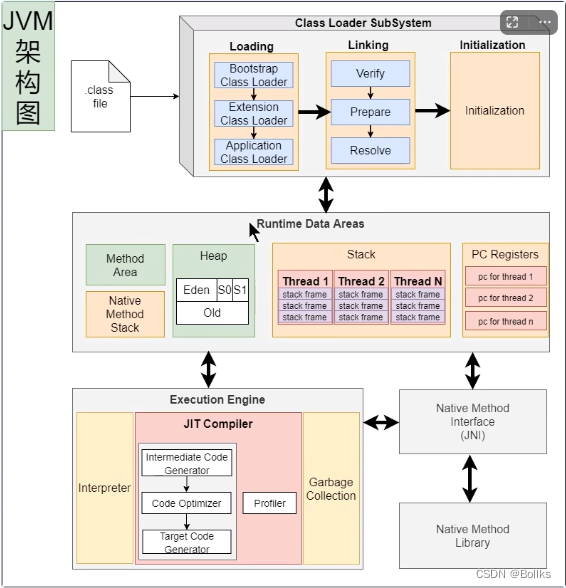
JVM即拥有解释器,也拥有编辑器(JIT)Java的执行过程
流程概要

详细流程

JVM编译器
- JVM中集成了两种编译器
Client Compiler注重启动速度和局部优化。使用C1编译器,编译后的机器码文件运行效率低于C2Server Compiler关注全局优化和更优性能,但由于进行了更多的全局分析,所以启动速度会减慢。拥有C2和Graal两种编译器,默认使用C2编译器
分层编译
结合C1和C2的优势,追求启动速度和峰值性能的一个平衡,将JVM执行状态分为五个层级:
- 解释执行
- 执行不带profiling的C1代码
- 执行仅带方法调用次数,以及循环回边执行次数profiling的C1代码
- 执行带所有profiling的C1代码
- 执行C2代码
(profiling即收集能够反映程序执行状态的数据,eg.方法调用次数、循环回边执行次数)


-
相关阅读:
[COCI2021-2022#1] Logičari
C++笔记 04
vue3 webviewAPP
(活动作品)[NOIP2005普及组]采药
cereal:支持C++11的开源序列化库
不要再说离群点难观测,来学学这种特征异常检测的高效方法
flink的物理DataFlow图及Slot处理槽任务分配
睿趣科技:抖音开网店新手卖什么好
Xcode 清空最近打开的项目
DolphinDB 基于 Glibc 升级的性能优化实战案例
- 原文地址:https://blog.csdn.net/bollks/article/details/138061022
