4 月 1 日,Infinity宣布端到端 RAG 解决方案 RAGFlow 开源,仅一天收获上千颗星,到底有何魅力? 我们来安装体验并从代码层面来分析看看。
安装体验#
服务器需要有docker,或者直接访问官方提供的demo: https://demo.ragflow.io/
docker-compose安装#
- 需要确保
vm.max_map_count不小于 262144 【更多】:
sysctl -w vm.max_map_count=262144
- 克隆仓库:
$ git clone https://github.com/infiniflow/ragflow.git
- 进入 docker 文件夹,利用提前编译好的 Docker 镜像启动服务器:
$ cd ragflow/docker $ docker compose -f docker-compose-CN.yml up -d
体验#
启动成功后,浏览器输入 http://服务器ip 或者直接访问官方demo https://demo.ragflow.io/
注册登录,进入后可以创建知识库,然后上传文档。
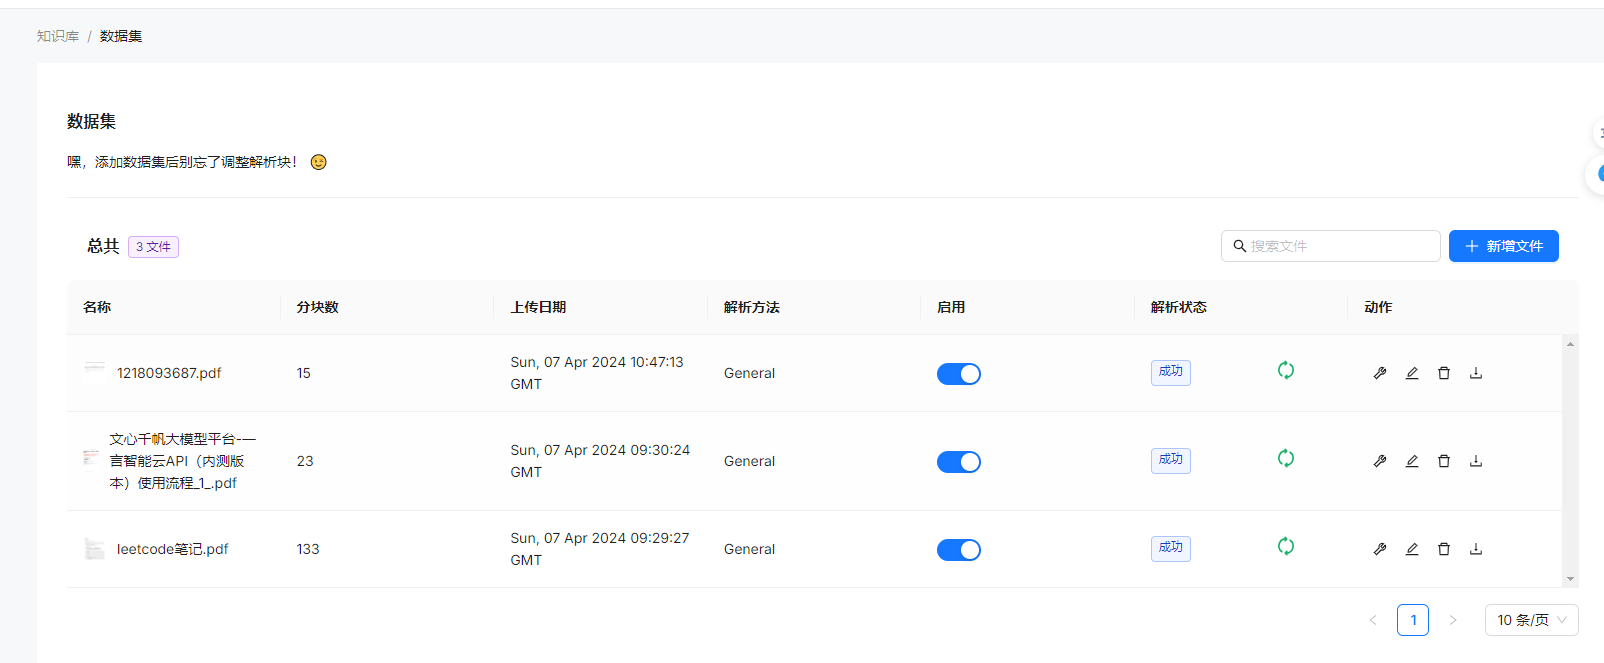
上传成功后,可以通过解析状态查看解析进度,也可以配置文档的parser解析方法,以更好的解析内容。
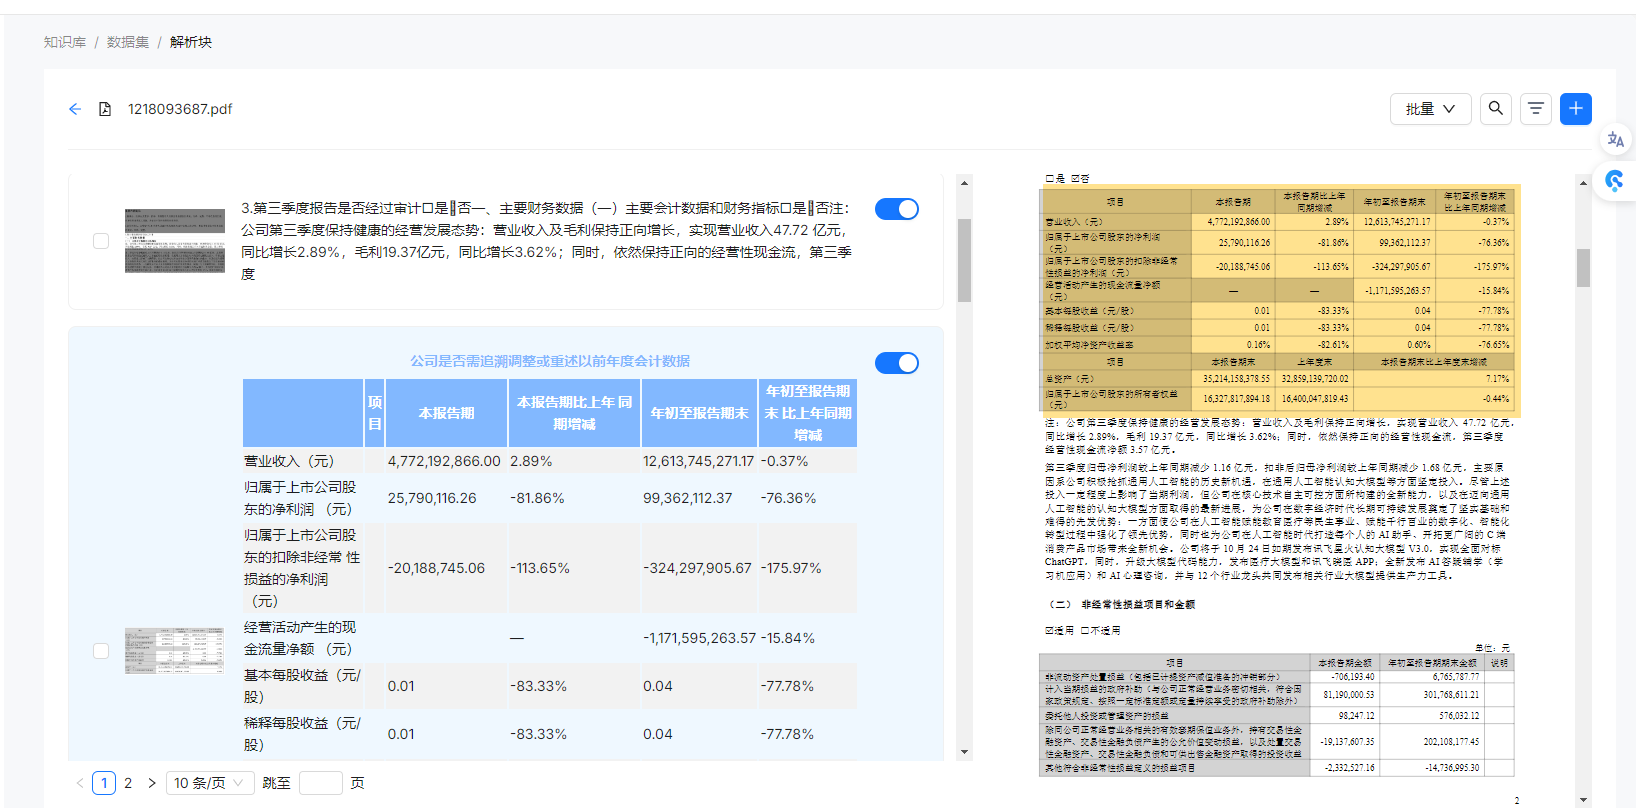
点击文档名称,可以进入文档详情,查看拆分的chunk,可以看到普通的文本是按照token拆分,还未实现按照段落语义拆分,差评。表格是单独抽取出来,独立存储的,将文档里的表格比较好的还原为了html表格,准确率尚可,这里好评。每个chunk有原文截图,点击后,右边的pdf预览,可以高亮当前的chunk所在区域,翻了下代码,使用的react-pdf-highlighter,体验挺好的一个组件。
DeepDoc 介绍#
DeepDoc 是 RAGFlow 的核心组件,它利用视觉信息和解析技术,对文档进行深度理解,提取文本、表格和图像等信息。DeepDoc 的功能模块包括:
-
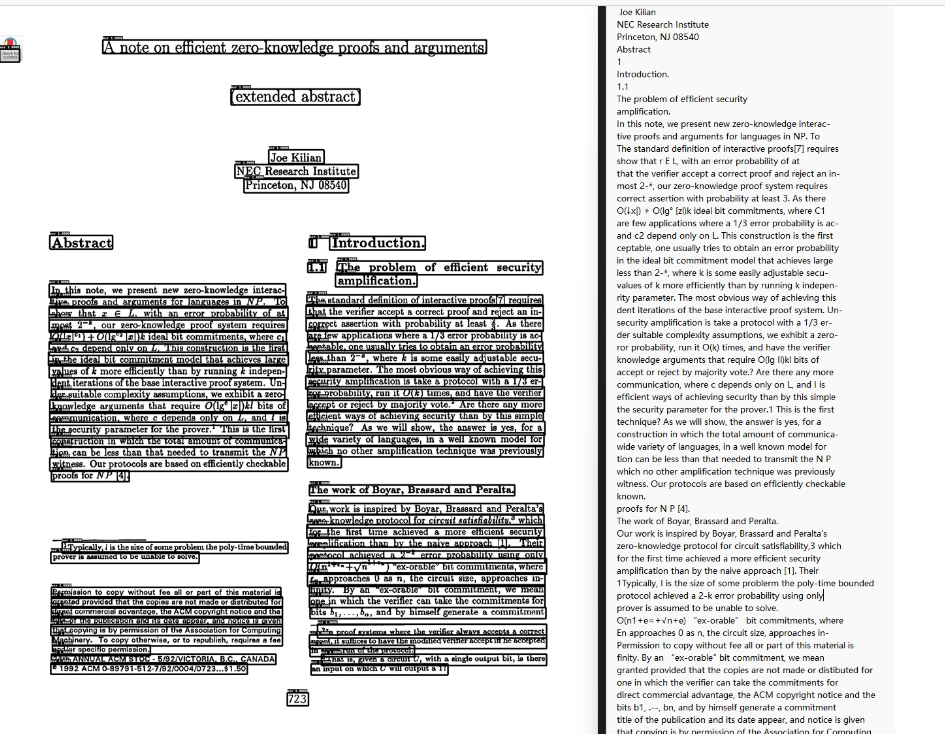
OCR, 支持将图片、PDF识别为文本。
-
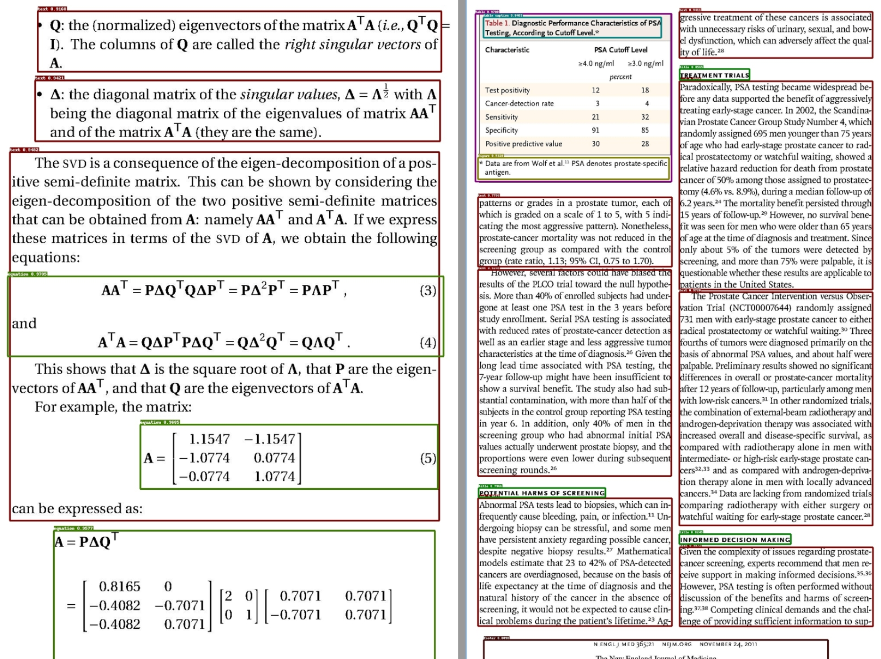
版面识别,识别文档的标题、段落、表格、图像等。
-
表格结构识别 (TSR),识别的行、列,以及合并的单元格。
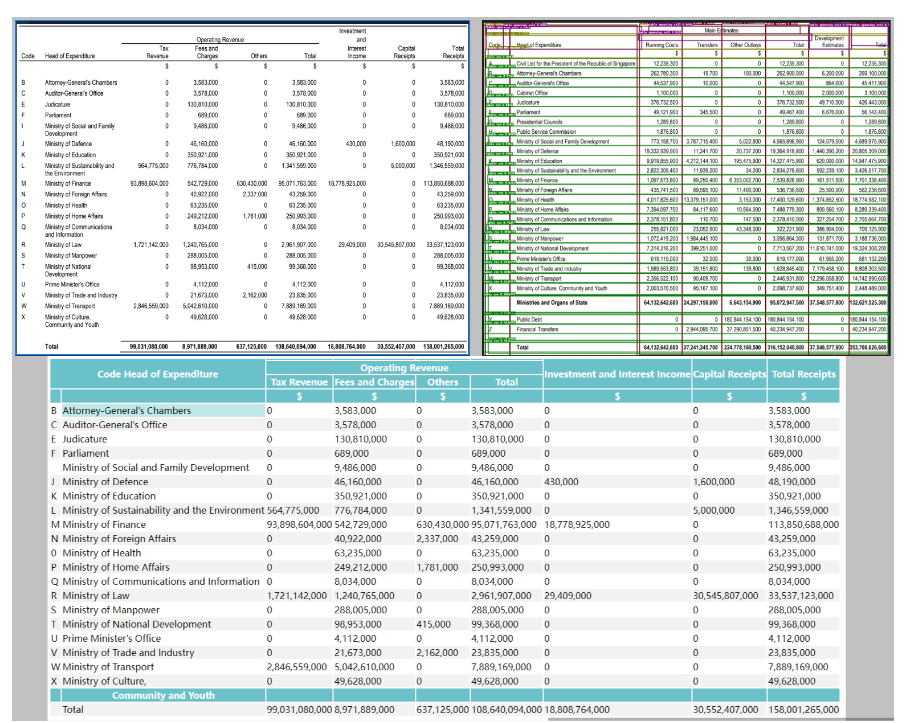
-
支持多类型文档解析,比如PDF、DOCX、EXCEL 和 PPT,甚至图片 ,并提取文本块、表格和图像等信息。
DeepDoc CV模型#
DeepDoc的模型应该是基于paddleOCR的模型去微调训练的,开源出来的模型是onnx格式的。
OCR识别#
主要代码在ocr.py里,代码定义TextRecognizer 做文字识别,TextDetector 做文本框检测,OCR整合检测和识别功能,对外提供调用。
OCR的核心流程:
- 创建 OCR 实例,load模型
- 调用
__call__方法,传入图像数据。- 使用 TextDetector 进行文本检测,获取文本框坐标
- 对每个文本框,使用 get_rotate_crop_image 方法进行旋转和裁剪
- 使用 TextRecognizer 对裁剪后的图像进行文本识别
- 过滤掉置信度低于阈值(0.5)的识别结果。
- 返回最终的文本框坐标和识别结果。
版面分析#
版面分析主要在recognizer.py和layout_recognizer.py里,定义了一个名为LayoutRecognizer 继承Recognizer的类,用于对文档图像进行板式分析,识别不同类型的区域,例如表格、标题、段落等。这里用的模型应该还是基于paddleocr里的版面分析模型去优化的。
先看Recognizer的__call__ 方法,传入图像列表和置信度阈值:
def __call__(self, image_list, thr=0.7, batch_size=16):
res = []
imgs = []
for i in range(len(image_list)):
if not isinstance(image_list[i], np.ndarray):
imgs.append(np.array(image_list[i]))
else: imgs.append(image_list[i])
batch_loop_cnt = math.ceil(float(len(imgs)) / batch_size)
for i in range(batch_loop_cnt):
start_index = i * batch_size
end_index = min((i + 1) * batch_size, len(imgs))
batch_image_list = imgs[start_index:end_index]
inputs = self.preprocess(batch_image_list)
print("preprocess")
for ins in inputs:
bb = self.postprocess(self.ort_sess.run(None, {k:v for k,v in ins.items() if k in self.input_names})[0], ins, thr)
res.append(bb)
#seeit.save_results(image_list, res, self.label_list, threshold=thr)
return res
- 先预处理,将图像列表转换为模型输入格式
- 然后调用ort_sess执行onnx推理,最后postprocess,提取模型返回的布局信息,包括区域类型、坐标和置信度。
再看LayoutRecognizer 的__call__ 方法,这里是模型应用的工程代码部分,很多细节的小技巧,先上代码,里面加了一些注释:
def __call__(self, image_list, ocr_res, scale_factor=3,
thr=0.2, batch_size=16, drop=True):
# 可以过滤的垃圾数据
def __is_garbage(b):
patt = [r"^•+$", r"(版权归©|免责条款|地址[::])", r"\.{3,}", "^[0-9]{1,2} / ?[0-9]{1,2}$",
r"^[0-9]{1,2} of [0-9]{1,2}$", "^http://[^ ]{12,}",
"(资料|数据)来源[::]", "[0-9a-z._-]+@[a-z0-9-]+\\.[a-z]{2,3}",
"\\(cid *: *[0-9]+ *\\)"
]
return any([re.search(p, b["text"]) for p in patt])
# 调用父类的模型识别
layouts = super().__call__(image_list, thr, batch_size)
# save_results(image_list, layouts, self.labels, output_dir='output/', threshold=0.7)
assert len(image_list) == len(ocr_res)
# Tag layout type
boxes = []
assert len(image_list) == len(layouts)
garbages = {}
page_layout = []
for pn, lts in enumerate(layouts):
# OCR 识别的box文本框
bxs = ocr_res[pn]
# layout转换为box形式
lts = [{"type": b["type"],
"score": float(b["score"]),
"x0": b["bbox"][0] / scale_factor, "x1": b["bbox"][2] / scale_factor,
"top": b["bbox"][1] / scale_factor, "bottom": b["bbox"][-1] / scale_factor,
"page_number": pn,
} for b in lts]
# 按照(top,x0)排序
lts = self.sort_Y_firstly(lts, np.mean(
[l["bottom"] - l["top"] for l in lts]) / 2)
# 清理重叠的layout
lts = self.layouts_cleanup(bxs, lts)
page_layout.append(lts)
# Tag layout type, layouts are ready
# 这里其实是为文本框box分配layout,find不是特别准确
def findLayout(ty):
nonlocal bxs, lts, self
# 找对应了下的layout type
lts_ = [lt for lt in lts if lt["type"] == ty]
i = 0
# 为 ocr detect的box标记 layout_type while i < len(bxs):
# 已标记,跳过
if bxs[i].get("layout_type"):
i += 1
continue
# 垃圾信息,删除掉
if __is_garbage(bxs[i]):
bxs.pop(i)
continue
# 寻找与box重叠的layout
ii = self.find_overlapped_with_threashold(bxs[i], lts_, thr=0.4)
# 未找到
if ii is None: # belong to nothing
bxs[i]["layout_type"] = ""
i += 1
continue
lts_[ii]["visited"] = True
# 保留特征,为header或者footer,且在内容区域的边界内(这里定义了0.1,0.9)
keep_feats = [
lts_[ii]["type"] == "footer" and bxs[i]["bottom"] < image_list[pn].size[1] * 0.9 / scale_factor,
lts_[ii]["type"] == "header" and bxs[i]["top"] > image_list[pn].size[1] * 0.1 / scale_factor,
]
# 满足丢弃条件,删除box,文本放入garbages
if drop and lts_[ii]["type"] in self.garbage_layouts and not any(keep_feats):
if lts_[ii]["type"] not in garbages:
garbages[lts_[ii]["type"]] = []
garbages[lts_[ii]["type"]].append(bxs[i]["text"])
bxs.pop(i)
continue
# 符合要求的box,分配layout
bxs[i]["layoutno"] = f"{ty}-{ii}"
bxs[i]["layout_type"] = lts_[ii]["type"] if lts_[
ii]["type"] != "equation" else "figure"
i += 1
# 遍历layout类型,为文本框分配layout,之所以分开,是因为一个文本框可能和多个layout重叠,这里是减少冲突
for lt in ["footer", "header", "reference", "figure caption",
"table caption", "title", "table", "text", "figure", "equation"]:
findLayout(lt)
# add box to figure layouts which has not text box
# 将没有文本框的figure添加到boxes中,并更新ocr_res
for i, lt in enumerate(
[lt for lt in lts if lt["type"] in ["figure", "equation"]]):
# 有文本框重叠的图片,visited已经设置过
if lt.get("visited"):
continue
lt = deepcopy(lt)
del lt["type"]
lt["text"] = ""
lt["layout_type"] = "figure"
lt["layoutno"] = f"figure-{i}"
bxs.append(lt)
boxes.extend(bxs)
# 更新ocr_res
ocr_res = boxes
garbag_set = set()
for k in garbages.keys():
garbages[k] = Counter(garbages[k])
for g, c in garbages[k].items():
if c > 1:
garbag_set.add(g)
ocr_res = [b for b in ocr_res if b["text"].strip() not in garbag_set]
return ocr_res, page_layout
大概解释下:
__call__方法,它接收以下参数:image_list(图像列表),ocr_res(OCR识别的文本框),scale_factor(缩放因子,默认值为3),thr(阈值,默认值为0.2),batch_size(批处理大小,默认值为16),drop(是否删除,默认值为True)- 首先调用父类的call方法,将图片交给PP Structure模型识别出layouts,并清理重叠的layout(layouts_cleanup)
- 然后就是为文本框box分配layout,根据layout type,从layout里找出对应type的layout,如果和box有重叠大于阈值,就为box分配layout,不满足条件的box会被丢弃,比如包含垃圾文本(
__is_garbage) - 接着对于没有文本框的figure、equation 添加到boxes中,并更新ocr_res
- 最后返回更新后的ocr_res,以及page_layout信息
DeepDoc 的parser功能#
上面的OCR和版面分析,都是为parser服务的,parser负责解析文档,并拆分为chunk.
框架提供了PdfParser、PlainParser、DocxParser、ExcelParser、PptParser 5种解析器。
from .pdf_parser import HuParser as PdfParser, PlainParser
from .docx_parser import HuDocxParser as DocxParser
from .excel_parser import HuExcelParser as ExcelParser
from .ppt_parser import HuPptParser as PptParser
另外针对resume,提供了专门的简历解析功能。
我们挑选重点的PdfParser 也就是HuParser来分析。
PdfParser#
首先,初始化:
def __init__(self):
self.ocr = OCR()
if hasattr(self, "model_speciess"):
self.layouter = LayoutRecognizer("layout." + self.model_speciess)
else:
self.layouter = LayoutRecognizer("layout")
self.tbl_det = TableStructureRecognizer()
self.updown_cnt_mdl = xgb.Booster()
加载了上面说的OCR、LayoutRecognizer,以及TableStructureRecognizer用于表格结构识别,updown_cnt_mdl,一个xgb模型用来合并box。全靠模型很能做到满意的效果,所以一般都是模型搭配大量的工程trick,靠一些规则来解决一些边界情况。文档解析也是这样,需要多个模型配合,结合一些规则来做,这些规则通常是经验的集合,大白话就是各种case跑出来,遇到问题就加新的规则,都是泪。
不发散,我们来看PdfParser核心的__call__:
def __call__(self, fnm, need_image=True, zoomin=3, return_html=False):
# 转图片,处理文本,ocr识别
self.__images__(fnm, zoomin)
# 版面分析
self._layouts_rec(zoomin)
# table box 处理
self._table_transformer_job(zoomin)
# 合并文本块
self._text_merge()
self._concat_downward()
# 过滤分页信息
self._filter_forpages()
# 表格和图表抽取
tbls = self._extract_table_figure(
need_image, zoomin, return_html, False)
# 抽取的文本(去掉表格), 表格
return self.__filterout_scraps(deepcopy(self.boxes), zoomin), tbls
- 首先
__images__实现pdf转图片,读取pdf里的文本,并用ocr识别文本块等 - 然后进行版面识别
- 将识别到的table做处理
- 合并文本块
_concat_downward使用updown_cnt_mdl模型来做合并_filter_forpages过滤pdf里的分页信息_extract_table_figure抽取页面里的表格和图片,表格会转换为html__filterout_scraps合并文本块(去掉表格后的)- 最后返回合并后的文本和表格
这里的每一步都较为复杂,我们挑重点的来说。
pdf转图片#
这里代码较多,大概几件事情,分开来讲:
pdf文件读取
def __images__(self, fnm, zoomin=3, page_from=0,
page_to=299, callback=None):
self.lefted_chars = []
self.mean_height = []
self.mean_width = []
self.boxes = []
self.garbages = {}
self.page_cum_height = [0]
self.page_layout = []
self.page_from = page_from
try:
self.pdf = pdfplumber.open(fnm) if isinstance(
fnm, str) else pdfplumber.open(BytesIO(fnm))
self.page_images = [p.to_image(resolution=72 * zoomin).annotated for i, p in
enumerate(self.pdf.pages[page_from:page_to])]
self.page_chars = [[c for c in page.chars if self._has_color(c)] for page in
self.pdf.pages[page_from:page_to]]
self.total_page = len(self.pdf.pages)
except Exception as e:
self.pdf = fitz.open(fnm) if isinstance(
fnm, str) else fitz.open(
stream=fnm, filetype="pdf")
self.page_images = []
self.page_chars = []
mat = fitz.Matrix(zoomin, zoomin)
self.total_page = len(self.pdf)
for i, page in enumerate(self.pdf):
if i < page_from:
continue
if i >= page_to:
break
pix = page.get_pixmap(matrix=mat)
img = Image.frombytes("RGB", [pix.width, pix.height],
pix.samples)
self.page_images.append(img)
self.page_chars.append([])
- 首先初始化一些变量,如lefted_chars、mean_height、mean_width、boxes、garbages等。
- 然后,首先尝试使用
pdfplumber库打开PDF文件,并获取指定范围页面的文本和图像,pdfplumber是一个出名的python解析pdf的库,可以较好的提取文本、矩形、图片等,可以返回每个char字符的坐标、大小等信息。 - 如果发生异常,将尝试使用fitz库作为替代方案,fitz的话就读取不到文本了,会当成图像来处理。
pdf目录读取
这里使用了PyPDF2库来读取pdf的目录信息,但是貌似是基本的读取,其实pdf的目录可以关联到具体的章节内容,这里暂时看起来没有很好的利用。
self.outlines = []
try:
self.pdf = pdf2_read(fnm if isinstance(fnm, str) else BytesIO(fnm))
outlines = self.pdf.outline
def dfs(arr, depth):
for a in arr:
if isinstance(a, dict):
self.outlines.append((a["/Title"], depth))
continue
dfs(a, depth + 1)
dfs(outlines, 0)
except Exception as e:
logging.warning(f"Outlines exception: {e}")
if not self.outlines:
logging.warning(f"Miss outlines")
然后是英文文档检测,大概就是利用正则匹配。
logging.info("Images converted.")
self.is_english = [re.search(r"[a-zA-Z0-9,/¸;:'\[\]\(\)!@#$%^&*\"?<>._-]{30,}", "".join(
random.choices([c["text"] for c in self.page_chars[i]], k=min(100, len(self.page_chars[i]))))) for i in
range(len(self.page_chars))]
if sum([1 if e else 0 for e in self.is_english]) > len(
self.page_images) / 2:
self.is_english = True
else:
self.is_english = False
分页处理
这里是核心的代码:
- 会对文本做处理,适当的添加空格
- 对每页进行
__ocr处理 - 更新解析进度
for i, img in enumerate(self.page_images):
chars = self.page_chars[i] if not self.is_english else []
# 计算字符的平均宽度、高度
self.mean_height.append(
np.median(sorted([c["height"] for c in chars])) if chars else 0
)
self.mean_width.append(
np.median(sorted([c["width"] for c in chars])) if chars else 8
)
self.page_cum_height.append(img.size[1] / zoomin)
j = 0
while j + 1 < len(chars):
# 对满足条件的添加空格(只包含数字、字母、逗号、句号、冒号、分号、感叹号和百分号, 两个字符宽度小于width的一半
if chars[j]["text"] and chars[j + 1]["text"] \
and re.match(r"[0-9a-zA-Z,.:;!%]+", chars[j]["text"] + chars[j + 1]["text"]) \
and chars[j + 1]["x0"] - chars[j]["x1"] >= min(chars[j + 1]["width"],
chars[j]["width"]) / 2:
chars[j]["text"] += " "
j += 1
# if i > 0:
# if not chars: # self.page_cum_height.append(img.size[1] / zoomin) # else: # self.page_cum_height.append( # np.max([c["bottom"] for c in chars])) # OCR 识别
self.__ocr(i + 1, img, chars, zoomin)
if callback:
callback(prog=(i + 1) * 0.6 / len(self.page_images), msg="")
callback方法会更新文档解析进度,在文档页面可以查看实时进度
__ocr 处理
虽然叫OCR,但是主要做的是detect,检测文本框,然后根据经验规则来对文本块做处理:
def __ocr(self, pagenum, img, chars, ZM=3):
# 检测文本框
bxs = self.ocr.detect(np.array(img))
if not bxs:
self.boxes.append([])
return
bxs = [(line[0], line[1][0]) for line in bxs]
# 按照Y轴坐标排序
bxs = Recognizer.sort_Y_firstly(
[{"x0": b[0][0] / ZM, "x1": b[1][0] / ZM,
"top": b[0][1] / ZM, "text": "", "txt": t,
"bottom": b[-1][1] / ZM,
"page_number": pagenum} for b, t in bxs if b[0][0] <= b[1][0] and b[0][1] <= b[-1][1]],
self.mean_height[-1] / 3
)
# merge chars in the same rect
for c in Recognizer.sort_X_firstly(
chars, self.mean_width[pagenum - 1] // 4):
ii = Recognizer.find_overlapped(c, bxs)
if ii is None:
self.lefted_chars.append(c)
continue
ch = c["bottom"] - c["top"]
bh = bxs[ii]["bottom"] - bxs[ii]["top"]
if abs(ch - bh) / max(ch, bh) >= 0.7 and c["text"] != ' ':
self.lefted_chars.append(c)
continue
if c["text"] == " " and bxs[ii]["text"]:
if re.match(r"[0-9a-zA-Z,.?;:!%%]", bxs[ii]["text"][-1]):
bxs[ii]["text"] += " "
else:
bxs[ii]["text"] += c["text"]
for b in bxs:
if not b["text"]:
left, right, top, bott = b["x0"] * ZM, b["x1"] * \
ZM, b["top"] * ZM, b["bottom"] * ZM
b["text"] = self.ocr.recognize(np.array(img),
np.array([[left, top], [right, top], [right, bott], [left, bott]],
dtype=np.float32))
del b["txt"]
bxs = [b for b in bxs if b["text"]]
if self.mean_height[-1] == 0:
self.mean_height[-1] = np.median([b["bottom"] - b["top"]
for b in bxs])
self.boxes.append(bxs)
- 首先使用self.ocr.detect方法检测图像中的文本框,并将结果存储在bxs变量中。如果没有检测到文本框,将空列表添加到self.boxes中并返回
- 对检测到的文本框按照Y轴坐标进行排序
- 遍历pdf提取到的文本chars,通过
find_overlapped检测与字符char重叠的文本框,符合条件的char放入文本框:- 这里的条件,高度差异小于整体高度的0.3 (
abs(ch - bh) / max(ch, bh) >= 0.7) - 否则就放入lefted_chars
- 这里的条件,高度差异小于整体高度的0.3 (
- 遍历文本框列表bxs,对于没有文本的文本框,尝试用ocr的recognize去识别文本,这里就做到了,能用原始文本的(准确)就用原始文本,原始是图片的,尝试用OCR去识别
- 最后将包含文本的文本框添加到self.boxes中,并更新self.mean_height
版面识别#
_layouts_rec:
def _layouts_rec(self, ZM, drop=True):
assert len(self.page_images) == len(self.boxes)
self.boxes, self.page_layout = self.layouter(
self.page_images, self.boxes, ZM, drop=drop)
# cumlative Y
for i in range(len(self.boxes)):
self.boxes[i]["top"] += \
self.page_cum_height[self.boxes[i]["page_number"] - 1]
self.boxes[i]["bottom"] += \
self.page_cum_height[self.boxes[i]["page_number"] - 1]
- 调用self.layouter方法来获取新的self.boxes和self.page_layout,layouter 就是上面说的版面分析,这里会传入page_images图片,以及ocr处理后的文本box,layouter执行后,会返回分配layout后的文本框boxes,同时清理掉一些无用文本框
- 然后更新box的top信息,加上pag_cum_height页面高度
表格处理 _table_transformer_job#
这里会遍历page_layout,得到每一页的layout,从layout中找到表格,并调用模型识别后再根据规则做处理。
DocxParser word文档解析#
word文档比pdf解析更容易,直接看__call__:
def __call__(self, fnm, from_page=0, to_page=100000):
self.doc = Document(fnm) if isinstance(
fnm, str) else Document(BytesIO(fnm))
pn = 0
secs = []
for p in self.doc.paragraphs:
if pn > to_page:
break
if from_page <= pn < to_page and p.text.strip():
secs.append((p.text, p.style.name))
for run in p.runs:
if 'lastRenderedPageBreak' in run._element.xml:
pn += 1
continue
if 'w:br' in run._element.xml and 'type="page"' in run._element.xml:
pn += 1
tbls = [self.__extract_table_content(tb) for tb in self.doc.tables]
return secs, tbls
- 通过docx库加载word文档
- 让后读取指定页面的paragraphs
- 通过
__extract_table_content解析表格
word里的表格,不需要模型来识别了,可以直接读取:
def __extract_table_content(self, tb):
df = []
for row in tb.rows:
df.append([c.text for c in row.cells])
return self.__compose_table_content(pd.DataFrame(df))
def __compose_table_content(self, df):
def blockType(b):
patt = [
("^(20|19)[0-9]{2}[年/-][0-9]{1,2}[月/-][0-9]{1,2}日*$", "Dt"),
(r"^(20|19)[0-9]{2}年$", "Dt"),
(r"^(20|19)[0-9]{2}[年/-][0-9]{1,2}月*$", "Dt"),
("^[0-9]{1,2}[月/-][0-9]{1,2}日*$", "Dt"),
(r"^第*[一二三四1-4]季度$", "Dt"),
(r"^(20|19)[0-9]{2}年*[一二三四1-4]季度$", "Dt"),
(r"^(20|19)[0-9]{2}[ABCDE]$", "DT"),
("^[0-9.,+%/ -]+$", "Nu"),
(r"^[0-9A-Z/\._~-]+$", "Ca"),
(r"^[A-Z]*[a-z' -]+$", "En"),
(r"^[0-9.,+-]+[0-9A-Za-z/$¥%<>()()' -]+$", "NE"),
(r"^.{1}$", "Sg")
]
for p, n in patt:
if re.search(p, b):
return n
tks = [t for t in huqie.qie(b).split(" ") if len(t) > 1]
if len(tks) > 3:
if len(tks) < 12:
return "Tx"
else:
return "Lx"
if len(tks) == 1 and huqie.tag(tks[0]) == "nr":
return "Nr"
return "Ot"
if len(df) < 2:
return []
max_type = Counter([blockType(str(df.iloc[i, j])) for i in range(
1, len(df)) for j in range(len(df.iloc[i, :]))])
max_type = max(max_type.items(), key=lambda x: x[1])[0]
colnm = len(df.iloc[0, :])
hdrows = [0] # header is not nessesarily appear in the first line
if max_type == "Nu":
for r in range(1, len(df)):
tys = Counter([blockType(str(df.iloc[r, j]))
for j in range(len(df.iloc[r, :]))])
tys = max(tys.items(), key=lambda x: x[1])[0]
if tys != max_type:
hdrows.append(r)
lines = []
for i in range(1, len(df)):
if i in hdrows:
continue
hr = [r - i for r in hdrows]
hr = [r for r in hr if r < 0]
t = len(hr) - 1
while t > 0:
if hr[t] - hr[t - 1] > 1:
hr = hr[t:]
break
t -= 1
headers = []
for j in range(len(df.iloc[i, :])):
t = []
for h in hr:
x = str(df.iloc[i + h, j]).strip()
if x in t:
continue
t.append(x)
t = ",".join(t)
if t:
t += ": "
headers.append(t)
cells = []
for j in range(len(df.iloc[i, :])):
if not str(df.iloc[i, j]):
continue
cells.append(headers[j] + str(df.iloc[i, j]))
lines.append(";".join(cells))
if colnm > 3:
return lines
return ["\n".join(lines)]
__extract_table_content函数接收一个表格对象(tb)作为输入,然后遍历表格的每一行,将每一行的单元格内容添加到一个列表(df)中- 然后
__compose_table_content抽取表格内容,没仔细研究,大意是根据单元格的数据类型来判断列的类型,最后讲单元格拼接为字符串
总结#
这里囫囵吐糟的review了下相关代码,可以看到RAGFlow在工程方面做了较多的工作,和微调的模型结合产生了良好的化学反应,通过一些工程的优化解决模型的badcase,最终做出了体验较好的产品,这是RAG文档解析的光明大道。
