-
ElasticSearch之通过update_by_query和_reindex重建索引
写在前面
当我们索引的mapping,setting发生变更时,我们需要重建索引来使得这些变更生效。es提供了两种方式来完成重建索引的操作:
1:update by query,在本索引重建 2:reindex,在新索引上重建- 1
- 2
我们通过具体实例来分别看下。
1:增加子字段
核心点,如果不执行update_by_query,修改mapping前将会无法查询到。执行update_by_query的方式如下:
POST {索引名称}/_update_by_query { }- 1
- 2
- 3
- 4
具体实例
(从上往下看即可):# 1:创建索引,指定mapping DELETE blogs PUT blogs { "mappings": { "properties": { "content": { "type": "text" }, "keyword": { "type": "text" } } } } # 2:修改mapping前插入一条数据 PUT blogs/_doc/1 { "content": "Hadoop is coll", "keyword": "Hadoop" } # 3:修改mapping,增加子字段english PUT blogs/_mapping { "properties": { "content": { "type": "text", "fields": { "english": { "type": "text", "analyzer": "english" } } }, "keyword": { "type": "text" } } } # 4:修改mapping后插入一条记录 PUT blogs/_doc/2 { "content": "Elasticsearch is hard to study,but i will keep up", "keyword": "Elasticsearch" } # 5:查询修改mapping前的数据,查询不到 POST blogs/_search { "query": { "match": { "content.english": "Hadoop" } } } # 6:查询修改mapping后的数据,可以查询到 POST blogs/_search { "query": { "match": { "content.english": "Elasticsearch" } } } # 7:执行update_by_query,重建本索引 POST blogs/_update_by_query { } # 8:再次查询修改mapping前的数据,就可以查询到了 POST blogs/_search { "query": { "match": { "content.english": "Hadoop" } } }- 1
- 2
- 3
- 4
- 5
- 6
- 7
- 8
- 9
- 10
- 11
- 12
- 13
- 14
- 15
- 16
- 17
- 18
- 19
- 20
- 21
- 22
- 23
- 24
- 25
- 26
- 27
- 28
- 29
- 30
- 31
- 32
- 33
- 34
- 35
- 36
- 37
- 38
- 39
- 40
- 41
- 42
- 43
- 44
- 45
- 46
- 47
- 48
- 49
- 50
- 51
- 52
- 53
- 54
- 55
- 56
- 57
- 58
- 59
- 60
- 61
- 62
- 63
- 64
- 65
- 66
- 67
- 68
- 69
- 70
- 71
- 72
- 73
- 74
- 75
- 76
- 77
- 78
- 79
- 80
- 81
- 82
- 83
- 84
- 85
2:修改字段类型
es不允许修改字段类型,想要完成修改字段类型操作的话必须使用reindex。
# 1:创建索引,指定mapping,注意此时keyword字段是text类型 DELETE blogs PUT blogs { "mappings": { "properties": { "content": { "type": "text" }, "keyword": { "type": "text" } } } } # 2:插入几条测试数据 POST blogs/_bulk {"index": {"_id": 1}} {"content":"Hadoop is coll","keyword":"Hadoop"} {"index": {"_id": 2}} {"content":"Elasticsearch is hard to study,but i will keep up","keyword":"Elasticsearch"} # 3:尝试修改keyword的数据类型从text为keyword,会报错 # mapper [keyword] of different type, current_type [text], merged_type [keyword] PUT blogs/_mapping { "properties": { "content": { "type": "text" }, "keyword": { "type": "keyword" } } } # 4:创建全新的索引,但是指定keyword字段类型为keyword DELETE blogs_fix PUT blogs_fix { "mappings": { "properties": { "content": { "type": "text" }, "keyword": { "type": "keyword" } } } } # 5:通过reindex拷贝数据到新索引 POST _reindex { "source": { "index": "blogs" }, "dest": { "index": "blogs_fix" } } # 6:看是否成功 "count" : 2即为成功了 GET blogs_fix/_count # 7:对keyword字段执行term agg,可以成功,进一步验证其字段类型是keyword(因为textfielddata默认是关闭的无法term) GET blogs_fix/_search { "aggs": { "term分组验证就是keyword类型": { "terms": { "field": "keyword" } } } }- 1
- 2
- 3
- 4
- 5
- 6
- 7
- 8
- 9
- 10
- 11
- 12
- 13
- 14
- 15
- 16
- 17
- 18
- 19
- 20
- 21
- 22
- 23
- 24
- 25
- 26
- 27
- 28
- 29
- 30
- 31
- 32
- 33
- 34
- 35
- 36
- 37
- 38
- 39
- 40
- 41
- 42
- 43
- 44
- 45
- 46
- 47
- 48
- 49
- 50
- 51
- 52
- 53
- 54
- 55
- 56
- 57
- 58
- 59
- 60
- 61
- 62
- 63
- 64
- 65
- 66
- 67
- 68
- 69
- 70
- 71
- 72
- 73
- 74
- 75
- 76
- 77
- 78
- 79
- 80
3:其他知识点
3.1:reindex需要注意的点

第二点需要注意,提前设置好mapping和setting,要不然可能会做无用功。3.2:op_type
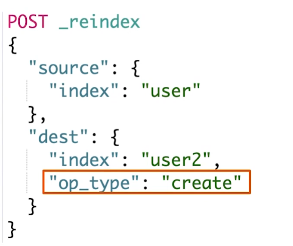
如果是目标index已经存在部分文档,为了忽略已存在的文档,可增加该参数:

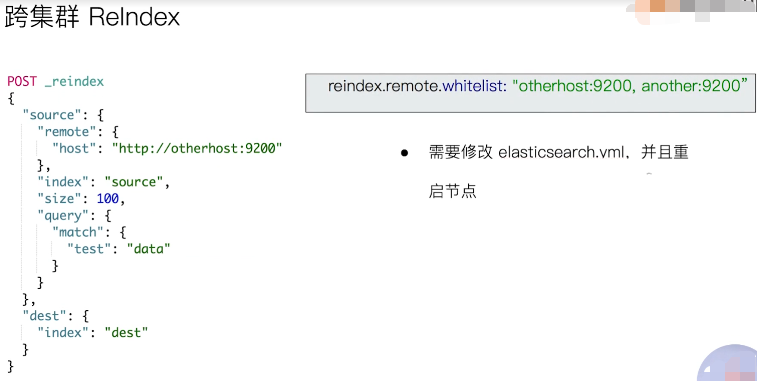
3.3:跨集群reindex

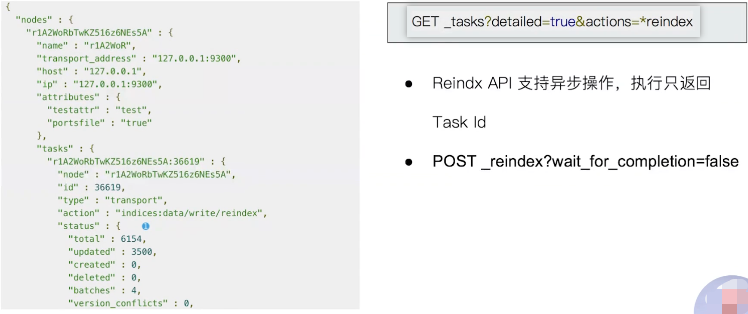
3.4:异步reindex
通过增加
wait_for_completion=false,使用异步方式来复制索引,可通过GET _tasks?detailed=true&actions=*reindex来查看任务执行情况:

写在后面
参考文章列表
-
相关阅读:
ChatGPT研究报告:AIGC带来新一轮范式转移
vue中调用高德地图
【创作活动】作为程序员的那些愚蠢瞬间
Stream入门
SpringBoot+Mybatis-Plus整合Sharding-JDBC5.1.1实现单库分表【全网最新】
LeetCode220828_89、数组中的第K个最大元素
Spring 中的事件监听机制
在不同的市场中使用不同的股票程序化交易接口
推荐搜索中各类排序算法综述
【Java SE】抽象类和接口
- 原文地址:https://blog.csdn.net/wang0907/article/details/136739105
