-
博客系统(SSM)
前端页面
 http://t.csdnimg.cn/zwKyG以上是之前写过的博客前端页面的内容,下面是通过SSM实现的后端内容。
目录
一.准备工作
1.1数据准备
建表SQL
- -- 建表SQL
- create database if not exists java_blog_spring charset utf8mb4;
- -- ⽤⼾表
- DROP TABLE IF EXISTS java_blog_spring.user;
- CREATE TABLE java_blog_spring.user(
- `id` INT NOT NULL AUTO_INCREMENT,
- `user_name` VARCHAR ( 128 ) NOT NULL,
- `password` VARCHAR ( 128 ) NOT NULL,
- `github_url` VARCHAR ( 128 ) NULL,
- `delete_flag` TINYINT ( 4 ) NULL DEFAULT 0,
- `create_time` DATETIME DEFAULT now(),
- `update_time` DATETIME DEFAULT now(),
- PRIMARY KEY ( id ),
- UNIQUE INDEX user_name_UNIQUE ( user_name ASC )) ENGINE = INNODB DEFAULT CHARACTER
- SET = utf8mb4 COMMENT = '⽤⼾表';
- -- 博客表
- drop table if exists java_blog_spring.blog;
- CREATE TABLE java_blog_spring.blog (
- `id` INT NOT NULL AUTO_INCREMENT,
- `title` VARCHAR(200) NULL,
- `content` TEXT NULL,
- `user_id` INT(11) NULL,
- `delete_flag` TINYINT(4) NULL DEFAULT 0,
- `create_time` DATETIME DEFAULT now(),
- `update_time` DATETIME DEFAULT now(),
- PRIMARY KEY (id))
- ENGINE = InnoDB DEFAULT CHARSET = utf8mb4 COMMENT = '博客表';
- -- 新增⽤⼾信息
- insert into java_blog_spring.user (user_name, password,github_url)values("zhangsan","123456","https://gitee.com/Roylele-java-j");
- insert into java_blog_spring.user (user_name, password,github_url)values("lisi","123456","https://gitee.com/Roylele-java-j");
- insert into java_blog_spring.blog(title,content,user_id) values("第一篇博客","111我是博客正文我是博客正文我是博客正文",1);
- insert into java_blog_spring.blog(title,content,user_id) values("第一篇博客","222我是博客正文我是博客正文我是博客正文",2);
 1.2创建项目

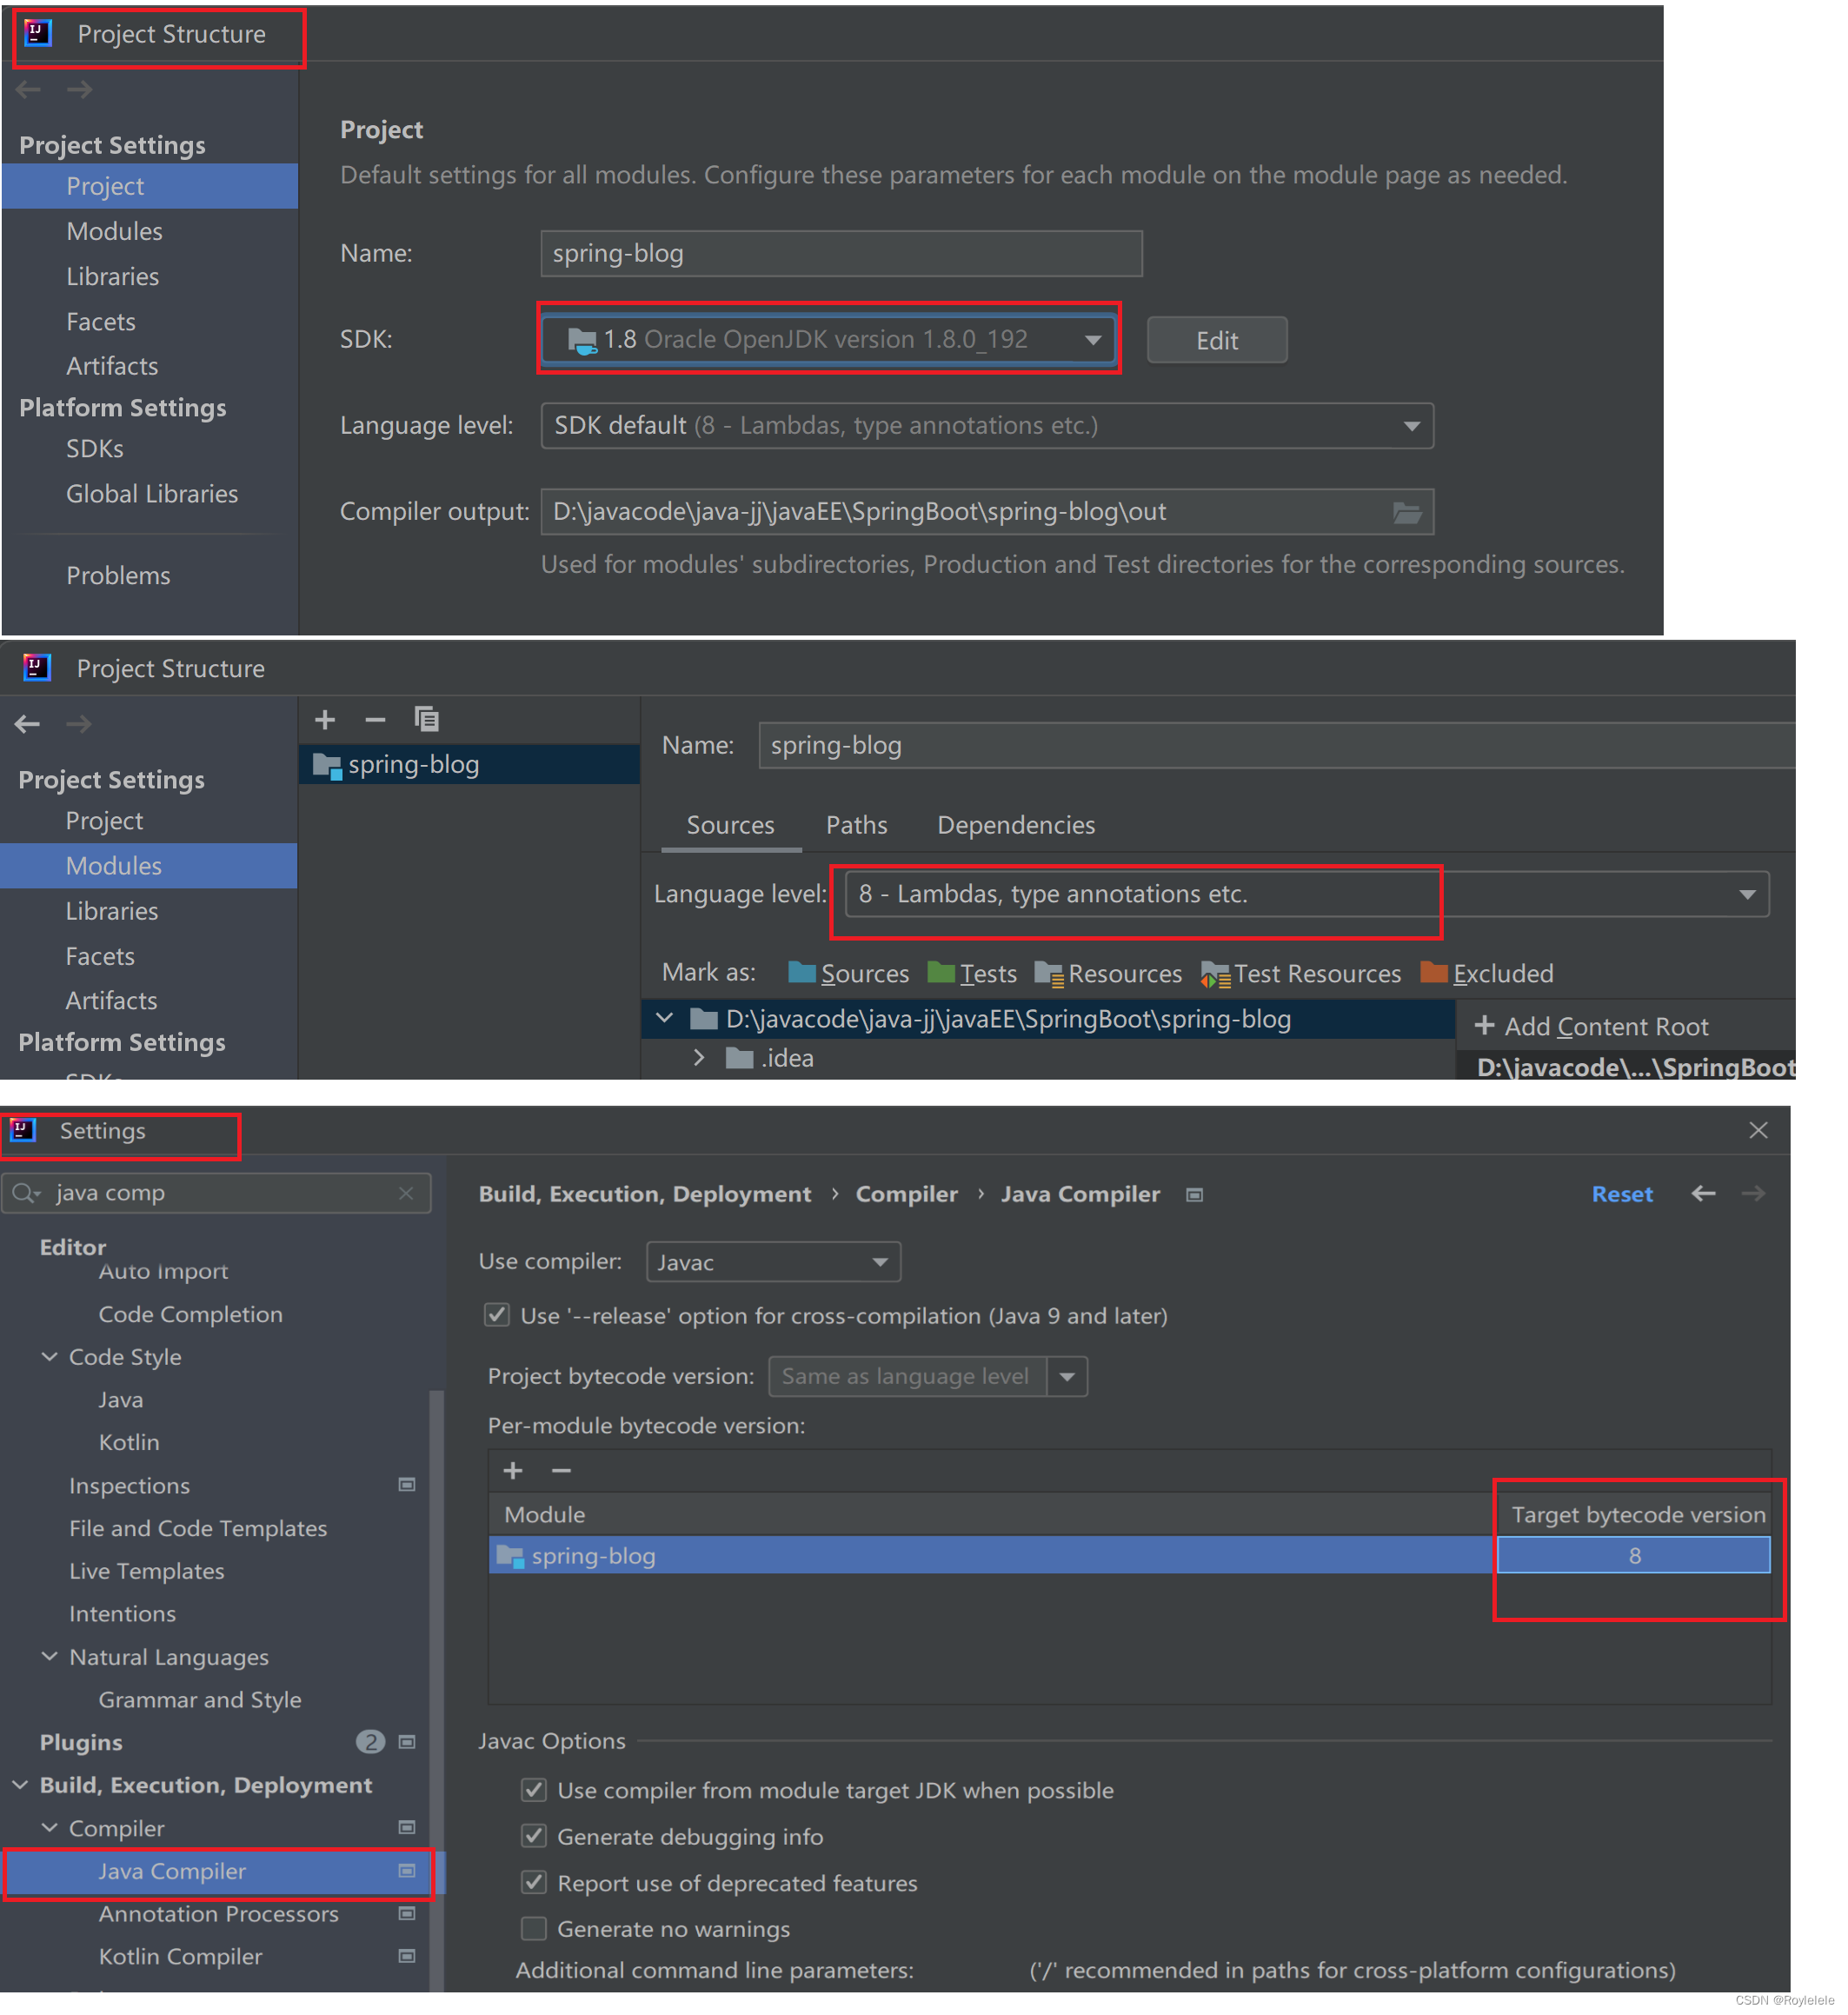
以JDK17创建,改成JDK8的版本
修改pom文件

1.2修改配置版本文件
1.3配置数据库
配置application.yml文件
- #数据库连接配置
- spring:
- datasource:
- url: jdbc:mysql://127.0.0.1:3306/java_blog_spring?characterEncoding=utf8&useSSL=false
- username: root
- password: root
- driver-class-name: com.mysql.cj.jdbc.Driver
- mybatis:
- configuration:
- map-underscore-to-camel-case: true #配置驼峰⾃动转换
- log-impl: org.apache.ibatis.logging.stdout.StdOutImpl #打印sql语句
- mapper-locations: classpath:mapper/**Mapper.xml
- # 设置⽇志⽂件的⽂件名
- logging:
- file:
- name: logger/spring-blog.log
二.项目公共模块
项目分为控制层(Controller), 服务层(Service), 持久层(Mapper). 各层之间的调用关系如下:

2.1实体类
- @Data
- public class UserInfo {
- private Integer id;
- private String userName;
- private String password;
- private String githubUrl;
- private Byte deleteFlag;
- private Date createTime;
- private Date updateTime;
- }
- @Data
- public class BlogInfo {
- private Integer id;
- private String title;
- private String content;
- private Integer userId;
- private Integer deleteFlag;
- private Date createTime;
- private Date updateTime;
- }
2.2操作数据库部分
涉及到数据库的部分:
1.用户登录,校验用户名和密码是否正确
SQL:根据用户名,查询用户信息
2.博客列表页
SQL:根据ID名,查询用户信息
SQL:获取博客列表
3.博客详情页··
SQL:根据博客ID,获取博客详情
SQL:根据博客ID,编辑博客
SQL:根据博客ID,删除博客
4.博客添加/修改
SQL:根据输入内容,添加博客

对数据库的操作
- @Mapper
- public interface UserInfoMapper {
- // 根据用户名,查询用户信息
- @Select("select * from user where user_name=#{userName} and delete_flag=0")
- UserInfo queryByName(String userName);
- // 根据用户ID,查询用用户信息
- @Select("select * from user where id=#{id} and delete_flag=0")
- UserInfo queryById(Integer id);
- }
- @Mapper
- public interface BlogInfoMapper {
- // 获取博客列表
- @Select("select * from blog where delete_flag=0")
- List
queryBlogList(); - // 根据博客ID,获取博客详情
- @Select("select * from blog where id=#{id} and delete_flag=0")
- BlogInfo queryById(Integer id);
- @Update("update blog set title=#{title},content=#{content} where id=#{id}")
- // 根据博客ID,编辑博客
- Integer update(BlogInfo blogInfo);
- @Update("update blog set delete_flag=1 where id=#{id}")
- // 根据博客ID,删除博客
- Integer deleteBlog(Integer id);
- // 根据输入内容,添加博客
- @Insert("insert into blog(title,content,user_id) values(#{title},#{content},#{userId})")
- Integer insertBlog(BlogInfo blogInfo);
- }
测试操作数据库功能

- @SpringBootTest
- class UserInfoMapperTest {
- @Autowired
- private UserInfoMapper userInfoMapper;
- @Test
- void queryByName() {
- System.out.println(userInfoMapper.queryByName("zhangsan"));
- }
- @Test
- void queryById() {
- System.out.println(userInfoMapper.queryById(2));
- }
- }
- @SpringBootTest
- class BlogInfoMapperTest {
- @Autowired
- private BlogInfoMapper blogInfoMapper;
- @Test
- void queryBlogList() {
- System.out.println(blogInfoMapper.queryBlogList());
- }
- @Test
- void queryById() {
- System.out.println(blogInfoMapper.queryById(1));
- }
- @Test
- void update() {
- BlogInfo blogInfo=new BlogInfo();
- blogInfo.setTitle("test11111");
- blogInfo.setContent("好想躺平");
- blogInfo.setId(3);
- blogInfoMapper.update(blogInfo);
- }
- @Test
- void deleteBlog() {
- blogInfoMapper.deleteBlog(3);
- }
- @Test
- void insertBlog() {
- BlogInfo blogInfo=new BlogInfo();
- blogInfo.setTitle("test");
- blogInfo.setContent("好好学习,天天向上");
- blogInfo.setUserId(1);
- blogInfoMapper.insertBlog(blogInfo);
- }
- }
定义返回结果的类型Result
- //定义统一的返回结果
- @Data
- public class Result
{ - private int code;//200-成功 -1失败
- private String errorMsg;//
- private T data;
- public static
Result success(T data){ - Result result=new Result();
- result.setCode(Constants.RESULT_SUCCESS);
- result.setData(data);
- return result;
- }
- public static
Result fail(String errorMsg,T data){ - Result result=new Result();
- result.setCode(Constants.RESULT_FAIL);
- result.setErrorMsg(errorMsg);
- result.setData(data);
- return result;
- }
- }
把常量对应放在一个类Constants中:
- public class Constants {
- public static final Integer RESULT_SUCCESS=200;
- public static final Integer RESULT_FAIL=-1;
- }
使用AOP的方式完成统一返回结果处理:
- @ControllerAdvice
- //AOP统一返回结果
- public class ResponseAdvice implements ResponseBodyAdvice {
- @Override
- public boolean supports(MethodParameter returnType, Class converterType) {
- return true;
- }
- @SneakyThrows
- @Override
- public Object beforeBodyWrite(Object body, MethodParameter returnType, MediaType selectedContentType, Class selectedConverterType, ServerHttpRequest request, ServerHttpResponse response) {
- if(body instanceof Result){
- return body;
- }
- //返回结果是String类型需要单独处理
- if (body instanceof String){
- ObjectMapper objectMapper=new ObjectMapper();
- return objectMapper.writeValueAsString(Result.success(body));
- }
- return Result.success(body);
- }
- }
统一异常处理:
- //统一异常处理 拦截异常
- @ResponseBody//返回的是对象,而不是页面
- @ControllerAdvice
- public class ErrorAdvice {
- @ExceptionHandler//捕获到异常的注释
- public Result errorHandler(Exception e){
- Result result=new Result();
- // 写法一
- // result.setErrorMsg(e.getMessage());
- // 写法二
- result.setErrorMsg("内部发生错误,请联系管理员");
- result.setCode(Constants.RESULT_FAIL);
- return result;
- }
- }
三.功能开发
3.1博客列表
获取博客列表
约定前后端交互接口:
请求:blog/getList
响应:''code'':200 , ''msg'':" " data:
- @RequestMapping("/blog")
- @RestController
- public class BlogController {
- @Autowired
- private BlogService blogService;
- //获取博客列表
- @RequestMapping("/getList")
- public List
getBlogList(){ - return blogService.getBlogList();
- }
- }
- @Service
- public class BlogService {
- @Autowired
- private BlogInfoMapper blogInfoMapper;
- public List
getBlogList() { - return blogInfoMapper.queryBlogList();
- }
- }
- @Mapper
- public interface BlogInfoMapper {
- // 获取博客列表
- @Select("select * from blog where delete_flag=0")
- List
queryBlogList();

前端交互部分:
- <script>
- getBlogList();
- function getBlogList(){
- $.ajax({
- type:"get",
- url:"/blog/getList",
- success:function(result){
- if(result.code==200 && result.data!=null){
- var blogList=result.data;
- //拼接字符串
- var finalHtml="";
- //对每一条博客,拼接成一个div
- for(var blog of blogList){
- finalHtml +='';finalHtml +=''+blog.title+'';finalHtml +=''+blog.createTime+'';finalHtml +=''+blog.content+'';finalHtml +='查看全文>>';finalHtml +='';
- }
- $(".right").html(finalHtml);
- }
- }
- });
- }
- script>
此时查看页面:

修改日期格式
对日期格式进行修改:使用SimpleDataFormat

创建一个日期工具类
- //日期工具类
- public class DateUtils {
- //日期转换成2024-02-28 16;02这种格式
- public static String formatDate(Date date){
- SimpleDateFormat simpleDateFormat=new SimpleDateFormat("yyyy-MM-dd HH:mm");
- return simpleDateFormat.format(date);
- }
- }
对BlogInfo中的 private Date createTime;
自己重新定义想要的get方法
- @Data
- public class BlogInfo {
- private Integer id;
- private String title;
- private String content;
- private Integer userId;
- private Integer deleteFlag;
- private Date createTime;
- private Date updateTime;
- //自定义Date的get方法
- public String getCreateTime() {
- return DateUtils.formatDate(createTime);
- }
- }

3.2博客详情
通过点击博客列表页的产看全文进入到详细的博客详情页。
后端代码:
约定前后端交互接口:
请求:/blog/getBlogDetail?blogId=1
BlogController类中添加BlogService类中添加
- //获取博客详情
- @RequestMapping("/getBlogDetail")
- public BlogInfo getBlogDetail(Integer blogId){
- return blogService.getBlogDetail(blogId);
- }
BlogService类中添加
- public BlogInfo getBlogDetail(Integer id) {
- return blogInfoMapper.queryById(id);
- }
测试后端代码:

前端代码:

blog_detail.html
- //获取博客详情
- $.ajax({
- type:"get",
- url:"/blog/getBlogDetail"+location.search,
- success:function(result){
- if(result.code==200 && result.data!=null){
- var blog=result.data;
- $(".title").text(blog.title);
- $(".date").text(blog.creatTime);
- $(".detail").text(blog.content);
- }
- }
- });
3.3实现登录(使用令牌)
账号密码登录
以前使用的方式:
1.根据用户名和密码,验证密码是否正确
2.如果密码正确,存储session
3.后续访问时,携带cookie(携带sessionId)
现在使用token的方式:
1.根据用户名和密码,验证密码是否正确
2.如果密码正确,后端生成token,并返回给前端(可以放在cookie中,也可以放在本地存储中)
3.后续访问,携带token,后端校验token的合法性(通常放在http请求的header中)
约定前后端交互接口:
/user/login
参数username=xxx&&password=xxx

创建JwtUtils工具类
- //JWT工具类
- public class JwtUtils {
- private static final String secretString="yvc+h4mLEjn0+7s1XQNUp8q71z5kuYgn2JnAvLXK8Hg=";
- private static final long expiration=30*60*1000;
- private static final Key key= Keys.hmacShaKeyFor(Decoders.BASE64.decode(secretString));//签名的编码方式
- public static String genToken(Map
- String token= Jwts.builder()
- .setClaims(claim)//设置载荷
- .setExpiration(new Date(System.currentTimeMillis()+expiration))//生成过期时间
- .signWith(key)//设置签名
- .compact();//生成token
- return token;
- }
- }
UserController中添加
- @RequestMapping("/user")
- @RestController
- public class UserController {
- @Autowired
- private UserService userService;
- @RequestMapping("/login")
- public Result login(String username, String password){
- //1.参数校验
- //2.密码校验
- //3.生成token并返回
- if(!StringUtils.hasLength(username) || !StringUtils.hasLength(password)){
- return Result.fail("用户名或密码为空");
- }
- //获取数据库中的密码
- UserInfo userInfo=userService.queryByName(username);
- if(userInfo==null ||userInfo.getId()<0){
- return Result.fail("用户不存在");
- }
- if(!password.equals(userInfo.getPassword())){
- return Result.fail("密码错误");
- }
- //生成token并返回
- Map
- claim.put("id",userInfo.getId());
- claim.put("name",userInfo.getUserName());
- String token= JwtUtils.genToken(claim);
- return Result.success(token);
- }
- }
UserService中添加
- @Service
- public class UserService {
- @Autowired
- private UserInfoMapper userInfoMapper;
- public UserInfo queryByName(String username) {
- return userInfoMapper.queryByName(username);
- }
- }
测试后端:

前端:
- <script>
- function login() {
- // location.assign("blog_list.html");
- $.ajax({
- type:"post",
- url:"/user/login",
- data:{
- userName:$("#username").val(),
- password:$("#password").val()
- },
- success:function(result){
- if(result.code==200 && result.data!=null){
- //密码正确
- //本地存储token
- localStorage.setItem("user_token",result.data);
- location.href="blog_list.html";
- }else{
- alert(result.errorMsg);
- }
- }
- });
- }
- script>
测试前端的登录功能,及查看存储的token:

强制登录
使用AOP拦截器的方式
- //拦截器
- @Slf4j
- @Configuration
- public class LoginInterceptor implements HandlerInterceptor {
- @Override
- public boolean preHandle(HttpServletRequest request, HttpServletResponse response, Object handler) throws Exception {
- //进行用户登录校验
- //1.从header中获取token
- //2.验证token
- //http发送请求
- String token=request.getHeader("user_token");
- log.info("从header中获取token,token"+token);
- Claims claims= JwtUtils.parseToken((token));
- if(claims==null){
- //token是不合法的
- response.setStatus(401);
- return false;
- }
- return true;
- }
- }
- //让拦截器生效
- @Configuration
- public class WebConfig implements WebMvcConfigurer {
- private static final List
excludePath= Arrays.asList( - "/user/login",
- "/**/*.html",
- "/pic/**",
- "/js/**",
- "/css/**",
- "/blog-editormd/**"
- );
- @Autowired
- private LoginInterceptor loginInterceptor;
- @Override
- public void addInterceptors(InterceptorRegistry registry) {
- //注册拦截器
- registry.addInterceptor(loginInterceptor)
- .addPathPatterns("/**")
- .excludePathPatterns(excludePath);
- }
- }
JWT工具类:
- @Slf4j
- //JWT工具类
- public class JwtUtils {
- private static final String secretString="yvc+h4mLEjn0+7s1XQNUp8q71z5kuYgn2JnAvLXK8Hg=";
- private static final long expiration=30*60*1000;
- private static final Key key= Keys.hmacShaKeyFor(Decoders.BASE64.decode(secretString));//签名的编码方式
- public static String genToken(Map
- String token= Jwts.builder()
- .setClaims(claim)//设置载荷
- .setExpiration(new Date(System.currentTimeMillis()+expiration))//生成过期时间
- .signWith(key)//设置签名
- .compact();//生成token
- return token;
- }
- //解析token,返回校验token得到的值
- public static Claims parseToken(String token){
- if(token==null){
- return null;
- }
- //使用JWT设置签名,生成token和解析token要使用同一个签名
- JwtParser build = Jwts.parserBuilder().setSigningKey(key).build();
- Claims claims=null;
- try{
- //拿到签名后,通过签名获取信息解析
- claims = build.parseClaimsJws(token).getBody();
- }catch (Exception e){
- log.error("解析token失败"+token);
- }
- return claims;
- }
- }

前端:

这样用户登录后,即时后端服务器重启,用户也不会退出登录。
3.4实现显示用户信息
显示用户信息
博客列表,显示当前登录用户信息
/user/getUserInfo
两种方式:
1.如果页面需要的信息较少,且是固定不变的内容,可以把这些信息存储在token中,直接从token 中拿
2.从token中获取用户ID,根据用户ID,获取用户信息(推荐)
这里使用第二种方式
UserController中
- /**
- * 获取登录用户的信息
- */
- @RequestMapping("/getUserInfo")
- public UserInfo getUserInfo(HttpServletRequest request){
- //1.从token中获取用户ID
- //2.根据用户ID,获取用户信息
- String token= request.getHeader("user_token");
- Integer userId=JwtUtils.getUserIdFromToken(token);
- if(userId==null){
- return null;
- }
- return userService.queryById(userId);
- }
UserService中
- @Autowired
- private UserInfoMapper userInfoMapper;
- @Autowired
- private BlogInfoMapper blogInfoMapper;
- public UserInfo queryById(Integer userId) {
- return userInfoMapper.queryById(userId);
- }
测试:使用postman

博客详情页,显示当前作者的信息
/user/getAuthorInfo?blogId=1
UserController中
- /**
- * 获取当前作者的信息
- */
- @RequestMapping("/getAuthorInfo")
- public UserInfo getAuthorInfo(Integer blogId){
- if(blogId==null || blogId<0){
- return null;
- }
- return userService.getAuthorInfo(blogId);
- }
UserService中
- public UserInfo getAuthorInfo(Integer blogId) {
- //1.根据博客ID获取userId
- //2.根据userId获取userInfo
- BlogInfo blogInfo = blogInfoMapper.queryById(blogId);
- if(blogInfo==null || blogInfo.getUserId()<0){
- return null;
- }
- return userInfoMapper.queryById(blogInfo.getUserId());
- }
测试:

前端:
blog_list.html中
- //获取用户信息
- getUserInfo();
- function getUserInfo(){
- $.ajax({
- type:"get",
- url:"/user/getUserInfo",
- success:function(result){
- if(result.code==200 && result.data!=null){
- //页面填充
- var user=result.data;
- $(".left .card h3").text(user.userName);
- $(".left .card a").attr("href",user.githubUrl);
- }else{
- location.href="blog_login.html"
- }
- }
- });
- }
同理,blog_detail.html中:
- //获取博客作者信息
- getUserInfo();
- function getUserInfo(){
- $.ajax({
- type:"get",
- url:"/user/getAuthorInfo"+location.search,
- success:function(result){
- if(result.code==200 && result.data!=null){
- //页面填充
- var user=result.data;
- $(".left .card h3").text(user.userName);
- $(".left .card a").attr("href",user.githubUrl);
- }else{
- location.href="blog_login.html"
- }
- }
- });
- }

可以发现获取作者信息的博客列表前端代码和博客细节页代码前端代码只有url不同,则可以把这两段代码提取到common.js中去。
common.js
- //把url作为参数提取出来
- function getUserInfo(url){
- $.ajax({
- type:"get",
- url:url,
- success:function(result){
- if(result.code==200 && result.data!=null){
- //页面填充
- var user=result.data;
- $(".left .card h3").text(user.userName);
- $(".left .card a").attr("href",user.githubUrl);
- }else{
- location.href="blog_login.html"
- }
- }
- });
- }
同时对blog_list.html和blog_detail.html中进行调用修改

3.5实现用户退出
清除存储的token值即可完成退出
在common.js中
- //用户注销
- function logout(){
- localStorage.removeItem("user_token");
- location.href="blog_login.html";
- }
3.6实现发博客
约定前后端交互接口
请求:/blog/add
参数:title=标题&content=正文
后端BlogController中添加
- /**
- * 发布博客
- */
- @RequestMapping("/add")
- public Result publishBlog(String title, String content, HttpServletRequest request){
- //从token中获取userId
- String token=request.getHeader("user_token");
- Integer userId= JwtUtils.getUserIdFromToken(token);
- if(userId==null || userId<0){
- return Result.fail("用户未登录");
- }
- //插入博客
- BlogInfo blogInfo=new BlogInfo();
- blogInfo.setUserId(userId);
- blogInfo.setTitle(title);
- blogInfo.setContent(content);
- blogService.insertBlog(blogInfo);
- return Result.success("success");
- }
BlogService中添加
- public Integer insertBlog(BlogInfo blogInfo) {
- return blogInfoMapper.insertBlog(blogInfo);
- }
前端:

blog_edit.html中:
- function submit() {
- $.ajax({
- type:"post",
- url:"/blog/add",
- data:{
- title:$("#title").val(),
- content:$("#content").val()
- },
- success:function(result){
- if(result.code==200){
- location.href="blog_list.html";
- }else{
- alert(result.error());
- }
- }
- });
- }
3.7实现删除、编辑博客
编辑按钮
当登录用户和作者是同一个人才可以编辑、删除。
在博客详情页判断是否显示编辑和删除按钮
判断条件:当前 登录用户 == 作者
1.单独写一个接口,返回true/false(登录用户 == 作者)
2.获取博客详情使,同时返回登录用户是否为作者(当前系统使用的方式)
在BlogInfo中添加定义,属性中布尔类型,以is开头,注意这里生成的set和get方法与之前的有所不同。


BlogController中
- //获取博客详情
- @RequestMapping("/getBlogDetail")
- public BlogInfo getBlogDetail(Integer blogId,HttpServletRequest request){
- BlogInfo blogInfo=blogService.getBlogDetail(blogId);
- //判断作者是否为登录用户
- //从token中获取userId
- String token=request.getHeader("user_token");
- Integer userId= JwtUtils.getUserIdFromToken(token);
- if(userId!=null && userId==blogInfo.getUserId()){
- blogInfo.setLoginUser(true);
- }
- return blogInfo;
- }
前端:当登录用户与文章作者为同一个人时,添加按钮。
blog_detail.html中
- //判断是否显示编辑/删除按钮
- console.log(result);
- if(blog.loginUser){
- console.log("===true")
- var finalHtml="";
- finalHtml +='<button onclick="window.location.href=\'blog_update.html?blogId=1'+ blog.id+'\'">编辑button>';
- finalHtml +=' <button onclick="deleteBlog('+blog.id+')">删除button>';
- $(".operating").html(finalHtml);
- }else{
- console.log("===false");
- }
按钮效果:

编辑博客
1.获取博客详情
2.发布博客(更新文章)
BlogController中:
- /**
- * 编辑博客
- */
- @RequestMapping("/update")
- public boolean updateBlog(Integer id,String title,String content){
- BlogInfo blogInfo=new BlogInfo();
- blogInfo.setTitle(title);
- blogInfo.setContent(content);
- blogInfo.setId(id);
- blogService.updateBlog(blogInfo);
- return true;
- }
BlogService中:
- public Integer updateBlog(BlogInfo blogInfo) {
- return blogInfoMapper.updateBlog(blogInfo);
- }
前端:
- function submit() {
- $.ajax({
- type:"post",
- url:"/blog/update",
- data:{
- id:$("#blogId").val(),
- title:$("#title").val(),
- content:$("#content").val(),
- },
- success:function(result){
- if(result.code==200 && result.data==true){
- location.href="blog_list.html";
- }
- }
- });

删除博客
- @RequestMapping("/delete")
- public boolean deleteBlog(Integer blogId){
- blogService.delete(blogId);
- return true;
- }
BlogService中:
- public Integer delete(Integer blogId) {
- return blogInfoMapper.deleteBlog(blogId);
- }
前端:
- function deleteBlog(blogId) {
- $.ajax({
- type:"get",
- url:"/blog_delete"+location.search,
- success:function(result){
- if(result.code==200 && result.data==true){
- location.href="blog_list.html";
- }
- }
- });
- }
3.8加密(盐值)
加密思路:博采用MD5算法来进行加密。
实现加密
1.存储随机盐值
2.存储加密后的密文
3.加密算法(MD5)
写加密/解密工具类
- public class SecurityUtils {
- /**
- * 加密
- * @param password 明文密码
- * @return 盐值+密文
- */
- public static String encrypt(String password){
- //生成随机盐值
- String salt = UUID.randomUUID().toString().replace("-","");
- System.out.println(salt);
- //加密 盐值+明文
- String securityPassword = DigestUtils.md5DigestAsHex((salt+password).getBytes());
- //数据库中存储 盐值+密文
- return salt+securityPassword;
- }
- /**
- * 校验
- * @return
- */
- public static boolean verify(String inputPassword, String sqlPassword){
- //取出盐值
- if (sqlPassword ==null || sqlPassword.length()!=64){
- return false;
- }
- String salt = sqlPassword.substring(0,32);
- //得到密文
- String securityPassword = DigestUtils.md5DigestAsHex((salt+inputPassword).getBytes());
- return (salt+securityPassword).equals(sqlPassword);
- }
- public static void main(String[] args) {
- String finalPassword = encrypt("123456");
- System.out.println(finalPassword);
- System.out.println(verify("123456",finalPassword));
- }
- }
修改一下数据库密码,使用测试类给密码123456(假设我们的数据库密码为123456)生成密文:
修改数据库明文密码为密文, 执行SQL:
- update user set password='';
- //数据库 password修改成生成的密文
登录接口:
- @RequestMapping("/login")
- public Result login(String userName, String password){
- //1.参数校验
- //2.密码校验
- //3.生成token并返回
- if(!StringUtils.hasLength(userName) || !StringUtils.hasLength(password)){
- return Result.fail("用户名或密码为空");
- }
- //获取数据库中的密码
- UserInfo userInfo=userService.queryByName(userName);
- if(userInfo==null ||userInfo.getId()<0){
- return Result.fail("用户不存在");
- }
- //校验密码
- if (!SecurityUtils.verify(password, userInfo.getPassword())){
- return Result.fail("密码错误!");
- }
- //生成token并返回
- Map<String,Object> claim=new HashMap<>();
- claim.put("id",userInfo.getId());
- claim.put("name",userInfo.getUserName());
- String token= JwtUtils.genToken(claim);
- return Result.success(token);
- }

实现

-
相关阅读:
Ubuntu磁盘满了,导致黑屏
FANUC机器人_通过ROBOGUIDE从零开始做一个离线仿真项目(2)
Django框架的全面指南:从入门到高级【第128篇—Django框架】
数据治理-数据存储和操作-数据架构类型
【CS324】LLM(大模型的能力、数据、架构、分布式训练、微调等)
2374. 边积分最高的节点
MyBatis-Plus 一些记录(1)
IPWorks EDI Translator Delphi Edition
数字滚动组件(react)
面试经典150题——生命游戏
- 原文地址:https://blog.csdn.net/weixin_67793092/article/details/136165974
