-
一、MyBatis-Plus(未完成)
一、MyBatis-Plus
1.1 快速入门 MyBatis-plus
1.1.1 MyBatis-plus 概述
- Mybatis-Plus(简称MP)是 Mybatis 的增强工具
- 在 Mybatis 的基础上只做增强不做改变,为简化开发、提高效率而生
- Mybatis-plus 简称为 MP
1.1.2 环境搭建
在学习 MP 之前,我们首先要搭建一些环境,用于学习
-
首先创建一个数据库,以及数据表
-
然后将下面创表语句导入
-
-- -------------------------------------------------------- -- 主机: 127.0.0.1 -- 服务器版本: 8.0.28 - MySQL Community Server - GPL -- 服务器操作系统: Win64 -- HeidiSQL 版本: 12.2.0.6576 -- -------------------------------------------------------- /*!40101 SET @OLD_CHARACTER_SET_CLIENT=@@CHARACTER_SET_CLIENT */; /*!40101 SET NAMES utf8 */; /*!50503 SET NAMES utf8mb4 */; /*!40103 SET @OLD_TIME_ZONE=@@TIME_ZONE */; /*!40103 SET TIME_ZONE='+00:00' */; /*!40014 SET @OLD_FOREIGN_KEY_CHECKS=@@FOREIGN_KEY_CHECKS, FOREIGN_KEY_CHECKS=0 */; /*!40101 SET @OLD_SQL_MODE=@@SQL_MODE, SQL_MODE='NO_AUTO_VALUE_ON_ZERO' */; /*!40111 SET @OLD_SQL_NOTES=@@SQL_NOTES, SQL_NOTES=0 */; -- 导出 mp 的数据库结构 CREATE DATABASE IF NOT EXISTS `mp` /*!40100 DEFAULT CHARACTER SET utf8mb4 COLLATE utf8mb4_general_ci */ /*!80016 DEFAULT ENCRYPTION='N' */; USE `mp`; -- 导出 表 mp.address 结构 CREATE TABLE IF NOT EXISTS `address` ( `id` bigint NOT NULL AUTO_INCREMENT, `user_id` bigint DEFAULT NULL COMMENT '用户ID', `province` varchar(10) CHARACTER SET utf8 COLLATE utf8_general_ci DEFAULT NULL COMMENT '省', `city` varchar(10) CHARACTER SET utf8 COLLATE utf8_general_ci DEFAULT NULL COMMENT '市', `town` varchar(10) CHARACTER SET utf8 COLLATE utf8_general_ci DEFAULT NULL COMMENT '县/区', `mobile` varchar(255) CHARACTER SET utf8 COLLATE utf8_general_ci DEFAULT NULL COMMENT '手机', `street` varchar(255) CHARACTER SET utf8 COLLATE utf8_general_ci DEFAULT NULL COMMENT '详细地址', `contact` varchar(255) CHARACTER SET utf8 COLLATE utf8_general_ci DEFAULT NULL COMMENT '联系人', `is_default` bit(1) DEFAULT b'0' COMMENT '是否是默认 1默认 0否', `notes` varchar(255) CHARACTER SET utf8 COLLATE utf8_general_ci DEFAULT NULL COMMENT '备注', `deleted` bit(1) DEFAULT b'0' COMMENT '逻辑删除', PRIMARY KEY (`id`) USING BTREE, KEY `user_id` (`user_id`) USING BTREE ) ENGINE=InnoDB AUTO_INCREMENT=71 DEFAULT CHARSET=utf8mb3 ROW_FORMAT=COMPACT; -- 正在导出表 mp.address 的数据:~11 rows (大约) INSERT INTO `address` (`id`, `user_id`, `province`, `city`, `town`, `mobile`, `street`, `contact`, `is_default`, `notes`, `deleted`) VALUES (59, 2, '北京', '北京', '朝阳区', '13900112222', '金燕龙办公楼', 'Rose', b'1', NULL, b'0'), (60, 1, '北京', '北京', '朝阳区', '13700221122', '修正大厦', 'Jack', b'0', NULL, b'0'), (61, 1, '上海', '上海', '浦东新区', '13301212233', '航头镇航头路', 'Jack', b'1', NULL, b'0'), (63, 2, '广东', '佛山', '永春', '13301212233', '永春武馆', 'Rose', b'0', NULL, b'0'), (64, 3, '浙江', '杭州', '拱墅区', '13567809102', '浙江大学', 'Hope', b'1', NULL, b'0'), (65, 3, '浙江', '杭州', '拱墅区', '13967589201', '左岸花园', 'Hope', b'0', NULL, b'0'), (66, 4, '湖北', '武汉', '汉口', '13967519202', '天天花园', 'Thomas', b'1', NULL, b'0'), (67, 3, '浙江', '杭州', '拱墅区', '13967589201', '左岸花园', 'Hopey', b'0', NULL, b'0'), (68, 4, '湖北', '武汉', '汉口', '13967519202', '天天花园', 'Thomas', b'1', NULL, b'0'), (69, 3, '浙江', '杭州', '拱墅区', '13967589201', '左岸花园', 'Hopey', b'0', NULL, b'0'), (70, 4, '湖北', '武汉', '汉口', '13967519202', '天天花园', 'Thomas', b'1', NULL, b'0'); -- 导出 表 mp.user 结构 CREATE TABLE `user` ( `id` BIGINT(19) NOT NULL AUTO_INCREMENT COMMENT '用户id', `username` VARCHAR(50) NOT NULL COMMENT '用户名' COLLATE 'utf8_general_ci', `password` VARCHAR(128) NOT NULL COMMENT '密码' COLLATE 'utf8_general_ci', `phone` VARCHAR(20) NULL DEFAULT NULL COMMENT '注册手机号' COLLATE 'utf8_general_ci', `info` JSON NOT NULL COMMENT '详细信息', `status` INT(10) NULL DEFAULT '1' COMMENT '使用状态(1正常 2冻结)', `balance` INT(10) NULL DEFAULT NULL COMMENT '账户余额', `create_time` DATETIME NOT NULL DEFAULT CURRENT_TIMESTAMP COMMENT '创建时间', `update_time` DATETIME NOT NULL DEFAULT CURRENT_TIMESTAMP ON UPDATE CURRENT_TIMESTAMP COMMENT '更新时间', PRIMARY KEY (`id`) USING BTREE, UNIQUE INDEX `username` (`username`) USING BTREE ) COMMENT='用户表' COLLATE='utf8_general_ci' ENGINE=InnoDB ROW_FORMAT=COMPACT AUTO_INCREMENT=5 ; -- 正在导出表 mp.user 的数据:~4 rows (大约) INSERT INTO `user` (`id`, `username`, `password`, `phone`, `info`, `status`, `balance`, `create_time`, `update_time`) VALUES (1, 'Jack', '123', '13900112224', '{"age": 20, "intro": "佛系青年", "gender": "male"}', 1, 1600, '2023-05-19 20:50:21', '2023-06-19 20:50:21'), (2, 'Rose', '123', '13900112223', '{"age": 19, "intro": "青涩少女", "gender": "female"}', 1, 600, '2023-05-19 21:00:23', '2023-06-19 21:00:23'), (3, 'Hope', '123', '13900112222', '{"age": 25, "intro": "上进青年", "gender": "male"}', 1, 100000, '2023-06-19 22:37:44', '2023-06-19 22:37:44'), (4, 'Thomas', '123', '17701265258', '{"age": 29, "intro": "伏地魔", "gender": "male"}', 1, 800, '2023-06-19 23:44:45', '2023-06-19 23:44:45'); /*!40103 SET TIME_ZONE=IFNULL(@OLD_TIME_ZONE, 'system') */; /*!40101 SET SQL_MODE=IFNULL(@OLD_SQL_MODE, '') */; /*!40014 SET FOREIGN_KEY_CHECKS=IFNULL(@OLD_FOREIGN_KEY_CHECKS, 1) */; /*!40101 SET CHARACTER_SET_CLIENT=@OLD_CHARACTER_SET_CLIENT */; /*!40111 SET SQL_NOTES=IFNULL(@OLD_SQL_NOTES, 1) */;- 1
- 2
- 3
- 4
- 5
- 6
- 7
- 8
- 9
- 10
- 11
- 12
- 13
- 14
- 15
- 16
- 17
- 18
- 19
- 20
- 21
- 22
- 23
- 24
- 25
- 26
- 27
- 28
- 29
- 30
- 31
- 32
- 33
- 34
- 35
- 36
- 37
- 38
- 39
- 40
- 41
- 42
- 43
- 44
- 45
- 46
- 47
- 48
- 49
- 50
- 51
- 52
- 53
- 54
- 55
- 56
- 57
- 58
- 59
- 60
- 61
- 62
- 63
- 64
- 65
- 66
- 67
- 68
- 69
- 70
- 71
- 72
- 73
- 74
- 75
- 76
- 77
- 78
- 79
- 80
- 81
- 82
- 83
- 84
- 85
- 86
- 87
- 88
-
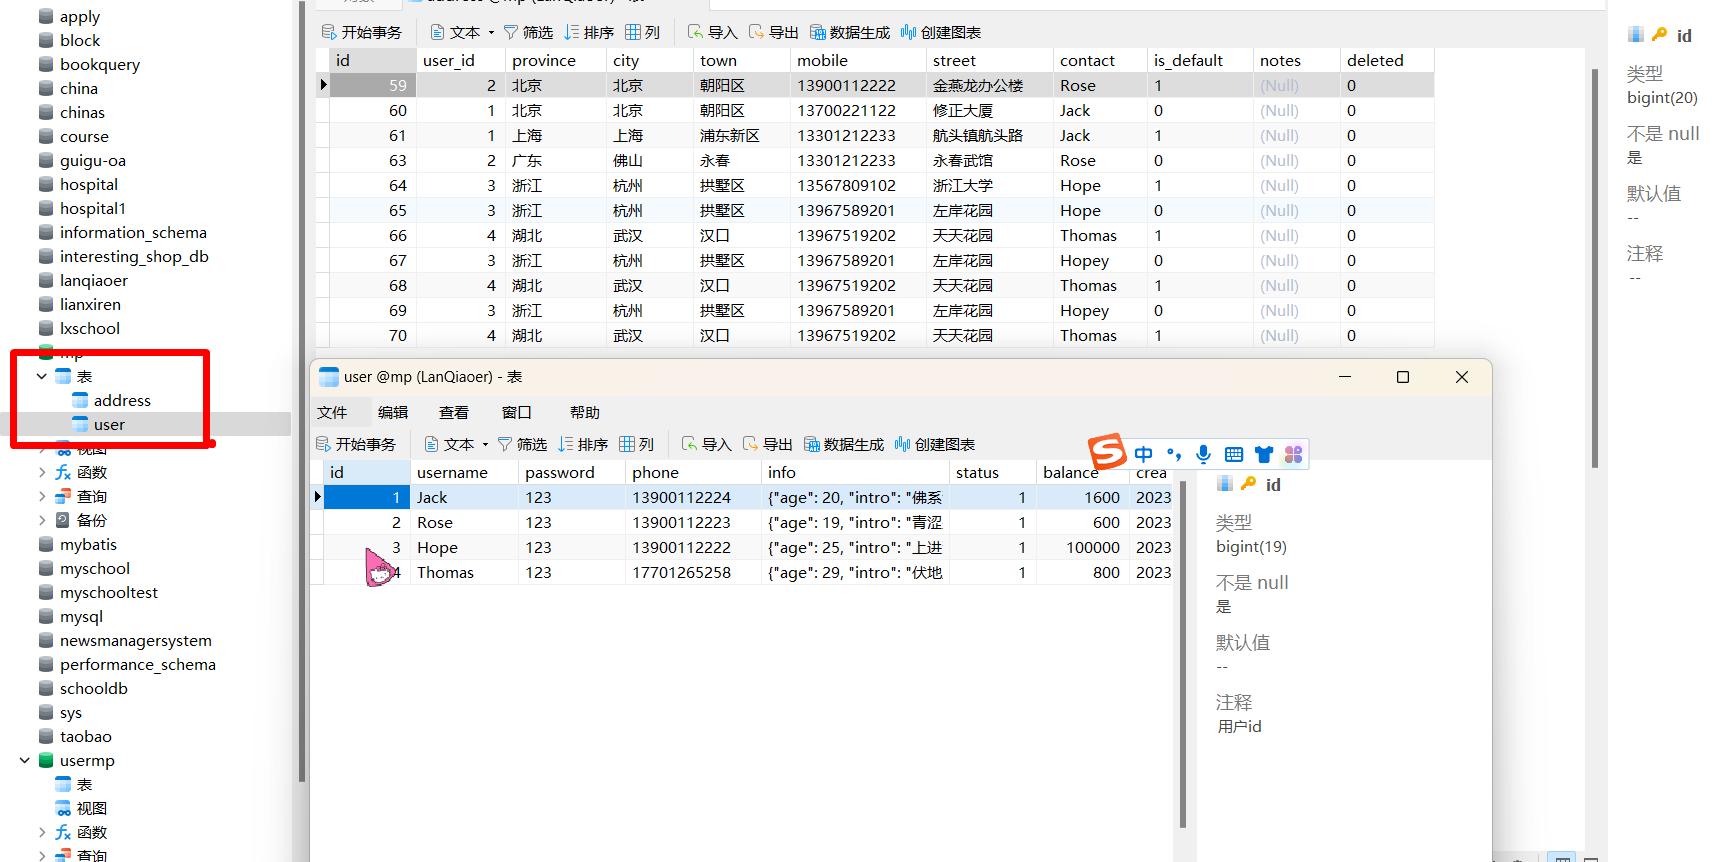
创建完成后会存在两张这样的表,用于数据测试
-
-
创建一个 SpringBoot 项目
-
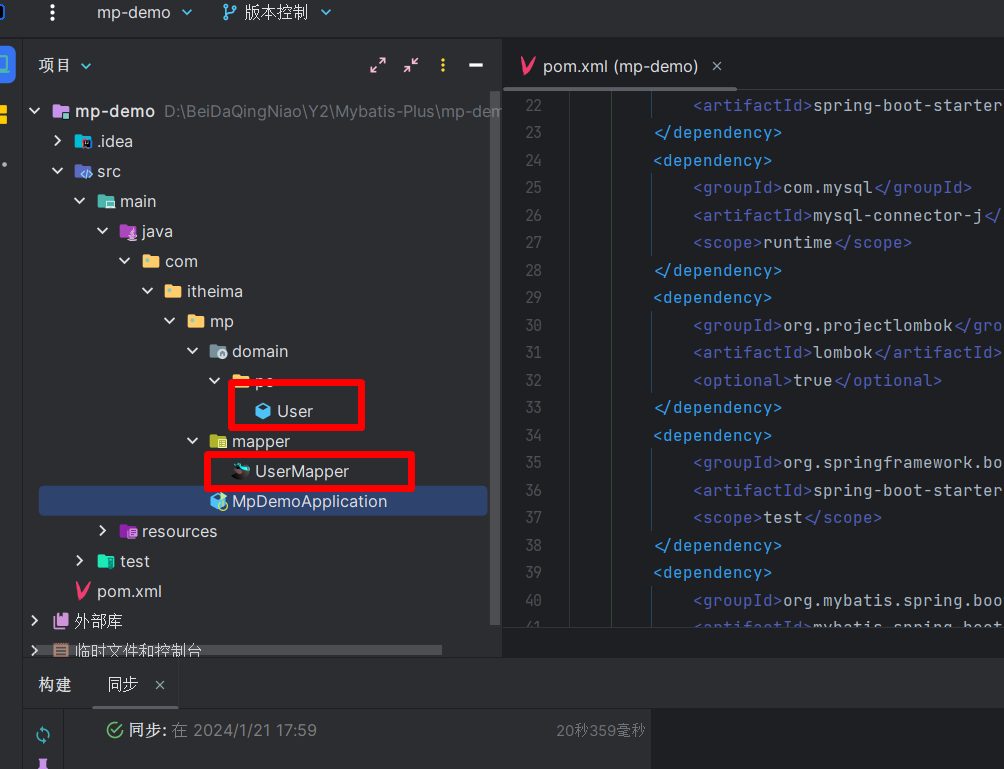
然后创建好 User 的 Mapper 以及 User 的实体类
-
-
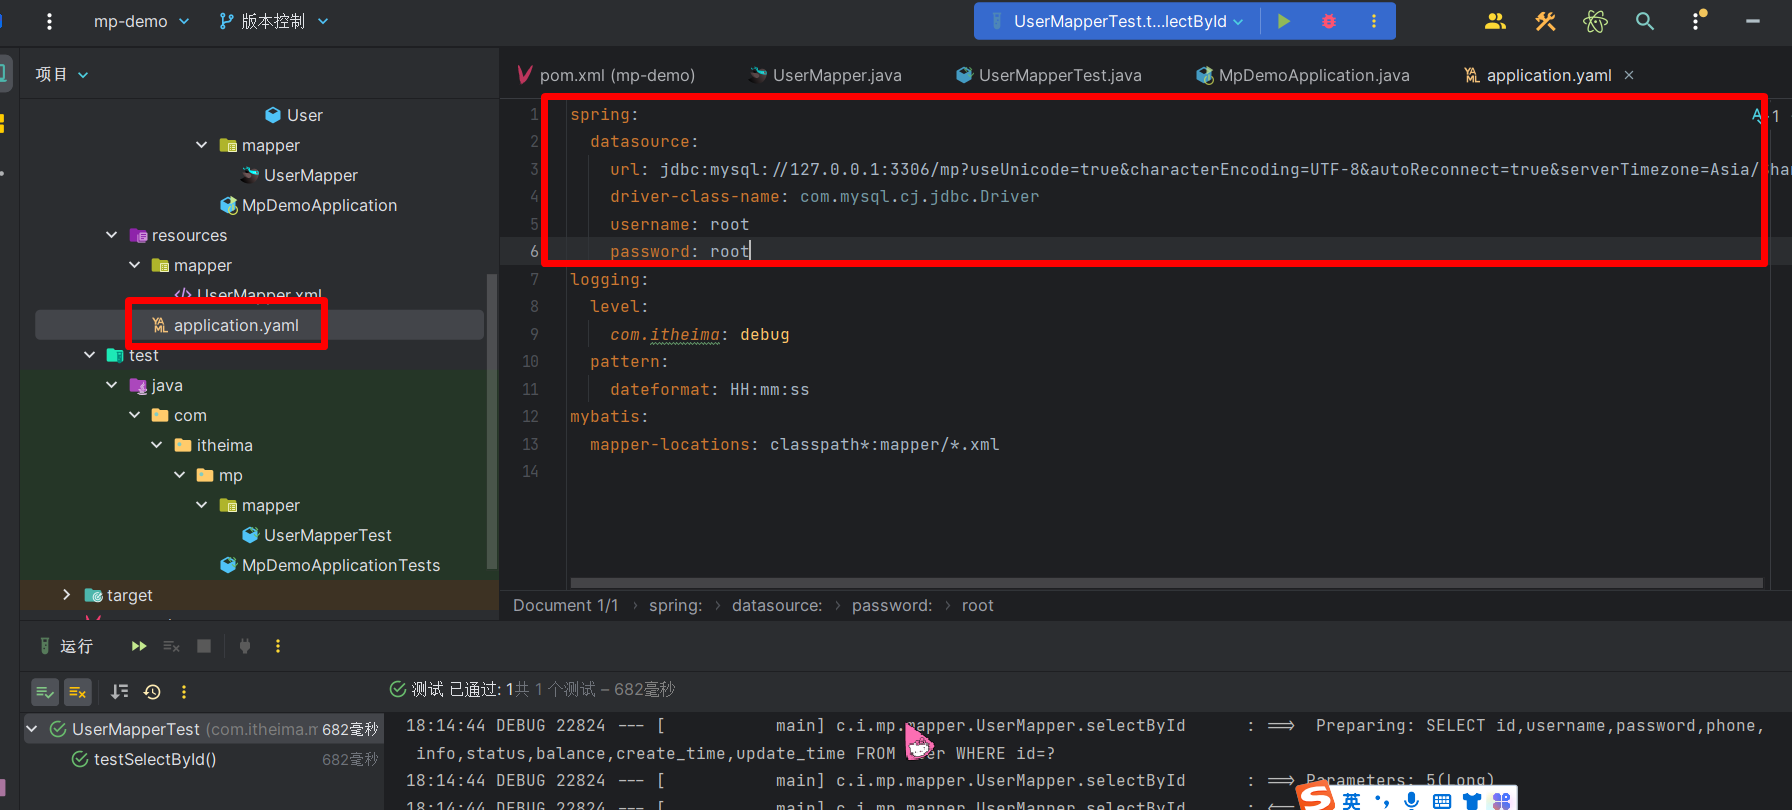
记得配置好一些配置文件,和配置 MyBatis 的方法是一样的
-
1.1.3 Mabtis-Plus 的使用
-
使用 MP 之前需要先导入 MP 的依赖
-
MP 的依赖集成了 Mabtis 和 Mabtis-Plus 的所有功能,并且实现了自动装配效果
-
因此可以用 Mabtis-plus 的依赖代替 Mabtis 的依赖
-
Myabtis-Plus 依赖
<dependency> <groupId>com.baomidougroupId> <artifactId>mybatis-plus-boot-starterartifactId> <version>3.5.3.1version> dependency>- 1
- 2
- 3
- 4
- 5
- 定义 Mapper
- 自定义的 Mapper 继承了 MyBatisPlus 提供的 BaseMapper 接口
- BaseMapper 内定义一些常用的 crud 的方法
package com.itheima.mp.mapper; import com.baomidou.mybatisplus.core.mapper.BaseMapper; import com.itheima.mp.domain.po.User; public interface UserMapper extends BaseMapper<User> { }- 1
- 2
- 3
- 4
- 5
- 6
- 7
- 8
- 9
-
BaseMapper 后面的泛型就是你要操作的数据表的实体类
-
继承的过程一定要指定泛型,这样才知道你所要操作的数据表是哪个
-
在测试类里面调用 BaseMapper 的方法,测试 crud
-

package com.itheima.mp.mapper; import com.itheima.mp.domain.po.User; import org.junit.jupiter.api.Test; import org.springframework.beans.factory.annotation.Autowired; import org.springframework.boot.test.context.SpringBootTest; import java.time.LocalDateTime; import java.util.List; @SpringBootTest class UserMapperTest { @Autowired private UserMapper userMapper; @Test void testInsert() { User user = new User(); user.setId(5L); user.setUsername("Lucy"); user.setPassword("123"); user.setPhone("18688990011"); user.setBalance(200); user.setInfo("{\"age\": 24, \"intro\": \"英文老师\", \"gender\": \"female\"}"); user.setCreateTime(LocalDateTime.now()); user.setUpdateTime(LocalDateTime.now()); userMapper.insert(user); } @Test void testSelectById() { User user = userMapper.selectById(5L); System.out.println("user = " + user); } @Test void testQueryByIds() { List<User> users = userMapper.selectBatchIds(List.of(1L, 2L, 3L, 4L)); users.forEach(System.out::println); } @Test void testUpdateById() { User user = new User(); user.setId(5L); user.setBalance(20000); userMapper.updateById(user); } @Test void testDeleteUser() { userMapper.deleteById(5L); } }- 1
- 2
- 3
- 4
- 5
- 6
- 7
- 8
- 9
- 10
- 11
- 12
- 13
- 14
- 15
- 16
- 17
- 18
- 19
- 20
- 21
- 22
- 23
- 24
- 25
- 26
- 27
- 28
- 29
- 30
- 31
- 32
- 33
- 34
- 35
- 36
- 37
- 38
- 39
- 40
- 41
- 42
- 43
- 44
- 45
- 46
- 47
- 48
- 49
- 50
- 51
- 52
- 53
- 54
- 55
- 56
1.1.4 常见注解
-
MP 通过扫描实体类,并且基于反射获取实体类信息作为数据库表信息
- 它会自动将类名驼峰转为下划线作为表名
- 实体类内名为id 的字段作为主键
- 变量名驼峰转下划线作为表的字段名
-
如果你的类名及变量名与数据库中的表和字段不对应,可以使用以下注解
注解 说明 @TableName 用于指定表名 @TableId 用于指定表中的主键字段信息 @TableField 用于指定表中的普通字段信息 -
@TableField使用场景 -
成员变量名与数据库字段名不一致
-
成员变量名以 is 开头的,且是布尔值的,因为 mp 再底层处理时会自动去除 is
-
成员变量名与数据库关键字冲突的,使用时要加上转义字符 ``
-
成员变量不是数据库字段的
-
示例
-

-
而图中的 @TableId 中的 type 参数表示主键的添加方式
-
IdType 枚举
- AUTO:数据库自增长
- Input:通过 set 方法自行输入
- ASSIGN_ID:自动分配id
1.1.5 常见配置
-
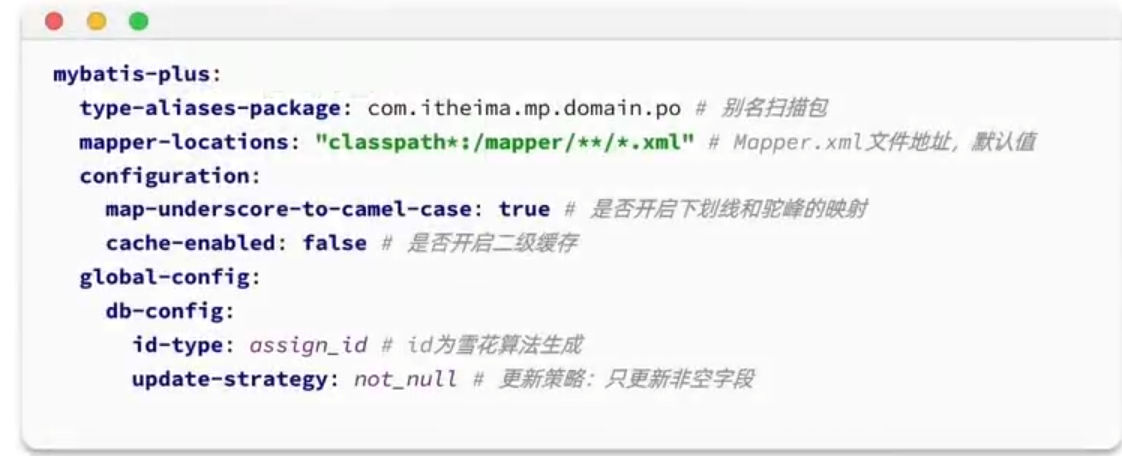
MP 的配置项继承了 Mabtis 原生配置和一些自己特有的配置,例如
-
-
type-aliases-package扫描实体类,假如将来需要定义mapper.xml的实体类类型,只需要写类名即可 -
mapper-locations指定mapper.xml文件地址 -
因为 MP 主要用于处理单表的增删改查,假如需要写一些复杂的 SQL 语句,就需要自己在 xml 中写 SQL 语句
-
其他一些配置项都不太常用,默认即可
-
也可以自行上 MP 官网查看配置
1.2 Myabtis-Plus 核心功能
1.2.1 条件构造器
-
MP 支持各种复杂的where 条件
-
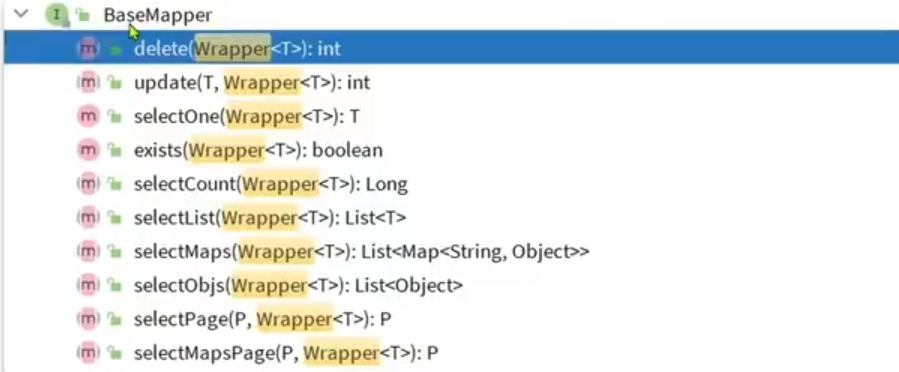
BaseMapper 是提供增删改查操作方法的一个类,它其中会接收一个 Wrapper 类型的参数
-
-
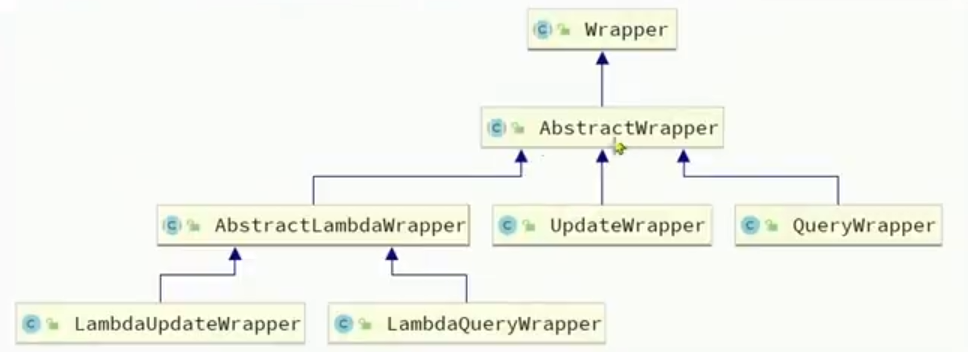
Wrapper 就是条件构造器,用于构造复杂 SQL 语句
-
Wrapper 是一个父类,它有很多的子类
-
-
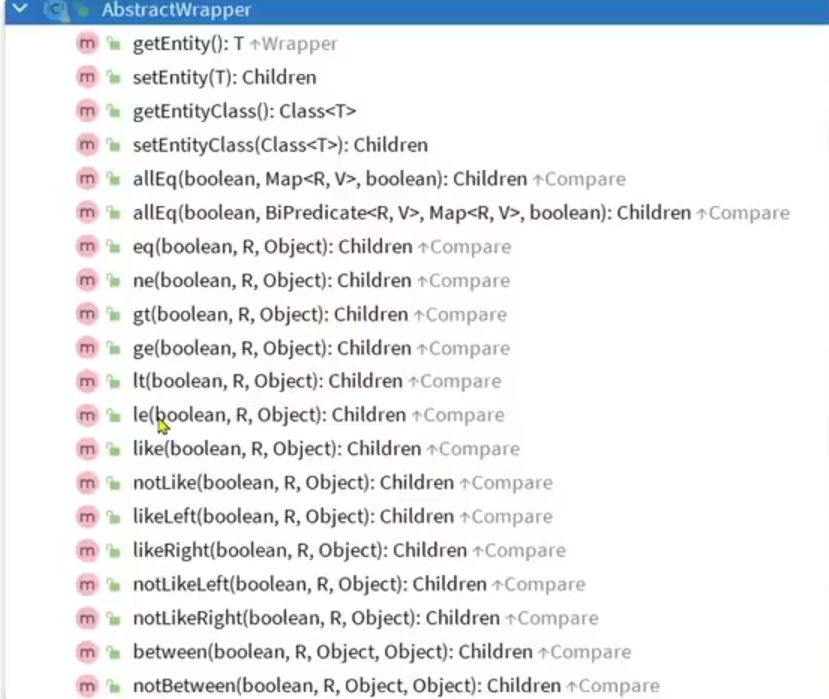
例如 AbstractWrapper 类中就定义了很多条件查询的方法
-
-
SQL 语句中写过的条件在这里一般都有对应的方法
- 例如 eq() 方法表示等于
- gt() 表示大于
- like() 模糊查询
-
QueryWrapper 和 LambdaQueryWrapper 通常用来构建 select、delete、update和where 条件部分
-
UpdateWrapper 和 LambdaUpdateWrapper 通常只有在 set 语句比较特殊的时候才使用
-
尽量使用 LambdaQueryWrapper 和 LambdUpdateWrapper、因为他们是使用的 Lambda 表达式 来获取实体类与数据库对应的字段,可以避免硬编码
1.2.2 条件构造器案例练习
1、基于 QueryWrapper 和 LambdaQueryWrapper 进行查询
查询出数据库中名字带 o 的,存款大于 1000元的人的 id、username、info、balance 字段
-
使用 QueryWrapper 查询
-
@Test void testSelectByQuery(){ QueryWrapper<User> queryWrapper=new QueryWrapper<>(); queryWrapper.select("id","username","info","balance ") .like("username","o") .ge("balance",1000); List<User> users = userMapper.selectList(queryWrapper); System.out.println(users); }- 1
- 2
- 3
- 4
- 5
- 6
- 7
- 8
- 9
-
使用 LambdaQueryWrapper 查询
-
@Test void testSelectByLambdaQuery(){ LambdaQueryWrapper<User> lambdaQueryWrapper=new LambdaQueryWrapper<>(); lambdaQueryWrapper.select(User::getId,User::getUsername,User::getInfo,User::getBalance) .like(User::getUsername,"o") .ge(User::getBalance,1000); List<User> users = userMapper.selectList(lambdaQueryWrapper); System.out.println(users); }- 1
- 2
- 3
- 4
- 5
- 6
- 7
- 8
- 9
-
上面的方法中 QueryWrapper 调用的方法
- select 表示要查询的字段
- like 表示模糊查询的数据,第一个参数是模糊的字段,第二个为模糊的值
- ge 表示大于等于,第一个参数指字段,第二个参数指值
-
LambdaQueryWrapper 需要传递一个函数,即实体类中的 get方法
-
你需要修改那个字段的值,就传入实体类与之对应的 get方法
2、基于 UpdateWrapper 和 LambdaUpdateWrapper 进行更新
更新 id 为 1、2、4 的用户的余额,扣除 200
-
使用 UpdateWrapper 更新
-
@Test void testUpdateByUpdateWrapper(){ List<Long> ids=List.of(1L,2L,4L); UpdateWrapper<User> updateWrapper=new UpdateWrapper<>(); updateWrapper.setSql("balance = balance -200") .in("id",ids); userMapper.update(null,updateWrapper); }- 1
- 2
- 3
- 4
- 5
- 6
- 7
- 8
-
使用 LambdaUpdateWrapper 更新
-
@Test void testUpdateByLambdaUpdateWrapper(){ List<Long> ids=List.of(1L,2L,4L); LambdaUpdateWrapper<User> lambdaUpdateWrapper=new LambdaUpdateWrapper<>(); lambdaUpdateWrapper.setSql("balance = balance -200") .in(User::getId,ids); userMapper.update(null,lambdaUpdateWrapper); }- 1
- 2
- 3
- 4
- 5
- 6
- 7
- 8
-
setSql 方法即自定义set部分的 SQL 语句
1.2.3 自定义 SQL
- 自定义 SQL 指的是我们使用 mp 的 wrapper 来定义 Whrer 部分,剩下的 SQL 语句由我们自己定义
- 为什么要去使用 自定义 SQL 呢
- 像我们之前写过的一个小案例 更新 id 为 1、2、4 的用户的余额,扣除 200
- 在这个案例中我们使用了 setSql 方法自己定义了 SQL 语句
- 这相当于我们把SQL 语句写入了 service 业务层当中
- 而很多企业要求 SQL 语句只能在 mapper 层或 mapper.xml 中去定义 SQL 语句
- 但是很多 SQL 语句的 where 条件比较复杂
- 我们使用 mp 去编写 where 条件的代码就会变得简单一些
- 这时候就需要使用 mp 的 自定义 SQL 了
- 我们可以使用 mp 的 Wrapper 来构建复杂的 where 条件
- 然后自己手动定义 SQL 语句的剩余部分
自定义 SQL 语句,这里依然使用之前的案例进行练习
更新 id 为 1、2、4 的用户的余额,扣除 200
1、基于 wrapper 构建 where 条件
-
在业务层定义一个方法,使用 wrapper 构建 where 条件
-
@Test void testCustomSqlUpdate(){ //更新条件 List<Long> ids=List.of(1L,2L,4L); int amount=200; //定义条件 LambdaUpdateWrapper<User> lambdaUpdateWrapper=new LambdaUpdateWrapper<>(); lambdaUpdateWrapper.in(User::getId,ids); //调用自定义方法 userMapper.updateBalanceByIds(lambdaUpdateWrapper,amount); }- 1
- 2
- 3
- 4
- 5
- 6
- 7
- 8
- 9
- 10
- 11
2、在mapper方法参数中用Param注解声明wrapper变量名称,必须是ew
-
自定义方法 updateBalanceByIds 在 mapper 层中创建
-
public interface UserMapper extends BaseMapper<User> { void updateBalanceByIds(@Param("ew") LambdaUpdateWrapper<User> lambdaUpdateWrapper,@Param("amount") int amount); }- 1
- 2
- 3
- 4
-
记住千万要给参数加上注解
-
这里规定 wrapper 的参数名要叫 ew
-
或者使用 mp 提供的一个常量
Constants.WRAPPER, 此常量由baomidou 提供,切记不要选错 -

3、自定义 SQL ,并使用 wrapper 条件
-
然后编写 SQL 语句的部分
-
可以在类上使用注解,也可以在 xml 中定义
-
我们这边在 xml 当中来定义
-
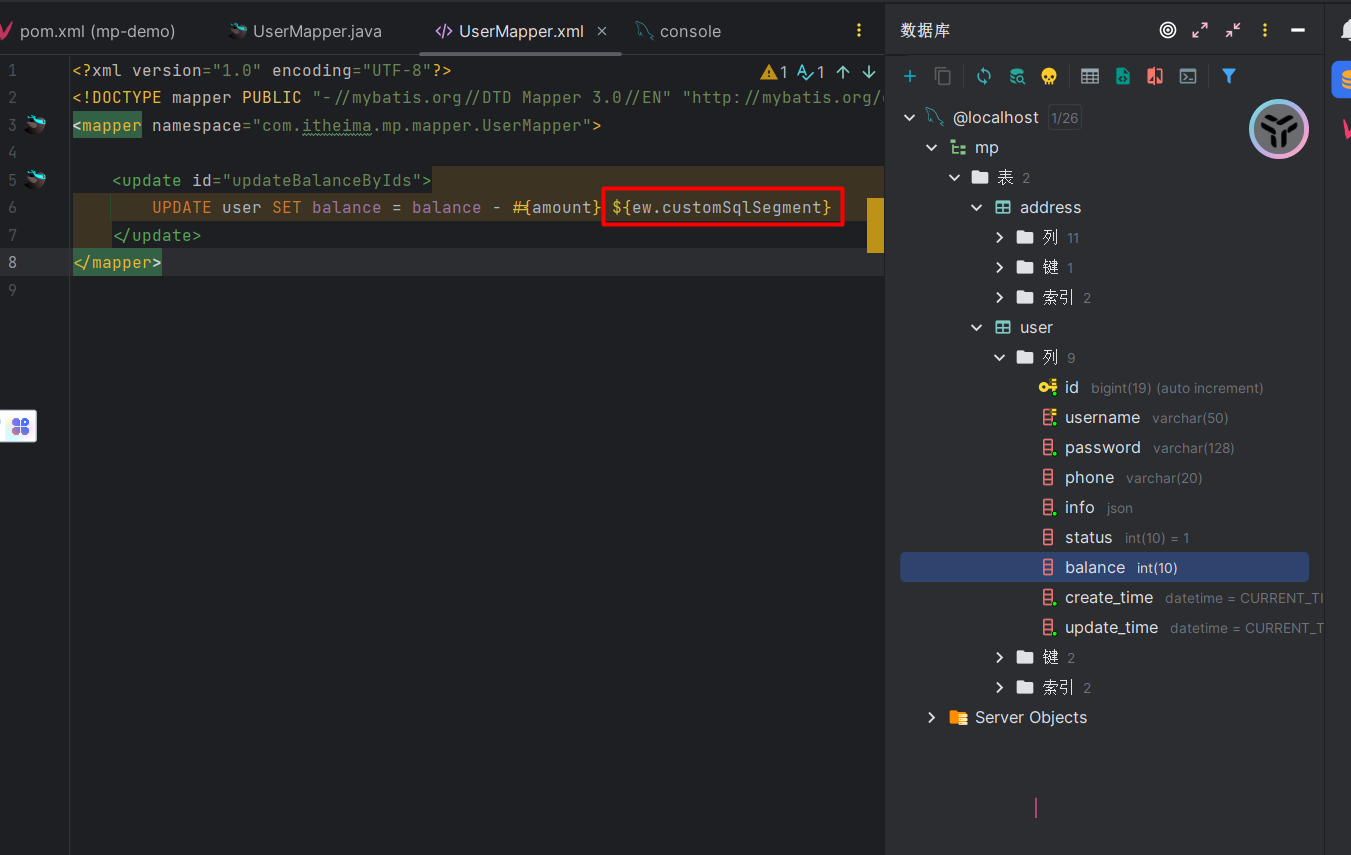
-
where 部分使用
${ew.customSqlSegment}来编写即可
1.2.4 IService 接口的基本用法
Iservice 接口内也提供了许多用于 增删改查 的方法,下面简单介绍一下
1、添加方法、
-

-
save 方法用于添加一条数据
-
saveBatch 方法用于批量添加数据
-
saveOrUpdateBatch 表示批量添加或修改数据
- 例如你传入一个对象,如果这个对象没有 id,则表示添加
- 如果对象有 id 则表示修改
2、删除方法
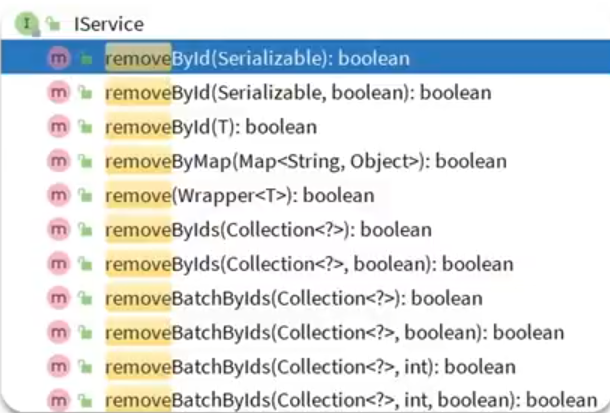
-
-
removeById 表示根据 id 删除一条数据
-
removeByIds 表示批量删除数据,使用 in 的方法批量删除数据
-
removeBatchByIds 也表示批量删除数据,它采用的是 JDBC 批量处理,批量提交 SQL 语句实现批量删除
-
removeBatchByIds 的性能要比 removeByIds 的性能要好一点
3、修改数据
-

-
updateById 表示根据 id 修改一条数据
-
updateBatchById 表示批量修改数据
4、查询一条数据
-

-
getById 表示根据 id 查询一条数据
-
getOne 表示根据其他条件查询一条数据
5、查询多条数据
-

-
listByIds 根据 id 的集合查询多条数据
-
list 表示查询所有数据
6、查询数据的数量
-

-
count 查询一共有几条数据
7、分页查询数据
8、使用 Lambda 表达式进行增删改查
-

-
如果需要根据复杂的条件进行增删改查的话,可以使用 Lambda
-
使用这些方法可以直接基于 LambdaWrapper 进行查询,不需要在 new wrapper 了
-
如果只是具有 id 的简单的增删改查,可以使用上面的那些方法
-
如果是复杂的增删改查,推荐使用 Lambda
1.2.5 简单的使用 IService 接口中的方法
- 使用 IService 接口的方法,首先需要使用我们自己的 Service 当中的接口来继承 IService
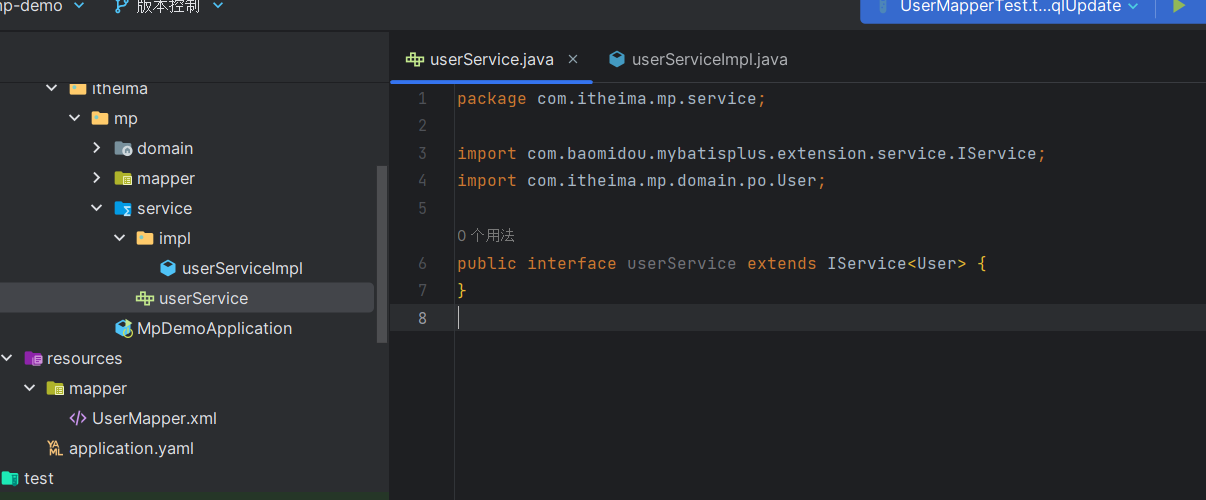
- 但是继承了 IService 接口,当中存在着许多需要实现的方法
- 所以 mp 也提供了 IService 的实现类 ServiceImpl
- 因此我们需要让我们的 Service层的实现类来继承 ServiceImpl 实现类
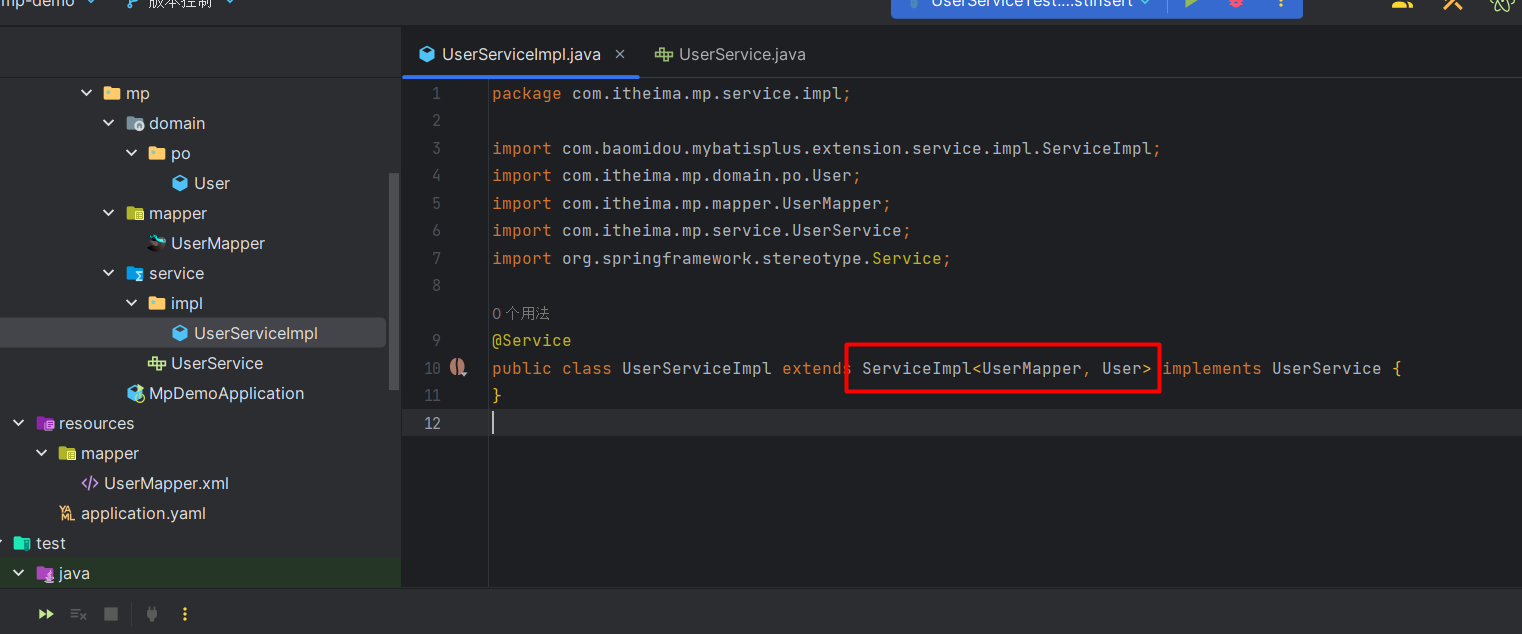
- 继承 ServiceImpl 需要两个泛型
- 第一个为要操作的表对应的 mapper
- 第二个为要操作的实体类
- 因为 ServiceImpl 类中有些方法也使用了 BaseMapper 当中的方法
测试一下,对用户表新增一个数据
package com.itheima.mp.service; import com.itheima.mp.domain.po.User; import org.junit.jupiter.api.Test; import org.springframework.beans.factory.annotation.Autowired; import org.springframework.boot.test.context.SpringBootTest; import java.time.LocalDateTime; @SpringBootTest public class UserServiceTest { @Autowired private UserService userService; @Test void testInsert() { User user = new User(); user.setUsername("LiLiYa"); user.setPassword("456"); user.setPhone("13000001234"); user.setBalance(8000); user.setInfo("{\"age\": 28, \"intro\": \"语文老师\", \"gender\": \"female\"}"); user.setCreateTime(LocalDateTime.now()); user.setUpdateTime(LocalDateTime.now()); userService.save(user); } }- 1
- 2
- 3
- 4
- 5
- 6
- 7
- 8
- 9
- 10
- 11
- 12
- 13
- 14
- 15
- 16
- 17
- 18
- 19
- 20
- 21
- 22
- 23
- 24
- 25
- 26
1.2.6 IService 开发基础业务接口
根据 Restful 风格实现以下接口

-
实现接口前需要引入两个依赖
- swagger 依赖,方便单元测试
- web 依赖
-
<dependency> <groupId>com.github.xiaoymingroupId> <artifactId>knife4j-openapi2-spring-boot-starterartifactId> <version>4.1.0version> dependency> <dependency> <groupId>org.springframework.bootgroupId> <artifactId>spring-boot-starter-webartifactId> dependency>- 1
- 2
- 3
- 4
- 5
- 6
- 7
- 8
- 9
- 10
- 11
-
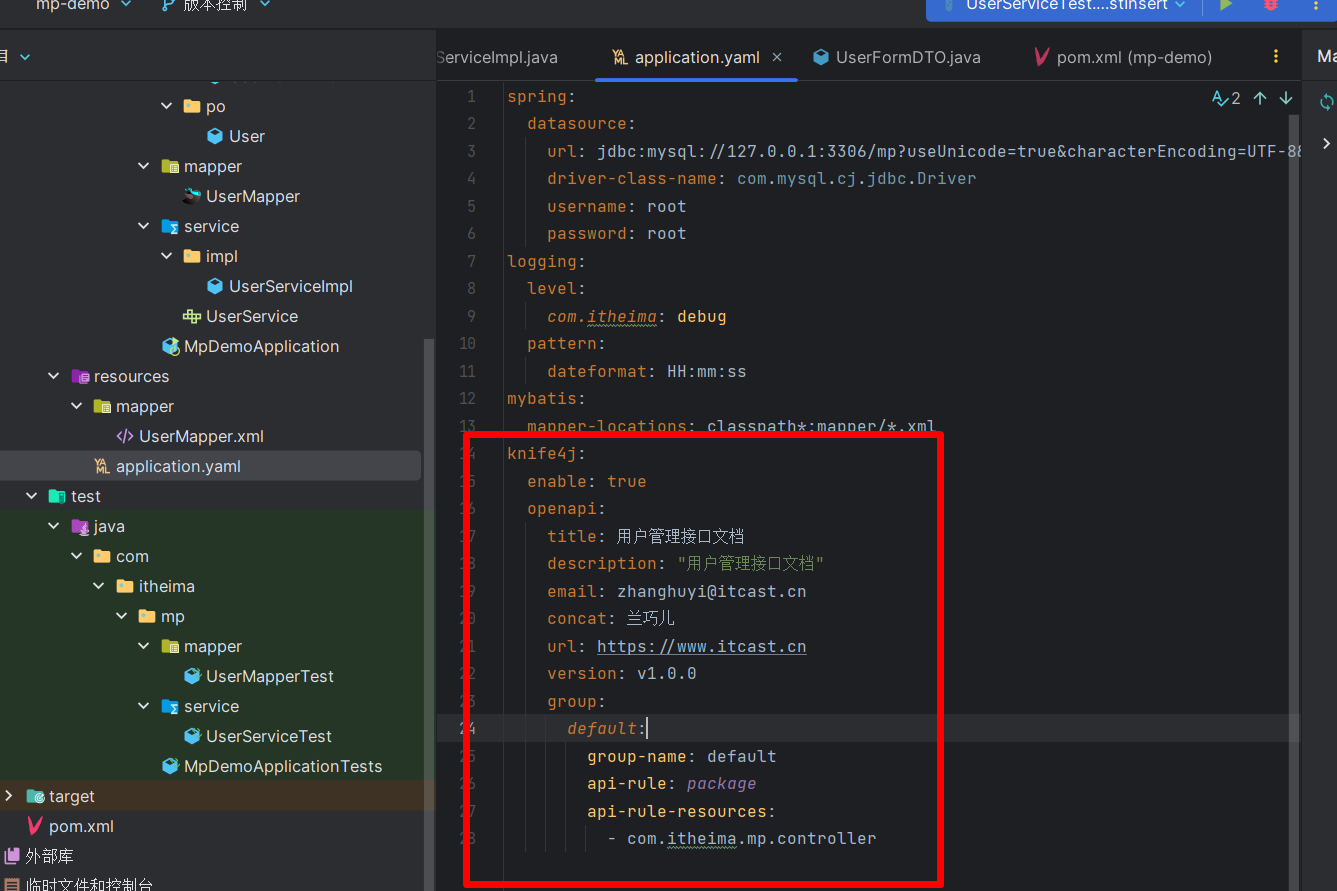
swagger 依赖引入后需要进行一些简单的配置
-
在
application.yml文件中进行配置 -
knife4j: enable: true openapi: title: 用户管理接口文档 description: "用户管理接口文档" email: zhanghuyi@itcast.cn concat: 虎哥 url: https://www.itcast.cn version: v1.0.0 group: default: group-name: default api-rule: package api-rule-resources: - com.itheima.mp.controller- 1
- 2
- 3
- 4
- 5
- 6
- 7
- 8
- 9
- 10
- 11
- 12
- 13
- 14
- 15
-
-
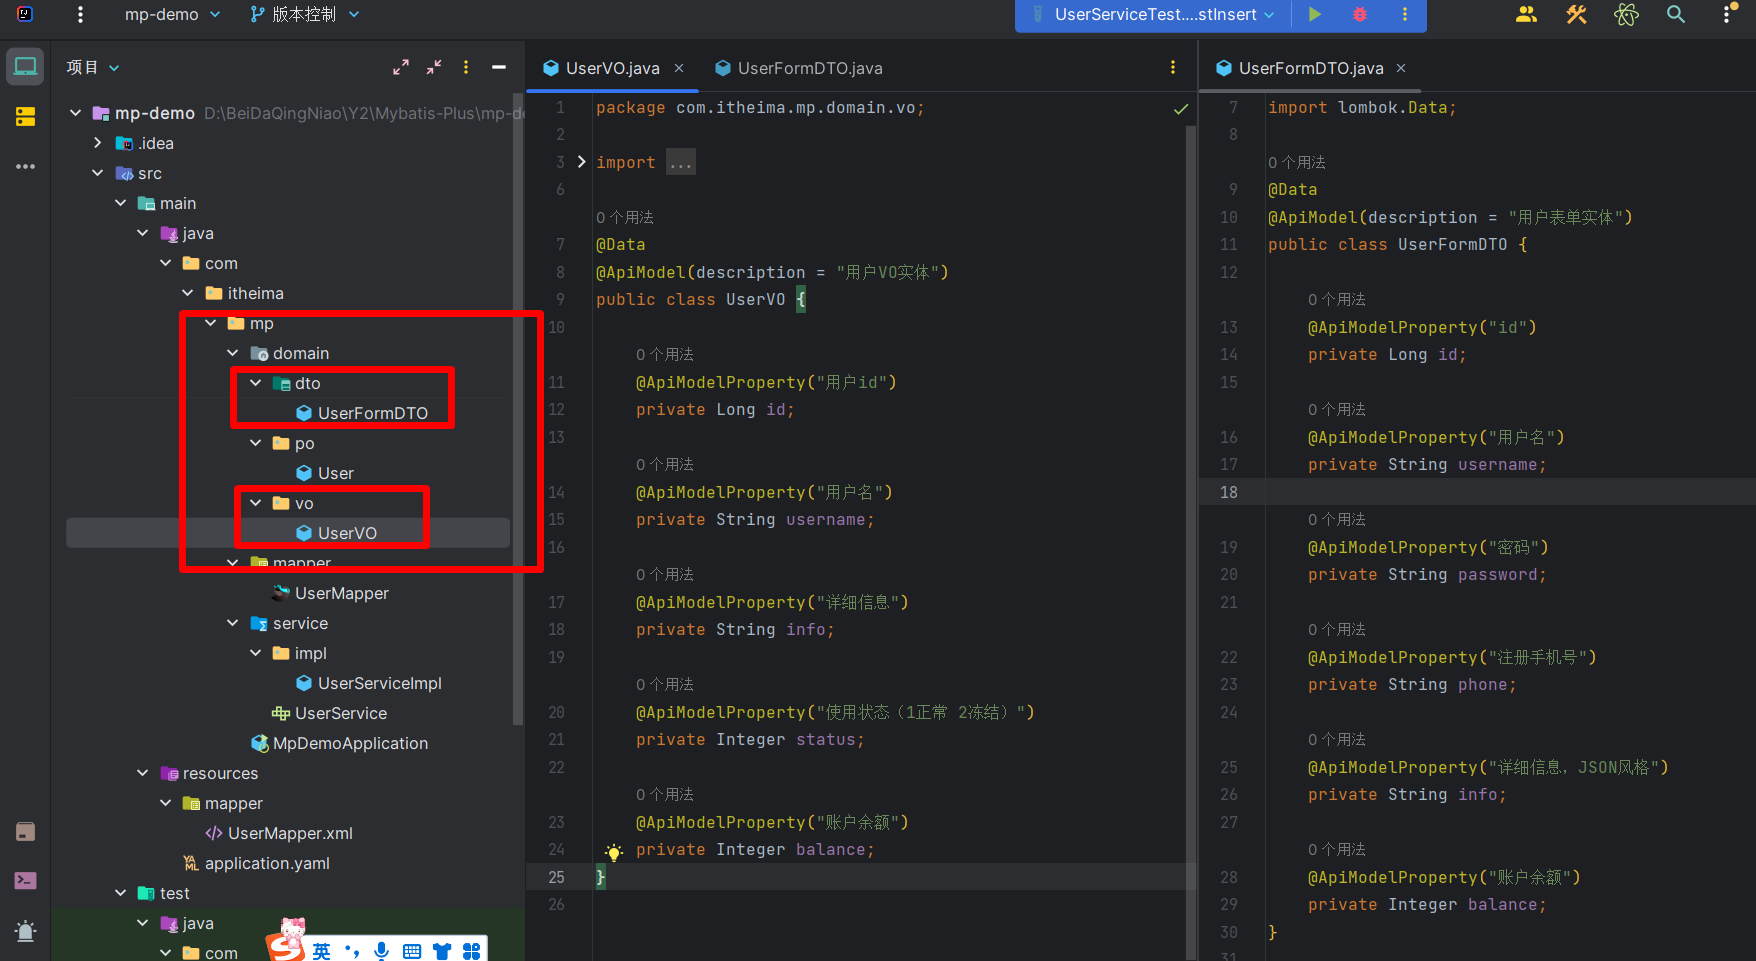
依赖导入后还需要准备俩个实体类
- 用户新增的 form 表单实体(dto)
- 查询用户时的 VO 实体(VO)
-
用户新增的 from 表单实体(dto)
-
package com.itheima.mp.domain.dto; import com.baomidou.mybatisplus.annotation.TableField; import com.baomidou.mybatisplus.extension.handlers.JacksonTypeHandler; import io.swagger.annotations.ApiModel; import io.swagger.annotations.ApiModelProperty; import lombok.Data; @Data @ApiModel(description = "用户表单实体") public class UserFormDTO { @ApiModelProperty("id") private Long id; @ApiModelProperty("用户名") private String username; @ApiModelProperty("密码") private String password; @ApiModelProperty("注册手机号") private String phone; @ApiModelProperty("详细信息,JSON风格") private String info; @ApiModelProperty("账户余额") private Integer balance; }- 1
- 2
- 3
- 4
- 5
- 6
- 7
- 8
- 9
- 10
- 11
- 12
- 13
- 14
- 15
- 16
- 17
- 18
- 19
- 20
- 21
- 22
- 23
- 24
- 25
- 26
- 27
- 28
- 29
- 30
- 31
-
查询用户时的 VO 实体(VO)
-
package com.itheima.mp.domain.vo; import io.swagger.annotations.ApiModel; import io.swagger.annotations.ApiModelProperty; import lombok.Data; @Data @ApiModel(description = "用户VO实体") public class UserVO { @ApiModelProperty("用户id") private Long id; @ApiModelProperty("用户名") private String username; @ApiModelProperty("详细信息") private String info; @ApiModelProperty("使用状态(1正常 2冻结)") private Integer status; @ApiModelProperty("账户余额") private Integer balance; }- 1
- 2
- 3
- 4
- 5
- 6
- 7
- 8
- 9
- 10
- 11
- 12
- 13
- 14
- 15
- 16
- 17
- 18
- 19
- 20
- 21
- 22
- 23
- 24
- 25
- 26
-
-
然后就可以进行开发了
-
新增一个 controller 类
-
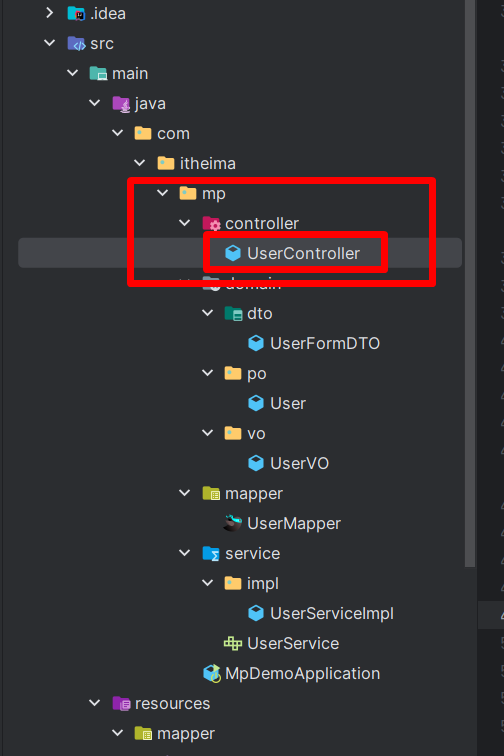
-
编写方法
-
package com.itheima.mp.controller; import cn.hutool.core.bean.BeanUtil; import com.itheima.mp.domain.dto.UserFormDTO; import com.itheima.mp.domain.po.User; import com.itheima.mp.domain.vo.UserVO; import com.itheima.mp.service.UserService; import io.swagger.annotations.Api; import io.swagger.annotations.ApiOperation; import io.swagger.annotations.ApiParam; import org.springframework.beans.factory.annotation.Autowired; import org.springframework.web.bind.annotation.*; import java.util.List; @Api(tags = "用户管理接口") @RequestMapping("/users") @RestController public class UserController { @Autowired UserService userService; //新增用户 @ApiOperation("新增用户接口") @PostMapping public void saveUser(@RequestBody UserFormDTO userFormDTO){ //把 DTO 拷贝到 po 中 User user = BeanUtil.copyProperties(userFormDTO, User.class); userService.save(user); } @ApiOperation("删除用户接口") @DeleteMapping("{id}") public void deleteUserById(@ApiParam("用户id") @PathVariable("id") Long id){ userService.removeById(id); } @ApiOperation("根据id查询用户接口") @GetMapping("{id}") public UserVO queryUserById(@ApiParam("用户id") @PathVariable("id") Long id){ User user = userService.getById(id); //把 PO 拷贝到 VO 中 UserVO userVO = BeanUtil.copyProperties(user, UserVO.class); return userVO; } @ApiOperation("根据id批量查询") @GetMapping public List<UserVO> queryUserByIds(@ApiParam("用户id集合")@PathVariable("ids") List<Long> ids){ List<User> users = userService.listByIds(ids); List<UserVO> userVOS = BeanUtil.copyToList(users, UserVO.class); return userVOS; } }- 1
- 2
- 3
- 4
- 5
- 6
- 7
- 8
- 9
- 10
- 11
- 12
- 13
- 14
- 15
- 16
- 17
- 18
- 19
- 20
- 21
- 22
- 23
- 24
- 25
- 26
- 27
- 28
- 29
- 30
- 31
- 32
- 33
- 34
- 35
- 36
- 37
- 38
- 39
- 40
- 41
- 42
- 43
- 44
- 45
- 46
- 47
- 48
- 49
- 50
- 51
- 52
- 53
1.2.7 IService 开发复杂业务接口
-
上面我们测试的一些业务都是较为简单的,仅仅使用 mp 提供的一个方法就能完成
-
当业务较为复杂的时候,我们就需要自定义 Service 方法来编写业务逻辑了
-
接下来我们将实现以下接口
-

-
首先在业务层 Service 中定义方法
-

-
根据 id 扣减余额的业务逻辑需要四部
- 查询用户
- 校验用户状态
- 校验余额是否充足
- 扣减余额
-
package com.itheima.mp.service.impl; import com.baomidou.mybatisplus.extension.service.impl.ServiceImpl; import com.itheima.mp.domain.po.User; import com.itheima.mp.mapper.UserMapper; import com.itheima.mp.service.UserService; import org.springframework.stereotype.Service; @Service public class UserServiceImpl extends ServiceImpl<UserMapper, User> implements UserService { @Override public void deductBalance(Long id, Integer money) { //查询用户 User user = this.getById(id); //校验用户状态 //status = 2 表示用户以注销 if(user == null || user.getStatus() == 2){ throw new RuntimeException("用户状态异常!"); } //校验用户余额是否充足 if(user.getBalance() < money){ throw new RuntimeException("用户余额不住"); } //扣减余额 //这边需要我们自定义 SQL baseMapper.deductBalance(id,money); } }- 1
- 2
- 3
- 4
- 5
- 6
- 7
- 8
- 9
- 10
- 11
- 12
- 13
- 14
- 15
- 16
- 17
- 18
- 19
- 20
- 21
- 22
- 23
- 24
- 25
- 26
- 27
- 28
- 29
-
这边需要我们在 mapper 中自定义 SQL
-
package com.itheima.mp.mapper; import com.baomidou.mybatisplus.core.conditions.update.LambdaUpdateWrapper; import com.baomidou.mybatisplus.core.mapper.BaseMapper; import com.baomidou.mybatisplus.core.toolkit.Constants; import com.itheima.mp.domain.po.User; import org.apache.ibatis.annotations.Param; import org.apache.ibatis.annotations.Update; import org.yaml.snakeyaml.scanner.Constant; public interface UserMapper extends BaseMapper<User> { @Update("update user SET balance = balance - #{money} where id =#{id}}") void deductBalance(@Param("id") Long id, @Param("money") Integer money); }- 1
- 2
- 3
- 4
- 5
- 6
- 7
- 8
- 9
- 10
- 11
- 12
- 13
- 14
- 15
-
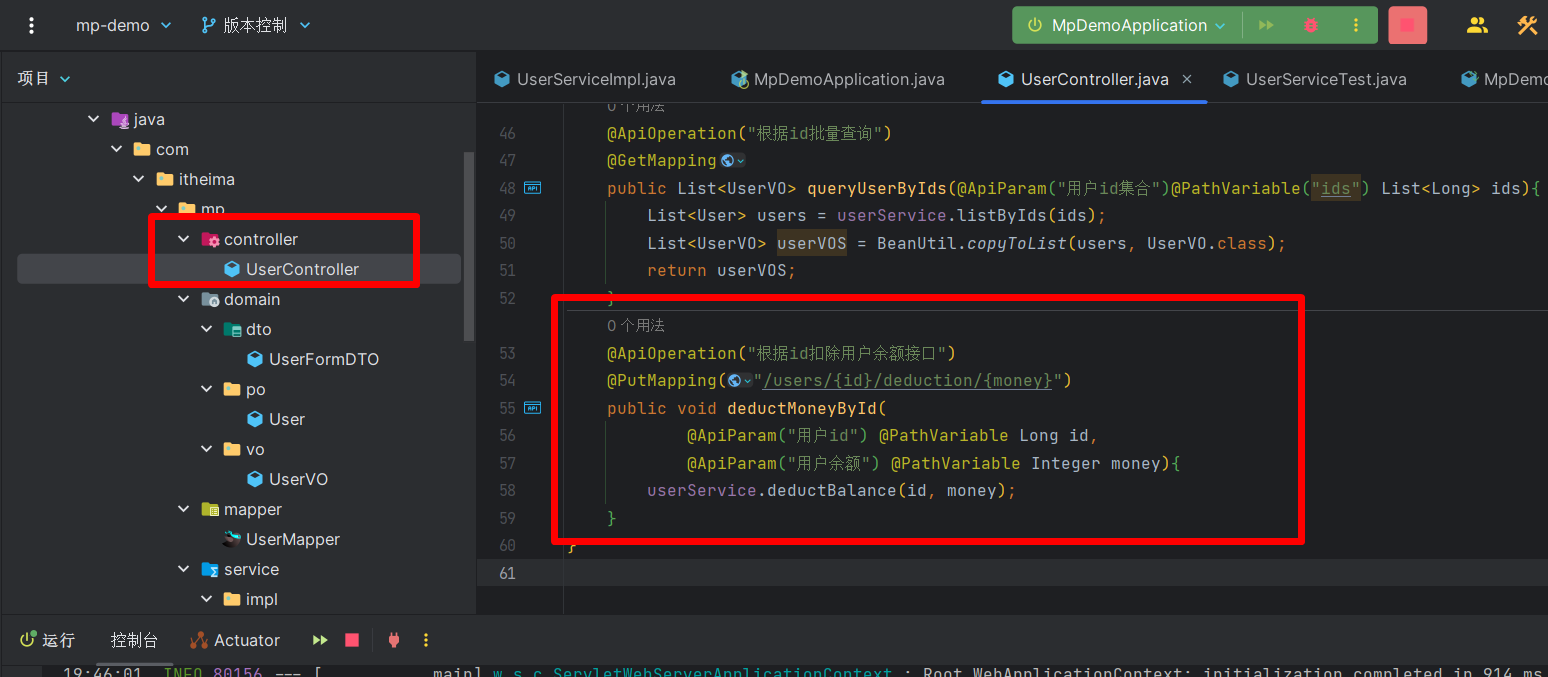
在 controller 类中定义方法
-
@ApiOperation("根据id扣除用户余额接口") @PutMapping("/users/{id}/deduction/{money}") public void deductMoneyById( @ApiParam("用户id") @PathVariable Long id, @ApiParam("用户余额") @PathVariable Integer money){ userService.deductBalance(id, money); }- 1
- 2
- 3
- 4
- 5
- 6
- 7
-
-
测试之前的所有方法
-
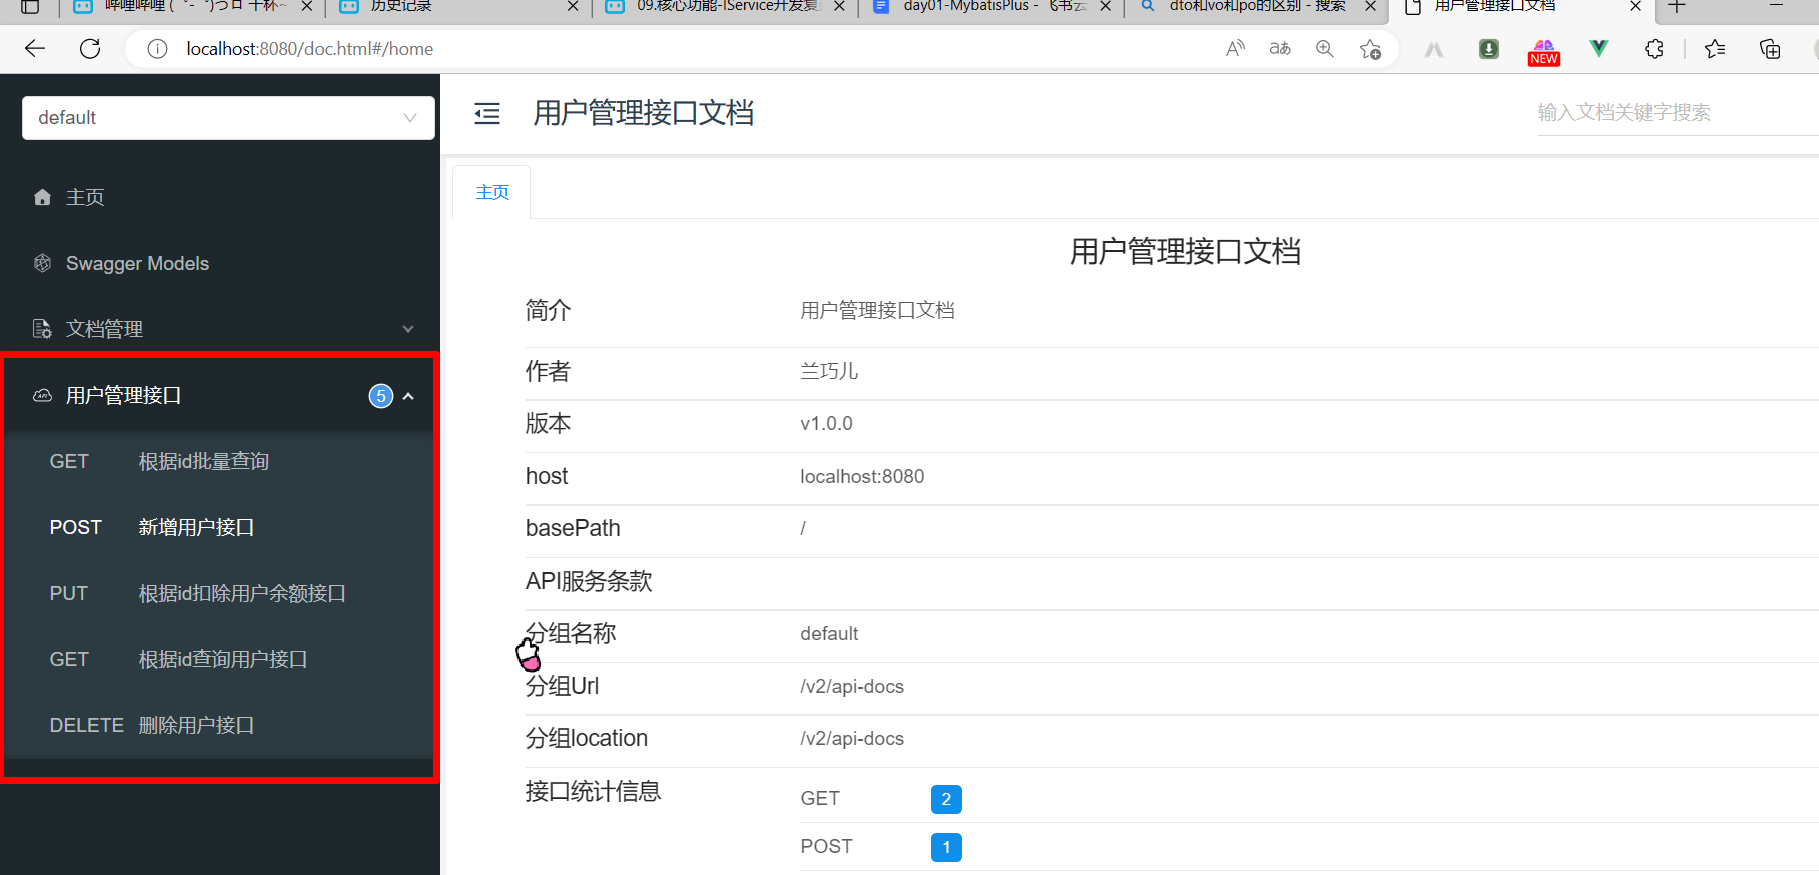
运行 Application 启动类
-
打开网页输入
http://localhost:8080/doc.html即可测试 -
tions.Update;
import org.yaml.snakeyaml.scanner.Constant;public interface UserMapper extends BaseMapper {
@Update(“update user SET balance = balance - #{money} where id =#{id}}”)
void deductBalance(@Param(“id”) Long id, @Param(“money”) Integer money);
}- **在 controller 类中定义方法** - ~~~java @ApiOperation("根据id扣除用户余额接口") @PutMapping("/users/{id}/deduction/{money}") public void deductMoneyById( @ApiParam("用户id") @PathVariable Long id, @ApiParam("用户余额") @PathVariable Integer money){ userService.deductBalance(id, money); }- 1
- 2
- 3
- 4
- 5
- 6
- 7
- 8
- 9
- 10
- 11
-
[外链图片转存中…(img-LyxfBDUe-1709726817092)]
-
测试之前的所有方法
-
运行 Application 启动类
-
打开网页输入
http://localhost:8080/doc.html即可测试 -
[外链图片转存中…(img-6y94xWvw-1709726817093)]
-
相关阅读:
推荐一款在线的JDK17中文文档
【Python&语义分割】Segment Anything(SAM)模型交互式分割+掩膜保存(三)
策略模式-实战
Docker build 技巧 —— 筑梦之路
CVE-2021-40444分析报告微软MHTML远程命令执行漏洞
代码随想录训练营day49, 买卖股票的最佳时机I/II
【从头构筑C#知识体系】1.4 事件
新品上市 | “电子表格软件”轻装上阵,企业报表用户的新选择
GAN实战笔记——第六章渐进式增长生成对抗网络(PGGAN)
Spring底层原理学习笔记--第三讲--(bean生命周期与模板方法)
- 原文地址:https://blog.csdn.net/m0_72817617/article/details/136516476

