-
在vue3中使用el-tree-select做一个树形下拉选择器
el-tree-select是一个含有下拉菜单的树形选择器,结合了 el-tree 和 el-select 两个组件的功能。
因为包含了el-tree的功能,我们可以自定义tree的节点,创造出想要的组件
使用default插槽可以自定义节点内容,它的default插槽相当于el-tree的default插槽
<template> <el-tree-select v-model="dirCode" :data="treeData" :highlight-current="true" :props="defaultProps" clearable filterable node-key="pathCode" :placeholder="placeholder" @clear="handleClear"> <template #default="{ node, data }"> <div class="custom-tree-node" @click="data.pathCode !== '-1' ? handleNodeClick(data) : ''"> <div class="tree-icon"> <svg-icon class="file" icon-class="file">svg-icon> div> <div class="tree-label one-line"> <span class="tree-label-text one-line"> {{ node.label }} span> div> div> template> el-tree-select> template>- 1
- 2
- 3
- 4
- 5
- 6
- 7
- 8
- 9
- 10
- 11
- 12
- 13
- 14
- 15
- 16
- 17
- 18
- 19
- 20
- 21
- 22
- 23
- 24
- 25
- 26
使用:model-value="modelValue"可以在适合用组件时直接v-model绑定值
我这里使用的是setup式的语法,当然也可以使用setup()方法<script setup> import { ref, reactive, watch, onMounted } from 'vue' import { getDirectory } from 'api/autoOperations/scriptManage' const props = defineProps({ placeholder: { type: String, default: '请选择目录', required: false }, code: { type: String, default: '', required: false }, path: { type: String, default: '', required: false } }) let dirCode = ref('') let dirPath = ref('') const treeData = ref([]) const emits = defineEmits(['change']) // 树状图默认配置 const defaultProps = reactive({ children: 'children', label: 'pathName', isLeaf(data, node) { return data.isLeaf == 'true' } }) watch(() => props.code, (val) => { if (val) { dirCode.value = val } }, { immediate: true, deep: true }) watch(() => props.path, (val) => { if (val) { dirPath.value = val } }, { immediate: true, deep: true }) onMounted(() => { getTreeData() }) // 这里从数据库获取数据 const getTreeData = () => { } const handleNodeClick = (data) => { dirCode.value = data.pathCode dirPath.value = data.dirPath emits('change', { dirPath: dirPath.value, dirCode: dirCode.value }) } const handleClear = () => { dirCode.value = '' dirPath.value = '' emits('change', { dirPath: dirPath.value, dirCode: dirCode.value }) } </script>- 1
- 2
- 3
- 4
- 5
- 6
- 7
- 8
- 9
- 10
- 11
- 12
- 13
- 14
- 15
- 16
- 17
- 18
- 19
- 20
- 21
- 22
- 23
- 24
- 25
- 26
- 27
- 28
- 29
- 30
- 31
- 32
- 33
- 34
- 35
- 36
- 37
- 38
- 39
- 40
- 41
- 42
- 43
- 44
- 45
- 46
- 47
- 48
- 49
- 50
- 51
- 52
- 53
- 54
- 55
- 56
- 57
- 58
- 59
- 60
- 61
- 62
- 63
- 64
- 65
- 66
- 67
- 68
- 69
- 70
- 71
- 72
- 73
- 74
- 75
- 76
- 77
- 78
- 79
- 80
- 81
- 82
这是我的自定义样式,用的scss
<style lang="scss" scoped> .custom-tree-node { display: flex; justify-content: space-between; align-items: center; width: calc(100% - 24px); font-size: 12px; line-height: 24px; .tree-icon { width: 20px; display: flex; align-items: center; .file { width: 20px; font-size: 20px; vertical-align: text-bottom; } } .tree-label { width: 100%; height: 24px; line-height: 24px; .tree-label-text { display: inline-block; max-width: calc(100% - 30px); } } } style>- 1
- 2
- 3
- 4
- 5
- 6
- 7
- 8
- 9
- 10
- 11
- 12
- 13
- 14
- 15
- 16
- 17
- 18
- 19
- 20
- 21
- 22
- 23
- 24
- 25
- 26
- 27
- 28
- 29
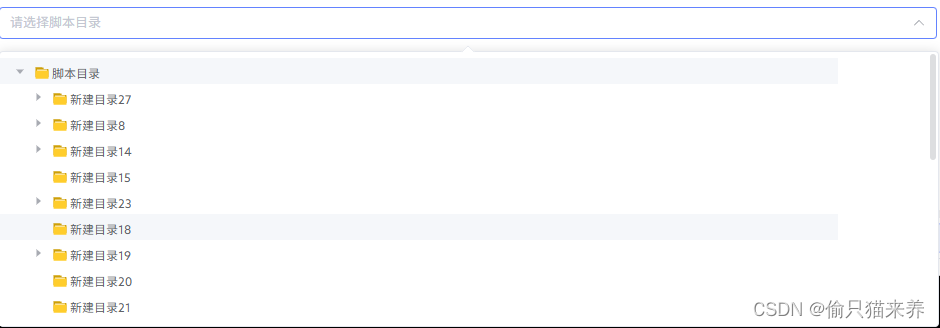
最后是效果图

-
相关阅读:
Apache POI 解析和处理Excel
腾然教育MCN覃小龙公子:覃宣量2022年2岁10个月亲子照
ES6 Proxy and Reflection API
【重识云原生】第六章容器基础6.4.9.3节——Service拓扑感知
web开发的前端和后端
打家劫舍3(二叉树型)Java
手机投屏到电脑时,手机提示连接失败
Web系统常见安全漏洞介绍及解决方案-XSS攻击
轻量级RPC分布式网络通信框架设计——服务配置中心zookeeper解析
前端工程化精讲第二十二课 案例分析:搭建基本的前端高效部署系统
- 原文地址:https://blog.csdn.net/qq_42602282/article/details/136510421
