-
vue项目中使用antvX6新手教程,附demo案例讲解(可拖拽流程图、网络拓扑图)
前言:
之前分别做了vue2和vue3项目里的网络拓扑图功能,发现对antv X6的讲解博客比较少,最近终于得闲码一篇了!
需求:
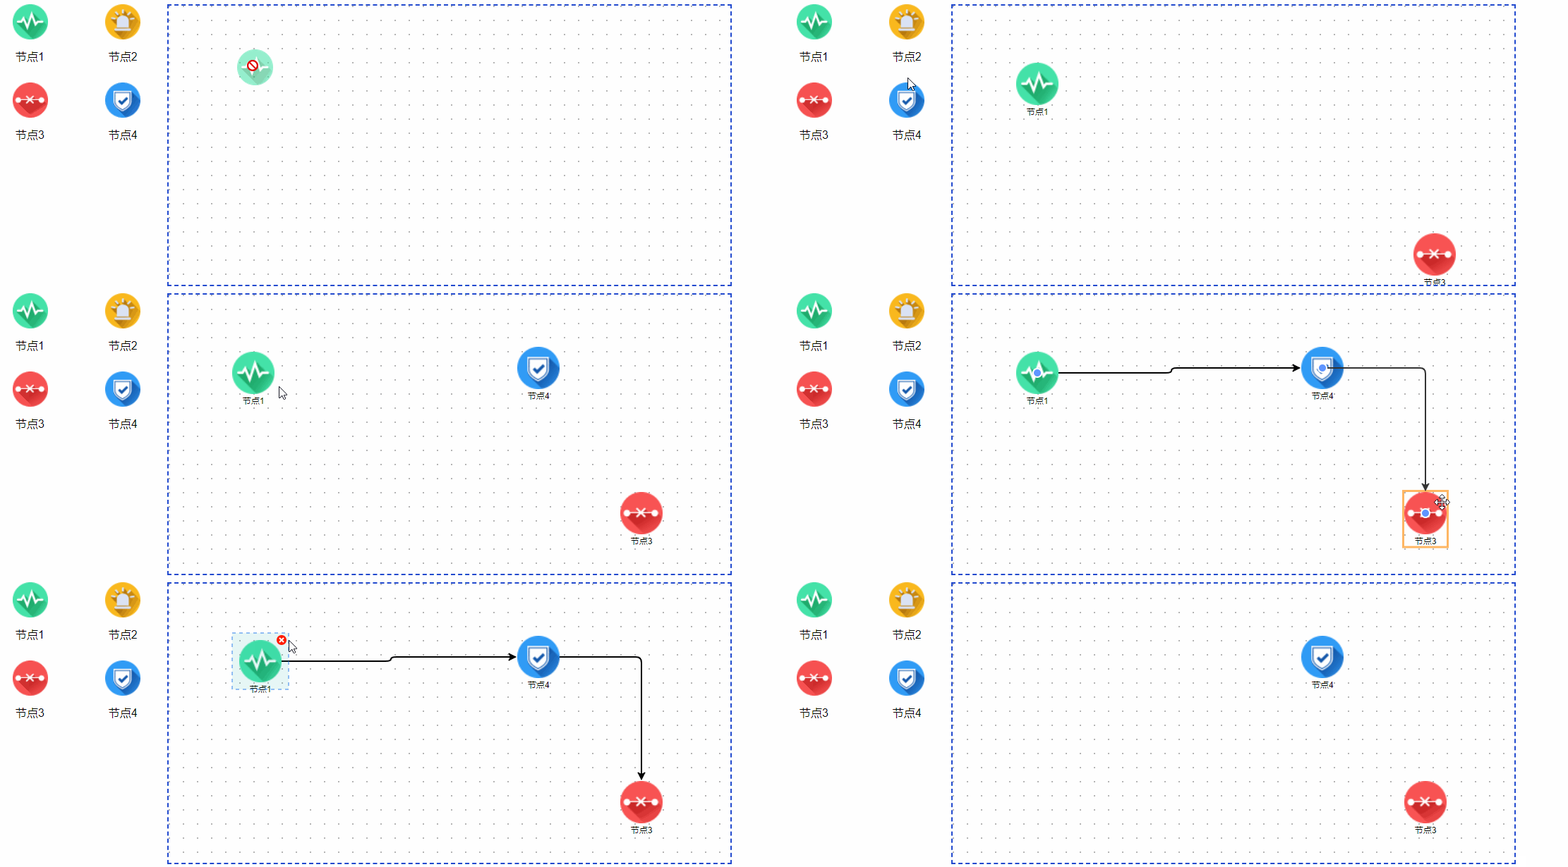
用户可以自己拖拽节点,节点之间可以随意连线,保存拓扑图数据后传给后端,然后在另一个页面拿到之前的数据进行渲染展示。
最终成品如下图:
一、准备工作:
1、装依赖
npm install --save @antv/x6

2、布局样式
首先我们先规划两块地方,左边用来放可以拖的节点,右边是antv X6的画布,如下图:(随意做的demo,比较丑哈)

布局代码:
- <template>
- <div class="dashboard-container">
- <p>选择节点p>
- <div class="antvBox">
- <div class="menu-list">
- <div v-for="item in moduleList" :key="item.id">
- <img :src="item.image" alt="" />
- <p>{{ item.name }}p>
- div>
- div>
- <div class="canvas-card">
- <div id="container" />
- div>
- div>
- div>
- template>
- <script>
- export default {
- name: "antvX6",
- data() {
- return {
- moduleList: [
- {
- id: 1,
- name: "节点1",
- image: require("@/assets/img/1.png"),
- },
- {
- id: 8,
- name: "节点2",
- image: require("@/assets/img/2.png"),
- },
- {
- id: 2,
- name: "节点3",
- image: require("@/assets/img/3.png"),
- },
- {
- id: 3,
- name: "节点4",
- image: require("@/assets/img/4.png"),
- },
- ],
- };
- },
- };
- script>
- <style lang="scss" scoped>
- .dashboard-container {
- .antvBox {
- display: flex;
- width: 100%;
- height: 100%;
- color: black;
- padding-top: 20px;
- .menu-list {
- height: 100%;
- width: 300px;
- padding: 0 10px;
- box-sizing: border-box;
- display: flex;
- justify-content: space-between;
- align-content: flex-start;
- flex-wrap: wrap;
- > div {
- margin-bottom: 10px;
- border-radius: 5px;
- padding: 0 10px;
- box-sizing: border-box;
- cursor: pointer;
- color: black;
- width: 105px;
- display: flex;
- flex-wrap: wrap;
- justify-content: center;
- img {
- height: 50px;
- width: 50px;
- }
- P {
- width: 90px;
- text-align: center;
- }
- }
- }
- .canvas-card {
- width: 1700px;
- height: 750px;
- box-sizing: border-box;
- > div {
- width: 1400px;
- height: 750px;
- border: 2px dashed #2149ce;
- }
- }
- }
- }
- style>
3、添加拖拽事件
我们要先给左侧图标加一个拖拽结束的事件:
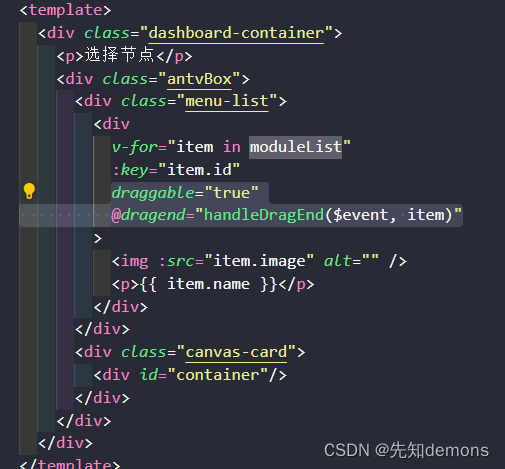
代码如下:
- draggable="true"
- @dragend="handleDragEnd($event, item)"
在methods定义handleDragEnd函数:
- // 拖动后松开鼠标触发事件
- handleDragEnd(e, item) {
- console.log(e, item); // 可以获取到最后拖动后松开鼠标时的坐标和拖动的节点相关信息
- },
效果 :
这个时候我们可以去页面试着拖动一个左边的图标,在鼠标松开时会看到控制台输出了节点相关信息,如下图:

以上就是准备工作了
二、使用antv X6
1、引入antv X6
import { Graph } from "@antv/x6";2、初始化画布
先在data(){}定义graph做画布示例对象:
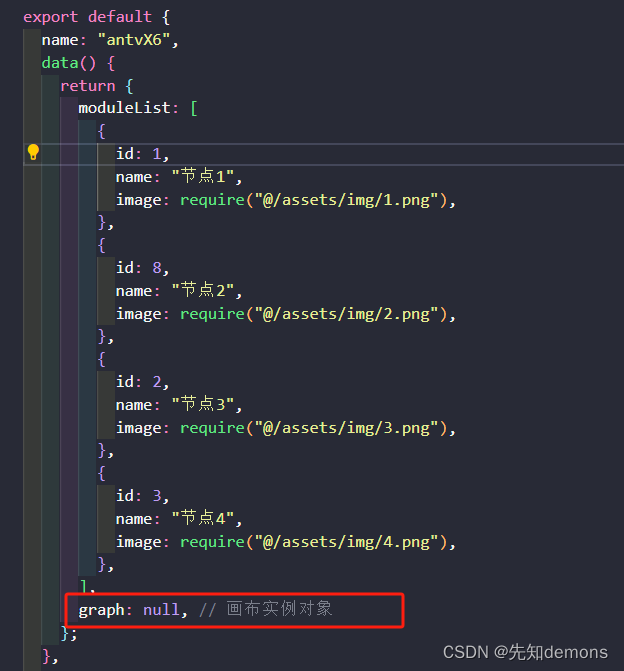
定义一个初始化函数,并且在mounted里面调用如下:
- initGraph() {
- const container = document.getElementById("container");
- this.graph = new Graph({
- container: container, // 画布容器
- width: container.offsetWidth, // 画布宽
- height: container.offsetHeight, // 画布高
- background: false, // 背景(透明)
- snapline: true, // 对齐线
- // 配置连线规则
- connecting: {
- snap: true, // 自动吸附
- allowBlank: false, // 是否允许连接到画布空白位置的点
- allowMulti: true, // 是否允许在相同的起始节点和终止之间创建多条边
- allowLoop: true, // 是否允许创建循环连线,即边的起始节点和终止节点为同一节点
- highlight: true, // 拖动边时,是否高亮显示所有可用的节点
- highlighting: {
- magnetAdsorbed: {
- name: "stroke",
- args: {
- attrs: {
- fill: "#5F95FF",
- stroke: "#5F95FF",
- },
- },
- },
- },
- router: {
- // 对路径添加额外的点
- name: "orth",
- },
- connector: {
- // 边渲染到画布后的样式
- name: "rounded",
- args: {
- radius: 8,
- },
- },
- },
- panning: {
- enabled: false,
- },
- mousewheel: {
- enabled: true, // 支持滚动放大缩小
- zoomAtMousePosition: true,
- modifiers: "ctrl",
- minScale: 0.5,
- maxScale: 3,
- },
- grid: {
- type: "dot",
- size: 20, // 网格大小 10px
- visible: true, // 渲染网格背景
- args: {
- color: "#a0a0a0", // 网格线/点颜色
- thickness: 2, // 网格线宽度/网格点大小
- },
- },
- });
- },
- mounted() {
- this.initGraph();
- },
这里就是一些对画布的配置,多数我都加了注释,如有部分配置不懂可以评论区问我或者查官方文档
3、画布添加节点
代码如下:
- //添加节点到画布
- addHandleNode(x, y, id, image, name) {
- this.graph.addNode({
- id: id,
- shape: "image", // 指定使用何种图形,默认值为 'rect'
- x: x,
- y: y,
- width: 60,
- height: 60,
- imageUrl: image,
- attrs: {
- body: {
- stroke: "#ffa940",
- fill: "#ffd591",
- },
- label: {
- textWrap: {
- width: 90,
- text: name,
- },
- fill: "black",
- fontSize: 12,
- refX: 0.5,
- refY: "100%",
- refY2: 4,
- textAnchor: "middle",
- textVerticalAnchor: "top",
- },
- },
- ports: {
- groups: {
- group1: {
- position: [30, 30],
- },
- },
- items: [
- {
- group: "group1",
- id: "port1",
- attrs: {
- circle: {
- r: 6,
- magnet: true,
- stroke: "#ffffff",
- strokeWidth: 2,
- fill: "#5F95FF",
- },
- },
- },
- ],
- },
- zIndex: 10,
- });
- },
这里使用了antv X6提供的一个方法addNode,传入的参数分别是:x坐标、y坐标、id节点唯一标识、image图片、name节点名称,我的案例这五种就够了,如果有不同需求可以自己加
4、调用addHandleNode函数
在我们之前写了的拖动节点结束后的函数(handleDragEnd)里面去调用上面那个函数,代码如下:
- // 拖动后松开鼠标触发事件
- handleDragEnd(e, item) {
- console.log(e, item); // 可以获取到最后拖动后松开鼠标时的坐标和拖动的节点相关信息
- this.addHandleNode(
- e.pageX - 500,
- e.pageY - 200,
- new Date().getTime(),
- item.image,
- item.name
- );
- },
以上所有操作做完应该就可以完成节点拖拽、连线功能:
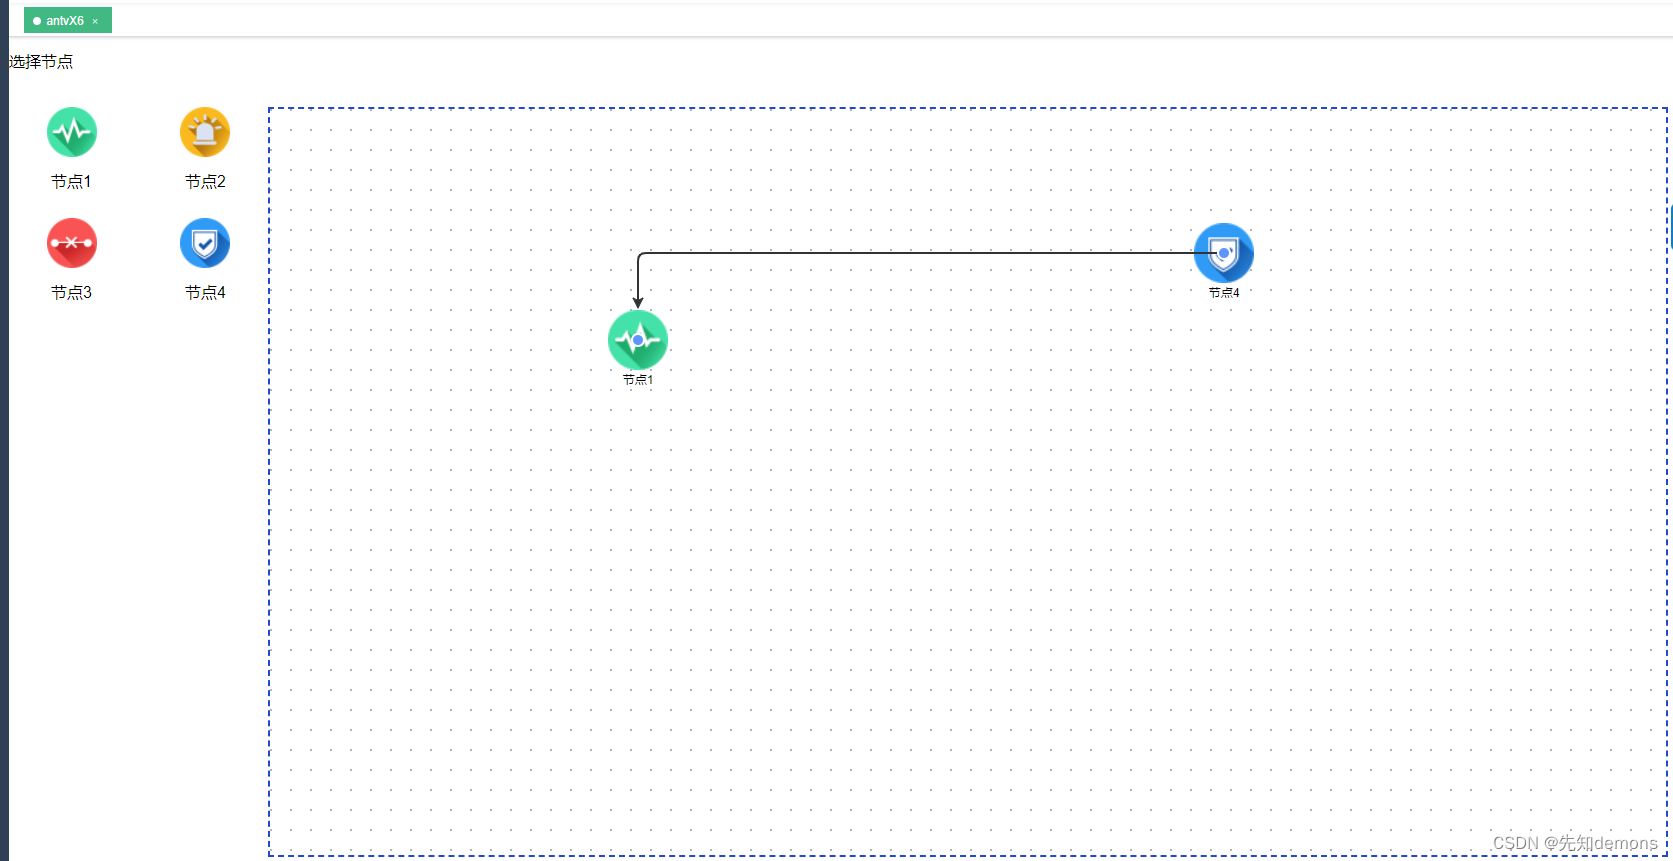
5、上图我们可以发现还差一些需求:
-
节点上的那个蓝色的连接桩一直显示,有点遮挡图标,也不太好看
-
节点无法删除
-
节点之间的连线也无法删除
这些都是需要点击操作的事件,需要了解antv X6的事件系统,官方文档贴图如下
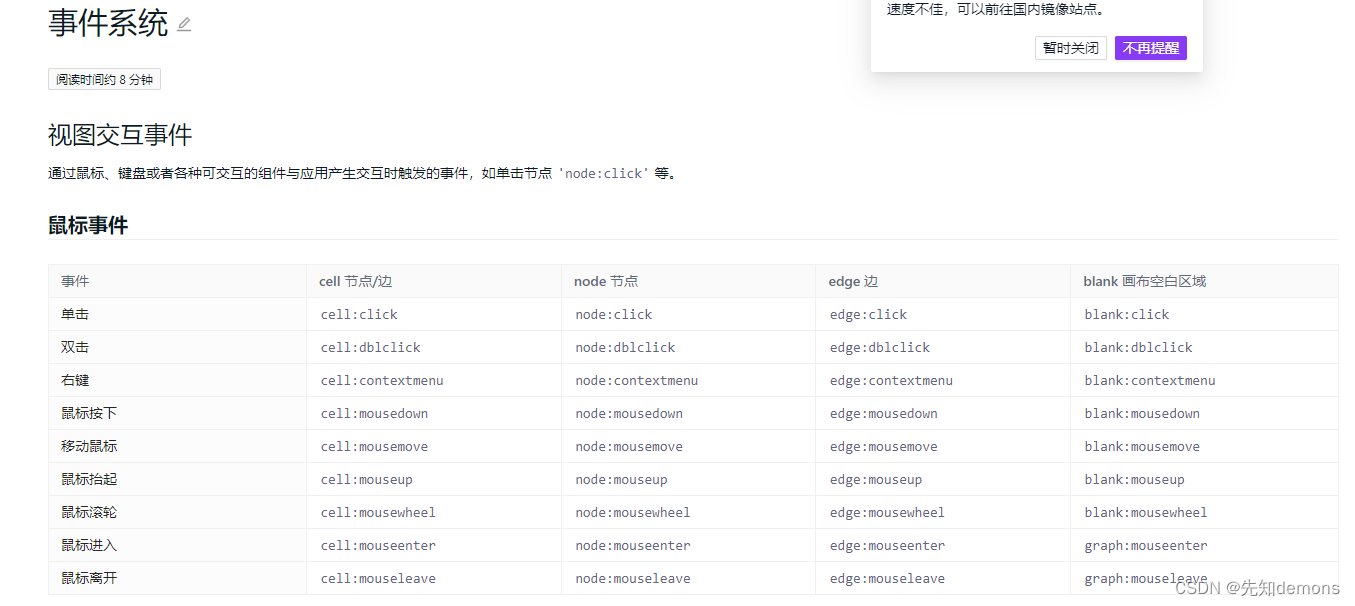
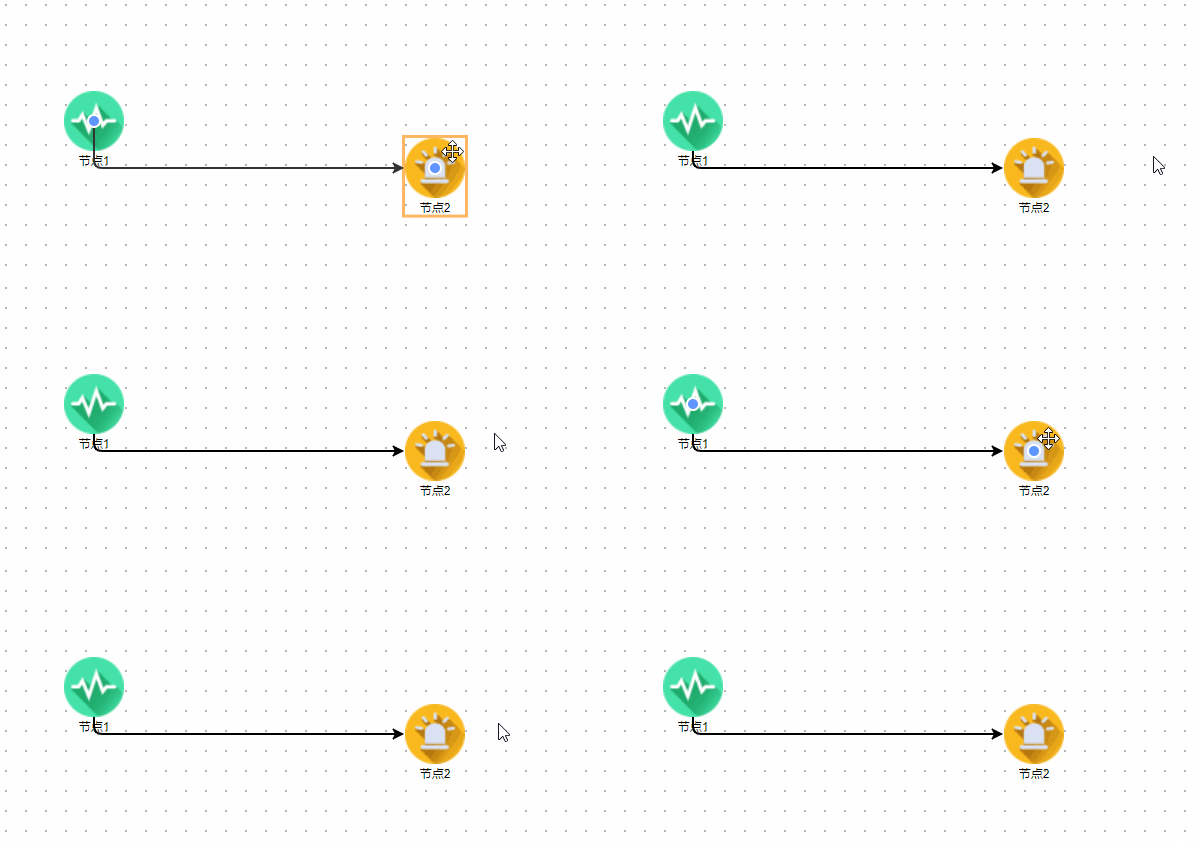
需求1:鼠标移入节点再显示连接桩
定义一个函数nodeAddEvent,代码如下:
- nodeAddEvent() {
- const { graph } = this;
- const container = document.getElementById("container");
- const changePortsVisible = (visible) => {
- const ports = container.querySelectorAll(".x6-port-body");
- for (let i = 0, len = ports.length; i < len; i = i + 1) {
- ports[i].style.visibility = visible ? "visible" : "hidden";
- }
- };
- this.graph.on("node:mouseenter", () => {
- changePortsVisible(true);
- });
- this.graph.on("node:mouseleave", () => {
- changePortsVisible(false);
- });
- },
然后把这个函数在initGraph里面调用一下:

效果如下:
需求2:可以选中并删除节点
想要的效果如下图:
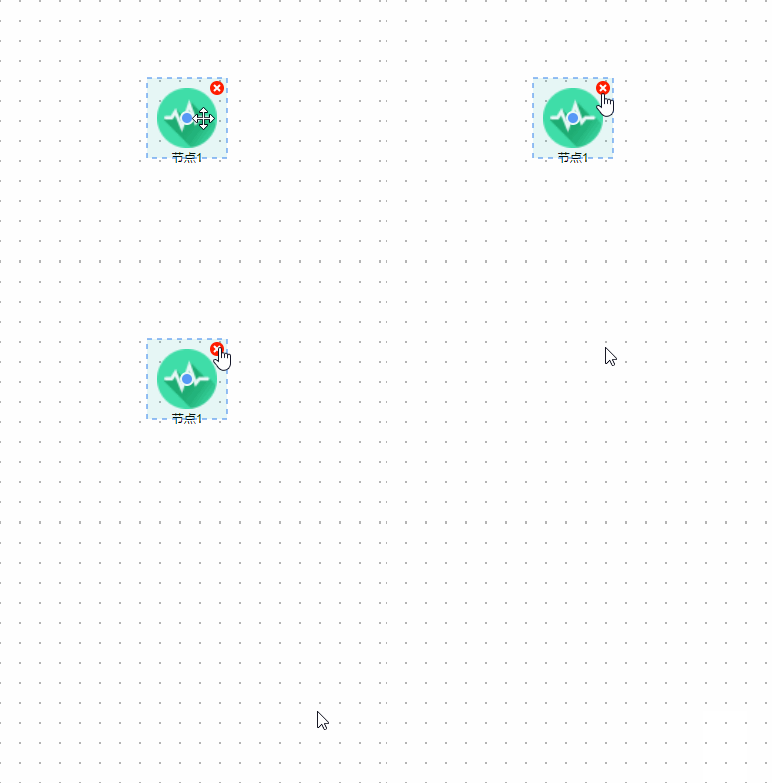
先在data(){}里面定义curSelectNode,然后在nodeAddEvent函数里加入以下代码:
- // 节点绑定点击事件
- this.graph.on("node:click", ({ e, x, y, node, view }) => {
- console.log("点击!!!", node);
- // 判断是否有选中过节点
- if (this.curSelectNode) {
- // 移除选中状态
- this.curSelectNode.removeTools();
- // 判断两次选中节点是否相同
- if (this.curSelectNode !== node) {
- node.addTools([
- {
- name: "boundary",
- args: {
- attrs: {
- fill: "#16B8AA",
- stroke: "#2F80EB",
- strokeWidth: 1,
- fillOpacity: 0.1,
- },
- },
- },
- {
- name: "button-remove",
- args: {
- x: "100%",
- y: 0,
- offset: {
- x: 0,
- y: 0,
- },
- },
- },
- ]);
- this.curSelectNode = node;
- } else {
- this.curSelectNode = null;
- }
- } else {
- this.curSelectNode = node;
- node.addTools([
- {
- name: "boundary",
- args: {
- attrs: {
- fill: "#16B8AA",
- stroke: "#2F80EB",
- strokeWidth: 1,
- fillOpacity: 0.1,
- },
- },
- },
- {
- name: "button-remove",
- args: {
- x: "100%",
- y: 0,
- offset: {
- x: 0,
- y: 0,
- },
- },
- },
- ]);
- }
- });
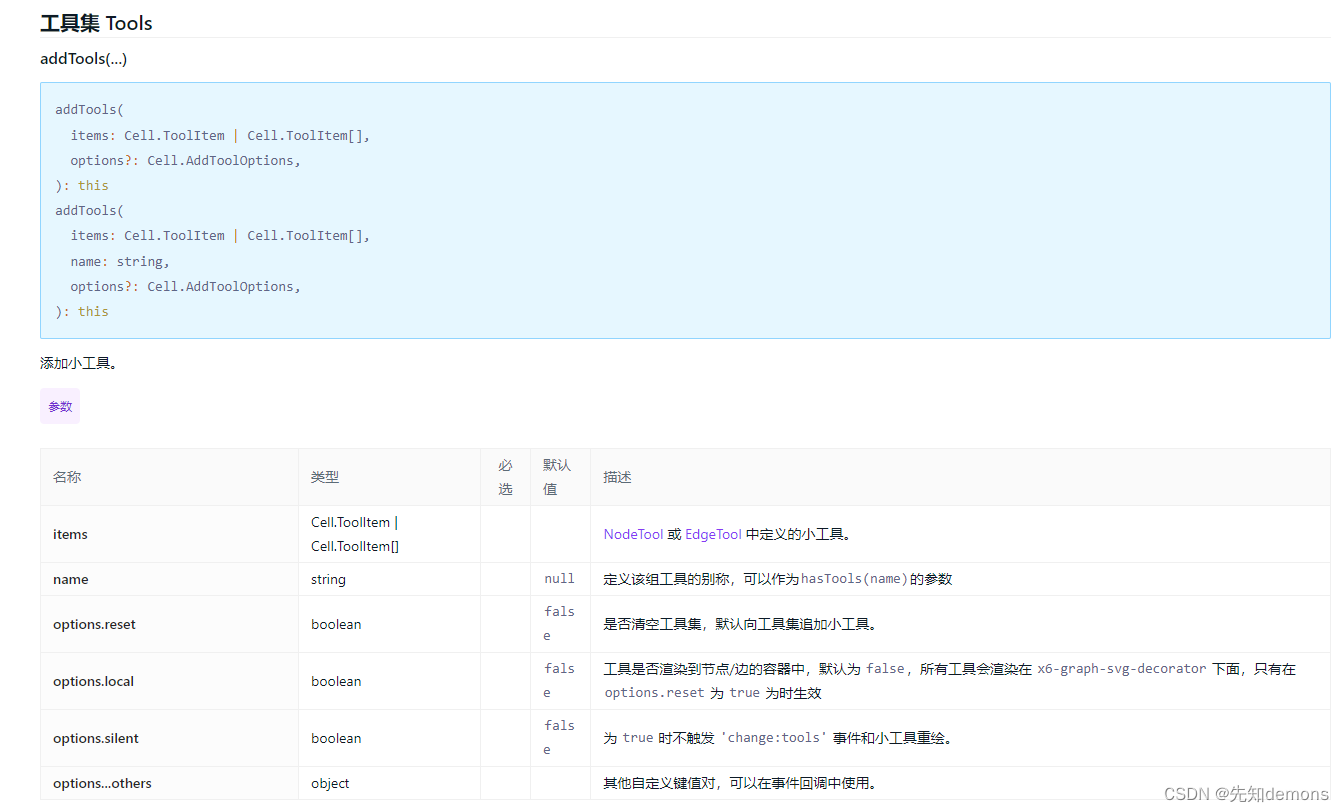
这里使用了antv X6的工具集,官方文档贴图如下:(需求3也使用了工具集)
需求3:可以选中并删除节点间连线
想要的效果如下:
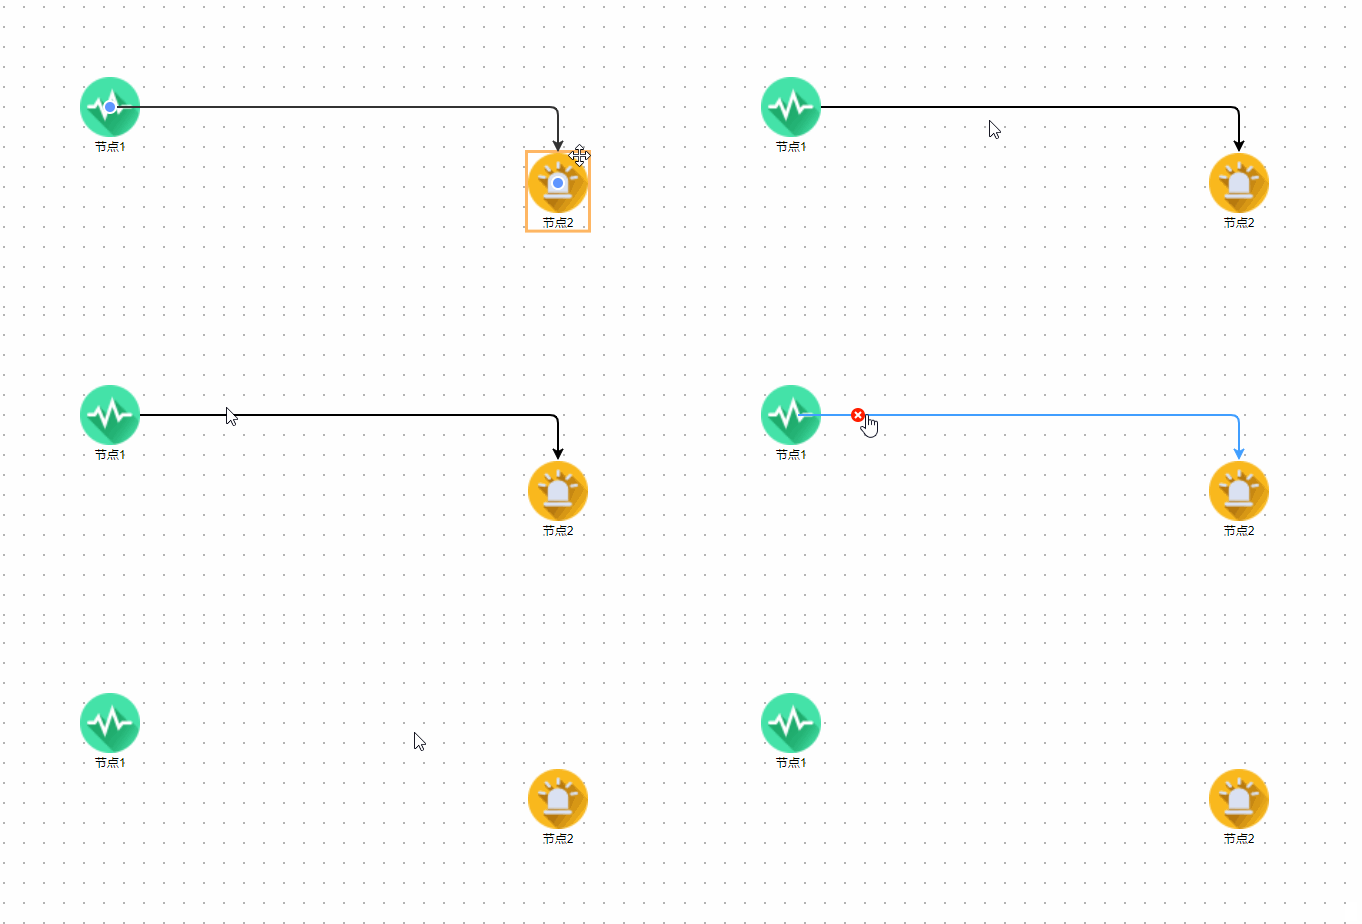
在nodeAddEvent函数里加入以下代码:
- // 连线绑定悬浮事件
- this.graph.on("cell:mouseenter", ({ cell }) => {
- if (cell.shape == "edge") {
- cell.addTools([
- {
- name: "button-remove",
- args: {
- x: "100%",
- y: 0,
- offset: {
- x: 0,
- y: 0,
- },
- },
- },
- ]);
- cell.setAttrs({
- line: {
- stroke: "#409EFF",
- },
- });
- cell.zIndex = 99; // 保证当前悬停的线在最上层,不会被遮挡
- }
- });
- this.graph.on("cell:mouseleave", ({ cell }) => {
- if (cell.shape === "edge") {
- cell.removeTools();
- cell.setAttrs({
- line: {
- stroke: "black",
- },
- });
- cell.zIndex = 1; // 保证未悬停的线在下层,不会遮挡悬停的线
- }
- });
6、输出拓扑图信息
可以写一个按钮来保存拓扑图信息,这里介绍以下两个个人感觉常用的函数:
- //保存画布,并提交
- save() {
- console.log(this.graph.toJSON(), "graph");
- console.log(this.graph.getNodes(), "node");
- },
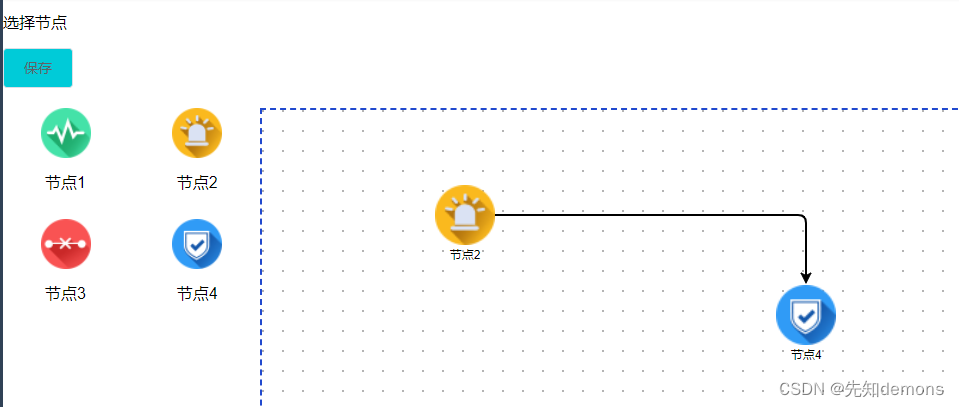
如上图所示,点击保存按钮后 ,控制台会输出:

第一个是整个图的信息,有节点有连线,可以自己展开看看里面的数据,第二个只有节点数据
四、总结
antv X6 是基于 HTML 和 SVG 的图编辑引擎,提供低成本的定制能力和开箱即用的内置扩展,方便我们快速搭建 DAG 图、ER 图、流程图、血缘图等应用。
这里只是介绍了一种基础拓扑图的案例,也可以将节点image换成react,做一个编辑节点内文字的功能,就变成流程图了。
查看官方文档和示例,也很容易加入其他的功能
antv X6案例链接:https://x6.antv.antgroup.com/examples
api文档:Graph | X6
-
相关阅读:
【Sql】sql server还原数据库的时候,提示:因为数据库正在使用,所以无法获得对数据库的独占访问权。
CS224W 13 Community Detection in Networks
2022联想创新科技大会--数字底座筑基行业智能
RabbitMQ 保证消息可靠性
JSTL 标签库
CAD布局图纸导出为模型图纸
Qt中QFile、QByteArray QDataStream和QTextStream区别
Android11去掉掉连接偏好里的【蓝牙】、【投射】、【通过蓝牙收到的文件】这三个菜单
Web 部署
超好用的大数据分析平台分享,SuccBI 一站式大数据分析平台
- 原文地址:https://blog.csdn.net/wzy_PROTEIN/article/details/136305034
