-
【初始RabbitMQ】延迟队列的实现
延迟队列概念
延迟队列中的元素是希望在指定时间到了之后或之前取出和处理消息,并且队列内部是有序的。简单来说,延时队列就是用来存放需要在指定时间被处理的元素的队列
延迟队列使用场景
延迟队列经常使用的场景有以下几点:
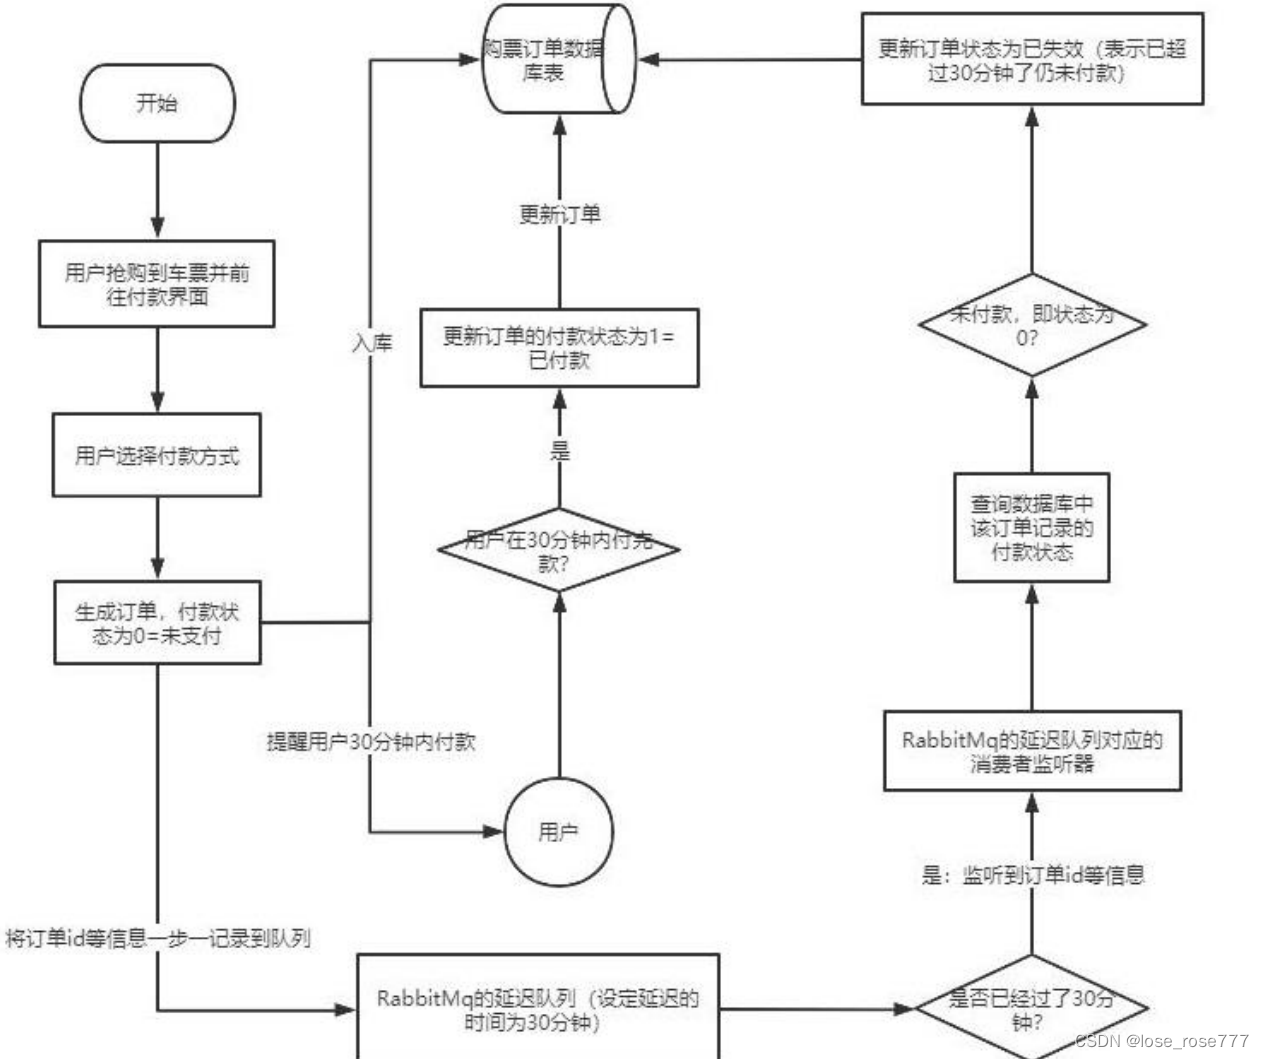
- 订单在十分钟之内未支付则自动取消
- 新创建的店铺,如果在十天内都没有上传过商品,则自动发送消息提醒
- 用户注册成功后,如果三天内没有登陆则进行短信提醒
- 用户发起退款,如果三天内没有得到处理则通知相关运营人员
- 预定会议后,需要在预定的时间点前十分钟通知各个与会人员参加会议
这些场景都有一个特点,需要在某个事件发生之后或者之前的指定时间点完成某一项任务,如: 发生订单生成事件,在十分钟之后检查该订单支付状态,然后将未支付的订单进行关闭;看起来似乎 使用定时任务,一直轮询数据,每秒查一次,取出需要被处理的数据,然后处理不就完事了吗?如果 数据量比较少,确实可以这样做,比如:对于“如果账单一周内未支付则进行自动结算”这样的需求, 如果对于时间不是严格限制,而是宽松意义上的一周,那么每天晚上跑个定时任务检查一下所有未支 付的账单,确实也是一个可行的方案。但对于数据量比较大,并且时效性较强的场景,如:“订单十 分钟内未支付则关闭“,短期内未支付的订单数据可能会有很多,活动期间甚至会达到百万甚至千万 级别,对这么庞大的数据量仍旧使用轮询的方式显然是不可取的,很可能在一秒内无法完成所有订单 的检查,同时会给数据库带来很大压力,无法满足业务要求而且性能低下
RabbitMQ中的TTL
TTL表示RabbitMQ中的一个消息或者队列的属性,表明一条消息或者该队列中所有消息的最大存活时间,单位是毫秒。换句话说,如果一条消息设置了 TTL 属性或者进入了设置 TTL 属性的队列,那么这 条消息如果在 TTL 设置的时间内没有被消费,则会成为"死信"。如果同时配置了队列的 TTL 和消息的 TTL,那么较小的那个值将会被使用
消息设置TTL
- rabbitTemplate.convertAndSend(
- "myExchange", // 交换机名称
- "XC", // 路由键
- message,
- correlationData -> {
- // 设置消息的 TTL
- correlationData.getMessageProperties().setExpiration(String.valueOf(ttlTime));
- return correlationData;
- }
- );
队列设置TTL
- Map
- args.put("x-message-ttl", 60000); // 设置队列中所有消息的TTL为60秒
- return new Queue("myQueue", true, false, false, args);
两者区别
如果设置了队列的 TTL 属性,那么一旦消息过期,就会被队列丢弃(如果配置了死信队列被丢到死信队 列中),而第二种方式,消息即使过期,也不一定会被马上丢弃,因为消息是否过期是在即将投递到消费者之前判定的,如果当前队列有严重的消息积压情况,则已过期的消息也许还能存活较长时间;另外,还需要注意的一点是,如果不设置 TTL,表示消息永远不会过期,如果将 TTL 设置为 0,则表示除非此时可以 直接投递该消息到消费者,否则该消息将会被丢弃
整合SpringBoot
创建项目

添加依赖
- "1.0" encoding="UTF-8"?>
"http://maven.apache.org/POM/4.0.0" xmlns:xsi="http://www.w3.org/2001/XMLSchema-instance" - xsi:schemaLocation="http://maven.apache.org/POM/4.0.0 https://maven.apache.org/xsd/maven-4.0.0.xsd">
4.0.0 org.springframework.boot spring-boot-starter-parent 3.2.2 com.example springboot-rabbitmq 0.0.1-SNAPSHOT demo Demo project for Spring Boot 17 org.springframework.boot spring-boot-starter-amqp org.springframework.boot spring-boot-starter-web org.projectlombok lombok true org.springframework.boot spring-boot-starter-test test org.springframework.amqp spring-rabbit-test test org.springframework.boot spring-boot-maven-plugin
修改配置文件
- spring.rabbitmq.host=118.31.6.132
- spring.rabbitmq.port=5672
- spring.rabbitmq.username=admin
- spring.rabbitmq.password=123
队列TTL
代码架构图
创建两个队列 QA 和 QB,两者队列 TTL 分别设置为 10S 和 40S,然后在创建一个交换机 X 和死信交 换机 Y,它们的类型都是 direct,创建一个死信队列 QD,它们的绑定关系如下:

配置文件类代码
- package com.example.demo.config;
- import org.springframework.amqp.core.*;
- import org.springframework.beans.factory.annotation.Qualifier;
- import org.springframework.context.annotation.Bean;
- import org.springframework.context.annotation.Configuration;
- import java.util.HashMap;
- import java.util.Map;
- @Configuration
- public class TtlQueueConfig {
- public static final String X_EXCHANGE = "X";
- public static final String QUEUE_A = "QA";
- public static final String QUEUE_B = "QB";
- public static final String Y_DEAD_LETTER_EXCHANGE = "Y";
- public static final String DEAD_LETTER_QUEUE = "QD";
- @Bean("xExchange")
- public DirectExchange xExchange(){
- return new DirectExchange(X_EXCHANGE);
- }
- @Bean("yExchange")
- public DirectExchange yExchange(){
- return new DirectExchange(Y_DEAD_LETTER_EXCHANGE);
- }
- @Bean("queueA")
- public Queue queueA(){
- Map
- args.put("x-dead-letter-exchange",Y_DEAD_LETTER_EXCHANGE);
- args.put("x-dead-letter-routing-key","YD");
- args.put("x-message-ttl",10000);
- return QueueBuilder.durable(QUEUE_A).withArguments(args).build();
- }
- @Bean("queueB")
- public Queue queueB(){
- Map
- args.put("x-dead-letter-exchange", Y_DEAD_LETTER_EXCHANGE);
- args.put("x-dead-letter-routing-key", "YD");
- args.put("x-message-ttl", 40000);
- return QueueBuilder.durable(QUEUE_B).withArguments(args).build();
- }
- @Bean
- public Binding queueaBindingX(@Qualifier("queueA") Queue queueA,
- @Qualifier("xExchange") DirectExchange xExchange){
- return BindingBuilder.bind(queueA).to(xExchange).with("XA");
- }
- @Bean
- public Binding queuebBindingX(@Qualifier("queueB") Queue queue1B,
- @Qualifier("xExchange") DirectExchange xExchange){
- return BindingBuilder.bind(queue1B).to(xExchange).with("XB");
- }
- @Bean
- public Binding deadLetterBindingQAD(@Qualifier("queueD") Queue queueD,
- @Qualifier("yExchange") DirectExchange yExchange){
- return BindingBuilder.bind(queueD).to(yExchange).with("YD");
- }
- @Bean("queueD")
- public Queue queueD(){
- return new Queue(DEAD_LETTER_QUEUE);
- }
- }
消息生产者代码
- package com.example.demo.controller;
- import lombok.extern.slf4j.Slf4j;
- import org.springframework.amqp.rabbit.core.RabbitTemplate;
- import org.springframework.beans.factory.annotation.Autowired;
- import org.springframework.web.bind.annotation.GetMapping;
- import org.springframework.web.bind.annotation.PathVariable;
- import org.springframework.web.bind.annotation.RequestMapping;
- import org.springframework.web.bind.annotation.RestController;
- import java.util.Date;
- @Slf4j
- @RequestMapping("/ttl")
- @RestController
- public class SendMsgController {
- @Autowired
- private RabbitTemplate rabbitTemplate;
- @GetMapping("/sendMsg/{message}")
- public void sendMsg(@PathVariable String message){
- log.info("当前时间:{},发送一个消息给两个TTL队列:{}",new Date(),message);
- rabbitTemplate.convertAndSend("X","XA","消息来自ttl为10s的队列:"+message);
- rabbitTemplate.convertAndSend("X","XB","消息来自ttl为40s的队列:"+message);
- }
- }
消息消费者代码
- package com.example.demo.consumer;
- import com.rabbitmq.client.Channel;
- import lombok.extern.slf4j.Slf4j;
- import org.springframework.amqp.core.Message;
- import org.springframework.amqp.rabbit.annotation.RabbitListener;
- import org.springframework.stereotype.Component;
- import java.io.IOException;
- import java.util.Date;
- @Slf4j
- @Component
- public class DeadLetterQueueConsumer {
- //接受消息
- @RabbitListener(queues = "QD")
- public void receiveD(Message message, Channel channel) throws IOException {
- String msg = new String(message.getBody());
- log.info("当前时间:{},收到死信队列信息{}", new Date().toString(), msg);
- }
- }
发送一个请求:127.0.0.1:8080/ttl/sendMsg/haha

第一条消息在 10S 后变成了死信消息,然后被消费者消费掉,第二条消息在 40S 之后变成了死信消息, 然后被消费掉,这样一个延时队列就打造完成了
不过,如果这样使用的话,岂不是每增加一个新的时间需求,就要新增一个队列,这里只有 10S 和 40S 两个时间选项,如果需要一个小时后处理,那么就需要增加 TTL 为一个小时的队列,如果是预定会议室然后提前通知这样的场景,岂不是要增加无数个队列才能满足需求
延迟队列优化
代码架构图
在这里新增了一个队列 QC,绑定关系如下,该队列不设置 TTL 时间
配置文件类代码
- package com.example.demo.config;
- import org.springframework.amqp.core.*;
- import org.springframework.beans.factory.annotation.Qualifier;
- import org.springframework.context.annotation.Bean;
- import org.springframework.stereotype.Component;
- import java.util.HashMap;
- import java.util.Map;
- @Component
- public class MsgTtlQueueConfig {
- public static final String Y_DEAD_LETTER_EXCHANGE = "Y";
- public static final String QUEUE_C = "QC";
- //声明队列 C 死信交换机
- @Bean("queueC")
- public Queue queueB(){
- Map
- //声明当前队列绑定的死信交换机
- args.put("x-dead-letter-exchange", Y_DEAD_LETTER_EXCHANGE);
- //声明当前队列的死信路由 key
- args.put("x-dead-letter-routing-key", "YD");
- //没有声明 TTL 属性
- return QueueBuilder.durable(QUEUE_C).withArguments(args).build();
- }
- //声明队列 B 绑定 X 交换机
- @Bean
- public Binding queuecBindingX(@Qualifier("queueC") Queue queueC,
- @Qualifier("xExchange") DirectExchange xExchange){
- return BindingBuilder.bind(queueC).to(xExchange).with("XC");
- }
- }
消息生产者代码
- package com.example.demo.controller;
- import lombok.extern.slf4j.Slf4j;
- import org.springframework.amqp.rabbit.core.RabbitTemplate;
- import org.springframework.beans.factory.annotation.Autowired;
- import org.springframework.web.bind.annotation.GetMapping;
- import org.springframework.web.bind.annotation.PathVariable;
- import org.springframework.web.bind.annotation.RequestMapping;
- import org.springframework.web.bind.annotation.RestController;
- import java.util.Date;
- @Slf4j
- @RequestMapping("/ttl")
- @RestController
- public class SendMsgController {
- @Autowired
- private RabbitTemplate rabbitTemplate;
- @GetMapping("sendExpirationMsg/{message}/{ttlTime}")
- public void sendMsg(@PathVariable String message,@PathVariable String ttlTime) {
- rabbitTemplate.convertAndSend("X", "XC", message, correlationData ->{
- correlationData.getMessageProperties().setExpiration(ttlTime);
- return correlationData;
- });
- log.info("当前时间:{},发送一条时长{}毫秒 TTL 信息给队列 C:{}", new Date(),ttlTime, message);
- }
- }
发起请求:
http://localhost:8080/ttl/sendExpirationMsg/你好 1/20000 http://localhost:8080/ttl/sendExpirationMsg/你好 2/2000

看起来似乎没什么问题,但是在最开始的时候,就介绍过如果使用在消息属性上设置 TTL 的方式,消 息可能并不会按时“死亡“,因为 RabbitMQ 只会检查第一个消息是否过期,如果过期则丢到死信队列, 如果第一个消息的延时时长很长,而第二个消息的延时时长很短,第二个消息并不会优先得到执行
Rabbitmq 插件实现延迟队列
如果不能实现在消息粒度上的 TTL,并使其在设置的 TTL 时间 及时死亡,就无法设计成一个通用的延时队列。那如何解决呢,接下来我们就去解决该问题
安装延时队列插件
在官网上下载 https://www.rabbitmq.com/community-plugins.html,下载 rabbitmq_delayed_message_exchange 插件,然后解压放置到 RabbitMQ 的插件目录。或者
链接:https://pan.baidu.com/s/1U7rdXf2yk9PRGxOJxhcY8A?pwd=d0jd
提取码:d0jd进入 RabbitMQ 的安装目录下的 plgins 目录,执行下面命令让该插件生效 rabbitmq_delayed_message_exchange

重启RabbitMQ:systemctl restart rabbitmq-server
然后我们就可以看管理界面
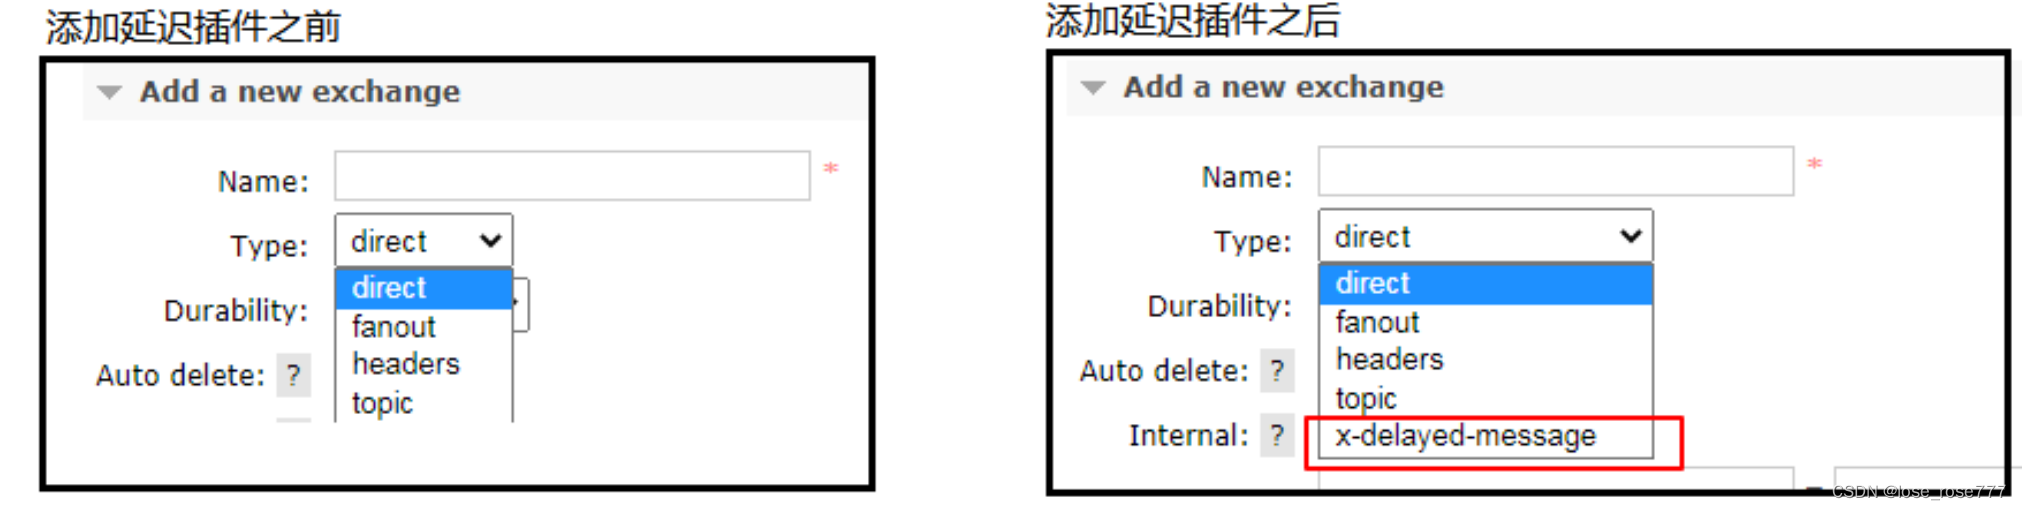
代码架构图
在这里新增了一个队列 delayed.queue,一个自定义交换机 delayed.exchange,绑定关系如下:
配置文件类代码
- package com.example.demo.config;
- import org.springframework.amqp.core.Binding;
- import org.springframework.amqp.core.BindingBuilder;
- import org.springframework.amqp.core.CustomExchange;
- import org.springframework.amqp.core.Queue;
- import org.springframework.beans.factory.annotation.Qualifier;
- import org.springframework.context.annotation.Bean;
- import org.springframework.context.annotation.Configuration;
- import org.springframework.amqp.core.*;
- import java.util.HashMap;
- import java.util.Map;
- @Configuration
- public class DelayedQueueConfig {
- public static final String DELAYED_QUEUE_NAME = "delayed.queue";
- public static final String DELAYED_EXCHANGE_NAME = "delayed.exchange";
- public static final String DELAYED_ROUTING_KEY = "delayed.routingkey";
- @Bean
- public Queue delayedQueue(){
- return new Queue(DELAYED_QUEUE_NAME);
- }
- //自定义交换机 我们这里实现一个延迟交换机
- @Bean
- public CustomExchange delayedExchange(){
- Map
- //自定义交换机的类型
- args.put("x-delayed-type", "direct");
- /**
- * 1、交换机名称
- * 2、交换机类型
- * 3、持久化
- * 4、自动删除
- * 5、其他参数
- */
- return new CustomExchange(DELAYED_EXCHANGE_NAME, "x-delayed-message", true, false,
- args);
- }
- @Bean
- public Binding bindingDelayedQueue(@Qualifier("delayedQueue") Queue queue,
- @Qualifier("delayedExchange") CustomExchange
- delayedExchange) {
- return BindingBuilder.bind(queue).to(delayedExchange).with(DELAYED_ROUTING_KEY).noargs();
- }
- }
消息生产者代码
- package com.example.demo.controller;
- import lombok.extern.slf4j.Slf4j;
- import org.springframework.amqp.rabbit.core.RabbitTemplate;
- import org.springframework.beans.factory.annotation.Autowired;
- import org.springframework.web.bind.annotation.GetMapping;
- import org.springframework.web.bind.annotation.PathVariable;
- import org.springframework.web.bind.annotation.RequestMapping;
- import org.springframework.web.bind.annotation.RestController;
- import java.util.Date;
- @Slf4j
- @RequestMapping("/ttl")
- @RestController
- public class SendMsgController {
- @Autowired
- private RabbitTemplate rabbitTemplate;
- public static final String DELAYED_EXCHANGE_NAME = "delayed.exchange";
- public static final String DELAYED_ROUTING_KEY = "delayed.routingkey";
- @GetMapping("sendDelayMsg/{message}/{delayTime}")
- public void sendMsg(@PathVariable String message,@PathVariable Integer delayTime) {
- rabbitTemplate.convertAndSend(DELAYED_EXCHANGE_NAME, DELAYED_ROUTING_KEY, message,
- correlationData ->{
- correlationData.getMessageProperties().setDelay(delayTime);
- return correlationData;
- });
- }
- }
消息消费者代码
- package com.example.demo.consumer;
- import com.rabbitmq.client.Channel;
- import lombok.extern.slf4j.Slf4j;
- import org.springframework.amqp.core.Message;
- import org.springframework.amqp.rabbit.annotation.RabbitListener;
- import org.springframework.stereotype.Component;
- import java.io.IOException;
- import java.util.Date;
- @Slf4j
- @Component
- public class DeadLetterQueueConsumer {
- public static final String DELAYED_QUEUE_NAME = "delayed.queue";
- @RabbitListener(queues = DELAYED_QUEUE_NAME)
- public void receiveDelayedQueue(Message message){
- String msg = new String(message.getBody());
- log.info("当前时间:{},收到延时队列的消息:{}", new Date().toString(), msg);
- }
- }
发起请求:
http://localhost:8080/ttl/sendDelayMsg/come on baby1/20000 http://localhost:8080/ttl/sendDelayMsg/come on baby2/2000

第二个消息被先消费掉了,符合预期
总结
延时队列在需要延时处理的场景下非常有用,使用 RabbitMQ 来实现延时队列可以很好的利用 RabbitMQ 的特性,如:消息可靠发送、消息可靠投递、死信队列来保障消息至少被消费一次以及未被正 确处理的消息不会被丢弃。另外,通过 RabbitMQ 集群的特性,可以很好的解决单点故障问题,不会因为 单个节点挂掉导致延时队列不可用或者消息丢失
-
相关阅读:
名词作形容词的用法
2022年第二季度全球网络攻击创新高,如何有效防范网络攻击
【项目管理】Java使用pdfbox调用打印机打印PDF文件
TSRFormer:复杂场景的表格结构识别新利器
Learning Sample Relationship for Exposure Correction 论文阅读笔记
windows驱动远程VS 2019调试
C# 代码合集
JDBC 连接数据库的四种方式
【扩散模型从原理到实战】Chapter2 Hugging Face简介
OpenAI官方吴达恩《ChatGPT Prompt Engineering 提示词工程师》(3)摘要
- 原文地址:https://blog.csdn.net/loss_rose777/article/details/136208626