-
RabbitMQ的安装与使用
介绍
RabbitMQ是一个在AMQP基础上完成的,可复用的企业消息系统。他遵循Mozilla Public License开源协议。开发语言为Erlang。
linux系统中安装RabbitMQ比较繁琐,这里使用的是Docker安装。一、RabbitMQ的安装
1 查找镜像
docker search rabbitmq:management- 1

2 拉取镜像
docker pull macintoshplus/rabbitmq-management- 1

3 查看镜像
docker images- 1

4 创建容器
docker run -d --hostname mzw-rabbitmq --name rabbitmq -e RABBITMQ_DEFAULT_USER=admin -e RABBITMQ_DEFAULT_PASS=admin -p 15672:15672 -p 5672:5672 c20- 1
命令解读:
- 运行一个镜像
- -d 后台守护运行
- –hostname mzw-rabbitmq 指定主机名称
- –name 指定容器名称
- -e RABBITMQ_DEFAULT_USER=admin 指定用户名
- -e RABBITMQ_DEFAULT_PASS=admin 指定密码
- -p 15672:15672 -p 5672:5672 端口映射
- c20 镜像ID 简写

5 查看容器
docker ps- 1

6 访问测试
访问地址:http://192.168.2.xx:15672/

输入启动容器时设置的用户密码登录

这就表示RabbitMQ安装成功了二、RabbitMQ的使用
1 创建项目
创建SpringBoot项目并引入相关依赖

2 配置文件
# RabbitMQ 配置 spring.rabbitmq.name=rabbitmq-demo01 spring.rabbitmq.host=192.168.2.22 spring.rabbitmq.port=5672 spring.rabbitmq.username=admin spring.rabbitmq.password=admin # 自定义一个属性,设置队列的名称 mq.queue.name=hello-queue- 1
- 2
- 3
- 4
- 5
- 6
- 7
- 8
- 9
3 队列配置文件
import org.springframework.amqp.core.Binding; import org.springframework.amqp.core.BindingBuilder; import org.springframework.amqp.core.CustomExchange; import org.springframework.amqp.core.Queue; import org.springframework.beans.factory.annotation.Value; import org.springframework.context.annotation.Bean; import org.springframework.context.annotation.Configuration; import java.util.HashMap; import java.util.Map; // 添加@Configuration 注解,表示一个注解类 @Configuration public class QueueConfig { @Value("${mq.queue.name}") private String queueName; /** * 初始化短信队列 * @return */ @Bean public Queue delayedSmsQueueInit() { return new Queue(queueName); } }- 1
- 2
- 3
- 4
- 5
- 6
- 7
- 8
- 9
- 10
- 11
- 12
- 13
- 14
- 15
- 16
- 17
- 18
- 19
- 20
- 21
- 22
- 23
- 24
- 25
- 26
- 27
4 消费者
import org.springframework.amqp.rabbit.annotation.RabbitListener; import org.springframework.stereotype.Component; /** * 创建一个rabbitmq消费者 */ @Component public class Receiver { // 接受MQ消息 并 处理消息 @RabbitListener(queues = {"${mq.queue.name}"}) public void process(String msg){ // 处理消息 System.out.println("我是MQ消费者,我接收到的消息是:" + msg ); } }- 1
- 2
- 3
- 4
- 5
- 6
- 7
- 8
- 9
- 10
- 11
- 12
- 13
- 14
- 15
- 16
5 生产者
import org.springframework.amqp.core.AmqpTemplate; import org.springframework.beans.factory.annotation.Autowired; import org.springframework.beans.factory.annotation.Value; import org.springframework.stereotype.Component; /** * 消息提供者 */ @Component public class Sender { @Autowired private AmqpTemplate template; @Value("${mq.queue.name}") private String queueName; // 发送消息 public void send(String msg){ // 队列名,消息内容 template.convertAndSend(queueName,msg); } }- 1
- 2
- 3
- 4
- 5
- 6
- 7
- 8
- 9
- 10
- 11
- 12
- 13
- 14
- 15
- 16
- 17
- 18
- 19
- 20
- 21
- 22
- 23
- 24
6 测试
- 发送消息
@Autowired private Sender sender; @Test void contextLoads() { sender.send("你好啊......"); }- 1
- 2
- 3
- 4
- 5
- 6
- 接收消息
三、交换器
RabbitMQ中有五种主要的交互器分别如下
交换器 说明 direct 发布与订阅 完全匹配 fanout 广播 topic 主体,规则匹配 fanout 转发 custom 自定义 四、普通队列Demo
上边已经演示,这里不重复演示。
五、死信队列Demo
1 介绍
死信队列就是在某种情况下,导致消息无法被正常消费(异常,过期,队列已满等),存放这些未被消费的消息的队列即为死信队列。
2 示例
2.1 配置
- 配置文件
# RabbitMQ 配置 spring.rabbitmq.name=rabbitmq-demo01 spring.rabbitmq.host=192.168.2.22 spring.rabbitmq.port=5672 spring.rabbitmq.username=admin spring.rabbitmq.password=admin ###死信队列 mq.dlx.exchange=mq_dlx_exchange mq.dlx.queue=mq_dlx_queue mq.dlx.routingKey=mq_dlx_key ###备胎交换机 mq.exchange=mq_exchange mq.queue=mq_queue mq.routingKey=routing_key- 1
- 2
- 3
- 4
- 5
- 6
- 7
- 8
- 9
- 10
- 11
- 12
- 13
- 14
- 15
- 16
- 配置类
import org.springframework.amqp.core.*; import org.springframework.beans.factory.annotation.Value; import org.springframework.context.annotation.Bean; import org.springframework.context.annotation.Configuration; import java.util.HashMap; import java.util.Map; @Configuration public class MQConfig { /** * 普通交换机 */ @Value("${mq.exchange}") private String mqExchange; /** * 普通队列 */ @Value("${mq.queue}") private String mqQueue; /** * 普通路由key */ @Value("${mq.routingKey}") private String mqRoutingKey; /** * 死信交换机 */ @Value("${mq.dlx.exchange}") private String dlxExchange; /** * 死信队列 */ @Value("${mq.dlx.queue}") private String dlxQueue; /** * 死信路由 */ @Value("${mq.dlx.routingKey}") private String dlxRoutingKey; /** * 声明死信交换机 * @return DirectExchange */ @Bean public DirectExchange dlxExchange() { return new DirectExchange(dlxExchange); } /** * 声明死信队列 * @return Queue */ @Bean public Queue dlxQueue() { return new Queue(dlxQueue); } /** * 声明普通业务交换机 * @return DirectExchange */ @Bean public DirectExchange mqExchange() { return new DirectExchange(mqExchange); } /** * 声明普通队列 * @return Queue */ @Bean public Queue mqQueue() { // 普通队列绑定我们的死信交换机 Map<String, Object> arguments = new HashMap<>(2); //死信交换机 arguments.put("x-dead-letter-exchange", dlxExchange); //死信队列 arguments.put("x-dead-letter-routing-key", dlxRoutingKey); return new Queue(mqQueue, true, false, false, arguments); } /** * 绑定死信队列到死信交换机 * @return Binding */ @Bean public Binding binding(Queue dlxQueue,DirectExchange dlxExchange) { return BindingBuilder.bind(dlxQueue).to(dlxExchange).with(dlxRoutingKey); } /** * 绑定普通队列到普通交换机 * @return Binding */ @Bean public Binding mqBinding(Queue mqQueue,DirectExchange mqExchange) { return BindingBuilder.bind(mqQueue).to(mqExchange).with(mqRoutingKey); } }- 1
- 2
- 3
- 4
- 5
- 6
- 7
- 8
- 9
- 10
- 11
- 12
- 13
- 14
- 15
- 16
- 17
- 18
- 19
- 20
- 21
- 22
- 23
- 24
- 25
- 26
- 27
- 28
- 29
- 30
- 31
- 32
- 33
- 34
- 35
- 36
- 37
- 38
- 39
- 40
- 41
- 42
- 43
- 44
- 45
- 46
- 47
- 48
- 49
- 50
- 51
- 52
- 53
- 54
- 55
- 56
- 57
- 58
- 59
- 60
- 61
- 62
- 63
- 64
- 65
- 66
- 67
- 68
- 69
- 70
- 71
- 72
- 73
- 74
- 75
- 76
- 77
- 78
- 79
- 80
- 81
- 82
- 83
- 84
- 85
- 86
- 87
- 88
- 89
- 90
- 91
- 92
- 93
- 94
- 95
- 96
- 97
- 98
- 99
- 100
- 101
- 102
- 103
- 104
2.2 生产者
import lombok.extern.slf4j.Slf4j; import org.springframework.web.bind.annotation.RestController; import org.springframework.amqp.rabbit.core.RabbitTemplate; import org.springframework.beans.factory.annotation.Autowired; import org.springframework.beans.factory.annotation.Value; import org.springframework.web.bind.annotation.RequestMapping; /** * 生产者 */ @RestController @Slf4j public class MQProducer { @Autowired private RabbitTemplate rabbitTemplate; /** * 普通交换机 */ @Value("${mq.exchange}") private String mqExchange; /** * 普通路由key */ @Value("${mq.routingKey}") private String mqRoutingKey; @RequestMapping("/sendMsg") public String sendMsg() { String msg = "Hello RabbitMQ ......"; //发送消息 参数一:交换机 参数二:路由键(用来指定发送到哪个队列) rabbitTemplate.convertAndSend(mqExchange, mqRoutingKey, msg, message -> { // 设置消息过期时间 10秒过期 如果过期时间内还没有被消费 就会发送给死信队列 message.getMessageProperties().setExpiration("10000"); return message; }); log.info("生产者发送消息:{}", msg); return "success"; } }- 1
- 2
- 3
- 4
- 5
- 6
- 7
- 8
- 9
- 10
- 11
- 12
- 13
- 14
- 15
- 16
- 17
- 18
- 19
- 20
- 21
- 22
- 23
- 24
- 25
- 26
- 27
- 28
- 29
- 30
- 31
- 32
- 33
- 34
- 35
- 36
- 37
- 38
- 39
- 40
2.3 消费者
import lombok.extern.slf4j.Slf4j; import org.springframework.amqp.rabbit.annotation.RabbitListener; import org.springframework.stereotype.Component; /** * 消费者 */ @Component @Slf4j public class MQConsumer { /** * 监听队列回调的方法 * * @param msg */ @RabbitListener(queues = {"${mq.queue}"}) public void mqConsumer(String msg) { log.info("正常普通消费者消息MSG:{}", msg); } }- 1
- 2
- 3
- 4
- 5
- 6
- 7
- 8
- 9
- 10
- 11
- 12
- 13
- 14
- 15
- 16
- 17
- 18
- 19
- 20
- 21
2.4 死信消费者
import lombok.extern.slf4j.Slf4j; import org.springframework.amqp.rabbit.annotation.RabbitListener; import org.springframework.stereotype.Component; /** * 死信消费者 */ @Component @Slf4j public class MQDlxConsumer { /** * 死信队列监听队列回调的方法 * * @param msg */ @RabbitListener(queues = {"${mq.dlx.queue}"}) public void mqConsumer(String msg) { log.info("死信队列消费普通消息:msg{}", msg); } }- 1
- 2
- 3
- 4
- 5
- 6
- 7
- 8
- 9
- 10
- 11
- 12
- 13
- 14
- 15
- 16
- 17
- 18
- 19
- 20
- 21
2.5 结果
访问:http://127.0.0.1:9023/sendMsg 会被 消费者 消费掉
将 消费者 代码注释掉,在访问http://127.0.0.1:9023/sendMsg,等待10秒钟后会被死信队列接收到。

六、延时队列Demo
- 两种方式:
- 第一种:使用死信队列,将消息放入一个没有被监听的队列上,设置TTL(一条消息的最大存活时间)为延迟的时间,时间到了没有被消费,直接成为死信。监听死信队列来进行操作。
- 第二种:使用rabbitmq官方提供的delayed插件来真正实现延迟队列。本文对第二种进行详解
1 安装延迟插件
官网下载:https://www.rabbitmq.com/community-plugins.html
我的RabbitMQ是3.12 b版本的,下载此插件
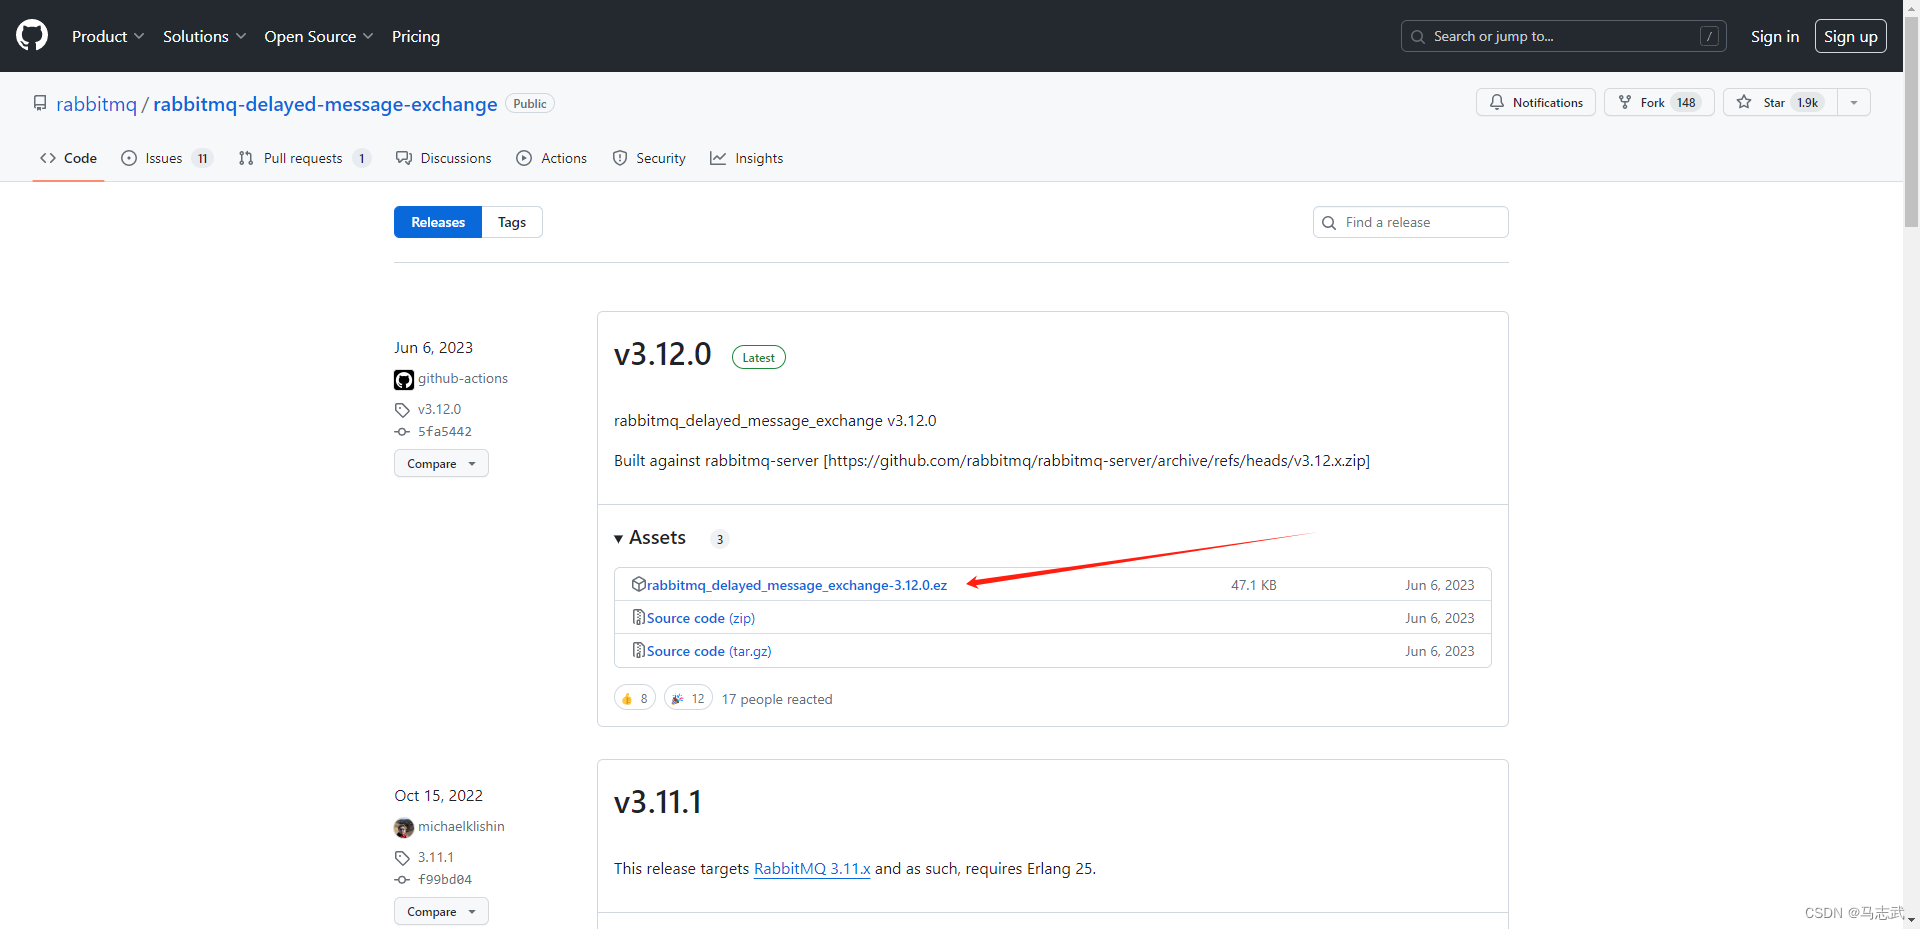
1.1 下载插件
wget https://github.com/rabbitmq/rabbitmq-delayed-message-exchange/releases/download/v3.12.0/rabbitmq_delayed_message_exchange-3.12.0.ez- 1

1.2 将插件拷贝到RabbitMQ容器的插件目录
docker cp ./rabbitmq_delayed_message_exchange-3.12.0.ez de24369edeb4:/plugins- 1

1.3 进入到容器
docker exec -it de24369edeb4 /bin/bash- 1
1.4 开启插件
rabbitmq-plugins enable rabbitmq_delayed_message_exchange- 1

1.5 查看
rabbitmq-plugins list- 1
E* 或 e* 代表 插件已启用

在RabbitMQ控制台可以看到

2 示例
2.1 配置
- 配置文件
# RabbitMQ 配置 spring.rabbitmq.name=rabbitmq-demo01 spring.rabbitmq.host=192.168.2.22 spring.rabbitmq.port=5672 spring.rabbitmq.username=admin spring.rabbitmq.password=admin # 自定义一个属性,设置队列的名称 mq.queue.name=hello-queue- 1
- 2
- 3
- 4
- 5
- 6
- 7
- 8
- 9
- 配置类
import org.springframework.amqp.core.Binding; import org.springframework.amqp.core.BindingBuilder; import org.springframework.amqp.core.CustomExchange; import org.springframework.amqp.core.Queue; import org.springframework.beans.factory.annotation.Value; import org.springframework.context.annotation.Bean; import org.springframework.context.annotation.Configuration; import java.util.HashMap; import java.util.Map; /** * 使用x-delayed-message 延时队列插件 */ @Configuration public class QueueConfig { @Value("${mq.queue.name}") private String queueName; /** * 初始化短信队列 * @return */ @Bean public Queue delayedSmsQueueInit() { return new Queue(queueName); } /** * 初始化延迟交换机 * @return */ @Bean public CustomExchange delayedExchangeInit() { Map<String, Object> args = new HashMap<>(); // 设置类型,可以为fanout、direct、topic args.put("x-delayed-type", "direct"); // 第一个参数是延迟交换机名字,第二个是交换机类型,第三个设置持久化,第四个设置自动删除,第五个放参数 return new CustomExchange("delayed_exchange","x-delayed-message", true,false,args); } /** * 短信队列绑定到交换机 * @param delayedSmsQueueInit * @param customExchange * @return */ @Bean public Binding delayedBindingSmsQueue(Queue delayedSmsQueueInit, CustomExchange customExchange) { // 延迟队列绑定延迟交换机并设置RoutingKey为sms return BindingBuilder.bind(delayedSmsQueueInit).to(customExchange).with("sms").noargs(); } }- 1
- 2
- 3
- 4
- 5
- 6
- 7
- 8
- 9
- 10
- 11
- 12
- 13
- 14
- 15
- 16
- 17
- 18
- 19
- 20
- 21
- 22
- 23
- 24
- 25
- 26
- 27
- 28
- 29
- 30
- 31
- 32
- 33
- 34
- 35
- 36
- 37
- 38
- 39
- 40
- 41
- 42
- 43
- 44
- 45
- 46
- 47
- 48
- 49
- 50
- 51
- 52
- 53
- 54
2.2 生产者
import lombok.extern.slf4j.Slf4j; import org.springframework.amqp.core.AmqpTemplate; import org.springframework.beans.factory.annotation.Autowired; import org.springframework.beans.factory.annotation.Value; import org.springframework.web.bind.annotation.RequestMapping; import org.springframework.web.bind.annotation.RestController; /** * 生产者 */ @RestController @Slf4j public class Sender { @Autowired private AmqpTemplate template; @Value("${mq.queue.name}") private String queueName; // 发送消息 @RequestMapping("/sendMsg") public void send(){ String msg = "Hello RabbitMQ ......"; // 队列名,消息内容 template.convertAndSend(queueName,msg); log.info("生产者发送消息:{}", msg); } @RequestMapping("/sendDelayedMsg") public void sendDelayedMsg(){ String msg = "Hello RabbitMQ Delayed ......"; // 第一个参数是延迟交换机名称,第二个是Routingkey,第三个是消息主题,第四个是X,并设置延迟时间,单位 是毫秒 template.convertAndSend("delayed_exchange","sms",msg,a -> { a.getMessageProperties().setDelay(2000); return a; }); log.info("生产者发送延时消息:{}", msg); } }- 1
- 2
- 3
- 4
- 5
- 6
- 7
- 8
- 9
- 10
- 11
- 12
- 13
- 14
- 15
- 16
- 17
- 18
- 19
- 20
- 21
- 22
- 23
- 24
- 25
- 26
- 27
- 28
- 29
- 30
- 31
- 32
- 33
- 34
- 35
- 36
- 37
- 38
- 39
- 40
- 41
2.3 消费产者
import lombok.extern.slf4j.Slf4j; import org.springframework.amqp.rabbit.annotation.RabbitListener; import org.springframework.stereotype.Component; /** * 消费者 */ @Component @Slf4j public class Receiver { // 接受MQ消息 并 处理消息 @RabbitListener(queues = {"${mq.queue.name}"}) public void process(String msg){ // 处理消息 log.info("我是MQ消费者,我接收到的消息是:{}", msg); } }- 1
- 2
- 3
- 4
- 5
- 6
- 7
- 8
- 9
- 10
- 11
- 12
- 13
- 14
- 15
- 16
- 17
- 18
- 19
2.4 结果
访问:http://127.0.0.1:9022/sendMsg
访问:http://127.0.0.1:9022/sendDelayedMsg

-
相关阅读:
Prometheus TSDB存储原理
docker-compose的环境变量指令怎么添加数组类型的环境变量
C选择结构程序设计
扩展的以太网
MySQL学习笔记-4.数据更新时的性能问题
本地Chatglm2-6b模型训练,deepspeed依赖安装报错。
JUL日志框架
技术速览|Meta Llama 2 下一代开源大型语言模型
从局部变量说起,关于一个莫得名堂的引用和一个坑!
Python数据分析与可视化期末简答题复习
- 原文地址:https://blog.csdn.net/ruoshui_t/article/details/136157253