-
前端 webSocket 的使用
webSocket使用
注意要去监听websocket 对象事件,处理我们需要的数据
我是放在了最外层的index 内,监听编辑状态,去触发定义的方法。因为我这个项目是组件化开发,全部只有一个总编辑按钮,我只需监听是否触发了编辑即可。看自己的项目需求了。initWs () { this.topic = [...new Set(this.topic)].filter(v => v) this.worker = new Worker() this.worker.postMessage({ topic: this.topic, host: window.location.host }) this.worker.addEventListener('message', ({ data }) => { console.log('message====>', data) for (const key in data) { window.$eventBus.$emit(key, data[key]) } }) this.$store.commit('setisPanel', true) },- 1
- 2
- 3
- 4
- 5
- 6
- 7
- 8
- 9
- 10
- 11
- 12
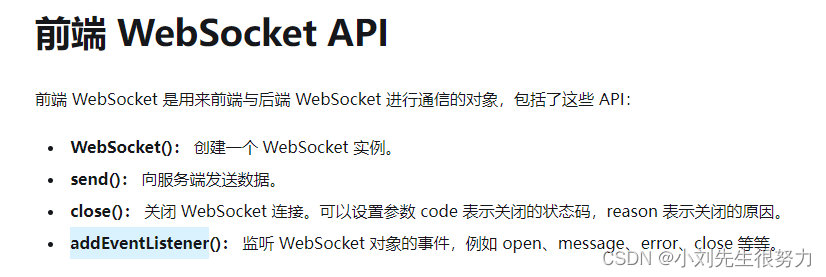
一、概念
定义
WebSocket是html5提供的一种在单个TCP连接上进行双向通信的协议,解决了客户端和服务端之间的实时通信问题。浏览器和服务器只需完成一次握手,两者之间就可以创建一个持久性的TCP连接,此后服务器和客户端通过此TCP连接进行双向实时通信。例子:现在需要根据用户不同的输入来获取后端不同的数据,http请求的方式就是每次用户输入我就发送一个http请求。然而websocket的解决是一次连接成功后,每次用户输入都会发送给后台,但是这个发送的数据却是一直处在已经连接的状态,并不是每次想http每一次都是一次新的连接。
优点
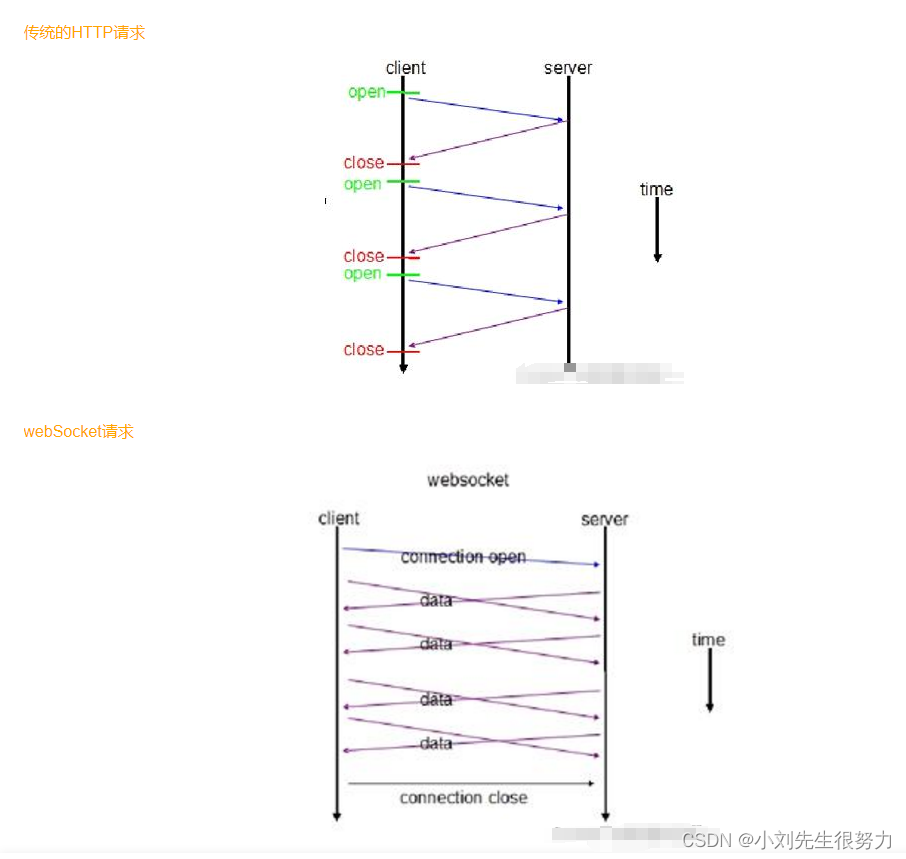
为了实现数据推送,一般所用的技术都是ajax轮询。轮询是在特定的时间间隔,由浏览器主动发起请求,将服务器的数据拉回来。轮询需要不断的向服务器发送请求,会占用很多带宽和服务器资源。WebSocket建立TCP连接后,服务器可以主动给客户端传递数据,能够更好的节省服务器资源和带宽,实现更实时的数据通讯。
借鉴一张图
用法
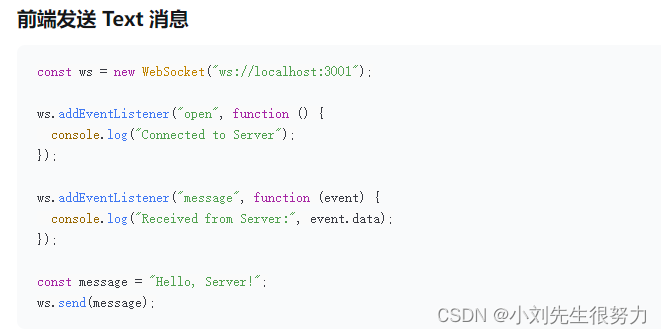
// 申请一个WebSocket对象, // 参数是服务端地址, // 同http协议使用http://开头一样,WebSocket协议的url使用ws://开头,另外安全的WebSocket协议使用wss://开头 var wsUrl = "ws://192.168.00.01:8888/xxx/xxxx"; const ws = new WebSocket(wsUrl); ws.onopen = function(){ //当WebSocket创建成功时,触发onopen事件 console.log("open"); ws.send("hello"); //将消息发送到服务端 } ws.onmessage = function(e){ //当客户端收到服务端发来的消息时,触发onmessage事件,参数e.data包含server传递过来的数据 console.log(e.data); } ws.onclose = function(e){ //当客户端收到服务端发送的关闭连接请求时,触发onclose事件 console.log("close"); } ws.onerror = function(e){ //如果出现连接、处理、接收、发送数据失败的时候触发onerror事件 console.log(error); }- 1
- 2
- 3
- 4
- 5
- 6
- 7
- 8
- 9
- 10
- 11
- 12
- 13
- 14
- 15
- 16
- 17
- 18
- 19
- 20
- 21
- 22
- 23
结合上述用法可以自行封装(不一定适用你的项目,不过大致逻辑就是这样)
export default class socketIO { constructor (topic, url, callback) { this.socketTask = null this.isOpen = false // 避免重复连接 this.url = process.env.NODE_ENV === 'development' ? '172.16.66.229:8958' : url this.topic = topic // 订阅的测点 this.connectNum = 1 // 重连次数 // 心跳检测 this.timeout = 1000 * 10 // 多少秒发送心跳 this.heartbeatInterval = null this.reconnectTimeOut = null this.callback = callback this.init() } // 进入这个页面的时候创建websocket连接【整个页面随时使用】 init () { const ws = this.url.includes('https') ? 'wss': 'ws' this.socketTask = new WebSocket(`${ws}://${this.url}/control/converter/api/v1/ws/connect?wsDataGroupId=real_customize`) if (!this.socketTask) { return } this.socketTask.onopen = () => { this.connectNum = 1 console.log('WebSocket连接成功!') clearInterval(this.reconnectTimeOut) clearInterval(this.heartbeatInterval) this.isOpen = true this.start() this.socketTask.onmessage = (e) => { setTimeout(() => { // 字符串转json let res = JSON.parse(e.data) // console.log('message---------->', res) for (let i = 0; i < res.length; i++) { if (res[i].dataType !== 'heartbeat') { this.callback(res[i]) } } }, 0) } } this.socketTask.onerror = (res) => { console.log('WebSocket连接打开失败,请检查!') this.socketTask = null this.isOpen = false clearInterval(this.heartbeatInterval) clearInterval(this.reconnectTimeOut) if (this.connectNum < 6) { console.error(`WebSocket连接失败,正尝试第${this.connectNum}次连接`) this.reconnect() this.connectNum += 1 } } this.socketTask.onclose = () => { console.log('已经被关闭了-------') clearInterval(this.heartbeatInterval) clearInterval(this.reconnectTimeOut) this.isOpen = false this.socketTask = null } } // 主动关闭socket连接 close () { if (!this.isOpen) { return } this.socketTask && this.socketTask.close() } // 发送消息 send (data) { console.log('send---------->', data) // 注:只有连接正常打开中 ,才能正常成功发送消息 if (this.socketTask) { this.socketTask.send(JSON.stringify(data)) } } // 开启心跳检测 start () { // 测点监听 this.send({ dataType: 'monitoring_points_new', data: this.topic }) // 心跳检测 this.heartbeatInterval = setInterval(() => { this.send({ dataType: 'heartbeat', data: `${new Date().getTime()}` }) }, this.timeout) } // 重新连接 reconnect () { // 停止发送心跳 clearInterval(this.heartbeatInterval) // 如果不是人为关闭的话,进行重连 if (!this.isOpen) { this.reconnectTimeOut = setInterval(() => { console.log('开始重连----------') if (this.isOpen) { clearInterval(this.reconnectTimeOut) } else { this.init() } }, 5000) } } }- 1
- 2
- 3
- 4
- 5
- 6
- 7
- 8
- 9
- 10
- 11
- 12
- 13
- 14
- 15
- 16
- 17
- 18
- 19
- 20
- 21
- 22
- 23
- 24
- 25
- 26
- 27
- 28
- 29
- 30
- 31
- 32
- 33
- 34
- 35
- 36
- 37
- 38
- 39
- 40
- 41
- 42
- 43
- 44
- 45
- 46
- 47
- 48
- 49
- 50
- 51
- 52
- 53
- 54
- 55
- 56
- 57
- 58
- 59
- 60
- 61
- 62
- 63
- 64
- 65
- 66
- 67
- 68
- 69
- 70
- 71
- 72
- 73
- 74
- 75
- 76
- 77
- 78
- 79
- 80
- 81
- 82
- 83
- 84
- 85
- 86
- 87
- 88
- 89
- 90
- 91
- 92
- 93
- 94
- 95
- 96
- 97
- 98
- 99
- 100
- 101
- 102
- 103
- 104
- 105
- 106
- 107
- 108
- 109
- 110
- 111
- 112
- 113
-
相关阅读:
【OpenCV】OpenCV (C++) 与 OpenCvSharp (C#) 之间数据通信
AIGC 绘画Stable Diffusion工具的安装与使用
代码随想录算法训练营第42天|动态规划:01背包理论基础、动态规划:01背包理论基础(滚动数组)、416. 分割等和子集
黑客技术(网络安全)学习
linux内核的一些宏
java集合
计算机毕业设计ssm基于vuejs的二手车交易平台ue120系统+程序+源码+lw+远程部署
电脑磁盘怎么加密?磁盘加密软件哪个更好用?
二、sql手工注入
如何快速迁移服务器ubuntu的国内源
- 原文地址:https://blog.csdn.net/lzfengquan/article/details/136163056
