-
【Element-ui】Layout与Container组件
提示:文章写完后,目录可以自动生成,如何生成可参考右边的帮助文档
前言
在现代Web开发中,页面的布局设计是至关重要的一环。为了简化布局的实现,Element UI提供了强大的Layout和Container组件。这两个组件使得页面布局变得更加灵活和易于管理。在本文中,我们将深入探讨Element UI的Layout和Container组件,了解它们的基本用法以及如何通过它们实现响应式的页面布局。
一、Layout 布局
通过基础的 24 分栏,迅速简便地创建布局。
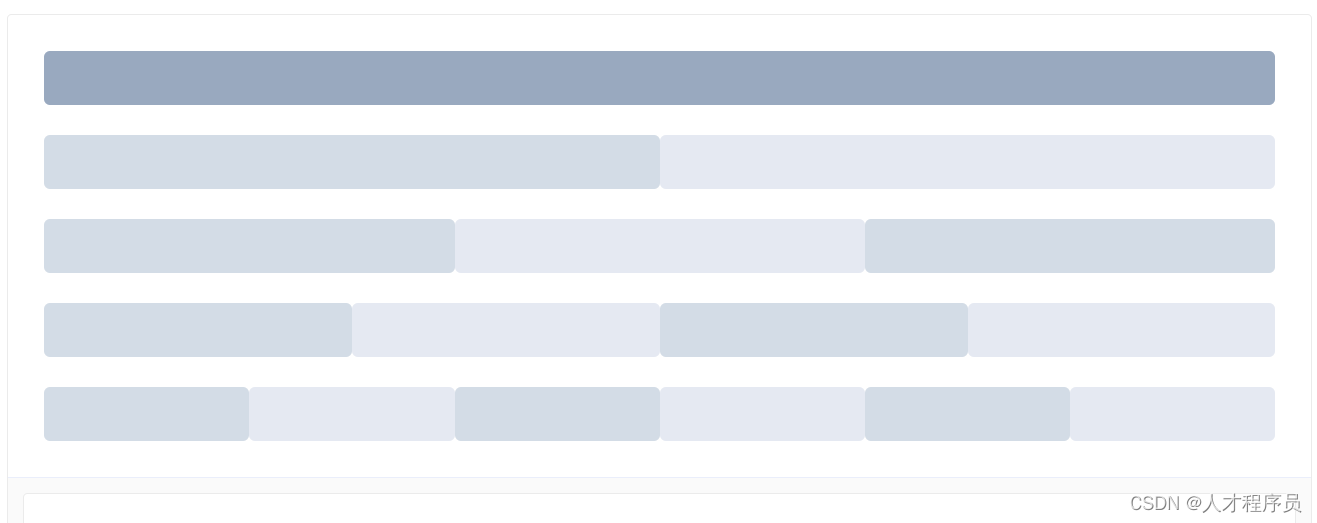
1.1 基础布局
使用单一分栏创建基础的栅格布局。
<el-row> <el-col :span="24"><div class="grid-content bg-purple-dark">div>el-col> el-row> <el-row> <el-col :span="12"><div class="grid-content bg-purple">div>el-col> <el-col :span="12"><div class="grid-content bg-purple-light">div>el-col> el-row> <el-row> <el-col :span="8"><div class="grid-content bg-purple">div>el-col> <el-col :span="8"><div class="grid-content bg-purple-light">div>el-col> <el-col :span="8"><div class="grid-content bg-purple">div>el-col> el-row> <el-row> <el-col :span="6"><div class="grid-content bg-purple">div>el-col> <el-col :span="6"><div class="grid-content bg-purple-light">div>el-col> <el-col :span="6"><div class="grid-content bg-purple">div>el-col> <el-col :span="6"><div class="grid-content bg-purple-light">div>el-col> el-row> <el-row> <el-col :span="4"><div class="grid-content bg-purple">div>el-col> <el-col :span="4"><div class="grid-content bg-purple-light">div>el-col> <el-col :span="4"><div class="grid-content bg-purple">div>el-col> <el-col :span="4"><div class="grid-content bg-purple-light">div>el-col> <el-col :span="4"><div class="grid-content bg-purple">div>el-col> <el-col :span="4"><div class="grid-content bg-purple-light">div>el-col> el-row>- 1
- 2
- 3
- 4
- 5
- 6
- 7
- 8
- 9
- 10
- 11
- 12
- 13
- 14
- 15
- 16
- 17
- 18
- 19
- 20
- 21
- 22
- 23
- 24
- 25
- 26

el-row:
el-row 是一个容器,用于包含一组列(el-col)。
在示例中,你可以看到多个 el-row 组件,每个都代表页面中的一行。el-col:
el-col 是列元素,用于放置内容。通过设置 :span 属性,你可以指定每列的宽度占比,这里使用的是栅格系统,总宽度为 24。
例如,:span=“24” 表示占满整行,:span=“12” 表示占据一半的宽度,:span=“8” 表示占据三分之一的宽度,以此类推。嵌套布局:
注意到在某些 el-col 中,又包含了新的 el-row 和 el-col,形成了嵌套的布局结构。这种嵌套使得布局更加灵活,可以根据设计需求创建多层次的页面结构。1.2 分栏间隔
Row 组件 提供 gutter 属性来指定每一栏之间的间隔,默认间隔为 0。
<el-row :gutter="20"> <el-col :span="6"><div class="grid-content bg-purple">div>el-col> <el-col :span="6"><div class="grid-content bg-purple">div>el-col> <el-col :span="6"><div class="grid-content bg-purple">div>el-col> <el-col :span="6"><div class="grid-content bg-purple">div>el-col> el-row>- 1
- 2
- 3
- 4
- 5
- 6

指定每一栏之间的间隔是什么意思:
想象一下你有一排书架,每一本书代表页面上的一个栏。这些书之间的空隙就是书架上的间隔。现在,假设你想在每本书的旁边留一些空地,让它们之间不那么紧凑,这就是指定每一栏之间的间隔。在这个场景中,书本就是栅格布局中的每一栏,而书本之间的空地就是间隔。通过设置 gutter 属性,你就可以控制每一栏之间的空隙大小,使得整体布局看起来更加舒适和有序。
1.3 混合布局
通过基础的 1/24 分栏任意扩展组合形成较为复杂的混合布局。
<el-row :gutter="20"> <el-col :span="16"><div class="grid-content bg-purple">div>el-col> <el-col :span="8"><div class="grid-content bg-purple">div>el-col> el-row> <el-row :gutter="20"> <el-col :span="8"><div class="grid-content bg-purple">div>el-col> <el-col :span="8"><div class="grid-content bg-purple">div>el-col> <el-col :span="4"><div class="grid-content bg-purple">div>el-col> <el-col :span="4"><div class="grid-content bg-purple">div>el-col> el-row> <el-row :gutter="20"> <el-col :span="4"><div class="grid-content bg-purple">div>el-col> <el-col :span="16"><div class="grid-content bg-purple">div>el-col> <el-col :span="4"><div class="grid-content bg-purple">div>el-col> el-row>- 1
- 2
- 3
- 4
- 5
- 6
- 7
- 8
- 9
- 10
- 11
- 12
- 13
- 14
- 15
1.4 分栏偏移
当你在设计网页布局时,有时候你可能希望某个元素(比如一个列)不是从页面的最左侧开始,而是往右边偏移一些。就好像你在排列一行书架上的书,你想让某本书不是直接靠在书架的一端,而是有一些空隙。
在这个情境中,网页的布局中,每一列可以看作是一本书,而设置 col 组件的 offset 属性,就像是告诉系统:“嗨,请把这一列(书)从左边开始数起,往右偏移一定的距离,就好像在书架上移动了几本书一样。”
这个偏移量是以列数为单位的,所以如果你设置了 offset: 2,就相当于这一列向右移动了两列的宽度。这样,你就可以更加灵活地控制页面上各个元素的位置,创造出更多样化的布局效果。支持偏移指定的栏数。
通过制定 col 组件的 offset 属性可以指定分栏偏移的栏数。<el-row :gutter="20"> <el-col :span="6"><div class="grid-content bg-purple">div>el-col> <el-col :span="6" :offset="6"><div class="grid-content bg-purple">div>el-col> el-row> <el-row :gutter="20"> <el-col :span="6" :offset="6"><div class="grid-content bg-purple">div>el-col> <el-col :span="6" :offset="6"><div class="grid-content bg-purple">div>el-col> el-row> <el-row :gutter="20"> <el-col :span="12" :offset="6"><div class="grid-content bg-purple">div>el-col> el-row>- 1
- 2
- 3
- 4
- 5
- 6
- 7
- 8
- 9
- 10
- 11

1.5 对齐方式
通过 flex 布局来对分栏进行灵活的对齐。
将 type 属性赋值为 ‘flex’,可以启用 flex 布局,并可通过 justify 属性来指定 start, center, end, space-between, space-around 其中的值来定义子元素的排版方式。
<el-row type="flex" class="row-bg"> <el-col :span="6"><div class="grid-content bg-purple">div>el-col> <el-col :span="6"><div class="grid-content bg-purple-light">div>el-col> <el-col :span="6"><div class="grid-content bg-purple">div>el-col> el-row> <el-row type="flex" class="row-bg" justify="center"> <el-col :span="6"><div class="grid-content bg-purple">div>el-col> <el-col :span="6"><div class="grid-content bg-purple-light">div>el-col> <el-col :span="6"><div class="grid-content bg-purple">div>el-col> el-row> <el-row type="flex" class="row-bg" justify="end"> <el-col :span="6"><div class="grid-content bg-purple">div>el-col> <el-col :span="6"><div class="grid-content bg-purple-light">div>el-col> <el-col :span="6"><div class="grid-content bg-purple">div>el-col> el-row> <el-row type="flex" class="row-bg" justify="space-between"> <el-col :span="6"><div class="grid-content bg-purple">div>el-col> <el-col :span="6"><div class="grid-content bg-purple-light">div>el-col> <el-col :span="6"><div class="grid-content bg-purple">div>el-col> el-row> <el-row type="flex" class="row-bg" justify="space-around"> <el-col :span="6"><div class="grid-content bg-purple">div>el-col> <el-col :span="6"><div class="grid-content bg-purple-light">div>el-col> <el-col :span="6"><div class="grid-content bg-purple">div>el-col> el-row>- 1
- 2
- 3
- 4
- 5
- 6
- 7
- 8
- 9
- 10
- 11
- 12
- 13
- 14
- 15
- 16
- 17
- 18
- 19
- 20
- 21
- 22
- 23
- 24
- 25
- 26
1.6 响应式布局
参照了 Bootstrap 的 响应式设计,预设了五个响应尺寸:xs、sm、md、lg 和 xl。
想象一下你在使用一个网站,而这个网站需要适应不同设备的屏幕大小,比如手机、平板电脑和桌面电脑。为了让这个网站在各种设备上都能够看起来好看而不失功能,设计师们通常会采用响应式布局。
Bootstrap 提出了一套响应式设计的概念,其中包括了五个预设的尺寸:xs、sm、md、lg 和 xl。1.xs(Extra Small): 针对极小屏幕,比如手机。
2.sm(Small): 针对小屏幕,比如平板。
3.md(Medium): 针对中等屏幕,比如大一点的平板或小一点的桌面电脑。
4.lg(Large): 针对大屏幕,比如桌面电脑。
5.xl(Extra Large): 针对极大屏幕,比如大尺寸的桌面显示器。通过这种预设的尺寸,设计者可以为每个屏幕尺寸定义不同的布局规则,确保在不同的设备上都能够提供最佳的用户体验。所以,当你看到一个网站是“响应式设计”时,就意味着它会根据你使用的设备类型和屏幕大小,动态地调整页面的布局和样式,以便更好地适应不同的环境。这样,无论你是在手机上浏览还是在桌面电脑上查看,都能够获得舒适的浏览体验。
1.7 el-col中的 push和pull
参数 说明 类型 可选值 默认值
push 栅格向右移动格数 number — 0
pull 栅格向左移动格数 number — 0想象一下你有一排书架,每一本书代表页面上的一个栏。现在,假设你想要移动某本书在书架上的位置,使它不再在原来的位置上。
1.push(向右推移): 如果你想把某本书往右边移动几本书的位置,就像是把它往书架的右侧推一样,那么在网页布局中,你可以使用 push 属性。这个属性的值表示你要把这一栏(或元素)向右移动的格数。
2.pull(向左拉动): 相反,如果你想把某本书往左边移动,就像是把它往书架的左侧拉一样,那么在网页布局中,你可以使用 pull 属性。这个属性的值表示你要把这一栏(或元素)向左移动的格数。总的来说,push 和 pull 属性可以帮助你在栅格布局中灵活地调整元素的位置,就像是在书架上移动书本一样,让你更好地控制页面的布局。
二、Container 布局容器
2.1 Container是干什么的?
用于布局的容器组件,方便快速搭建页面的基本结构:
:外层容器。当子元素中包含 或 时,全部子元素会垂直上下排列,否则会水平左右排列。 :顶栏容器。 :侧边栏容器。 :主要区域容器。 :底栏容器。 以上组件采用了 flex 布局,使用前请确定目标浏览器是否兼容。此外,
的子元素只能是后四者,后四者的父元素也只能是 。 2.2 Container Attributes
参数 说明 类型 可选值 默认值
direction 子元素的排列方向 string horizontal / vertical 子元素中有 el-header 或 el-footer 时为 vertical,否则为 horizontal2.3 Header Attributes
参数 说明 类型 可选值 默认值
height 顶栏高度 string — 60px2.4 Aside Attributes
参数 说明 类型 可选值 默认值
width 侧边栏宽度 string — 300px2.5 Footer Attributes
参数 说明 类型 可选值 默认值
height 底栏高度 string — 60px
总结
Element UI 的 Layout 和 Container 组件为页面布局提供了便利的解决方案。通过灵活的组合,我们可以轻松创建出各种风格的页面布局,满足不同项目的需求。使用这些组件,不仅可以提高开发效率,还能确保页面的响应式设计,使得应用在不同设备上都能够良好地展现。在你的下一个Vue.js项目中,不妨考虑使用Element UI的Layout和Container组件,体验它们带来的便利和灵活性。
-
相关阅读:
微信小程序实现tab切换和吸顶效果
ssm+校园疫情申报系统 毕业设计-附源码221228
HiveSQL分位数函数percentile()使用详解+实例代码
深入解析 TypeScript 中的 .d.ts 语法
隐私计算头条周刊(7.31-8.6)
Spring Boot集成Timefold Solver实现课程表编排
JavaSE学习文档(上)
三十四、Fluent液体喷雾蒸发模拟
链式设计模式——装饰模式和职责链模式
[附源码]java毕业设计心理测评系统
- 原文地址:https://blog.csdn.net/m0_62599305/article/details/134753743
