-
NPM 与 XUI 共存!Nginx Proxy Manager 搭配 X-UI 实现 Vless+WS+TLS 教程!
之前分享过搭建可以与宝塔共存的一个 “魔法” 服务器状态监控应用 ——xui,支持 Vmess+WS+TLS。
最近 Docker 视频出的比较多,前阵子又出现了宝塔国内版存在隐私泄露的问题,很多小伙伴其实都不用宝塔了,那么,在我们现在装了 Nginx Proxy Manager(NPM)的环境下,
80和443端口都转由 NPM 来管理了,可以让 XUI 和 NPM 共存吗?如何用 NPM 来反代 XUI 呢?今天我们就来折腾一下!1. 搭建环境
- 服务器:腾讯香港轻量应用服务器 24 元 / 月 VPS 一台展示用的服务器是甲骨文圣何塞永久免费服务器,本期搭建用的是 Vultr 的服务器,按小时计费,可随时销毁(最好是选 非大陆的服务器)(腾讯轻量购买链接)移动、联通用户建议可以用 Racknerd 试试
- 系统:Debian 10(DD 脚本 非必需 DD 用原来的系统也 OK)
- 域名一枚,并做好解析到服务器上(域名购买、域名解析 视频教程)
- 安装好 Docker、Docker-compose(相关脚本)
- 安装好 Nginx Proxy Manager(相关教程)
2. 搭建视频
YouTube:https://youtu.be/aYC4BTzbw8c
3. 搭建方式
3.1 服务器初始设置
服务器初始设置,参考
【Docker 系列】不用宝塔面板,小白一样可以玩转 VPS 服务器!
3.2 下载 xui
新版(支持功能更多):
BASH
bash <(curl -Ls https://raw.githubusercontent.com/FranzKafkaYu/x-ui/master/install.sh)
旧版:
BASH
bash <(curl -Ls https://raw.githubusercontent.com/vaxilu/x-ui/master/install.sh)
根据提示设置
端口信息、用户名、密码。3.3 登陆 xui 面板并配置

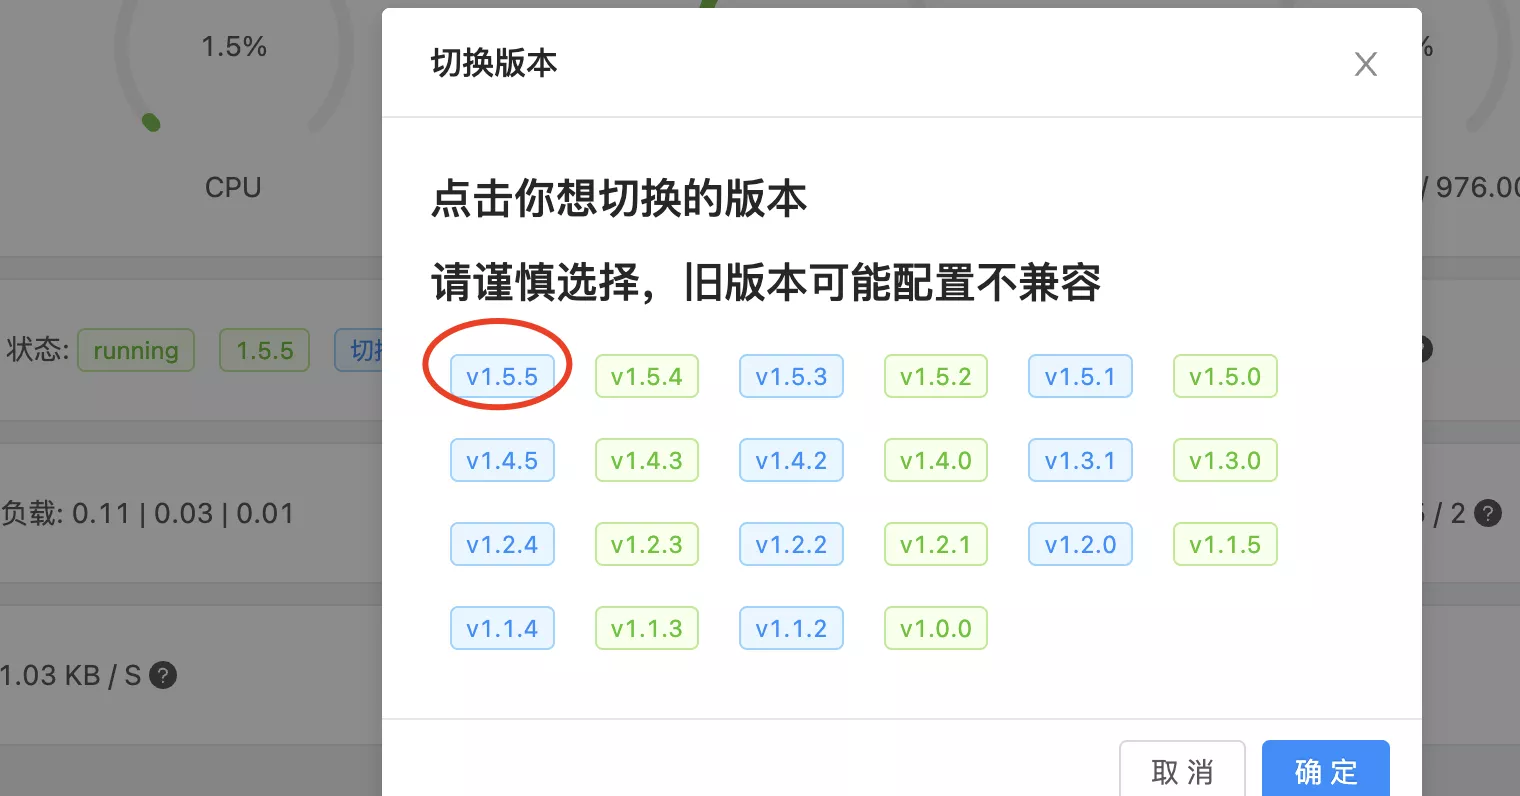
切换最新版本:
修改面板路径:
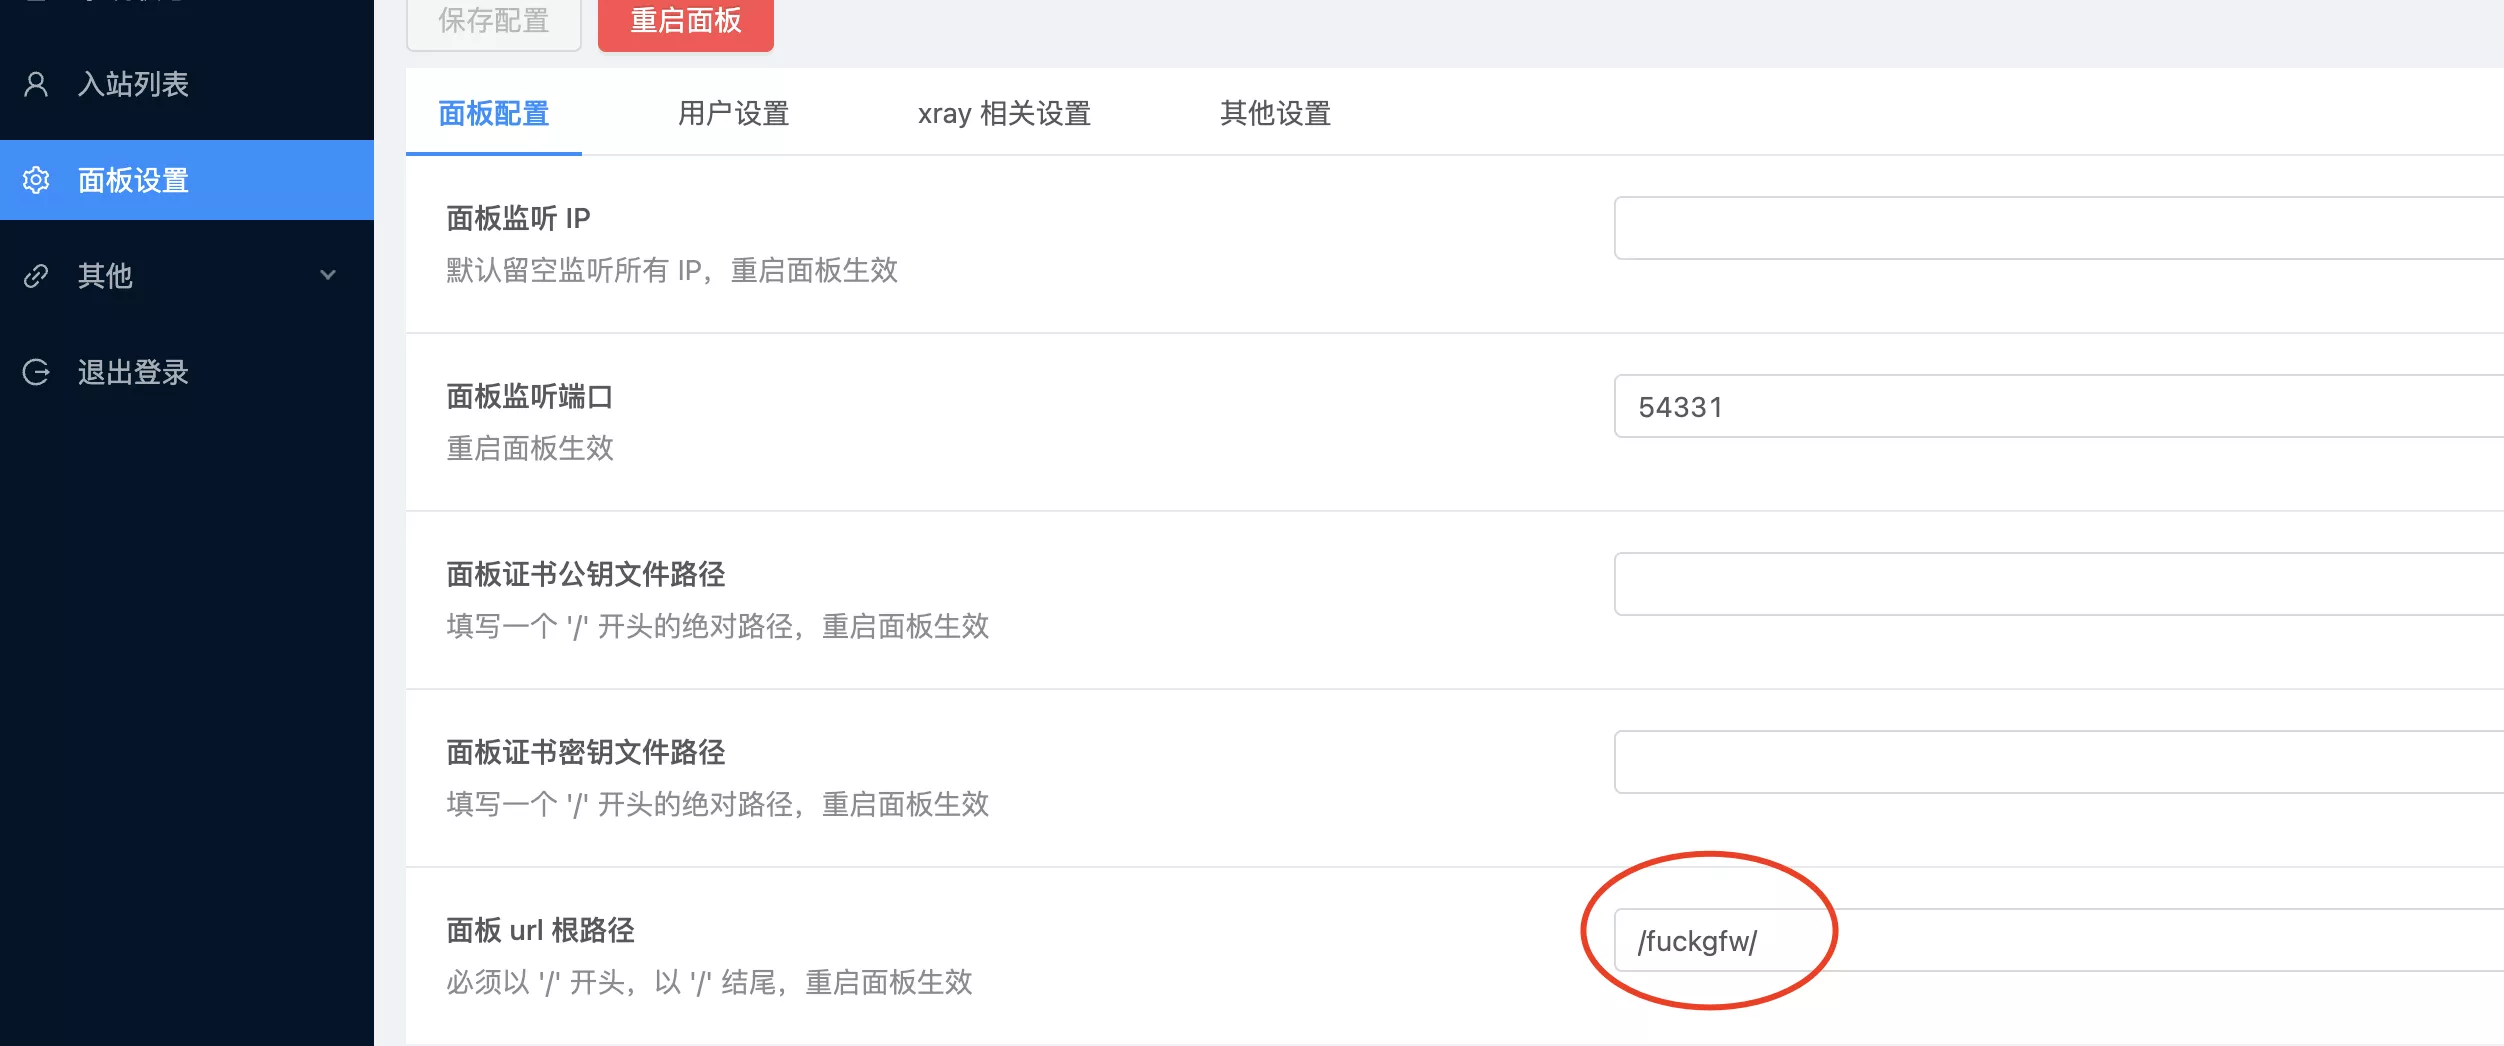
记得
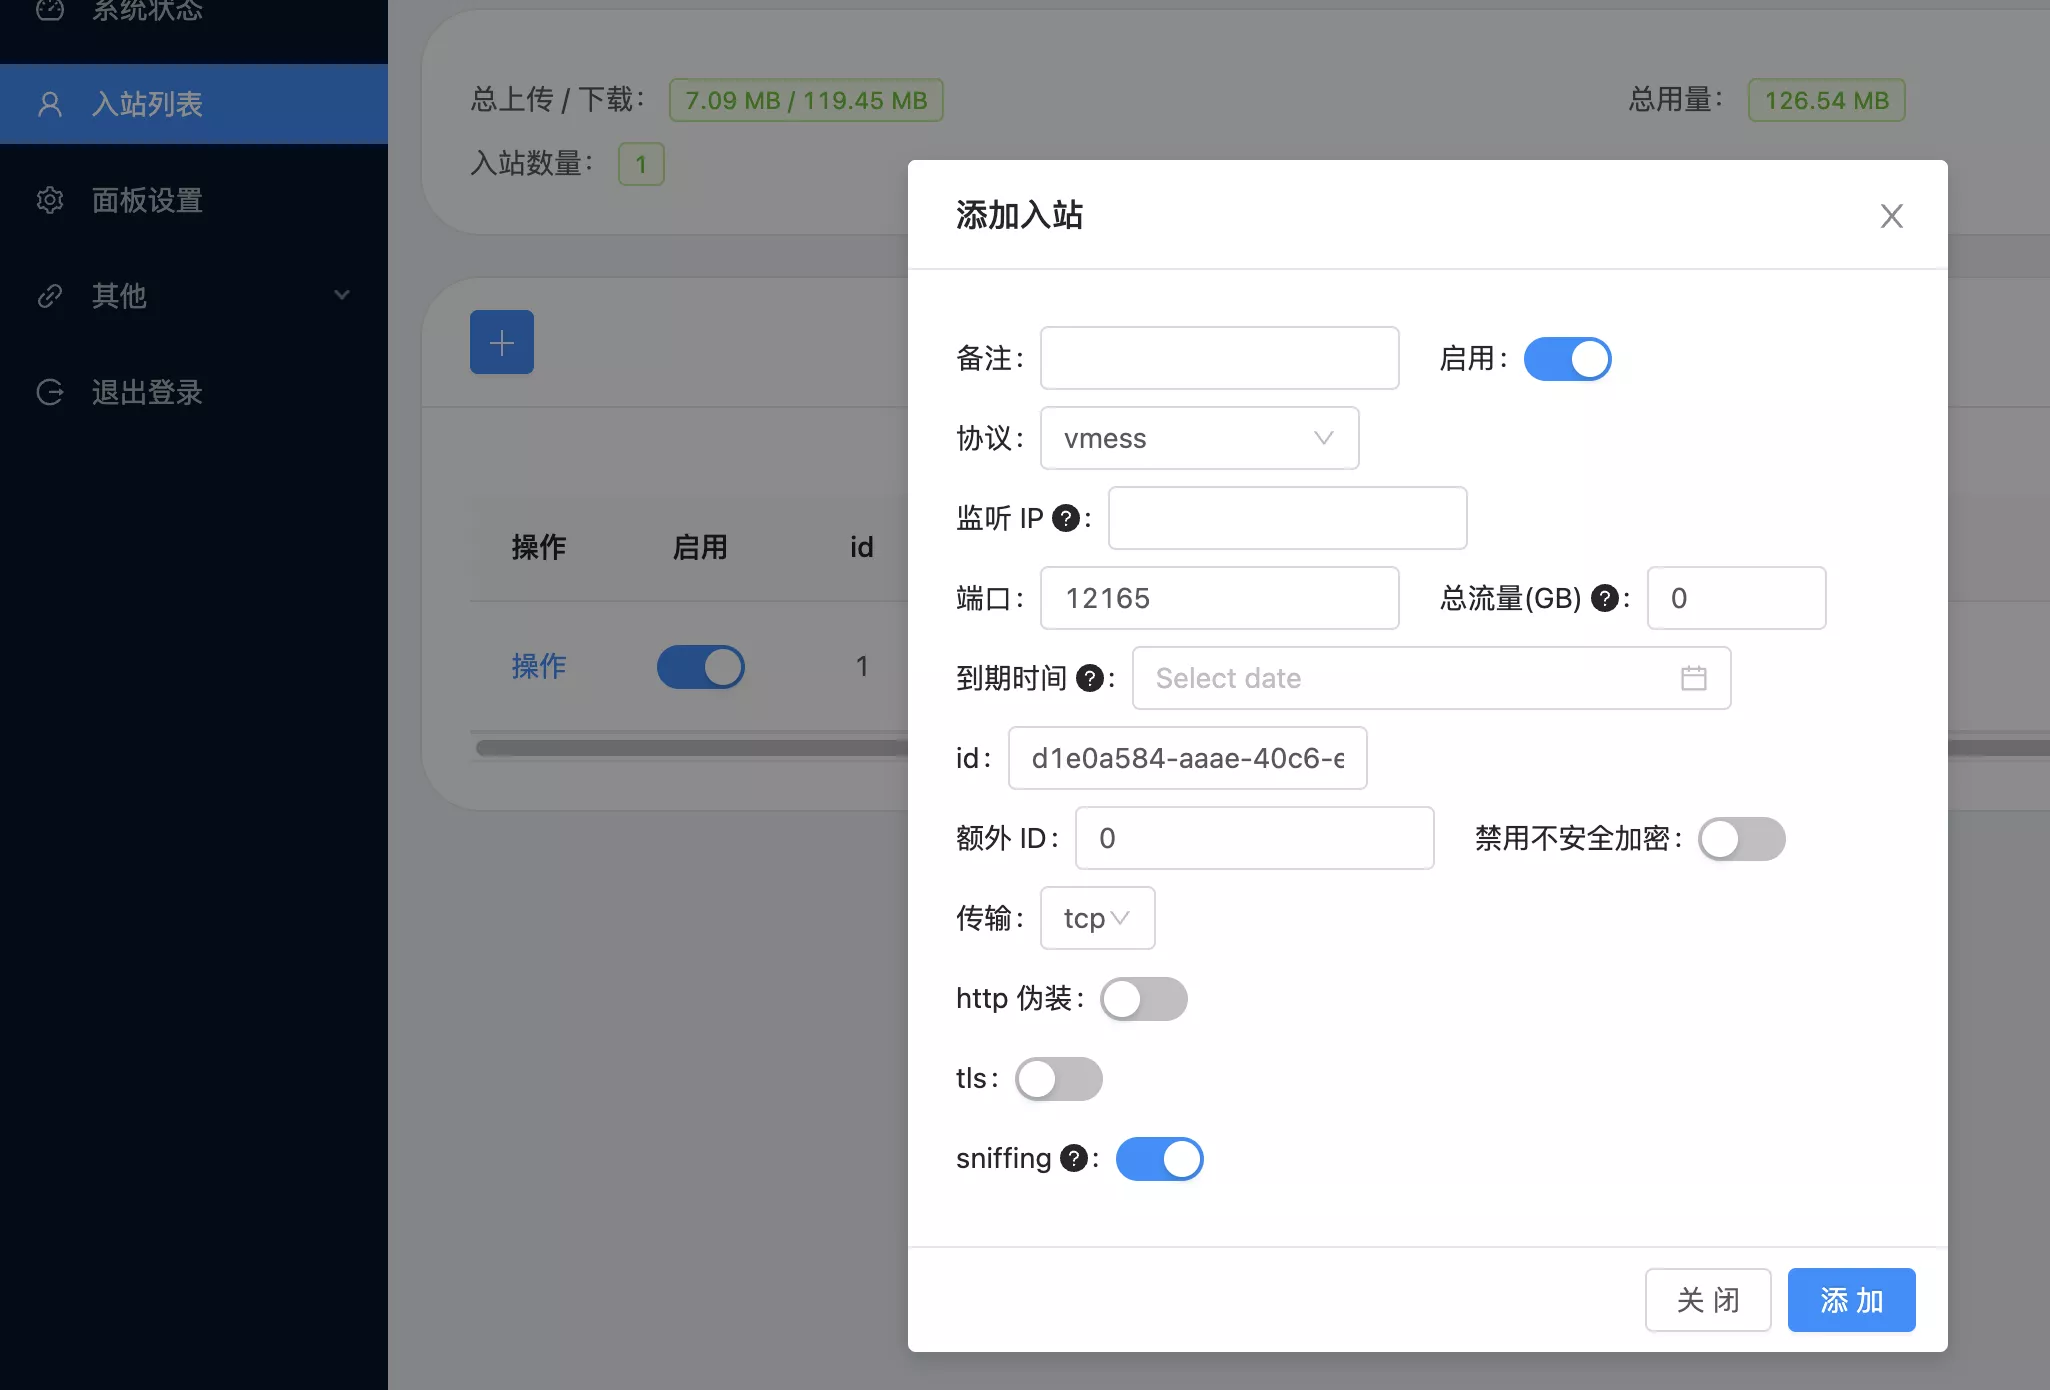
保存配置。添加
入站列表:
如果配置,只需要修改
4个地方: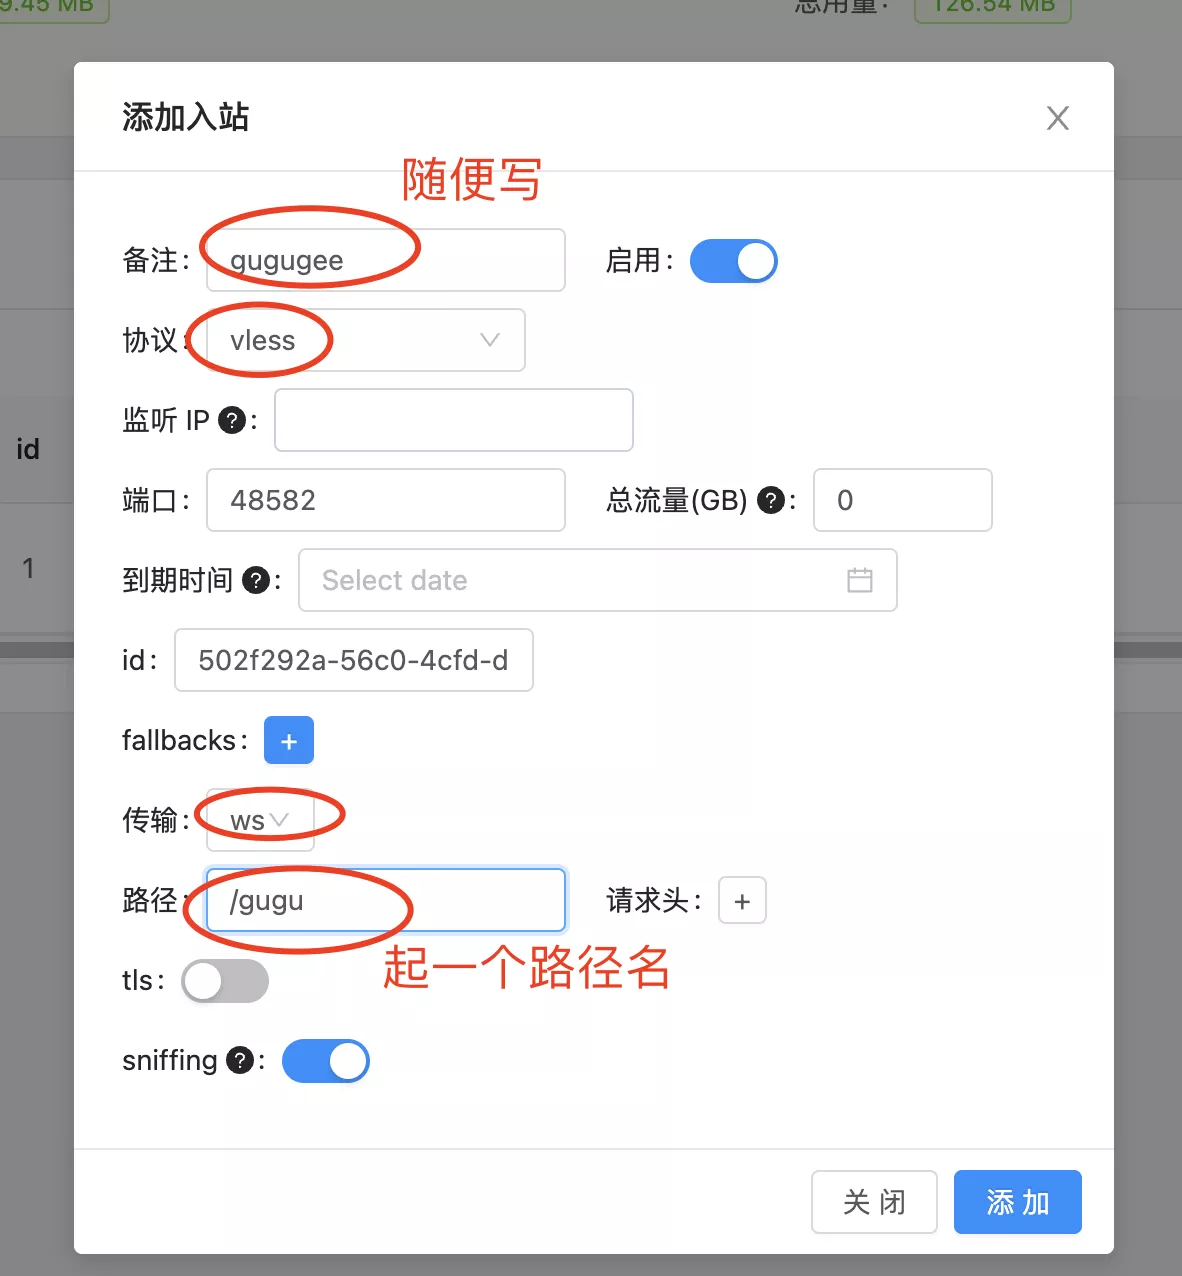
点击
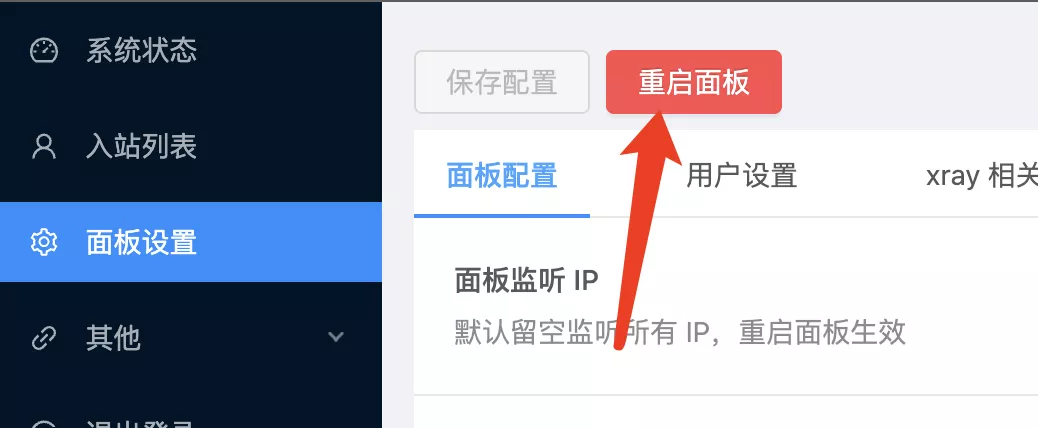
添加,之后点击重启面板
3.4 NPM 配置
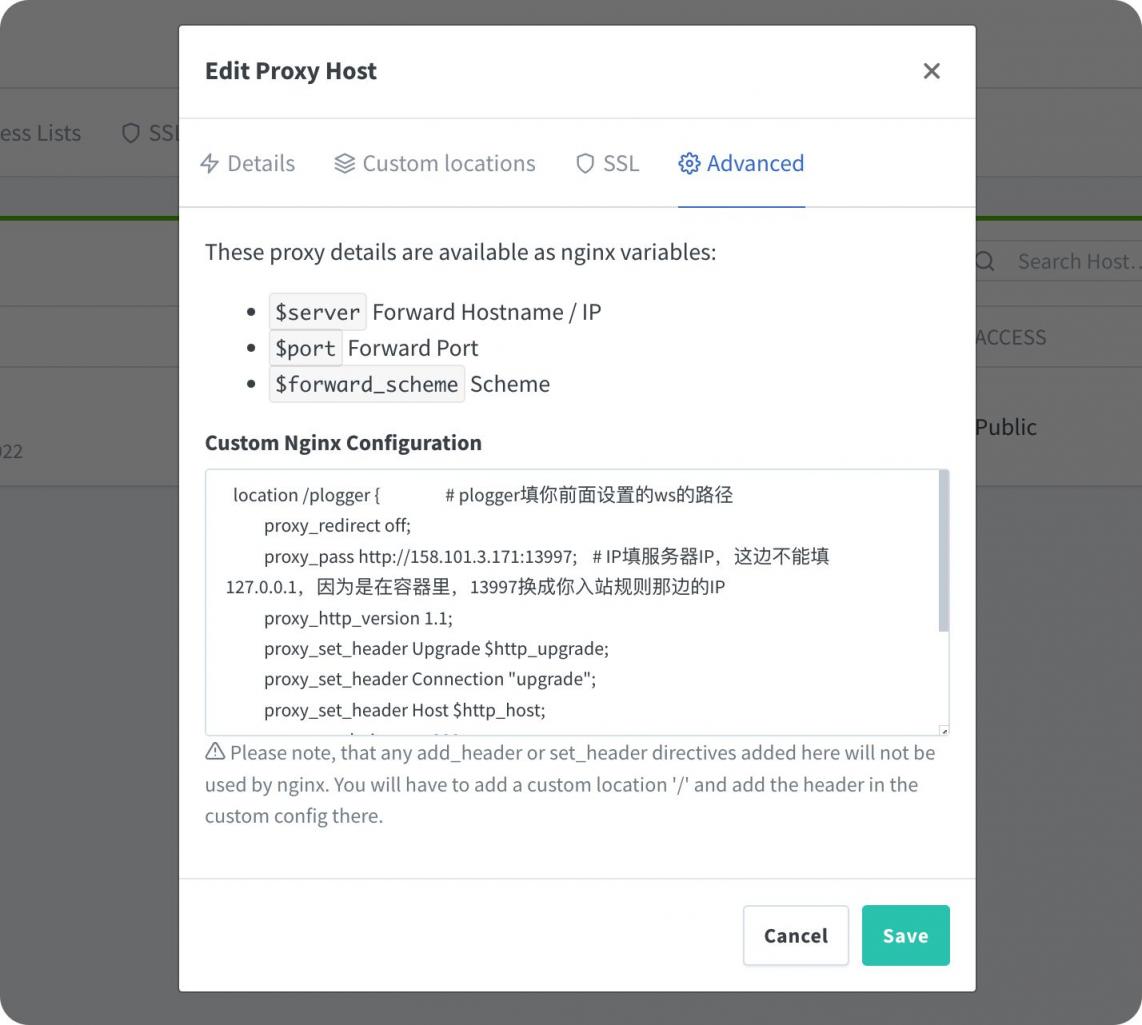
2022-12-15 更新简单方法
无需手动进入目录修改,只需要在面版即可操作!
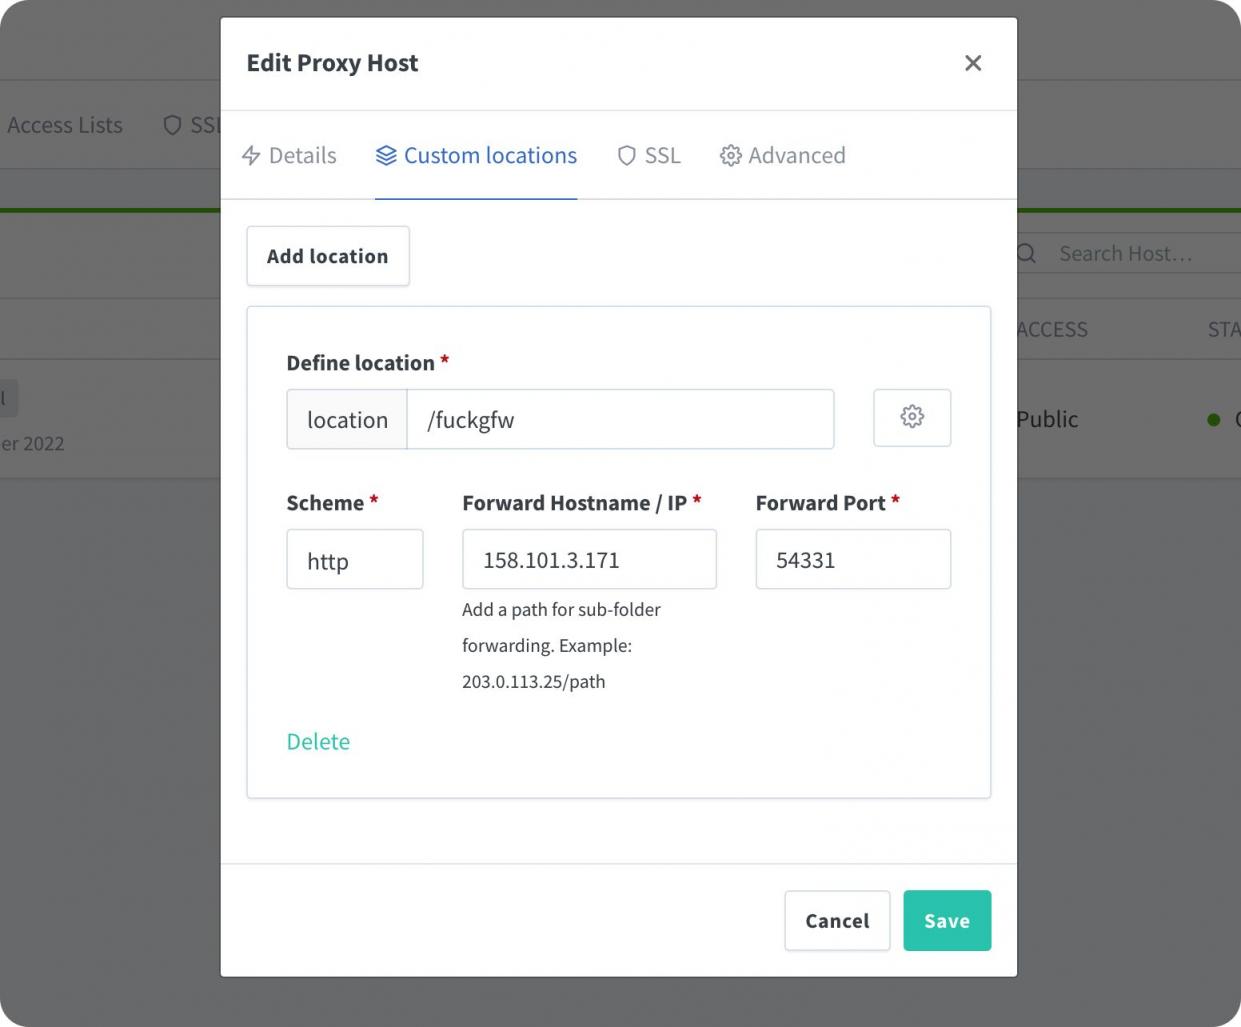
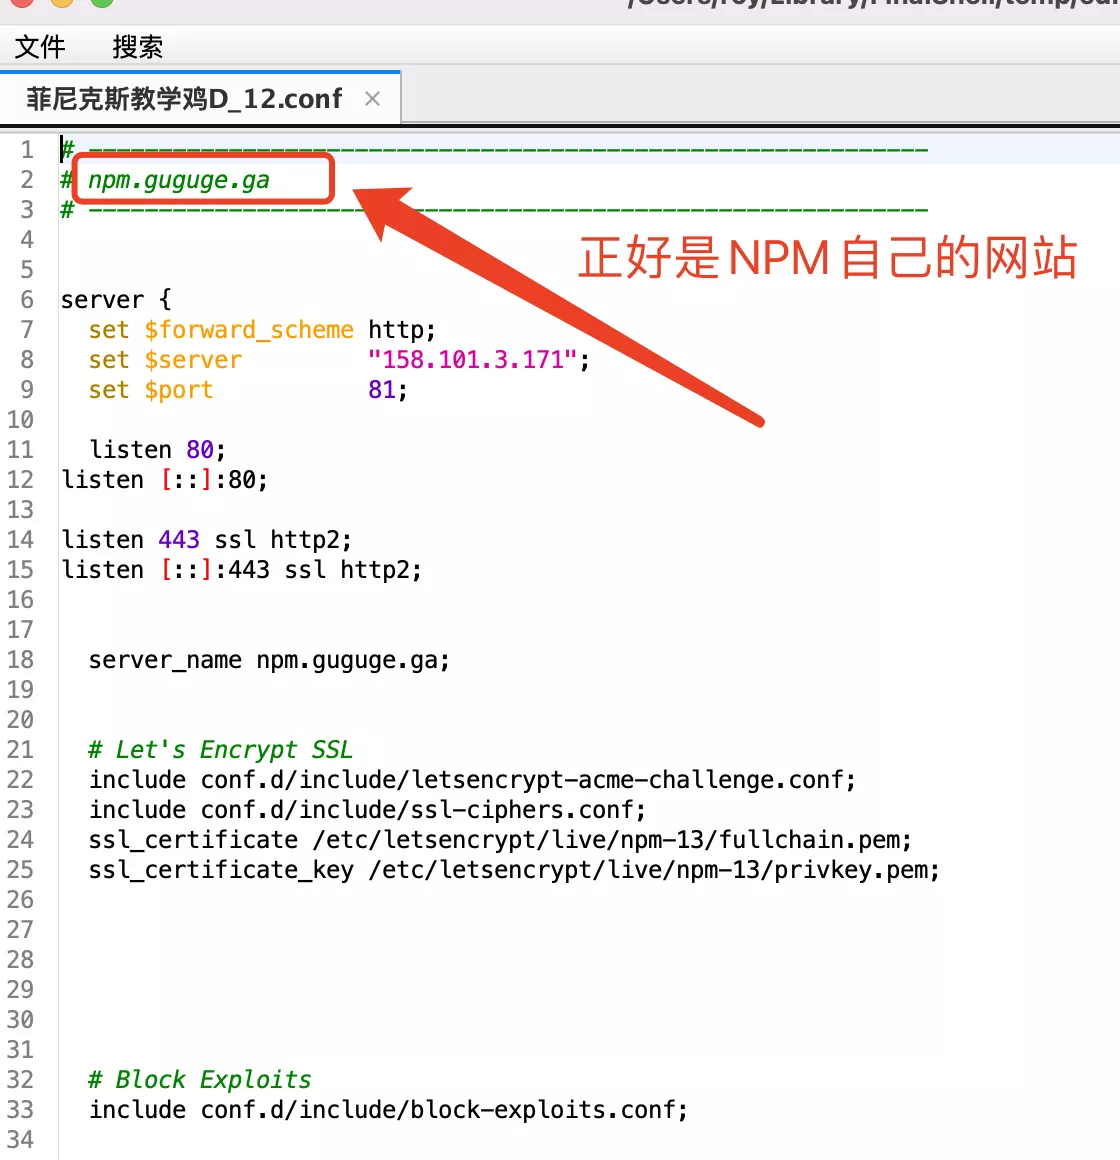
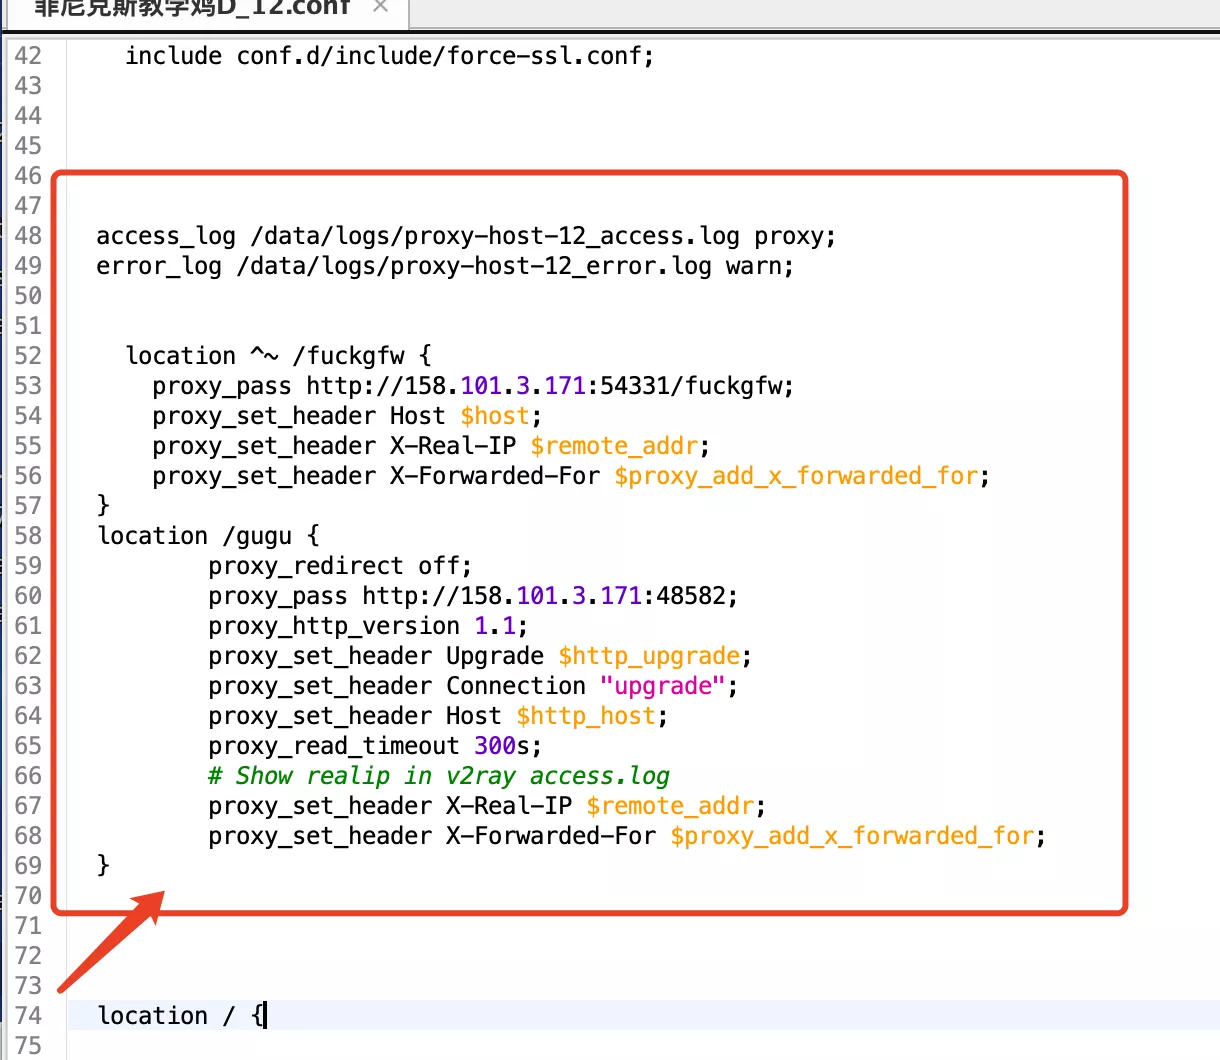
选择任意一个 NPM 代理上,分别在下面两个位置填入下面两个部分内容:

代替了旧方法中的:
NGINX
location ^~ /fuckgfw {              #fuckgfw换成你前面设置的面板的url根路径
    proxy_pass http://158.101.3.171:54331/fuckgfw;  # IP填服务器IP,这边不能填127.0.0.1,因为是在容器里,54331换成你xui面板的端口
    proxy_set_header Host $host;
    proxy_set_header X-Real-IP $remote_addr;
    proxy_set_header X-Forwarded-For $proxy_add_x_forwarded_for;
}
NGINX
location /plogger {                 # plogger填你前面设置的ws的路径
        proxy_redirect off;
        proxy_pass http://158.101.3.171:13997;    # IP填服务器IP,这边不能填127.0.0.1,因为是在容器里,13997换成你入站规则那边的IP
        proxy_http_version 1.1;
        proxy_set_header Upgrade $http_upgrade;
        proxy_set_header Connection "upgrade";
        proxy_set_header Host $http_host;
        proxy_read_timeout 300s;
        # Show realip in v2ray access.log
        proxy_set_header X-Real-IP $remote_addr;
        proxy_set_header X-Forwarded-For $proxy_add_x_forwarded_for;
}
保存即可!
以下为旧方法,不建议采用
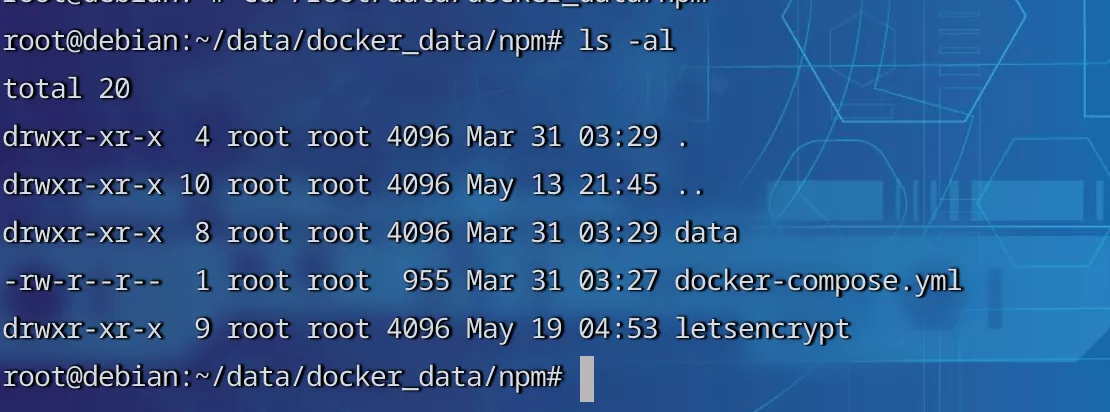
登陆服务器,来到 NPM 的安装路径下(这边假设大家都是用【Docker 系列】一个反向代理神器 ——Nginx Proxy Manager 这篇文章的方法搭建的):
BASH
cd /root/data/docker_data/npm
查看当前文件:
BASH
ls -al

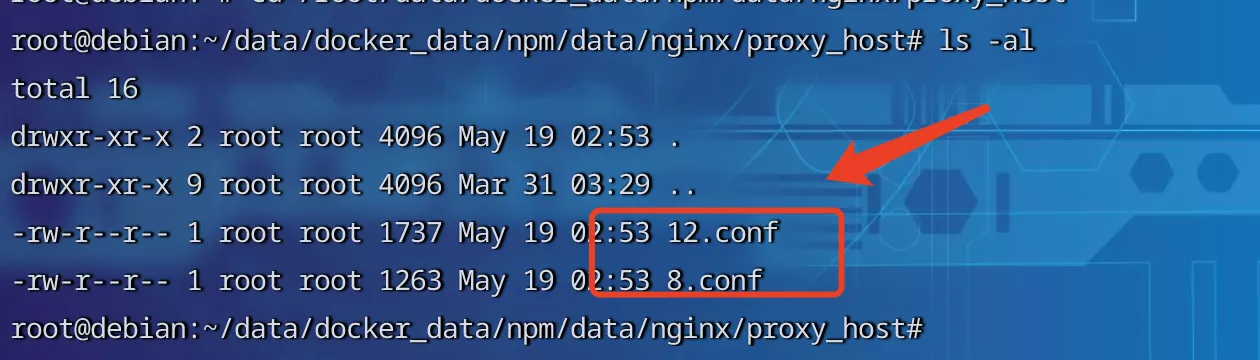
我们的文件都在
data目录下,一层一层找,找到我们的 Nginx 配置文件。BASH
cd data/nginx/proxy_host

可以看到两个文件(如果你 NPM 反代多的话,可能有很多个)
这边比较讨厌,是数字命名的,其实我们随便选一个也行。
以上为旧方法,不建议采用。
在上述位置加入以下内容:
NGINX
location ^~ /fuckgfw {              #fuckgfw换成你前面设置的面板的url根路径
    proxy_pass http://158.101.3.171:54331/fuckgfw;  # IP填服务器IP,这边不能填127.0.0.1,因为是在容器里,54331换成你xui面板的端口
    proxy_set_header Host $host;
    proxy_set_header X-Real-IP $remote_addr;
    proxy_set_header X-Forwarded-For $proxy_add_x_forwarded_for;
}
location /plogger {                 # plogger填你前面设置的ws的路径
        proxy_redirect off;
        proxy_pass http://158.101.3.171:13997;    # IP填服务器IP,这边不能填127.0.0.1,因为是在容器里,13997换成你入站规则那边的IP
        proxy_http_version 1.1;
        proxy_set_header Upgrade $http_upgrade;
        proxy_set_header Connection "upgrade";
        proxy_set_header Host $http_host;
        proxy_read_timeout 300s;
        # Show realip in v2ray access.log
        proxy_set_header X-Real-IP $remote_addr;
        proxy_set_header X-Forwarded-For $proxy_add_x_forwarded_for;
}
保存后,重启一下 NPM。
BASH
cd /root/data/docker_data/npm    # 来到docker-compose.yml所在的文件夹下

docker-compose restart  # 重启
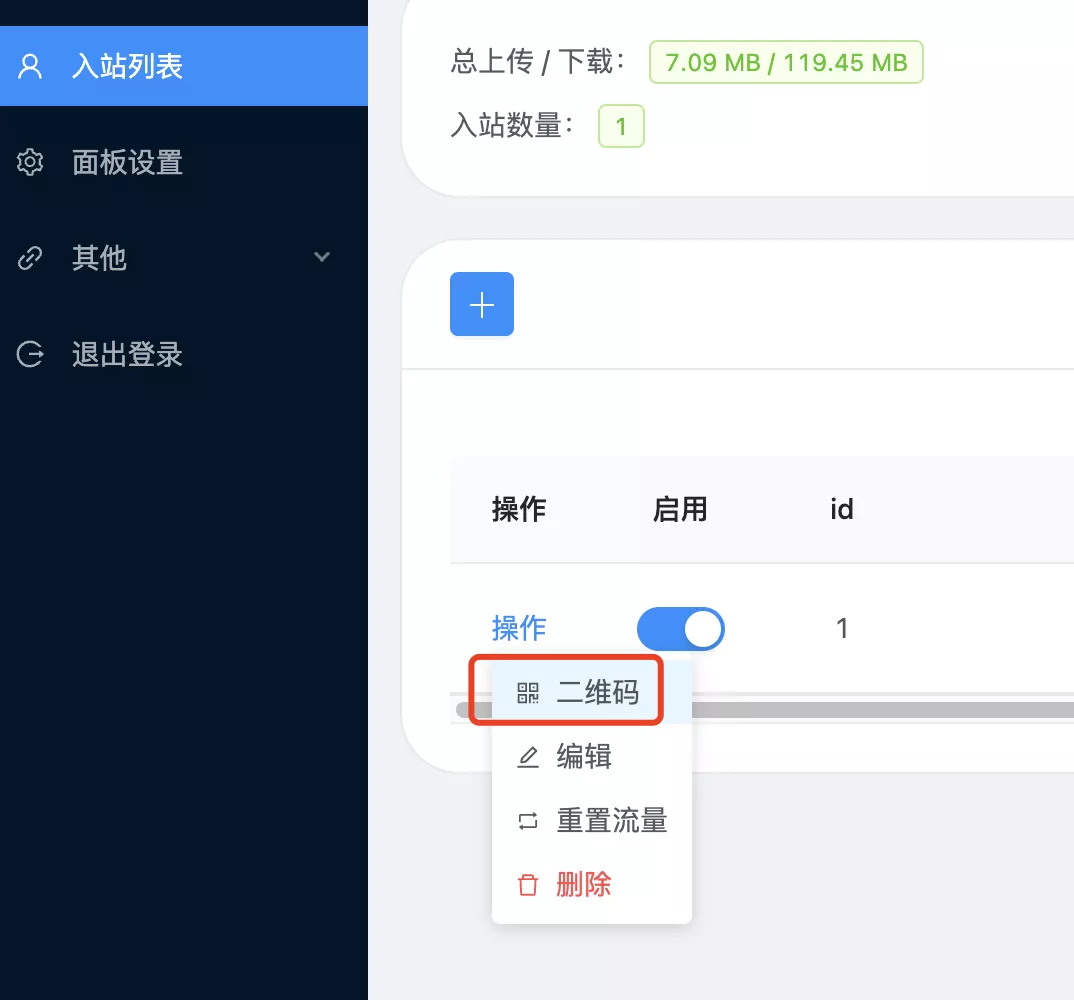
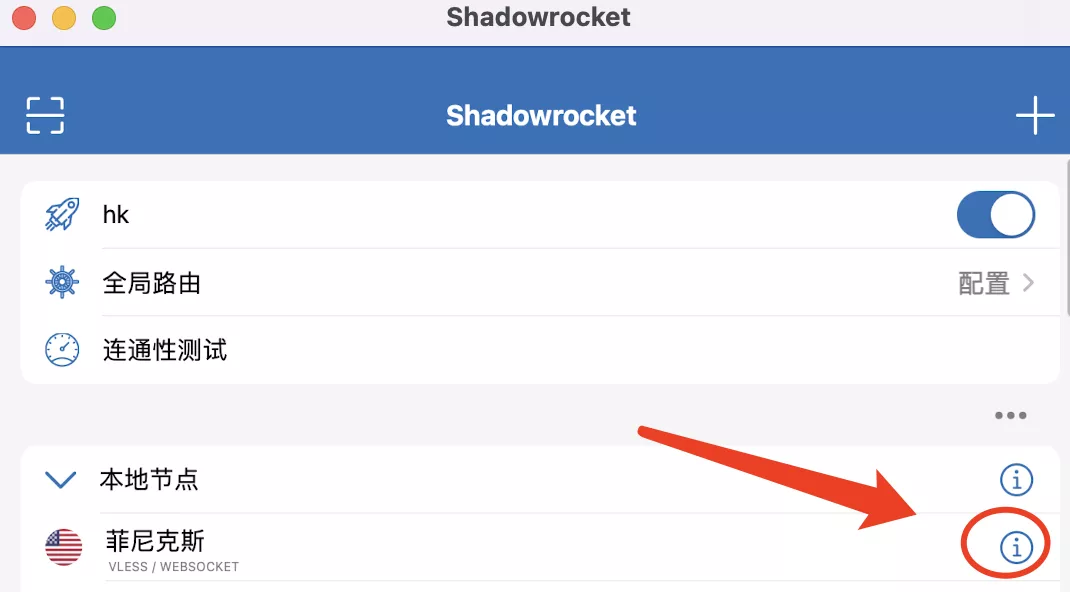
4. 客户端连接
以小火煎为例子,其他客户端类似:
点击打开二维码:


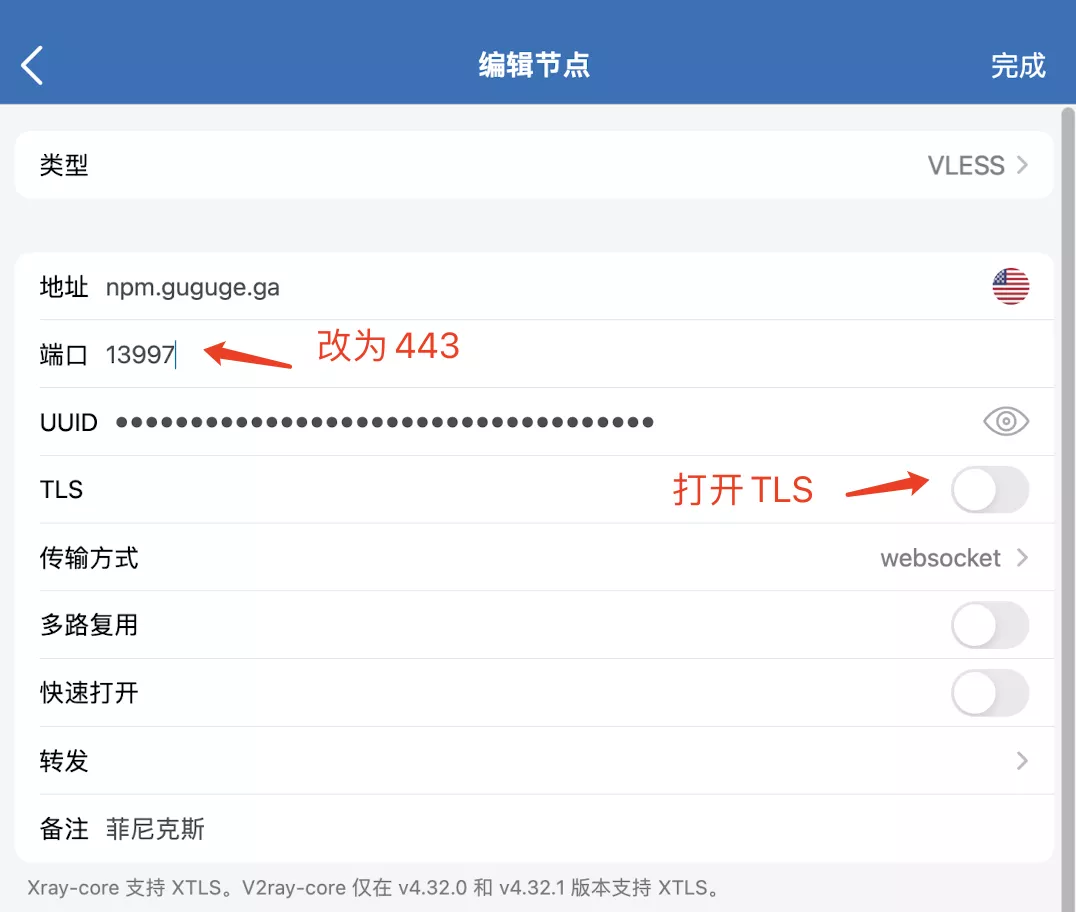
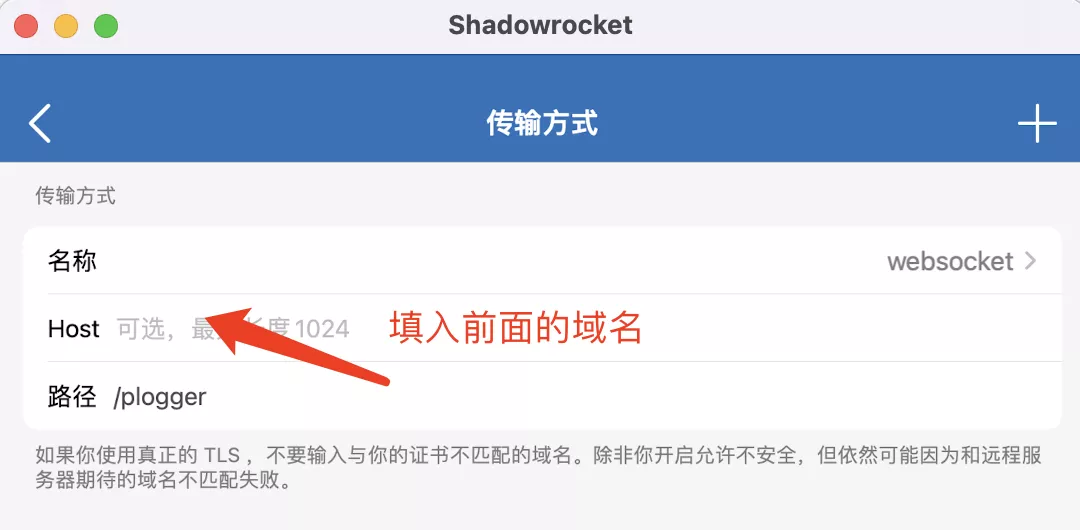
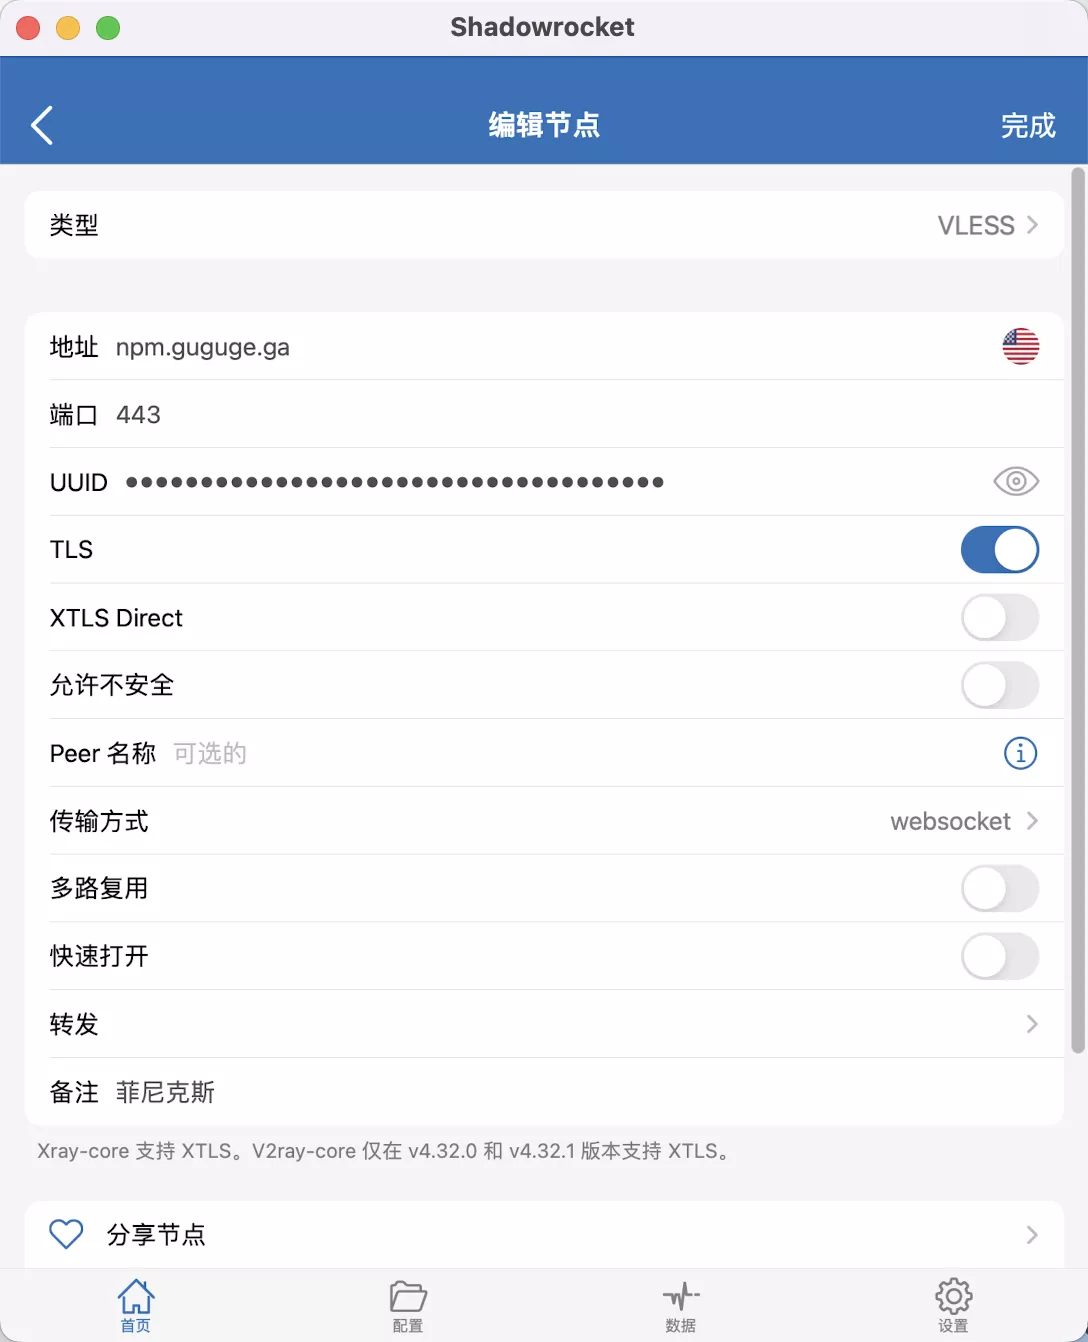
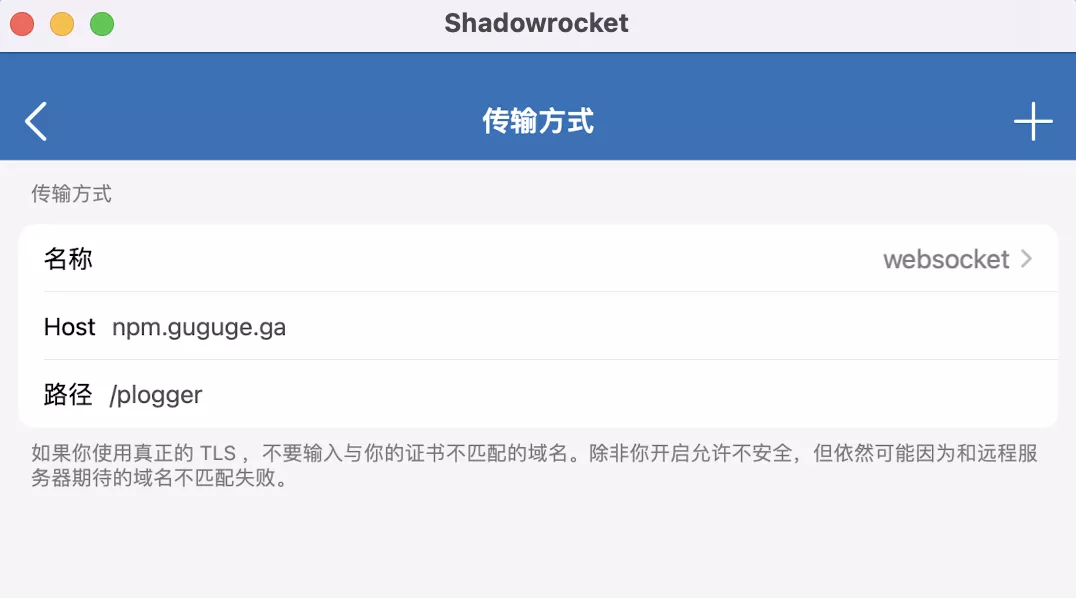
完整配置参考:


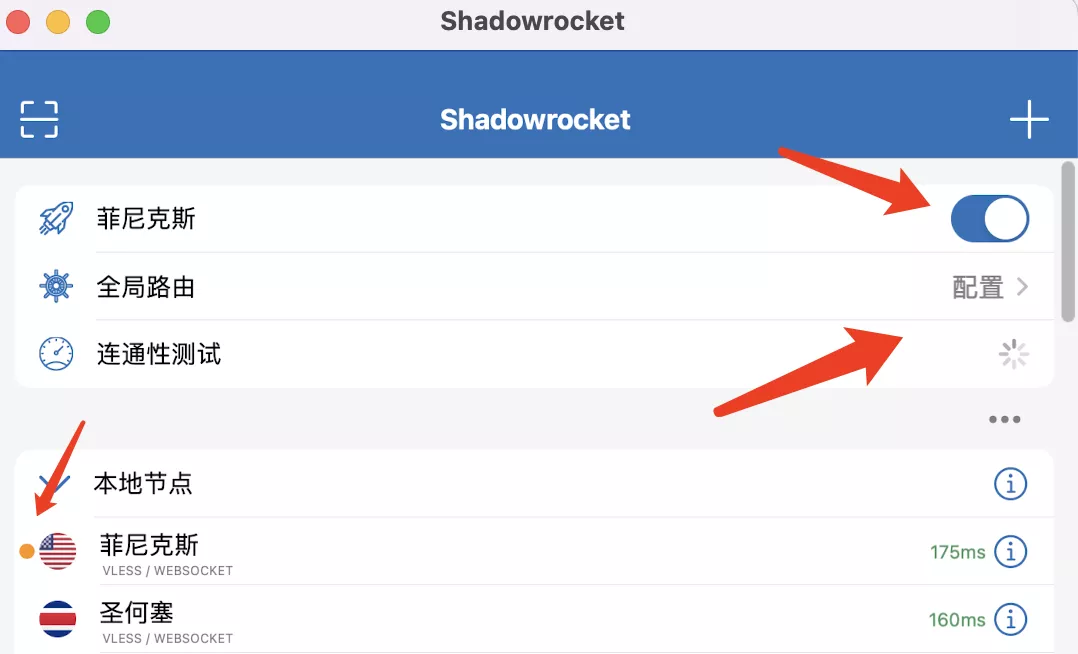
启动节点:

浏览器输入
https://ip.skk.moe/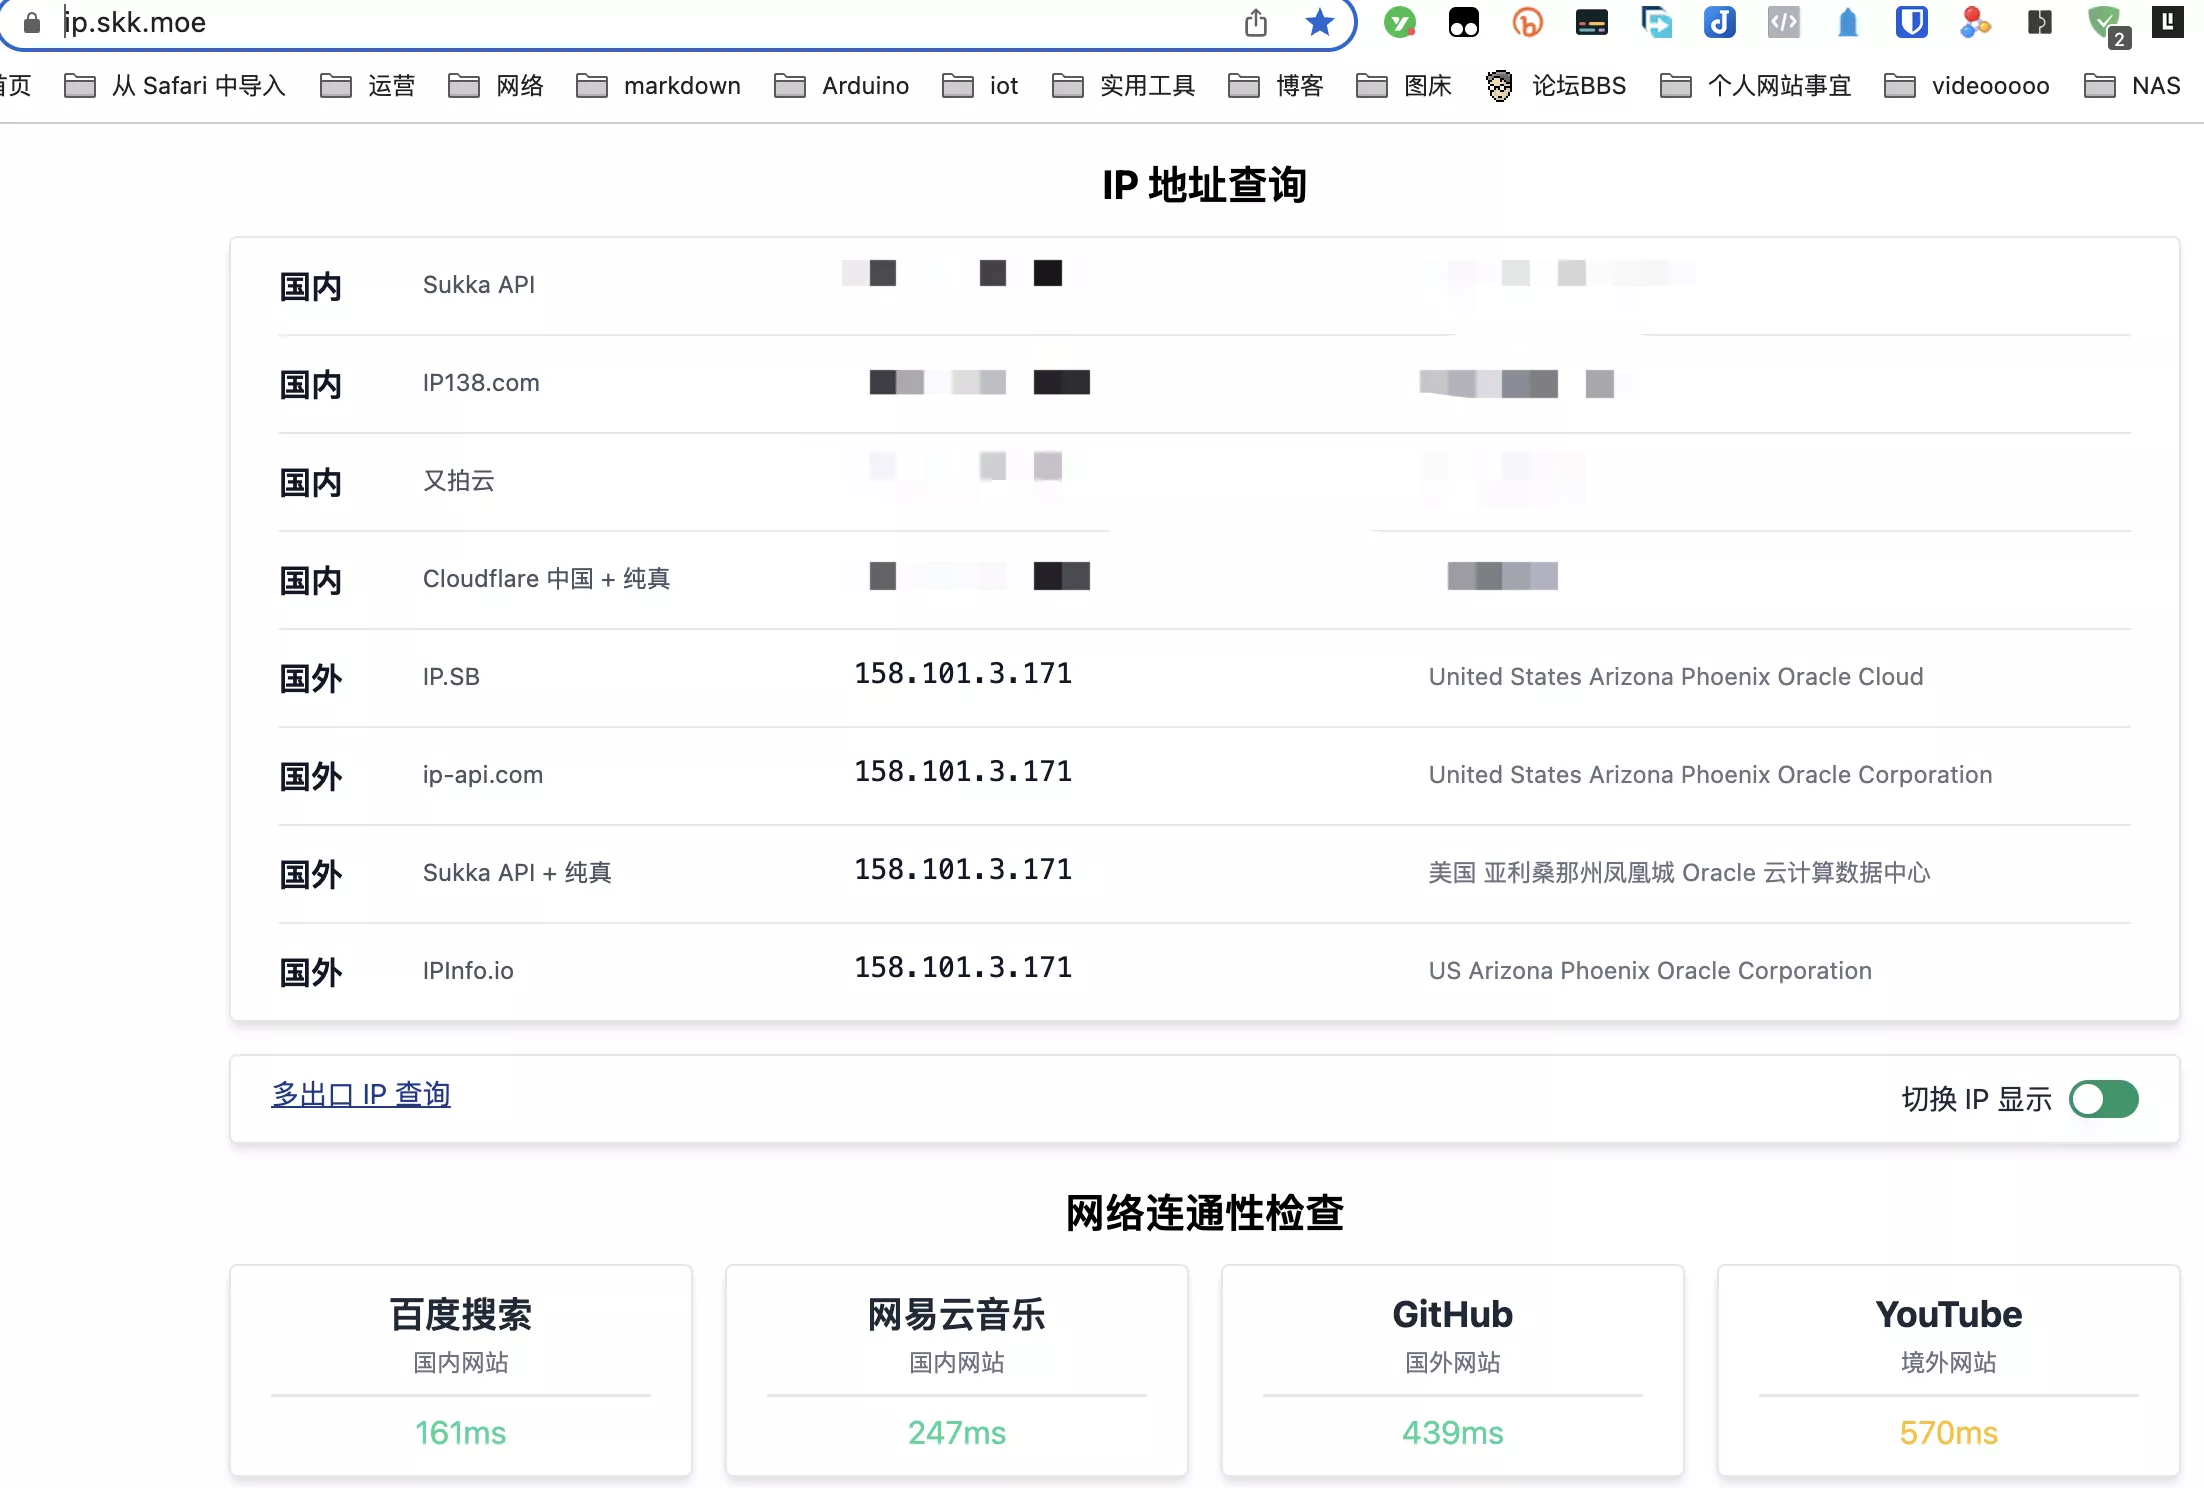
搞定!
5. 注意事项(重要)
由于我们是直接修改的配置文件,所以,在反代的这个站点,不用轻易在 NPM 后台面板上修改原来的配置(比如打开,然后点确定),这样会破坏掉我们这边写的 Nginx 配置文件,导致节点无法正常使用。
-
相关阅读:
Facebook投资百亿打造元宇宙,扎克伯格:放长线钓大鱼!
JavaScript【Array.isArray()、push()/pop()、shift()/unshift()、join()、concat()、reverse() 、slice()】(六)
第三代高级语言
编写搭建了基于HTTP访问日志的攻击威胁分析系统
Flink CDC介绍及原理
循环生成el-descriptions-item
antv-G6知识图谱安装--使用(实例)--连接线修改成动态,并添加跟随线移动的光圈,设置分支跟踪定位功能
使用 Python 进行 GUI 掷骰子模拟
省去findViewById()方法,kotlin-android-extensions插件
关于CSS 中权重的教程
- 原文地址:https://blog.csdn.net/u012995136/article/details/134485643