-
竞赛 题目:基于python的验证码识别 - 机器视觉 验证码识别
0 前言
🔥 优质竞赛项目系列,今天要分享的是
基于python的验证码识别
该项目较为新颖,适合作为竞赛课题方向,学长非常推荐!
🧿 更多资料, 项目分享:
https://gitee.com/dancheng-senior/postgraduate
1 项目简介
在python爬虫爬取某些网站的验证码的时候可能会遇到验证码识别的问题,现在的验证码大多分为四类:
-
1、计算验证码
-
2、滑块验证码
-
3、识图验证码
-
4、语音验证码
学长这主要写的就是识图验证码,识别的是简单的验证码,要想让识别率更高,识别的更加准确就需要花很多的精力去训练自己的字体库。
2 验证码识别步骤
1、灰度处理
2、二值化
3、去除边框(如果有的话)
4、降噪
5、切割字符或者倾斜度矫正
6、训练字体库
7、识别这6个步骤中前三个步骤是基本的,4或者5可根据实际情况选择是否需要,并不一定切割验证码,识别率就会上升很多有时候还会下降
这篇博客不涉及训练字体库的内容,请自行搜索。同样也不讲解基础的语法。
用到的几个主要的python库: Pillow(python图像处理库)、OpenCV(高级图像处理库)、pytesseract(识别库)
2.1 灰度处理&二值化
灰度处理,就是把彩色的验证码图片转为灰色的图片。
二值化,是将图片处理为只有黑白两色的图片,利于后面的图像处理和识别
在OpenCV中有现成的方法可以进行灰度处理和二值化,处理后的效果:
# 自适应阀值二值化 def _get_dynamic_binary_image(filedir, img_name): filename = './out_img/' + img_name.split('.')[0] + '-binary.jpg' img_name = filedir + '/' + img_name print('.....' + img_name) im = cv2.imread(img_name) im = cv2.cvtColor(im,cv2.COLOR_BGR2GRAY) #灰值化 # 二值化 th1 = cv2.adaptiveThreshold(im, 255, cv2.ADAPTIVE_THRESH_GAUSSIAN_C, cv2.THRESH_BINARY, 21, 1) cv2.imwrite(filename,th1) return th1- 1
- 2
- 3
- 4
- 5
- 6
- 7
- 8
- 9
- 10
- 11
2.2 去除边框
如果验证码有边框,那我们就需要去除边框,去除边框就是遍历像素点,找到四个边框上的所有点,把他们都改为白色,我这里边框是两个像素宽
注意:在用OpenCV时,图片的矩阵点是反的,就是长和宽是颠倒的
代码:
# 去除边框 def clear_border(img,img_name): filename = './out_img/' + img_name.split('.')[0] + '-clearBorder.jpg' h, w = img.shape[:2] for y in range(0, w): for x in range(0, h): if y < 2 or y > w - 2: img[x, y] = 255 if x < 2 or x > h -2: img[x, y] = 255 cv2.imwrite(filename,img) return img- 1
- 2
- 3
- 4
- 5
- 6
- 7
- 8
- 9
- 10
- 11
- 12
- 13
效果

2.3 图像降噪
降噪是验证码处理中比较重要的一个步骤,我这里使用了点降噪和线降噪

线降噪的思路就是检测这个点相邻的四个点(图中标出的绿色点),判断这四个点中是白点的个数,如果有两个以上的白色像素点,那么就认为这个点是白色的,从而去除整个干扰线,但是这种方法是有限度的,如果干扰线特别粗就没有办法去除,只能去除细的干扰线
# 干扰线降噪 def interference_line(img, img_name): filename = './out_img/' + img_name.split('.')[0] + '-interferenceline.jpg' h, w = img.shape[:2] # !!!opencv矩阵点是反的 # img[1,2] 1:图片的高度,2:图片的宽度 for y in range(1, w - 1): for x in range(1, h - 1): count = 0 if img[x, y - 1] > 245: count = count + 1 if img[x, y + 1] > 245: count = count + 1 if img[x - 1, y] > 245: count = count + 1 if img[x + 1, y] > 245: count = count + 1 if count > 2: img[x, y] = 255 cv2.imwrite(filename,img) return img- 1
- 2
- 3
- 4
- 5
- 6
- 7
- 8
- 9
- 10
- 11
- 12
- 13
- 14
- 15
- 16
- 17
- 18
- 19
- 20
- 21
点降噪的思路和线降噪的差不多,只是会针对不同的位置检测的点不一样,注释写的很清楚了
# 点降噪 def interference_point(img,img_name, x = 0, y = 0): """ 9邻域框,以当前点为中心的田字框,黑点个数 :param x: :param y: :return: """ filename = './out_img/' + img_name.split('.')[0] + '-interferencePoint.jpg' # todo 判断图片的长宽度下限 cur_pixel = img[x,y]# 当前像素点的值 height,width = img.shape[:2] for y in range(0, width - 1): for x in range(0, height - 1): if y == 0: # 第一行 if x == 0: # 左上顶点,4邻域 # 中心点旁边3个点 sum = int(cur_pixel) \ + int(img[x, y + 1]) \ + int(img[x + 1, y]) \ + int(img[x + 1, y + 1]) if sum <= 2 * 245: img[x, y] = 0 elif x == height - 1: # 右上顶点 sum = int(cur_pixel) \ + int(img[x, y + 1]) \ + int(img[x - 1, y]) \ + int(img[x - 1, y + 1]) if sum <= 2 * 245: img[x, y] = 0 else: # 最上非顶点,6邻域 sum = int(img[x - 1, y]) \ + int(img[x - 1, y + 1]) \ + int(cur_pixel) \ + int(img[x, y + 1]) \ + int(img[x + 1, y]) \ + int(img[x + 1, y + 1]) if sum <= 3 * 245: img[x, y] = 0 elif y == width - 1: # 最下面一行 if x == 0: # 左下顶点 # 中心点旁边3个点 sum = int(cur_pixel) \ + int(img[x + 1, y]) \ + int(img[x + 1, y - 1]) \ + int(img[x, y - 1]) if sum <= 2 * 245: img[x, y] = 0 elif x == height - 1: # 右下顶点 sum = int(cur_pixel) \ + int(img[x, y - 1]) \ + int(img[x - 1, y]) \ + int(img[x - 1, y - 1]) if sum <= 2 * 245: img[x, y] = 0 else: # 最下非顶点,6邻域 sum = int(cur_pixel) \ + int(img[x - 1, y]) \ + int(img[x + 1, y]) \ + int(img[x, y - 1]) \ + int(img[x - 1, y - 1]) \ + int(img[x + 1, y - 1]) if sum <= 3 * 245: img[x, y] = 0 else: # y不在边界 if x == 0: # 左边非顶点 sum = int(img[x, y - 1]) \ + int(cur_pixel) \ + int(img[x, y + 1]) \ + int(img[x + 1, y - 1]) \ + int(img[x + 1, y]) \ + int(img[x + 1, y + 1]) if sum <= 3 * 245: img[x, y] = 0 elif x == height - 1: # 右边非顶点 sum = int(img[x, y - 1]) \ + int(cur_pixel) \ + int(img[x, y + 1]) \ + int(img[x - 1, y - 1]) \ + int(img[x - 1, y]) \ + int(img[x - 1, y + 1]) if sum <= 3 * 245: img[x, y] = 0 else: # 具备9领域条件的 sum = int(img[x - 1, y - 1]) \ + int(img[x - 1, y]) \ + int(img[x - 1, y + 1]) \ + int(img[x, y - 1]) \ + int(cur_pixel) \ + int(img[x, y + 1]) \ + int(img[x + 1, y - 1]) \ + int(img[x + 1, y]) \ + int(img[x + 1, y + 1]) if sum <= 4 * 245: img[x, y] = 0 cv2.imwrite(filename,img) return img- 1
- 2
- 3
- 4
- 5
- 6
- 7
- 8
- 9
- 10
- 11
- 12
- 13
- 14
- 15
- 16
- 17
- 18
- 19
- 20
- 21
- 22
- 23
- 24
- 25
- 26
- 27
- 28
- 29
- 30
- 31
- 32
- 33
- 34
- 35
- 36
- 37
- 38
- 39
- 40
- 41
- 42
- 43
- 44
- 45
- 46
- 47
- 48
- 49
- 50
- 51
- 52
- 53
- 54
- 55
- 56
- 57
- 58
- 59
- 60
- 61
- 62
- 63
- 64
- 65
- 66
- 67
- 68
- 69
- 70
- 71
- 72
- 73
- 74
- 75
- 76
- 77
- 78
- 79
- 80
- 81
- 82
- 83
- 84
- 85
- 86
- 87
- 88
- 89
- 90
- 91
- 92
- 93
- 94
- 95
- 96
- 97
- 98
- 99
- 100
- 101
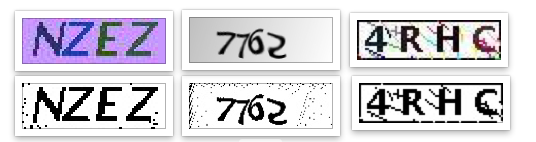
效果:

其实到了这一步,这些字符就可以识别了,没必要进行字符切割了,现在这三种类型的验证码识别率已经达到50%以上了
2.4 字符切割
字符切割通常用于验证码中有粘连的字符,粘连的字符不好识别,所以我们需要将粘连的字符切割为单个的字符,在进行识别
字符切割的思路就是找到一个黑色的点,然后在遍历与他相邻的黑色的点,直到遍历完所有的连接起来的黑色的点,找出这些点中的最高的点、最低的点、最右边的点、最左边的点,记录下这四个点,认为这是一个字符,然后在向后遍历点,直至找到黑色的点,继续以上的步骤。最后通过每个字符的四个点进行切割

图中红色的点就是代码执行完后,标识出的每个字符的四个点,然后就会根据这四个点进行切割(图中画的有些误差,懂就好)
但是也可以看到,m2是粘连的,代码认为他是一个字符,所以我们需要对每个字符的宽度进行检测,如果他的宽度过宽,我们就认为他是两个粘连在一起的字符,并将它在从中间切割
确定每个字符的四个点代码:
def cfs(im,x_fd,y_fd): '''用队列和集合记录遍历过的像素坐标代替单纯递归以解决cfs访问过深问题 ''' # print('**********') xaxis=[] yaxis=[] visited =set() q = Queue() q.put((x_fd, y_fd)) visited.add((x_fd, y_fd)) offsets=[(1, 0), (0, 1), (-1, 0), (0, -1)]#四邻域 while not q.empty(): x,y=q.get() for xoffset,yoffset in offsets: x_neighbor,y_neighbor = x+xoffset,y+yoffset if (x_neighbor,y_neighbor) in (visited): continue # 已经访问过了 visited.add((x_neighbor, y_neighbor)) try: if im[x_neighbor, y_neighbor] == 0: xaxis.append(x_neighbor) yaxis.append(y_neighbor) q.put((x_neighbor,y_neighbor)) except IndexError: pass # print(xaxis) if (len(xaxis) == 0 | len(yaxis) == 0): xmax = x_fd + 1 xmin = x_fd ymax = y_fd + 1 ymin = y_fd else: xmax = max(xaxis) xmin = min(xaxis) ymax = max(yaxis) ymin = min(yaxis) #ymin,ymax=sort(yaxis) return ymax,ymin,xmax,xmin def detectFgPix(im,xmax): '''搜索区块起点 ''' h,w = im.shape[:2] for y_fd in range(xmax+1,w): for x_fd in range(h): if im[x_fd,y_fd] == 0: return x_fd,y_fd def CFS(im): '''切割字符位置 ''' zoneL=[]#各区块长度L列表 zoneWB=[]#各区块的X轴[起始,终点]列表 zoneHB=[]#各区块的Y轴[起始,终点]列表 xmax=0#上一区块结束黑点横坐标,这里是初始化 for i in range(10): try: x_fd,y_fd = detectFgPix(im,xmax) # print(y_fd,x_fd) xmax,xmin,ymax,ymin=cfs(im,x_fd,y_fd) L = xmax - xmin H = ymax - ymin zoneL.append(L) zoneWB.append([xmin,xmax]) zoneHB.append([ymin,ymax]) except TypeError: return zoneL,zoneWB,zoneHB return zoneL,zoneWB,zoneHB- 1
- 2
- 3
- 4
- 5
- 6
- 7
- 8
- 9
- 10
- 11
- 12
- 13
- 14
- 15
- 16
- 17
- 18
- 19
- 20
- 21
- 22
- 23
- 24
- 25
- 26
- 27
- 28
- 29
- 30
- 31
- 32
- 33
- 34
- 35
- 36
- 37
- 38
- 39
- 40
- 41
- 42
- 43
- 44
- 45
- 46
- 47
- 48
- 49
- 50
- 51
- 52
- 53
- 54
- 55
- 56
- 57
- 58
- 59
- 60
- 61
- 62
- 63
- 64
- 65
- 66
- 67
- 68
- 69
- 70
- 71
- 72
- 73
- 74
- 75
- 76
- 77
- 78
- 79
- 80
- 81
- 82
- 83
- 84
切割粘连字符代码:
def cutting_img(im,im_position,img,xoffset = 1,yoffset = 1): filename = './out_img/' + img.split('.')[0] # 识别出的字符个数 im_number = len(im_position[1]) # 切割字符 for i in range(im_number): im_start_X = im_position[1][i][0] - xoffset im_end_X = im_position[1][i][1] + xoffset im_start_Y = im_position[2][i][0] - yoffset im_end_Y = im_position[2][i][1] + yoffset cropped = im[im_start_Y:im_end_Y, im_start_X:im_end_X] cv2.imwrite(filename + '-cutting-' + str(i) + '.jpg',cropped)- 1
- 2
- 3
- 4
- 5
- 6
- 7
- 8
- 9
- 10
- 11
- 12
效果:

2.5 识别
识别用的是typesseract库,主要识别一行字符和单个字符时的参数设置,识别中英文的参数设置,代码很简单就一行,我这里大多是filter文件的操作
# 识别验证码 cutting_img_num = 0 for file in os.listdir('./out_img'): str_img = '' if fnmatch(file, '%s-cutting-*.jpg' % img_name.split('.')[0]): cutting_img_num += 1 for i in range(cutting_img_num): try: file = './out_img/%s-cutting-%s.jpg' % (img_name.split('.')[0], i) # 识别字符 str_img = str_img + image_to_string(Image.open(file),lang = 'eng', config='-psm 10') #单个字符是10,一行文本是7 except Exception as err: pass print('切图:%s' % cutting_img_num) print('识别为:%s' % str_img)- 1
- 2
- 3
- 4
- 5
- 6
- 7
- 8
- 9
- 10
- 11
- 12
- 13
- 14
- 15
最后这种粘连字符的识别率是在30%左右,而且这种只是处理两个字符粘连,如果有两个以上的字符粘连还不能识别,但是根据字符宽度判别的话也不难,有兴趣的可以试一下
无需切割字符识别的效果:

需要切割字符的识别效果:

3 基于tensorflow的验证码识别
-
python库: tensorflow, opencv, pandas, gpu机器。
-
训练集: 10w 图片, 200step左右开始收敛。
-
策略: 切分图片,训练单字母识别。预测时也是同样切分。(ps:不切分训练及识别,跑了一夜,没有收敛)
-
准确率: 在区分大小写的情况下,单字母识别率98%, 整体识别率75%+。
3.1 数据集

数据集预处理
package com; import java.awt.Color; import java.io.File; import java.io.FileOutputStream; import java.io.IOException; import java.io.OutputStream; import java.util.Random; import org.patchca.color.ColorFactory; import org.patchca.filter.predefined.CurvesRippleFilterFactory; import org.patchca.filter.predefined.DiffuseRippleFilterFactory; import org.patchca.filter.predefined.DoubleRippleFilterFactory; import org.patchca.filter.predefined.MarbleRippleFilterFactory; import org.patchca.filter.predefined.WobbleRippleFilterFactory; import org.patchca.service.ConfigurableCaptchaService; import org.patchca.utils.encoder.EncoderHelper; import org.patchca.word.RandomWordFactory; public class CreatePatcha { private static Random random = new Random(); private static ConfigurableCaptchaService cs = new ConfigurableCaptchaService(); static { // cs.setColorFactory(new SingleColorFactory(new Color(25, 60, 170))); cs.setColorFactory(new ColorFactory() { @Override public Color getColor(int x) { int[] c = new int[3]; int i = random.nextInt(c.length); for (int fi = 0; fi < c.length; fi++) { if (fi == i) { c[fi] = random.nextInt(71); } else { c[fi] = random.nextInt(256); } } return new Color(c[0], c[1], c[2]); } }); RandomWordFactory wf = new RandomWordFactory(); // wf.setCharacters("23456789abcdefghigklmnpqrstuvwxyzABCDEFGHIGKLMNPQRSTUVWXYZ"); wf.setCharacters("0123456789abcdefghigklmnopqrstuvwxyzABCDEFGHIGKLMNOPQRSTUVWXYZ"); wf.setMaxLength(4); wf.setMinLength(4); cs.setWordFactory(wf); } public static void main(String[] args) throws IOException { for (int i = 0; i < 100; i++) { switch (random.nextInt(5)) { case 0: cs.setFilterFactory(new CurvesRippleFilterFactory(cs .getColorFactory())); break; case 1: cs.setFilterFactory(new MarbleRippleFilterFactory()); break; case 2: cs.setFilterFactory(new DoubleRippleFilterFactory()); break; case 3: cs.setFilterFactory(new WobbleRippleFilterFactory()); break; case 4: cs.setFilterFactory(new DiffuseRippleFilterFactory()); break; } OutputStream out = new FileOutputStream(new File(i + ".png")); String token = EncoderHelper.getChallangeAndWriteImage(cs, "png", out); out.close(); File f = new File(i+".png"); f.renameTo(new File("checkdata/" + token +"_" + i+".png")); System.out.println(i+"验证码=" + token); } } }- 1
- 2
- 3
- 4
- 5
- 6
- 7
- 8
- 9
- 10
- 11
- 12
- 13
- 14
- 15
- 16
- 17
- 18
- 19
- 20
- 21
- 22
- 23
- 24
- 25
- 26
- 27
- 28
- 29
- 30
- 31
- 32
- 33
- 34
- 35
- 36
- 37
- 38
- 39
- 40
- 41
- 42
- 43
- 44
- 45
- 46
- 47
- 48
- 49
- 50
- 51
- 52
- 53
- 54
- 55
- 56
- 57
- 58
- 59
- 60
- 61
- 62
- 63
- 64
- 65
- 66
- 67
- 68
- 69
- 70
- 71
- 72
- 73
- 74
- 75
- 76
- 77
- 78
3.2 基于tf的神经网络训练代码
#coding:utf-8from gen_captcha import gen_captcha_text_and_imagefrom gen_captcha import numberfrom gen_captcha import alphabetfrom gen_captcha import ALPHABETimport numpy as npimport tensorflow as tfimport osos.environ["CUDA_VISIBLE_DEVICES"] = "0"text, image = gen_captcha_text_and_image()print("验证码图像channel:", image.shape) # (70, 160, 3)# 图像大小IMAGE_HEIGHT = 70IMAGE_WIDTH = 70MAX_CAPTCHA = len(text)print("验证码文本最长字符数", MAX_CAPTCHA) # 验证码最长4字符; 我全部固定为4,可以不固定. 如果验证码长度小于4,用'_'补齐# 把彩色图像转为灰度图像(色彩对识别验证码没有什么用)def convert2gray(img): if len(img.shape) > 2: gray = np.mean(img, -1) # 上面的转法较快,正规转法如下 # r, g, b = img[:,:,0], img[:,:,1], img[:,:,2] # gray = 0.2989 * r + 0.5870 * g + 0.1140 * b return gray else: return img"""cnn在图像大小是2的倍数时性能最高, 如果你用的图像大小不是2的倍数,可以在图像边缘补无用像素。np.pad(image【,((2,3),(2,2)), 'constant', constant_values=(255,)) # 在图像上补2行,下补3行,左补2行,右补2行"""# 文本转向量# char_set = number + alphabet + ALPHABET + ['_'] # 如果验证码长度小于4, '_'用来补齐char_set = number + alphabet + ALPHABET # 如果验证码长度小于4, '_'用来补齐CHAR_SET_LEN = len(char_set) #26*2+10+1=63def text2vec(text): text_len = len(text) if text_len > MAX_CAPTCHA: raise ValueError('验证码最长4个字符') vector = np.zeros(MAX_CAPTCHA*CHAR_SET_LEN) def char2pos(c): if c =='_': k = 62 return k k = ord(c)-48 if k > 9: k = ord(c) - 55 if k > 35: k = ord(c) - 61 if k > 61: raise ValueError('No Map') return k for i, c in enumerate(text): idx = i * CHAR_SET_LEN + char2pos(c) vector[idx] = 1 return vector# 向量转回文本def vec2text(vec): char_pos = vec.nonzero()[0] text=[] for i, c in enumerate(char_pos): char_at_pos = i #c/63 char_idx = c % CHAR_SET_LEN if char_idx < 10: char_code = char_idx + ord('0') elif char_idx <36: char_code = char_idx - 10 + ord('A') elif char_idx < 62: char_code = char_idx- 36 + ord('a') elif char_idx == 62: char_code = ord('_') else: raise ValueError('error') text.append(chr(char_code)) return "".join(text)"""#向量(大小MAX_CAPTCHA*CHAR_SET_LEN)用0,1编码 每63个编码一个字符,这样顺利有,字符也有vec = text2vec("F5Sd")text = vec2text(vec)print(text) # F5Sdvec = text2vec("SFd5")text = vec2text(vec)print(text) # SFd5"""# 生成一个训练batchdef get_next_batch(batch_size=128, train = True): batch_x = np.zeros([batch_size, IMAGE_HEIGHT*IMAGE_WIDTH]) batch_y = np.zeros([batch_size, MAX_CAPTCHA*CHAR_SET_LEN]) # 有时生成图像大小不是(70, 160, 3) def wrap_gen_captcha_text_and_image(train): while True: text, image = gen_captcha_text_and_image(train) if image.shape == (70, 70, 3): return text, image for i in range(batch_size): text, image = wrap_gen_captcha_text_and_image(train) image = convert2gray(image) batch_x[i,:] = image.flatten() / 255 # (image.flatten()-128)/128 mean为0 batch_y[i,:] = text2vec(text) return batch_x, batch_y####################################################################X = tf.placeholder(tf.float32, [None, IMAGE_HEIGHT*IMAGE_WIDTH])Y = tf.placeholder(tf.float32, [None, MAX_CAPTCHA*CHAR_SET_LEN])keep_prob = tf.placeholder(tf.float32) # dropout# 定义CNNdef crack_captcha_cnn(w_alpha=0.01, b_alpha=0.1): x = tf.reshape(X, shape=[-1, IMAGE_HEIGHT, IMAGE_WIDTH, 1]) #w_c1_alpha = np.sqrt(2.0/(IMAGE_HEIGHT*IMAGE_WIDTH)) # #w_c2_alpha = np.sqrt(2.0/(3*3*32)) #w_c3_alpha = np.sqrt(2.0/(3*3*64)) #w_d1_alpha = np.sqrt(2.0/(8*32*64)) #out_alpha = np.sqrt(2.0/1024) # 3 conv layer w_c1 = tf.Variable(w_alpha*tf.random_normal([3, 3, 1, 32])) b_c1 = tf.Variable(b_alpha*tf.random_normal([32])) conv1 = tf.nn.relu(tf.nn.bias_add(tf.nn.conv2d(x, w_c1, strides=[1, 1, 1, 1], padding='SAME'), b_c1)) conv1 = tf.nn.max_pool(conv1, ksize=[1, 2, 2, 1], strides=[1, 2, 2, 1], padding='SAME') conv1 = tf.nn.dropout(conv1, keep_prob) w_c2 = tf.Variable(w_alpha*tf.random_normal([3, 3, 32, 64])) b_c2 = tf.Variable(b_alpha*tf.random_normal([64])) conv2 = tf.nn.relu(tf.nn.bias_add(tf.nn.conv2d(conv1, w_c2, strides=[1, 1, 1, 1], padding='SAME'), b_c2)) conv2 = tf.nn.max_pool(conv2, ksize=[1, 2, 2, 1], strides=[1, 2, 2, 1], padding='SAME') conv2 = tf.nn.dropout(conv2, keep_prob) w_c3 = tf.Variable(w_alpha*tf.random_normal([3, 3, 64, 64])) b_c3 = tf.Variable(b_alpha*tf.random_normal([64])) conv3 = tf.nn.relu(tf.nn.bias_add(tf.nn.conv2d(conv2, w_c3, strides=[1, 1, 1, 1], padding='SAME'), b_c3)) conv3 = tf.nn.max_pool(conv3, ksize=[1, 2, 2, 1], strides=[1, 2, 2, 1], padding='SAME') conv3 = tf.nn.dropout(conv3, keep_prob) # Fully connected layer w_d = tf.Variable(w_alpha*tf.random_normal([9*9*64, 1024])) b_d = tf.Variable(b_alpha*tf.random_normal([1024])) dense = tf.reshape(conv3, [-1, w_d.get_shape().as_list()[0]]) dense = tf.nn.relu(tf.add(tf.matmul(dense, w_d), b_d)) dense = tf.nn.dropout(dense, keep_prob) w_out = tf.Variable(w_alpha*tf.random_normal([1024, MAX_CAPTCHA*CHAR_SET_LEN])) b_out = tf.Variable(b_alpha*tf.random_normal([MAX_CAPTCHA*CHAR_SET_LEN])) out = tf.add(tf.matmul(dense, w_out), b_out) #out = tf.nn.softmax(out) return out# 训练def train_crack_captcha_cnn(): output = crack_captcha_cnn() # loss #loss = tf.reduce_mean(tf.nn.softmax_cross_entropy_with_logits(output, Y)) with tf.device('/gpu:0'): loss = tf.reduce_mean(tf.nn.softmax_cross_entropy_with_logits(logits=output, labels=Y)) # 最后一层用来分类的softmax和sigmoid有什么不同? # optimizer 为了加快训练 learning_rate应该开始大,然后慢慢衰 optimizer = tf.train.AdamOptimizer(learning_rate=0.001).minimize(loss) predict = tf.reshape(output, [-1, MAX_CAPTCHA, CHAR_SET_LEN]) max_idx_p = tf.argmax(predict, 2) max_idx_l = tf.argmax(tf.reshape(Y, [-1, MAX_CAPTCHA, CHAR_SET_LEN]), 2) correct_pred = tf.equal(max_idx_p, max_idx_l) accuracy = tf.reduce_mean(tf.cast(correct_pred, tf.float32)) saver = tf.train.Saver() config = tf.ConfigProto(allow_soft_placement=True) config.gpu_options.allow_growth = True with tf.Session(config=config) as sess: sess.run(tf.global_variables_initializer()) step = 0 while True: batch_x, batch_y = get_next_batch(256) _, loss_ = sess.run([optimizer, loss], feed_dict={X: batch_x, Y: batch_y, keep_prob: 0.75}) # 每100 step计算一次准确率 if step % 100 == 0: batch_x_test, batch_y_test = get_next_batch(100, False) acc = sess.run(accuracy, feed_dict={X: batch_x_test, Y: batch_y_test, keep_prob: 1.}) print('step:%d,loss:%g' % (step, loss_)) print('step:%d,acc:%g'%(step, acc)) # 如果准确率大于50%,保存模型,完成训练 if acc > 0.98: saver.save(sess, "crack_capcha.model", global_step=step) break step += 1def crack_captcha(captcha_image): output = crack_captcha_cnn() saver = tf.train.Saver() with tf.Session() as sess: saver.restore(sess, tf.train.latest_checkpoint('.')) predict = tf.argmax(tf.reshape(output, [-1, MAX_CAPTCHA, CHAR_SET_LEN]), 2) text_list = sess.run(predict, feed_dict={X: [captcha_image], keep_prob: 1}) text = text_list[0].tolist() vector = np.zeros(MAX_CAPTCHA*CHAR_SET_LEN) i = 0 for n in text: vector[i*CHAR_SET_LEN + n] = 1 i += 1 return vec2text(vector)if __name__ == '__main__': #text, image = gen_captcha_text_and_image() #image = convert2gray(image) #image = image.flatten() / 255 #predict_text = crack_captcha(image) #print("正确: {} 预测: {}".format(text, predict_text)) train_crack_captcha_cnn()- 1

4 最后
🧿 更多资料, 项目分享:
-
-
相关阅读:
如何快速生成项目目录结构树?
F1C100S自制开发板调试过程
JavaWeb学习之EL表达式
了解多媒体展厅弧幕投影系统收费构成,轻松制定预算
使用 puppeteer 加载 html 文件来运行 js 文件
嵌入式Linux应用开发-驱动大全-同步与互斥③
Use PlantUML to write the Sequence Diagram
分布式模式之Broker模式
QT: 一种精确定时器类的实现与使用
【UE 材质】力场护盾和冲击波效果
- 原文地址:https://blog.csdn.net/iuerfee/article/details/134405078
