-
2023 年最新企业微信官方会话机器人开发详细教程(更新中)
目标是开发一个简易机器人,能接收消息并作出回复。
获取企业 ID
企业信息页面链接地址:https://work.weixin.qq.com/wework_admin/frame#profile

自建企业微信机器人

配置机器人应用详情

功能配置

接收消息服务器配置
配置消息服务器配置

配置环境变量
获取 agentId 和 Secret 信息

创建 .env 配置文件配置企业微信机器人应用的配置信息
corpId= corpSecret= agentId=- 1
- 2
- 3
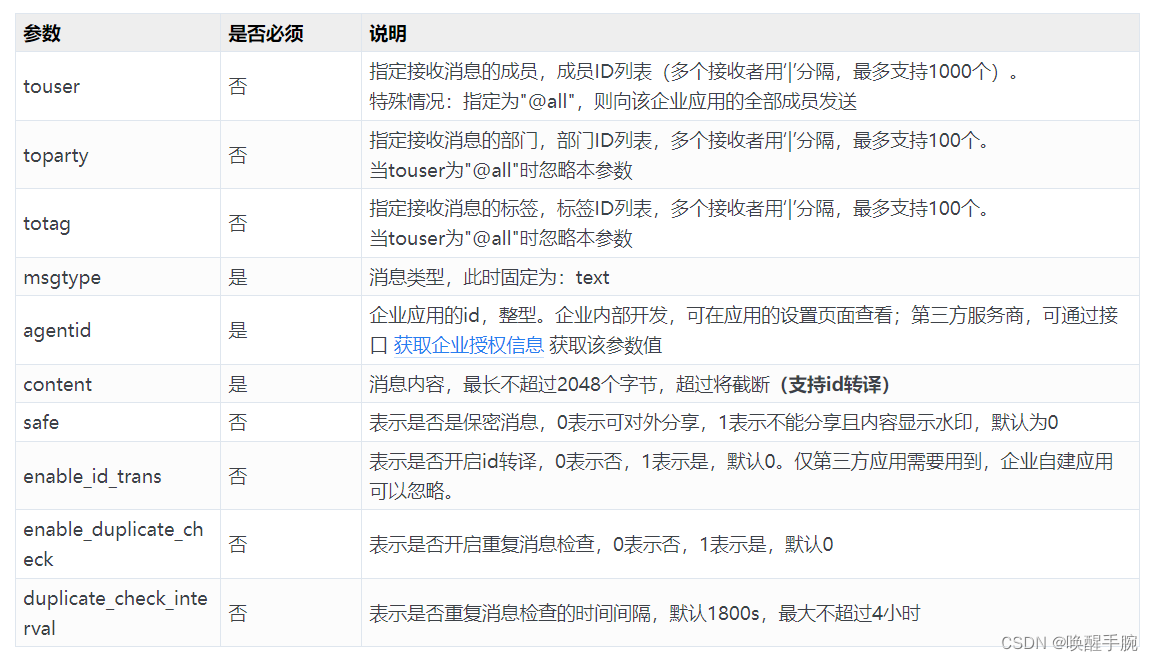
发送应用消息配置
配置应用消息:https://developer.work.weixin.qq.com/document/path/90236
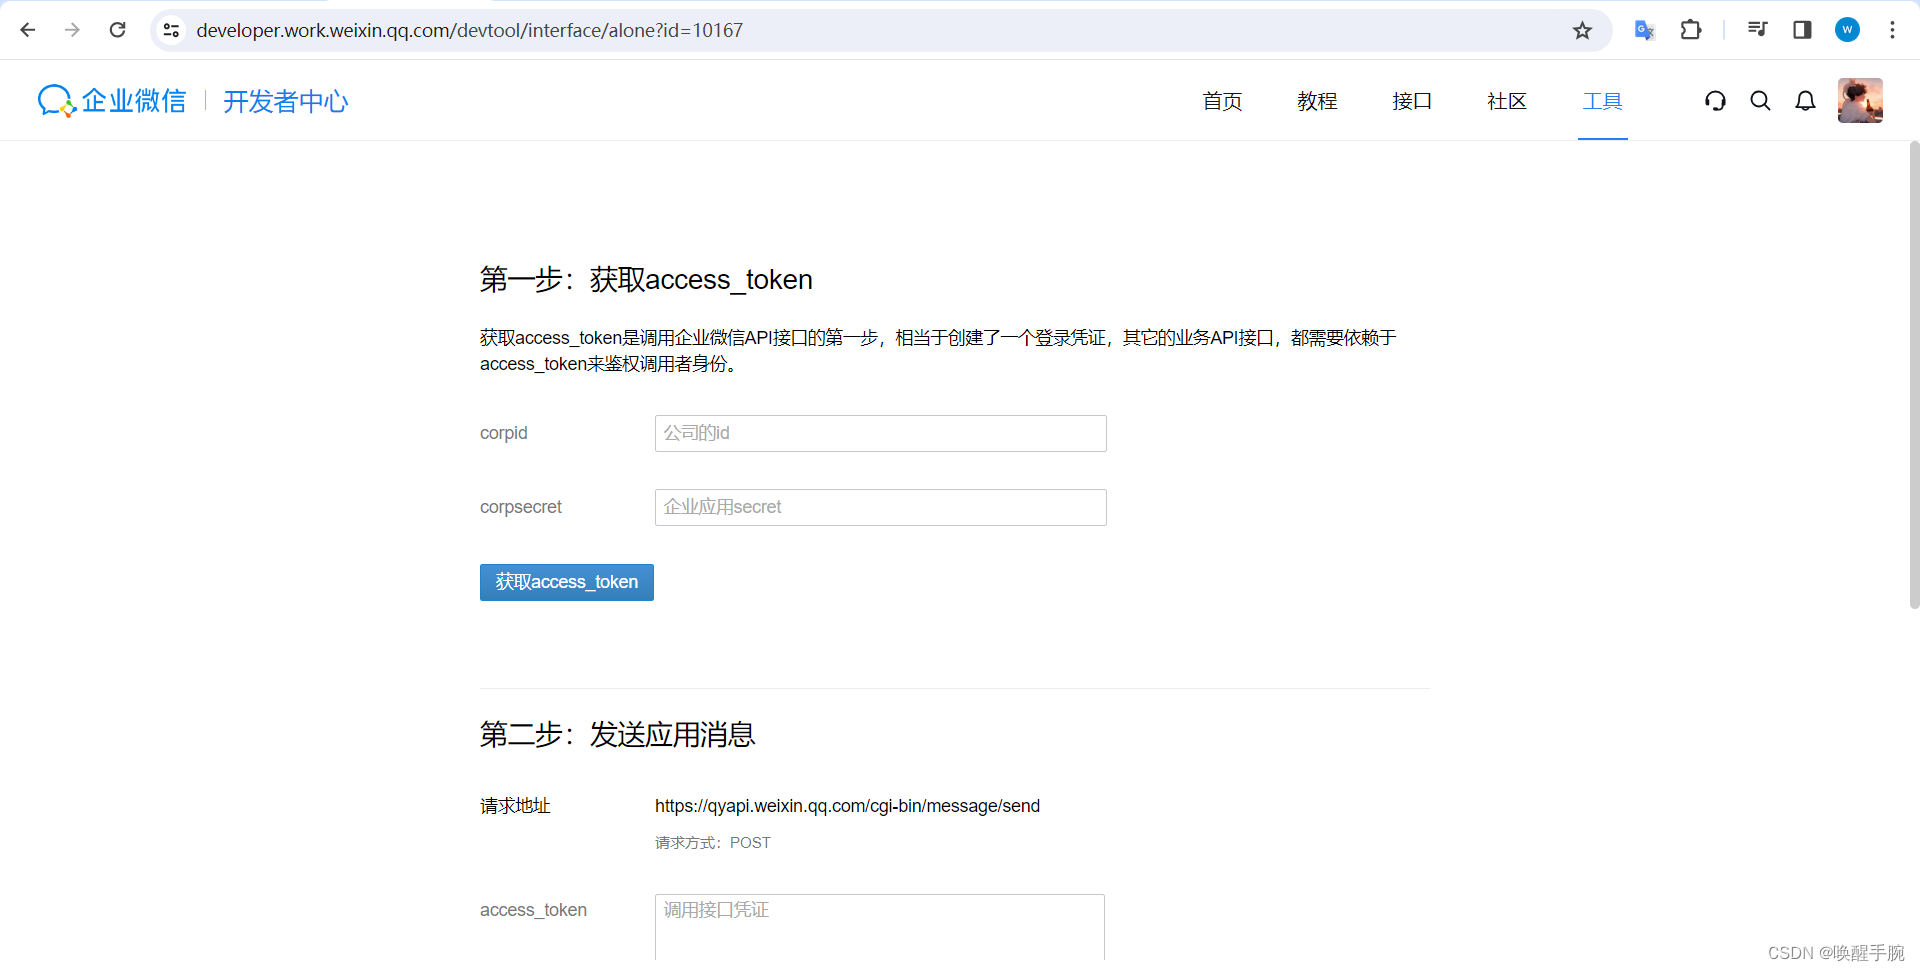
请求方式 POST(HTTPS) 请求地址 https://qyapi.weixin.qq.com/cgi-bin/message/send?access_token=ACCESS_TOKEN 机器人应用支持推送文本、图片、视频、文件、图文等类型。
配置 POST 请求参数

config.js 配置const request = require('request') const { config } = require('dotenv') config() const corpId = process.env.corpId const corpSecret = process.env.corpSecret const agentId = parseInt(process.env.agentId) const toUser = '@all' const tokenUrl = `https://qyapi.weixin.qq.com/cgi-bin/gettoken?corpid=${corpId}&corpsecret=${corpSecret}` const sendMsgUrl = "https://qyapi.weixin.qq.com/cgi-bin/message/send?access_token="; function getToken(success, error) { request(tokenUrl, function(error, response, body) { if (!error && response.statusCode == 200) { var json = JSON.parse(body); console.log(json) success(json.access_token) } else { error('Token in error.') } }) } function sendMessage(token, content) { const requestData = { touser: toUser, msgtype: "text", agentid: agentId, safe: 0, text: { content: content } } request({ url: `${sendMsgUrl}${token}`, method: "POST", json: true, headers: { "content-type": "application/json", }, body: requestData }, function(error, response, body) { console.log(body) if (!error && response.statusCode == 200) {} }); } function sendText(content) { getToken((token) => { sendMessage(token, content) }, (error) => { console.log(error) }) } module.exports = { sendText, }- 1
- 2
- 3
- 4
- 5
- 6
- 7
- 8
- 9
- 10
- 11
- 12
- 13
- 14
- 15
- 16
- 17
- 18
- 19
- 20
- 21
- 22
- 23
- 24
- 25
- 26
- 27
- 28
- 29
- 30
- 31
- 32
- 33
- 34
- 35
- 36
- 37
- 38
- 39
- 40
- 41
- 42
- 43
- 44
- 45
- 46
- 47
- 48
- 49
- 50
- 51
- 52
- 53
- 54
- 55
- 56
- 57
- 58
- 59
- 60
- 61
定时发送任务
npm 下载 node-schedule 定时任务模块
npm install node-schedule- 1
配置定时发送任务
const alarmWechat = require('./config.js') const schedule = require('node-schedule') const scheduleTask = ()=> { schedule.scheduleJob('30 * * * * *',() =>{ console.log('scheduleCronstyle:' + new Date()); alarmWechat.sendText('testmessage') }); } scheduleTask();- 1
- 2
- 3
- 4
- 5
- 6
- 7
- 8
- 9
- 10
- 11
开发者调试工具

群机器人配置
下载安装 axios 库
npm install axios- 1
创建 .env 环境变量配置文件
HOOKURL=https://qyapi.weixin.qq.com/cgi-bin/webhook/send?key=【密钥】- 1
具体实现
const axios = require("axios") const { config } = require("dotenv") config() let data = { msgtype: "text", text: { content: "helloworld" } } axios.post(hookurl, data, { headers: { "Content-Type": "application/json" } }).then(res => { console.log(res) }).catch(err => { console.log(err) })- 1
- 2
- 3
- 4
- 5
- 6
- 7
- 8
- 9
- 10
- 11
- 12
- 13
- 14
- 15
- 16
- 17
- 18
- 19
- 20
-
相关阅读:
《HTML5移动网站与App开发实战》简介
算法 —— 模拟
Go append函数
QT控件 — QScrollArea
宝塔的安装与查看
使用Cent Browser+Aria2+Bilibili Envolved下载b站视频--保姆级安装步骤
信息技术服务连续性策略
IntelliJ IDEA 的安装、配置与使用
基于若依的ruoyi-nbcio流程管理系统仿钉钉流程json转bpmn的flowable的xml格式(简单支持发起人与审批人的流程)续
RabbitMQ之Fanout(扇形) Exchange解读
- 原文地址:https://blog.csdn.net/qq_47452807/article/details/134360070
