-
使用大型语言模型进行文本摘要

📝 Text Summarization with Large Language Models。通过单击链接,您将能够逐步阅读完整的过程,并与图进行交互。谢谢你!
一、介绍
2022 年 11 月 30 日,标志着机器学习历史上的重要篇章。就在这一天,OpenAI 发布了 ChatGPT,为大型语言模型驱动的聊天机器人树立了新的基准,并为公众提供了无与伦比的对话体验。从那时起,大型语言模型(也称为LLM)由于能够执行大量任务而受到公众的关注。示例包括:
• 文本摘要:这些模型能够对大型文本进行摘要,包括法律文本、评论、对话等。
• 情绪分析:他们可以通读对产品和服务的评论,并将其分类为正面、负面或中立。这些也可以用于金融领域,以了解公众是否对某些证券感到看涨或看跌。
• 语言翻译:他们可以提供从一种语言到另一种语言的实时翻译。
• 基于文本的推荐系统:他们还可以根据客户对以前购买的产品的评论向客户推荐新产品。
但这些模型实际上是如何运作的呢?🤔
二、变压器架构
要了解LLM的现状,我们必须回到Google 2017年的《Attention is All You Need》。在这篇论文中,Transformer架构被引入世界,它永远改变了这个行业。

虽然循环神经网络可用于使计算机能够理解文本,但这些模型极其有限,因为它们只允许机器一次处理一个单词,这将导致模型无法获取完整的单词。文本的上下文。
然而, Transformer 架构基于注意力机制,它允许模型一次处理整个句子或段落,而不是一次处理每个单词。这是完整上下文理解可能性背后的主要秘密,它为所有这些语言处理模型提供了更多的能力。
使用转换器架构对文本输入的处理基于标记化,即将文本转换为称为标记的较小组件的过程。这些 可以是单词、子词、字符或许多其他。
然后,这些标记被映射到数字 ID,该 ID 对于每个单词或子单词都是唯一的。然后,每个 ID 被转换为一个嵌入:一个包含数值的密集、高维向量。这些值旨在捕获标记的原始含义并用作变压器模型的输入。
值得注意的是,这些嵌入是高维的,每个维度都捕获令牌含义的某些方面。由于嵌入的高维性质,人类不容易解释嵌入,但 Transformer 模型很容易使用它们来识别向量空间中具有相似含义的标记并将其分组在一起。
举个例子:

通过使用该向量作为输入,变压器模型学习如何根据可能自然跟随输入单词的后续单词的概率生成输出。重复此过程,直到模型从初始语句开始创建整个段落。
Andrej Karpathy 的博客上有一篇非常有趣的文章,循环神经网络的不合理有效性,解释了为什么基于神经网络的模型可以有效地预测文本的下一个单词。影响其有效性的因素之一是人类语言的固有规则,例如限制句子中单词使用的语法。
当您向模型提供书面语言示例(新闻文章、Twitter/X 帖子、产品评论、消息、对话等)时,它会通过这些示例隐式获取语言规则,这有助于它预测单词序列并生成类似人类的文本。
大型语言模型(例如GPT、T5、PEGASUS等)是规模更大的 Transformer 模型。这些模型建立在大量文本的基础上,因此它们可以学习并成为语言模式和结构方面的专家。GPT-4 是 ChatGPT 高级版背后的模型,它接受了来自互联网的大量文本数据的训练,例如书籍、文章、网站等。
还需要注意的是,不同的语言表现出不同的模式和结构。虽然英语、法语、德语、西班牙语、葡萄牙语和意大利语等西欧语言可能具有许多结构相似性,但阿拉伯语和日语等其他语言却非常不同,这给建模带来了独特的挑战。
三、这本笔记本
时间本笔记本的目标是演示如何将大型语言模型用于与语言处理相关的多项任务。在这种情况下,我将利用迁移学习的力量来构建一个能够总结对话的模型。
对于那些可能不知道的人来说,迁移学习是一种机器学习技术,其中我们使用预先训练的模型(该模型已经在广泛的领域中拥有丰富的知识),并通过在特定的环境中对其进行训练来定制其专业知识以适应特定的任务。我们可能拥有的数据集。这个过程也可以称为微调。
🤗 Transformers库是处理深度学习任务最流行的库之一,它提供了使用以下架构的可能性:

🤗 Transformers库使我们能够轻松下载和微调最先进的预训练模型,还使我们能够轻松使用TensorFlow和PyTorch来完成与自然语言预处理、计算机视觉、音频相关的多项任务, ETC。
3.1 任务
如前所述,当前的任务是文本摘要。从 Transformers 库的文档来看,摘要可以被描述为创建一个较短版本的文档或一篇捕获所有重要信息的文章。
在本例中,我们将使用包含聊天文本的数据集来总结对话。
3.2 数据集
对于此任务,我们将使用SamSum 数据集,其中包含三个用于训练、测试和验证的csv文件。所有这些文件都被构造为特定的
id、adialogue和asummary。SamSum 数据集由聊天文本组成,非常适合对话摘要。3.3 该模型
如前所述,我们将利用预训练模型的力量来完成此任务。在这种情况下,我决定使用BART架构,该架构是在 2019 年论文BART:用于自然语言生成、翻译和理解的去噪序列到序列预训练中提出的。更具体地说,我将微调已经过训练以执行新闻文章文本摘要的 BART 版本,即facebook/bart-large-xsum版本。
简而言之,BART 是一种去噪自动编码器,它采用多种方式扭曲输入文本的策略,例如删除一些单词并将其翻转,然后学习重建它。BART 在多个 NLP 基准测试中的表现优于 RoBERTa 和 BERT 等已建立的模型,并且由于其生成文本和学习输入文本上下文的能力,它在摘要任务中特别有效。
为了更深入地理解 BART,我强烈建议您阅读上面链接的研究论文,其中首次介绍了这种架构。
3.4 评估指标
评估语言模型的性能可能非常棘手,尤其是在文本摘要方面。我们模型的目标是生成一个描述对话内容的短句子,同时保留该对话中的所有重要信息。
我们可以用来评估绩效的定量指标之一是ROUGE 分数。它被认为是文本摘要的最佳指标之一,它通过将机器生成的摘要与用于参考的人类生成的摘要的质量进行比较来评估性能。
两个摘要之间的相似性是通过分析重叠的n 元语法(n-gram)(两个摘要中出现的单个单词或单词序列)来测量的。这些可以是一元语法 (ROUGE-1),其中仅测量单个单词的重叠;二元组(ROUGE-2),我们测量两个单词序列的重叠;trigrams (ROUGE-3),我们测量三词序列的重叠;除此之外,我们还有:
• ROUGE-L:它测量两个摘要之间的最长公共子序列(LCS) ,这有助于捕获机器生成文本的内容覆盖范围。如果两个摘要都具有序列“the apple is green”,则无论它们出现在两个文本中的何处,我们都会匹配。
• ROUGE-S:它评估跳跃二元组的重叠,跳跃二元组是允许单词之间有间隙的二元组。这有助于衡量机器生成的摘要的一致性。例如,在短语“this apple isabsolutely green”中,我们会找到“apple”和“green”等术语的匹配项(如果这就是我们要查找的内容)。
这些分数的范围通常为 0 到 100,其中 0 表示不匹配,100 表示两个摘要之间完全匹配。
除了定量指标之外,使用人类评估来分析语言模型的输出也很有用,因为我们能够以机器无法理解的方式理解文本。所以我们可能会读对话,然后读摘要,以检查摘要是否准确。
四、探索数据集
我们可以通过加载所有三个可用集
val、train、test和来开始对数据集的分析。- # Loading data
- train = pd.read_csv('/kaggle/input/samsum-dataset-text-summarization/samsum-train.csv')
- test = pd.read_csv('/kaggle/input/samsum-dataset-text-summarization/samsum-test.csv')
- val = pd.read_csv('/kaggle/input/samsum-dataset-text-summarization/samsum-validation.csv')
我现在将分别分析每个数据集。
4.1 训练数据集
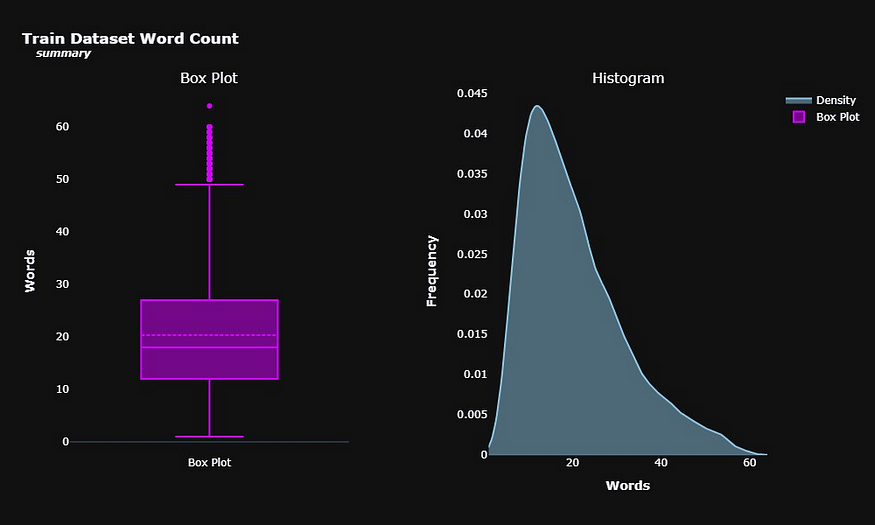
我们可以通过计算对话和摘要中的单词数来分析对话和摘要的长度。这可能为我们提供有关这些文本的结构的线索。
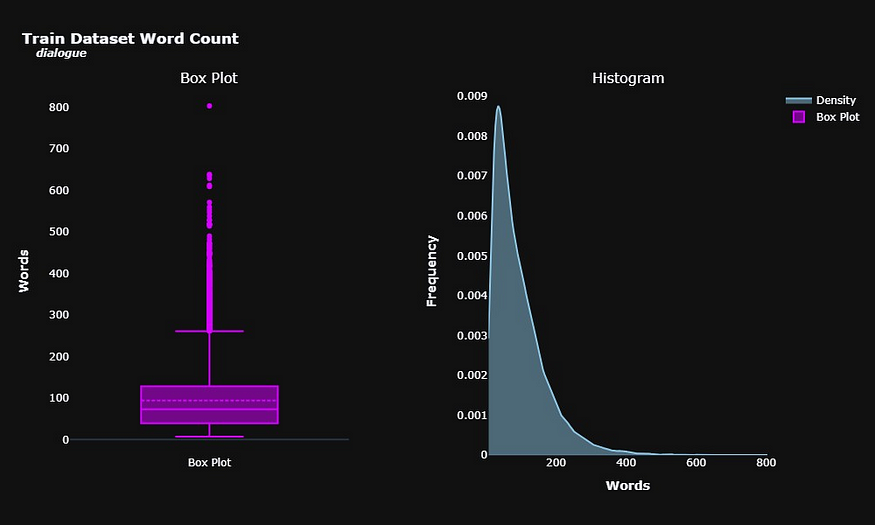
平均而言,对话由大约 94 个单词组成。我们确实有一些异常值,文本非常广泛,每个对话超过 300 个单词。
摘要自然是较短的文本,平均由大约 20 个单词组成,尽管我们也有一些带有大量摘要的异常值。
我们还可以使用 scikit-learn 的 TfidfVectorizer 来提取有关可用对话和摘要的更多信息。该函数将为我们提供一个数据框,其中包含语料库中最常见的术语,我们通过使用 max_features 参数进行选择。
在此数据框中,每一列代表整个语料库中最常见的术语,而每一行代表原始数据框中的一个条目,例如火车。对于每个条目中的每个术语,我们将看到与其关联的 TF-IDF 分数,该分数量化了给定对话(或摘要)中的术语相对于其在所有其他对话(或摘要)中的频率的相关性。
我们还将使用 ngram_range 参数来选择最常见的单词(一元组)、最常见的两个单词序列(二元组)和最常见的三个单词序列(三元组)。stop_words = 'english' 参数将帮助我们过滤掉英语中常见的停用词,这些词对整体上下文的影响不大,例如“and”、“of”等。
在测量最常见的术语后,我将绘制一个热图,显示这些术语之间的相关性。这可能有助于我们了解它们在对话中一起使用的频率。例如,当出现“我们”一词时,“将”一词出现的频率如何?

您可以看到这些项之间的相关性既不是强正相关,也不是强负相关。正相关性最强的术语是“don”和“know”,为 0.12。值得注意的是,TfidfVectorizer 函数对文本执行了一些更改,例如删除缩写,这解释了为什么该单词在没有撇号't的情况下不会出现。
同样有趣的是,我们注意到“是”和“是”这两个词之间存在负相关性,尽管仍然不是非常显着。发生这种情况可能是因为将两者包含在同一对话中是多余的,或者数据可能捕捉到了个人在对话中使用“是”而不是“是”的倾向。这些是我们在分析此类热图时可以考虑的一些假设。
让我们对摘要进行相同的分析。
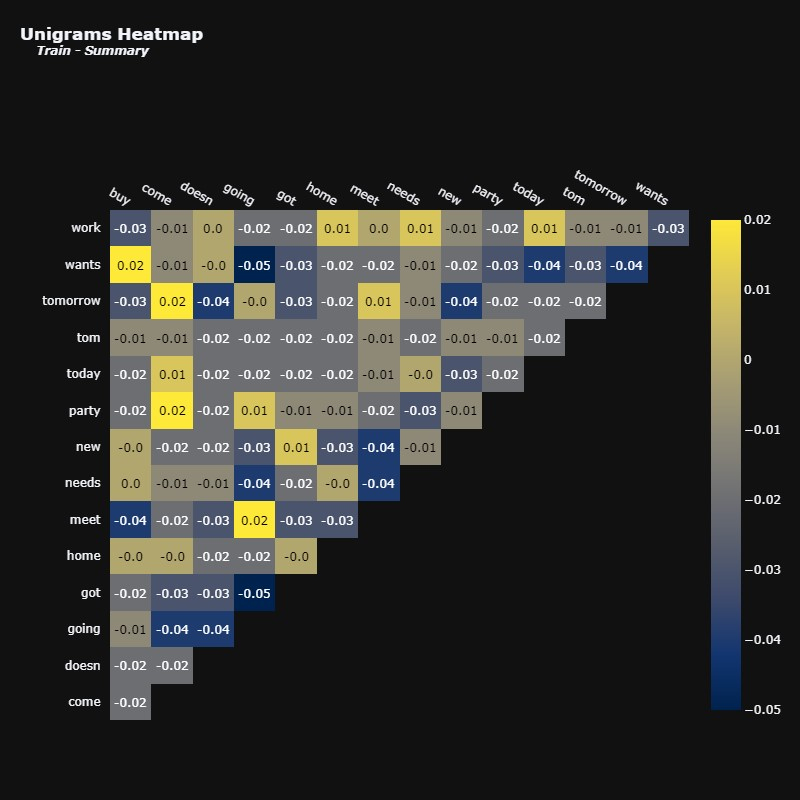
摘要中术语的相关性似乎比对话中术语的相关性更明显,尽管这些相关性仍然不强。这表明摘要可能比完整的对话更简洁地传达相关信息,这正是摘要背后的想法。
我们有正相关的配对,例如“去”和“会面”,“来”和“聚会”,以及“购买”和“想要”。看到这些一元词在文本中一起出现是很有意义的。
相反,负相关对在文本中不频繁同时出现也是合理的,例如“going”和“wants”,以及“going”和“got”。
现在让我们分析对话和摘要中的二元组。
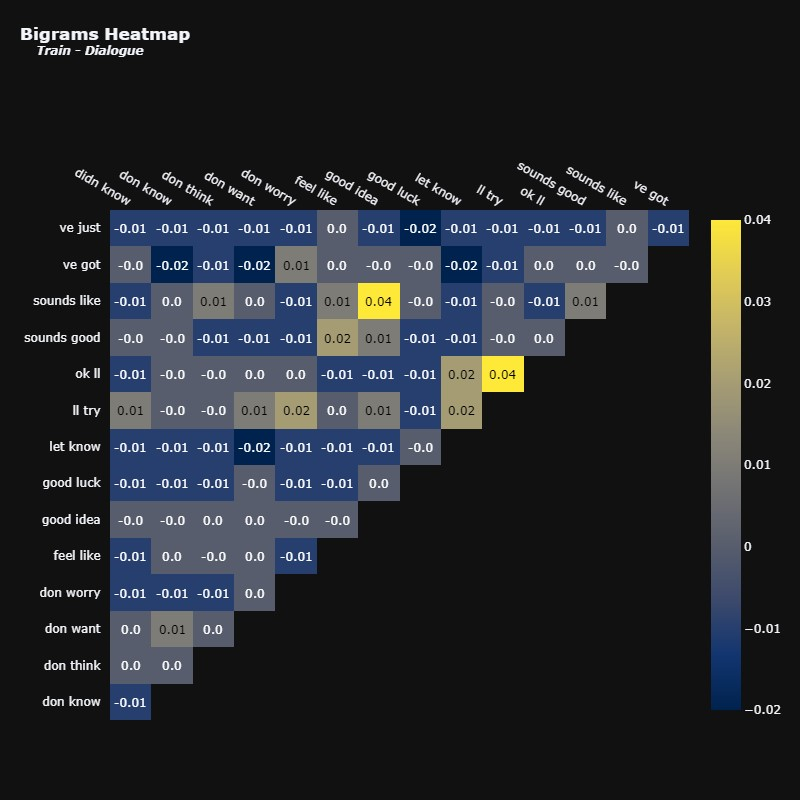
再次强调,相关性并不是很强。尽管如此,我们仍然可以看到一些看起来很合理的组合,例如“好主意”和“听起来像”。
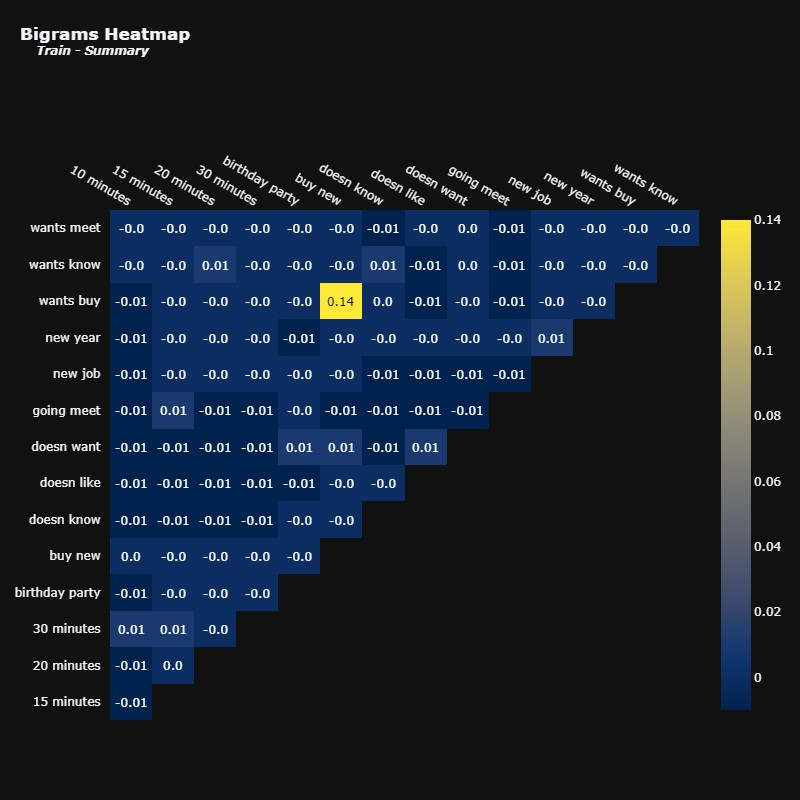
我们在“想买”和“买新”这对之间只有一种相关性。其他术语似乎根本没有任何相关性。
有趣的是,摘要倾向于包含会议记录信息,而对话中似乎没有这些信息。我们甚至可以通过查询一些摘要中出现二元组15 分钟的摘要来进一步研究这种关系。
- # Filtering dataset to see those containing the term '15 minutes' in the summary
- filtered_train = train[train['summary'].str.contains('15 minutes', case=False, na=False)]
- filtered_train.head()

最后一行让我们了解为什么我们在摘要中看到如此多与会议记录相关的术语,但在对话中却看不到。在对话中,人们可能会一起写“15min”,甚至写出其他形式,例如“15m”,而摘要则给我们一种模式化的描述,自然比其他形式来描述时间更突出。


我们再次可以看到这些项之间的相关性并不强。但是,仍然有可能看到看起来合乎逻辑的对一起出现在语料库中。
test我现在将对和数据集执行完全相同的分析val。我们可以预期与训练集分析过程中看到的行为相同,这就是为什么我将避免对以下图进行评论以避免冗余。但是,如果出现不同的情况,我们一定会进一步调查。注意:为了避免文章过于冗长,让我们直接进入预处理部分。如果您仍然希望查看测试和验证集上的 EDA,请不要忘记查看📝 使用大型语言模型 Kaggle 笔记本进行文本摘要。
4.2 数据预处理
氧使用预训练模型(例如 BART)的主要优点是这些模型通常非常稳健,并且需要很少的数据预处理。
在执行 EDA 时,我注意到一些文本中有一些标签,例如 file_photo。让我们看几个例子。- Theresa:
- Theresa:
- Theresa: Hey Louise, how are u?
- Theresa: This is my workplace, they always give us so much food here 😊
- Theresa: Luckily they also offer us yoga classes, so all the food isn't much of a problem 😂
- Louise: Hey!! 🙂
- Louise: Wow, that's awesome, seems great 😎 Haha
- Louise: I'm good! Are you coming to visit Stockholm this summer? 🙂
- Theresa: I don't think so :/ I need to prepare for Uni.. I will probably attend a few lessons this winter
- Louise: Nice! Do you already know which classes you will attend?
- Theresa: Yes, it will be psychology :) I want to complete a few modules that I missed :)
- Louise: Very good! Is it at the Uni in Prague?
- Theresa: No, it will be in my home town :)
- Louise: I have so much work right now, but I will continue to work until the end of summer, then I'm also back to Uni, on the 26th September!
- Theresa: You must send me some pictures, so I can see where you live :)
- Louise: I will, and of my cat and dog too 🤗
- Theresa: Yeeeesss pls :)))
- Louise: 👌👌
- Theresa: 🐱💕
我将使用下面定义的 clean_tags 函数从文本中删除这些标签,这样我们就可以使它们更干净。
- def clean_tags(text):
- clean = re.compile('<.*?>') # Compiling tags
- clean = re.sub(clean, '', text) # Replacing tags text by an empty string
- # Removing empty dialogues
- clean = '\n'.join([line for line in clean.split('\n') if not re.match('.*:\s*$', line)])
- return clean
- test1 = clean_tags(train['dialogue'].iloc[14727]) # Applying function to example text
- print(test1)
- Theresa: Hey Louise, how are u?
- Theresa: This is my workplace, they always give us so much food here 😊
- Theresa: Luckily they also offer us yoga classes, so all the food isn't much of a problem 😂
- Louise: Hey!! 🙂
- Louise: Wow, that's awesome, seems great 😎 Haha
- Louise: I'm good! Are you coming to visit Stockholm this summer? 🙂
- Theresa: I don't think so :/ I need to prepare for Uni.. I will probably attend a few lessons this winter
- Louise: Nice! Do you already know which classes you will attend?
- Theresa: Yes, it will be psychology :) I want to complete a few modules that I missed :)
- Louise: Very good! Is it at the Uni in Prague?
- Theresa: No, it will be in my home town :)
- Louise: I have so much work right now, but I will continue to work until the end of summer, then I'm also back to Uni, on the 26th September!
- Theresa: You must send me some pictures, so I can see where you live :)
- Louise: I will, and of my cat and dog too 🤗
- Theresa: Yeeeesss pls :)))
- Louise: 👌👌
- Theresa: 🐱💕
您可以看到我们已成功从文本中删除标签。我现在将定义 clean_df 函数,在其中我们将 clean_tags 应用于整个数据集。
- # Defining function to clean every text in the dataset.
- def clean_df(df, cols):
- for col in cols:
- df[col] = df[col].fillna('').apply(clean_tags)
- return df
- # Cleaning texts in all datasets
- train = clean_df(train,['dialogue', 'summary'])
- test = clean_df(test,['dialogue', 'summary'])
- val = clean_df(val,['dialogue', 'summary'])
标签已从文本中删除。进行此类数据清理以消除噪声是有益的,这些噪声可能不会对整体上下文产生显着影响,并且可能会损害性能。
我现在将执行一些必要的预处理,以准备我们的数据作为预训练模型的输入并进行微调。我在这里所做的大部分内容是 🤗 Transformers 文档中描述的文本摘要教程的一部分,您可以在此处查看。
首先,我将使用 🤗 数据集库将 Pandas 数据帧转换为数据集。这将使我们的数据准备好在整个 Hugging Face 生态系统中进行处理。
- # Transforming dataframes into datasets
- train_ds = Dataset.from_pandas(train)
- test_ds = Dataset.from_pandas(test)
- val_ds = Dataset.from_pandas(val)
- # Visualizing results
- print(train_ds)
- print('\n' * 2)
- print(test_ds)
- print('\n' * 2)
- print(val_ds)
- Dataset({
- features: ['id', 'dialogue', 'summary', '__index_level_0__'],
- num_rows: 14731
- })
- Dataset({
- features: ['id', 'dialogue', 'summary'],
- num_rows: 819
- })
- Dataset({
- features: ['id', 'dialogue', 'summary'],
- num_rows: 818
- })
要查看 🤗 数据集中的内容,我们可以选择特定行,如下所示。
train_ds[0] # Visualizing the first entry- {'id': '13818513',
- 'dialogue': "Amanda: I baked cookies. Do you want some?\r\nJerry: Sure!\r\nAmanda: I'll bring you tomorrow :-)",
- 'summary': 'Amanda baked cookies and will bring Jerry some tomorrow.',
- '__index_level_0__': 0}
这样,我们就可以看到原始ID、对话以及参考摘要。__index_level_0__ 不会向数据添加任何内容,并将被进一步删除。
成功将 pandas 数据帧转换为🤗数据集后,我们可以继续建模过程。
五、造型
作为我之前提到过,我们将微调 BART 的版本,该版本已在多篇新闻文章上进行过训练,用于文本摘要facebook/bart-large-xsum。
我将通过加载摘要管道来简要演示该模型,以向您展示它如何处理新闻数据。
- # Loading summarization pipeline with the bart-large-cnn model
- summarizer = pipeline('summarization', model = 'facebook/bart-large-xsum')
作为例子,我将使用 CNN 于 2023 年 10 月 24 日发表的以下新闻文章,世界上最长寿的狗 Bobi 去世,享年 31 岁。请注意,这是一篇完全看不见的新闻文章,我将其传递给模型,因此我们可以看到它的表现。
- news = '''Bobi, the world’s oldest dog ever, has died after reaching the
- almost inconceivable age of 31 years and 165 days, said Guinness World Records
- (GWR) on Monday.
- His death at an animal hospital on Friday was initially announced by
- veterinarian Dr. Karen Becker.
- She wrote on Facebook that “despite outliving every dog in history,
- his 11,478 days on earth would never be enough, for those who loved him.”
- There were many secrets to Bobi’s extraordinary old age, his owner
- Leonel Costa told GWR in February. He always roamed freely, without a leash
- or chain, lived in a “calm, peaceful” environment and ate human food soaked
- in water to remove seasonings, Costa said.
- He spent his whole life in Conqueiros, a small Portuguese village about
- 150 kilometers (93 miles) north of the capital Lisbon, often wandering around
- with cats.
- Bobi was a purebred Rafeiro do Alentejo – a breed of livestock
- guardian dog – according to his owner. Rafeiro do Alentejos have a
- life expectancy of about 12-14 years, according to the American Kennel Club.
- But Bobi lived more than twice as long as that life expectancy,
- surpassing an almost century-old record to become the oldest living dog
- and the oldest dog ever – a title which had previously been held by
- Australian cattle-dog Bluey, who was born in 1910 and lived to be 29 years
- and five months old.
- However, Bobi’s story almost had a different ending.
- When he and his three siblings were born in the family’s woodshed,
- Costa’s father decided they already had too many animals at home.
- Costa and his brothers thought their parents had taken all the puppies
- away to be destroyed. However, a few sad days later, they found Bobi alive,
- safely hidden in a pile of logs.
- The children hid the puppy from their parents and, by the time
- Bobi’s existence became known, he was too old to be put down and went on
- to live his record-breaking life.
- His 31st birthday party in May was attended by more than 100 people
- and a performing dance troupe, GWR said.
- His eyesight deteriorated and walking became harder as Bobi grew older
- but he still spent time in the backyard with the cats, rested more and
- napped by the fire.
- “Bobi is special because looking at him is like remembering the people
- who were part of our family and unfortunately are no longer here,
- like my father, my brother, or my grandparents who have already left
- this world,” Costa told GWR in May. “Bobi represents those generations.”
- '''
- summarizer(news) # Using the pipeline to generate a summary of the text above
- [{'summary_text': 'The world’s oldest dog has died,
- Guinness World Records has confirmed.'}]
您可以观察到该模型能够准确地生成更短的文本,其中包含输入文本中最相关的信息。这是一次成功的总结。
然而,该模型主要在由 CNN 和《每日邮报》的几篇新闻文章组成的数据集上进行训练,而不是在很多对话数据上进行训练。这就是为什么我要使用 SamSum 数据集对其进行微调。
让我们继续使用facebook/bart-large-xsum检查点加载 BartTokenizer 和 BartForConditionalGeneration。
- checkpoint = 'facebook/bart-large-xsum' # Model
- tokenizer = BartTokenizer.from_pretrained(checkpoint) # Loading Tokenizer
model = BartForConditionalGeneration.from_pretrained(checkpoint) # Loading Model我们还可以在模型的架构下方打印。
- BartForConditionalGeneration(
- (model): BartModel(
- (shared): Embedding(50264, 1024, padding_idx=1)
- (encoder): BartEncoder(
- (embed_tokens): Embedding(50264, 1024, padding_idx=1)
- (embed_positions): BartLearnedPositionalEmbedding(1026, 1024)
- (layers): ModuleList(
- (0-11): 12 x BartEncoderLayer(
- (self_attn): BartAttention(
- (k_proj): Linear(in_features=1024, out_features=1024, bias=True)
- (v_proj): Linear(in_features=1024, out_features=1024, bias=True)
- (q_proj): Linear(in_features=1024, out_features=1024, bias=True)
- (out_proj): Linear(in_features=1024, out_features=1024, bias=True)
- )
- (self_attn_layer_norm): LayerNorm((1024,), eps=1e-05, elementwise_affine=True)
- (activation_fn): GELUActivation()
- (fc1): Linear(in_features=1024, out_features=4096, bias=True)
- (fc2): Linear(in_features=4096, out_features=1024, bias=True)
- (final_layer_norm): LayerNorm((1024,), eps=1e-05, elementwise_affine=True)
- )
- )
- (layernorm_embedding): LayerNorm((1024,), eps=1e-05, elementwise_affine=True)
- )
- (decoder): BartDecoder(
- (embed_tokens): Embedding(50264, 1024, padding_idx=1)
- (embed_positions): BartLearnedPositionalEmbedding(1026, 1024)
- (layers): ModuleList(
- (0-11): 12 x BartDecoderLayer(
- (self_attn): BartAttention(
- (k_proj): Linear(in_features=1024, out_features=1024, bias=True)
- (v_proj): Linear(in_features=1024, out_features=1024, bias=True)
- (q_proj): Linear(in_features=1024, out_features=1024, bias=True)
- (out_proj): Linear(in_features=1024, out_features=1024, bias=True)
- )
- (activation_fn): GELUActivation()
- (self_attn_layer_norm): LayerNorm((1024,), eps=1e-05, elementwise_affine=True)
- (encoder_attn): BartAttention(
- (k_proj): Linear(in_features=1024, out_features=1024, bias=True)
- (v_proj): Linear(in_features=1024, out_features=1024, bias=True)
- (q_proj): Linear(in_features=1024, out_features=1024, bias=True)
- (out_proj): Linear(in_features=1024, out_features=1024, bias=True)
- )
- (encoder_attn_layer_norm): LayerNorm((1024,), eps=1e-05, elementwise_affine=True)
- (fc1): Linear(in_features=1024, out_features=4096, bias=True)
- (fc2): Linear(in_features=4096, out_features=1024, bias=True)
- (final_layer_norm): LayerNorm((1024,), eps=1e-05, elementwise_affine=True)
- )
- )
- (layernorm_embedding): LayerNorm((1024,), eps=1e-05, elementwise_affine=True)
- )
- )
- (lm_head): Linear(in_features=1024, out_features=50264, bias=False)
- )
可以看到模型由编码器和解码器组成,我们可以看到线性层以及激活函数,它们使用GeLU而不是更典型的ReLU。
观察输出层lm_head也很有趣,它向我们表明该模型非常适合生成词汇量大小的输出 — out_features=50264 — 这向我们表明该架构足以完成摘要任务以及其他任务,例如翻译。
现在我们必须预处理数据集并使用 BartTokenizer,以便我们的数据对于 BART 模型来说是清晰的。
以下 preprocess_function 可以直接从 Transformers 文档中复制,它可以很好地预处理多个 NLP 任务的数据。我将通过解释所采取的步骤来更深入地研究它如何预处理数据。
- input = [doc for doc in Examples[“dialogue”]]:在这一行中,我们迭代数据集中的每个对话并将它们保存为模型的输入。
- model_inputs = tokenizer(inputs, max_length=1024, truncation=True):这里,我们使用 tokenizer 将输入对话转换为 BART 模型可以轻松理解的标记。truncation=True 参数确保所有对话的最大数量为 1024 个标记,如 max_length 参数所定义。
- labels = tokenizer(text_target=examples[“summary”], max_length=128, truncation=True):这一行执行与上面非常相似的标记化过程。然而,这一次,它标记了目标变量,即我们的摘要。另请注意,此处的 max_length 明显较低,为 128。这意味着我们期望摘要的文本比对话短得多。
- model_inputs[“labels”] = labels[“input_ids”]:此行本质上是将标记化标签与标记化输入一起添加到预处理数据集中。
- def preprocess_function(examples):
- inputs = [doc for doc in examples["dialogue"]]
- model_inputs = tokenizer(inputs, max_length=1024, truncation=True)
- # Setup the tokenizer for targets
- with tokenizer.as_target_tokenizer():
- labels = tokenizer(examples["summary"], max_length=128, truncation=True)
- model_inputs["labels"] = labels["input_ids"]
- return model_inputs
- # Applying preprocess_function to the datasets
- tokenized_train = train_ds.map(preprocess_function, batched=True,
- remove_columns=['id', 'dialogue', 'summary', '__index_level_0__']) # Removing features
- tokenized_test = test_ds.map(preprocess_function, batched=True,
- remove_columns=['id', 'dialogue', 'summary']) # Removing features
- tokenized_val = val_ds.map(preprocess_function, batched=True,
- remove_columns=['id', 'dialogue', 'summary']) # Removing features
- # Printing results
- print('\n' * 3)
- print('Preprocessed Training Dataset:\n')
- print(tokenized_train)
- print('\n' * 2)
- print('Preprocessed Test Dataset:\n')
- print(tokenized_test)
- print('\n' * 2)
- print('Preprocessed Validation Dataset:\n')
- print(tokenized_val)
- Preprocessed Training Dataset:
- Dataset({
- features: ['input_ids', 'attention_mask', 'labels'],
- num_rows: 14731
- })
- Preprocessed Test Dataset:
- Dataset({
- features: ['input_ids', 'attention_mask', 'labels'],
- num_rows: 819
- })
- Preprocessed Validation Dataset:
- Dataset({
- features: ['input_ids', 'attention_mask', 'labels'],
- num_rows: 818
- })
我们的标记化数据集现在仅包含三个特征:input_ids、attention_mask 和 labels。让我们从标记化的训练数据集中打印一个样本,以进一步研究预处理函数如何更改数据。
- input_ids:
- [0, 10127, 5219, 35, 38, 17241, 1437, 15269, 4, 1832, 47, 236, 103, 116, 50121, 50118, 39237, 35, 9136, 328, 50121, 50118, 10127, 5219, 35, 38, 581, 836, 47, 3859, 48433, 2]
- attention_mask:
- [1, 1, 1, 1, 1, 1, 1, 1, 1, 1, 1, 1, 1, 1, 1, 1, 1, 1, 1, 1, 1, 1, 1, 1, 1, 1, 1, 1, 1, 1, 1, 1]
- sample:
- [0, 10127, 5219, 17241, 15269, 8, 40, 836, 6509, 103, 3859, 4, 2]
让我们进一步深入了解每个功能的含义。
- input_ids:这些是映射到对话的令牌 ID。每个标记代表一个 BART 模型可以完全理解的单词或子词。例如,数字5219 可能是BART 词汇表中“hello”等单词的映射。每个单词在上下文中都有其独特的标记。
- Attention_mask:此掩码指示模型应注意哪些标记以及应忽略哪些标记。这通常用在填充的上下文中——当一些标记用于均衡句子的长度时——但大多数这些填充标记不包含任何有意义的信息,因此注意掩模确保模型不会关注它们。在此特定示例中,所有标记都被掩码为“1”,这意味着它们都是相关的,并且没有一个标记用于填充。
- labels:与第一个功能类似,这些是摘要中的标记化单词和子词。这些是模型将接受训练并作为输出给出的标记。
我们现在必须使用
DataCollatorForSeq2Seq批处理数据。这些数据整理器还可以自动应用一些处理技术,例如填充。它们对于微调模型的任务非常重要,并且也出现在用于文本摘要的 🤗 Transformers 文档中。- # Instantiating Data Collator
- data_collator = DataCollatorForSeq2Seq(tokenizer=tokenizer, model=model)
接下来,我将加载 ROUGE 指标并定义一个新函数来评估模型。
文档中还提供了compute_metrics函数。在此函数中,我们提取模型生成的摘要以及人类生成的摘要,并对它们进行解码。然后我们使用 rouge 来比较它们的相似程度来评估性能。metric = load_metric('rouge') # Loading ROUGE ScoreDownloading builder script: 0%| | 0.00/2.16k [00:00- def compute_metrics(eval_pred):
- predictions, labels = eval_pred# Obtaining predictions and true labels
- # Decoding predictions
- decoded_preds = tokenizer.batch_decode(predictions, skip_special_tokens=True)
- # Obtaining the true labels tokens, while eliminating any possible masked token (i.e., label = -100)
- labels = np.where(labels != -100, labels, tokenizer.pad_token_id)
- decoded_labels = tokenizer.batch_decode(labels, skip_special_tokens=True)
- # Rouge expects a newline after each sentence
- decoded_preds = ["\n".join(nltk.sent_tokenize(pred.strip())) for pred in decoded_preds]
- decoded_labels = ["\n".join(nltk.sent_tokenize(label.strip())) for label in decoded_labels]
- # Computing rouge score
- result = metric.compute(predictions=decoded_preds, references=decoded_labels, use_stemmer=True)
- result = {key: value.mid.fmeasure * 100 for key, value in result.items()} # Extracting some results
- # Add mean-generated length
- prediction_lens = [np.count_nonzero(pred != tokenizer.pad_token_id) for pred in predictions]
- result["gen_len"] = np.mean(prediction_lens)
- return {k: round(v, 4) for k, v in result.items()}
我们现在使用 Seq2SeqTrainingArguments 类来设置一些相关的设置以进行微调。我会首先定义一个目录作为输出,然后定义评估策略、学习率等。
这个类可能非常广泛,具有几个不同的参数。我强烈建议您花些时间阅读文档来熟悉它们。
- # Defining parameters for training
- '''
- Please don't forget to check the documentation.
- Both the Seq2SeqTrainingArguments and Seq2SeqTrainer classes have
- quite an extensive list of parameters.
- doc: https://huggingface.co/docs/transformers/v4.34.1/en/main_classes/trainer
- '''
- training_args = Seq2SeqTrainingArguments(
- output_dir = 'bart_samsum',
- evaluation_strategy = "epoch",
- save_strategy = 'epoch',
- load_best_model_at_end = True,
- metric_for_best_model = 'eval_loss',
- seed = seed,
- learning_rate=2e-5,
- per_device_train_batch_size=4,
- per_device_eval_batch_size=4,
- gradient_accumulation_steps=2,
- weight_decay=0.01,
- save_total_limit=2,
- num_train_epochs=4,
- predict_with_generate=True,
- fp16=True,
- report_to="none"
- )
最后,Seq2SeqTrainer 类允许我们使用PyTorch来微调模型。在本课程中,我们定义模型、训练参数、用于训练和评估的数据集、分词器、data_collator 和指标。
- # Defining Trainer
- trainer = Seq2SeqTrainer(
- model=model,
- args=training_args,
- train_dataset=tokenized_train,
- eval_dataset=tokenized_test,
- tokenizer=tokenizer,
- data_collator=data_collator,
- compute_metrics=compute_metrics,
- )
- trainer.train() # Training model
培训结果
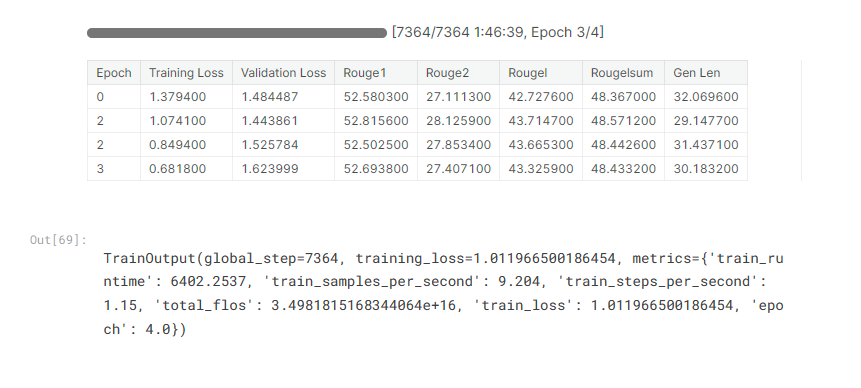
经过 4 个 epoch 后,我们终于完成了微调。由于我们在训练参数中设置了 load_best_model_at_end = True,训练器会自动保存性能最佳的模型,在本例中是验证损失最低的模型。
第二个纪元是验证损失最低的一个,为1.443861。它还获得了最高的 Rouge1 和 Rouge2 分数,以及最高的 Rougelsum 分数。
我之前没有介绍过Rougelsum分数。根据rouge-score 库的文档,我们可以得出结论,这与 RougeL 分数类似,但它衡量的是逐句级别的内容覆盖率,而不是整个摘要。
Gen Len 列为我们提供了模型生成的摘要的平均长度。重要的是要记住,我们需要简短但信息丰富的文本。在这种情况下,第二个时期也产生了平均最短的摘要。
六、评估和保存模型
A训练和测试模型后,我们可以评估其在
validation数据集上的性能。我们可以使用evaluate该方法。- # Evaluating model performance on the tokenized validation dataset
- validation = trainer.evaluate(eval_dataset = tokenized_val)
- print(validation) # Printing results

验证结果
这输出的分数与我们之前在训练和测试期间看到的分数相同。在这里,我们可以注意到,与测试集中的性能相比,我们在每个指标上都有更高的性能。说到
Gen Len,我们在验证集中也有更简洁的总结。考虑到此时我们的结果似乎令人满意,我们可以继续使用该
save_model方法将微调后的模型保存在bart_finetuned_samsum目录中。- # Saving model to a custom directory
- directory = "bart_finetuned_samsum"
- trainer.save_model(directory)
- # Saving model tokenizer
- tokenizer.save_pretrained(directory)
- ('bart_finetuned_samsum/tokenizer_config.json',
- 'bart_finetuned_samsum/special_tokens_map.json',
- 'bart_finetuned_samsum/vocab.json',
- 'bart_finetuned_samsum/merges.txt',
- 'bart_finetuned_samsum/added_tokens.json')
保存模型后,您可以轻松地将其上传到 Hugging Face Models并将其用于新的数据集和文本。
我们在这里训练的微调模型现在可供 Hugging Face 上的所有人使用,您可以通过单击luisotorres/bart-finetuned-samsum 来访问它。
让我们使用摘要管道加载模型,并生成一些用于人工评估的摘要,其中我们评估模型生成的摘要是否准确。
- # Loading summarization pipeline and model
- summarizer = pipeline('summarization', model = 'luisotorres/bart-finetuned-samsum')
加载管道后,我们现在可以生成一些摘要。我首先将使用验证数据集中的示例,以便我们可以将模型生成的摘要与参考摘要进行比较。
- Original Dialogue:
- John: doing anything special?
- Alex: watching 'Millionaires' on tvn
- Sam: me too! He has a chance to win a million!
- John: ok, fingers crossed then! :)
- Reference Summary:
- Alex and Sam are watching Millionaires.
- Model-generated Summary:
- [{'summary_text': "Alex and Sam are watching 'Millionaires' on tvn."}]
模型生成的摘要仅比参考摘要长一点,但它仍然很好地捕获了对话的内容。
让我们看另一个例子。
- Original Dialogue:
- Madison: Hello Lawrence are you through with the article?
- Lawrence: Not yet sir.
- Lawrence: But i will be in a few.
- Madison: Okay. But make it quick.
- Madison: The piece is needed by today
- Lawrence: Sure thing
- Lawrence: I will get back to you once i am through.
- Reference Summary:
- Lawrence will finish writing the article soon.
- Model-generated Summary:
- [{'summary_text': "Lawrence hasn't finished with the article yet,
- but he will be in a few minutes. Madison needs the piece by today."}]
模型生成的摘要再次比参考摘要长。然而,我肯定会说,模型生成的摘要比参考摘要提供更多信息,因为它让我们知道劳伦斯有一种完成这篇文章的紧迫感,因为麦迪逊今天需要它。
让我们看另一个例子。- Original Dialogue:
- Robert: Hey give me the address of this music shop you mentioned before
- Robert: I have to buy guitar cable
- Fred: Catch it on google maps
- Robert: thx m8
- Fred: ur welcome
- Reference Summary:
- Robert wants Fred to send him the address of the music shop as he needs to
- buy guitar cable.
- Model-generated Summary:
- [{'summary_text': 'Fred gives Robert the address of the music shop where
- he will buy guitar cable.'}]
在这种情况下,虽然生成的文本抓住了对话的本质,但由于含糊不清而缺乏清晰度。具体来说,代词“he”使人们不确定弗雷德或罗伯特是否打算购买吉他电缆。在最初的对话中,明确指出必须购买电缆的是罗伯特。
现在我们已经能够比较摘要了,我们可以创建一些对话并将它们输入到模型中以检查模型对它们的执行情况。
- Original Dialogue:
- John: Hey! I've been thinking about getting a PlayStation 5. Do you think it
- is worth it?
- Dan: Idk man. R u sure ur going to have enough free time to play it?
- John: Yeah, that's why I'm not sure if I should buy one or not. I've been
- working so much lately idk if I'm gonna be able to play it as much as I'd like.
- Model-generated Summary:
- [{'summary_text': "John is thinking about getting a PlayStation 5, but he's
- not sure if it's worth it as he doesn't have enough time to play it."}]
对于此对话,我决定添加一些缩写,例如idk(因为我不知道)和ru(因为你是吗),以观察模型如何解释它们。
我们可以看到,该模型已经能够成功捕捉对话的本质并识别主要主题,即约翰因为没有时间玩 PlayStation 5 而不确定是否要购买 PlayStation 5。
- Original Dialogue:
- Camilla: Who do you think is going to win the competition?
- Michelle: I believe Jonathan should win but I'm sure Mike is cheating!
- Camilla: Why do you say that? Can you prove Mike is really cheating?
- Michelle: I can't! But I just know!
- Camilla: You shouldn't accuse him of cheating if you don't have any
- evidence to support it.
- Model-generated Summary:
- [{'summary_text': 'Jonathan should win the competition, but Michelle thinks
- Mike is cheating.'}]
该模型再次抓住了对话的主题,即米歇尔相信乔纳森应该赢得比赛,但迈克可能作弊。不过,还可以做出一些进一步的改进,例如包括米歇尔无法真正提供任何证据来支持她相信迈克在作弊的信息。
七、结论与部署
在在本笔记本中,我们探索了如何使用大型语言模型来完成涉及自然语言处理的多项任务,更具体地说,是文本摘要任务。
我们深入研究了如何使用 Hugging Face 的 Transformers、Evaluate 和 Datasets 来利用 PyTorch 等框架来微调具有大量参数的预训练模型。这种类型的技术通常称为迁移学习,它允许数据科学家和机器学习工程师利用从先前任务中获得的知识来提高新任务的泛化能力。
我们使用已经过训练的 BART 模型来对新闻文章执行摘要,并对其进行微调以使用SamSum数据集执行对话摘要。
感谢 Hugging Face 的模型和空间,我已将这个模型上传到网上,任何人都可以免费在自己的摘要任务中使用它或在其他任务中进一步微调它。我强烈建议您访问luisotorres/bart-finetuned-samsum以获取有关如何使用此模型的更多信息。
我还构建了一个网络应用程序,您可以在其中使用该模型来总结对话和新闻文章。下面,您可以看到该网络应用程序的一些图像,该应用程序也可以在Bart Text Summarization上免费获得。
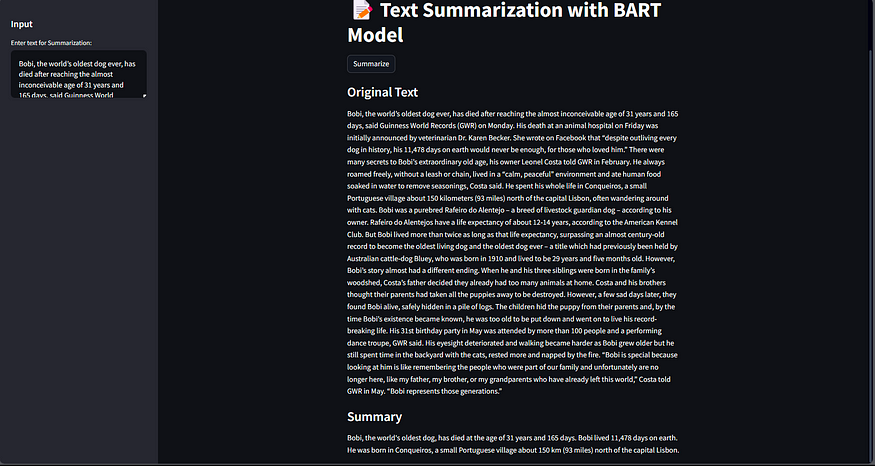
新闻文章摘要示例

对话总结的例子
我希望本笔记本能够为那些对使用法学硕士进行自然语言处理任务感兴趣的人以及那些已经使用法学硕士并正在寻求精炼该主题知识的人提供一个很好的介绍。
这本笔记本花了相当长的时间来制作,我非常感谢您对这项工作的反馈。如果您喜欢此处呈现的内容,请随时留下您的评论、建议和点赞。让我们联系吧!🔗
LinkedIn • Kaggle • HuggingFacehttps://medium.com/ai-in-plain-english/text-summarization-with-large-language-models-c9ae4be96863
-
相关阅读:
QUIC简介
如何将las数据转换为osgb数据?
Ubuntu1804安装ROS Melodic
如何应对继承的双面性
如何实现超大场景三维模型数据坐标转换
Mybatis-分页插件
VoxEdit 主题创作大赛:将 90 年代的复古元素带入 Web3
AlDente Pro for mac最新激活版:电池长续航软件
vue开发不能不知的小知识
18.项目开发之前端项目搭建测试
- 原文地址:https://blog.csdn.net/gongdiwudu/article/details/134318487