-
Datawhale智能汽车AI挑战赛
1.赛题解析
赛题地址:https://tianchi.aliyun.com/competition/entrance/532155
任务:- 输入:元宇宙仿真平台生成的前视摄像头虚拟视频数据(8-10秒左右);
- 输出:对视频中的信息进行综合理解,以指定的json文件格式,按照数据说明中的关键词(key)填充描述型的文本信息(value,中文/英文均可以)
评分标准:
系统会针对参赛者提交的json文件,通过描述型的文本信息与真值进行对比,综合得出分数;其中,“距离最近的交通参与者的行为”的题目为2分,其它题目为1分;每个视频的满分为10分。每一个视频结果中的key值,需要参考数据说明的json格式示例,请勿进行修改。2.Baseline详解
import paddle from PIL import Image from clip import tokenize, load_model import glob, json, os import cv2 from PIL import Image from tqdm import tqdm_notebook import numpy as np from sklearn.preprocessing import normalize import matplotlib.pyplot as plt- 1
- 2
- 3
- 4
- 5
- 6
- 7
- 8
- 9
- 10
paddle:PaddlePaddle深度学习框架。
PIL:Python Imaging Library,用于图像处理。
clip:包含CLIP模型的库。
glob:用于获取文件路径。
json:用于处理JSON数据。
os:用于操作文件和目录。
cv2:OpenCV库,用于读取视频帧。
tqdm_notebook:用于显示进度条。
numpy:用于数值计算。
sklearn.preprocessing.normalize:用于归一化数据。
matplotlib.pyplot:用于绘图。加载CLIP模型和转换器:
model, transforms = load_model('ViT_B_32', pretrained=True)- 1
定义匹配词典:
en_match_words = { "scerario" : ["suburbs","city street","expressway","tunnel","parking-lot","gas or charging stations","unknown"], "weather" : ["clear","cloudy","raining","foggy","snowy","unknown"], "period" : ["daytime","dawn or dusk","night","unknown"], "road_structure" : ["normal","crossroads","T-junction","ramp","lane merging","parking lot entrance","round about","unknown"], "general_obstacle" : ["nothing","speed bumper","traffic cone","water horse","stone","manhole cover","nothing","unknown"], "abnormal_condition" : ["uneven","oil or water stain","standing water","cracked","nothing","unknown"], "ego_car_behavior" : ["slow down","go straight","turn right","turn left","stop","U-turn","speed up","lane change","others"], "closest_participants_type" : ["passenger car","bus","truck","pedestrain","policeman","nothing","others","unknown"], "closest_participants_behavior" : ["slow down","go straight","turn right","turn left","stop","U-turn","speed up","lane change","others"], }- 1
- 2
- 3
- 4
- 5
- 6
- 7
- 8
- 9
- 10
- 11
- 12
定义结果JSON对象
submit_json = { "author" : "abc" , "time" : "231011", "model" : "model_name", "test_results" : [] }- 1
- 2
- 3
- 4
- 5
- 6
获取视频文件路径并排序:
paths = glob.glob('./初赛测试视频/*') paths.sort()- 1
- 2
遍历每个视频文件:
for video_path in paths: print(video_path)- 1
- 2
读取视频帧并进行预处理
cap = cv2.VideoCapture(video_path) img = cap.read()[1] image = cv2.cvtColor(img, cv2.COLOR_BGR2RGB) image = Image.fromarray(image) image = transforms(image).unsqueeze(0)- 1
- 2
- 3
- 4
- 5
定义单个视频结果的字典,并设置默认值:
single_video_result = { "clip_id": clip_id, "scerario" : "cityroad", "weather":"unknown", "period":"night", "road_structure":"ramp", "general_obstacle":"nothing", "abnormal_condition":"nothing", "ego_car_behavior":"turning right", "closest_participants_type":"passenger car", "closest_participants_behavior":"braking" }- 1
- 2
- 3
- 4
- 5
- 6
- 7
- 8
- 9
- 10
- 11
- 12
对于每个关键词,使用CLIP模型进行分类:
for keyword in en_match_words.keys(): if keyword not in ["weather", "road_structure"]:#只有当关键词为"weather"或"road_structure"时才会执行后续的操作,其他关键词则会跳过 continue texts = np.array(en_match_words[keyword])#先将关键词对应的文本转换为一个NumPy数组 #先使用了一个名为tokenize的函数,它将关键词转换为模型能够理解的标记序列,然后调用CLIP模型的model方法,传入图像和标记化的文本,获取图像和文本的logits(预测得分)。其中,logits_per_image表示图像的logits,logits_per_text表示文本的logits with paddle.no_grad(): logits_per_image, logits_per_text = model(image, tokenize(en_match_words[keyword])) probs = paddle.nn.functional.softmax(logits_per_image, axis=-1)#使用softmax函数对图像的logits进行归一化处理,得到每个类别的概率 probs = probs.numpy() single_video_result[keyword] = texts[probs[0].argsort()[::-1][0]]#将概率值转换为NumPy数组,并根据概率值从高到低进行排序。然后将对应的文本赋值给single_video_result字典中的相应关键词- 1
- 2
- 3
- 4
- 5
- 6
- 7
- 8
- 9
- 10
- 11
- 12
- 13
将单个视频结果添加到结果JSON对象中:
submit_json["test_results"].append(single_video_result)- 1
将结果JSON对象保存为文件:
with open('clip_result.json', 'w', encoding='utf-8') as up: json.dump(submit_json, up, ensure_ascii=False)- 1
- 2
对一系列视频进行分类,并将结果保存在一个JSON文件中。其中使用了PaddlePaddle的深度学习框架和OpenAI的CLIP模型来进行图像和文本的匹配和分类。
CLIP模型原理
可参考另一位助教写的博客点击直达
参考链接1CLIP的训练数据是文本-图像对:一张图像和它对应的文本描述,这里希望通过对比学习,模型能够学习到文本-图像对的匹配关系。如下图所示,CLIP包括两个模型:Text Encoder和Image Encoder,其中Text Encoder用来提取文本的特征,可以采用NLP中常用的text transformer模型;而Image Encoder用来提取图像的特征,可以采用常用CNN模型或者vision transformer。
CLIP的思想非常简单,只需要看懂这幅图就可以了,左边是训练的原理,CLIP一共有两个模态,一个是文本模态,一个是视觉模态,分别对应了Text Encoder和Image Encoder。- Text Encoder用于对文本进行编码,获得其Embedding;
- Image Encoder用于对图片编码,获得其Embedding。
- 两个Embedding均为一定长度的单一向量。


pytorch版:
全部代码及注释#导入库 import glob, json, os import cv2 from PIL import Image from tqdm import tqdm_notebook import numpy as np from sklearn.preprocessing import normalize import matplotlib.pyplot as plt from PIL import Image import requests from transformers import CLIPProcessor, CLIPModel #加载预训练的CLIP模型: #通过使用Hugging Face的transformers库,该代码从预训练模型 "openai/clip-vit-large-patch14-336" 中加载了一个CLIP模型,并创建了一个处理器processor model = CLIPModel.from_pretrained("openai/clip-vit-large-patch14-336") processor = CLIPProcessor.from_pretrained("openai/clip-vit-large-patch14-336") #通过URL下载一张图像,并使用PIL库打开该图像,处理图像数据 url = "http://images.cocodataset.org/val2017/000000039769.jpg" image = Image.open(requests.get(url, stream=True).raw) #准备模型输入并获取输出,使用CLIP处理器processor对图像和文本进行处理,准备成模型需要的张量格式,然后将输入传递给CLIP模型,获取模型的输出 inputs = processor(text=["a photo of a cat", "a photo of a dog"], images=image, return_tensors="pt", padding=True) outputs = model(**inputs) logits_per_image = outputs.logits_per_image # this is the image-text similarity score# 得到图像-文本相似度得分 logits_per_image.softmax(dim=1) # we can take the softmax to get the label probabilities# 对结果进行softmax处理,得到标签概率 #我们得到了图像和文本之间的相似度得分logits_per_image,并对其进行了softmax处理,得到了标签的概率分布 #分别定义了中文和英文对应的关键词匹配字典。 cn_match_words = { "工况描述": ["高速/城市快速路", "城区", "郊区", "隧道", "停车场", "加油站/充电站", "未知"], "天气": ["晴天", "雨天", "多云", "雾天", "下雪", "未知"], "时间": ["白天", "夜晚", "拂晓/日暮", "未知"], "道路结构": ["十字路口", "丁字路口", "上下匝道", "车道汇入", "进出停车场", "环岛", "正常车道", "未知"], "一般障碍物": ["雉桶", "水马", "碎石/石块", "井盖", "减速带", "没有"], "道路异常情况": ["油污/水渍", "积水", "龟裂", "起伏不平", "没有", "未知"], "自车行为": ["直行", "左转", "右转", "停止", "掉头", "加速", "减速", "变道", "其它"], "最近的交通参与者": ["行人", "小型汽车", "卡车", "交警", "没有", "未知", "其它"], "最近的交通参与者行为": ["直行", "左转", "右转", "停止", "掉头", "加速", "减速", "变道", "其它"], } en_match_words = { "scerario" : ["suburbs","city street","expressway","tunnel","parking-lot","gas or charging stations","unknown"], "weather" : ["clear","cloudy","raining","foggy","snowy","unknown"], "period" : ["daytime","dawn or dusk","night","unknown"], "road_structure" : ["normal","crossroads","T-junction","ramp","lane merging","parking lot entrance","round about","unknown"], "general_obstacle" : ["nothing","speed bumper","traffic cone","water horse","stone","manhole cover","nothing","unknown"], "abnormal_condition" : ["uneven","oil or water stain","standing water","cracked","nothing","unknown"], "ego_car_behavior" : ["slow down","go straight","turn right","turn left","stop","U-turn","speed up","lane change","others"], "closest_participants_type" : ["passenger car","bus","truck","pedestrain","policeman","nothing","others","unknown"], "closest_participants_behavior" : ["slow down","go straight","turn right","turn left","stop","U-turn","speed up","lane change","others"], } #读取视频文件 cap = cv2.VideoCapture(r'D:/D/Download/360安全浏览器下载/初赛测试视频/初赛测试视频/41.avi') #读取视频帧图像读取第一帧图片可以考虑一下怎么改进 img = cap.read()[1] image = cv2.cvtColor(img, cv2.COLOR_BGR2RGB)#转换图像颜色格式,将图像从BGR格式转换为RGB格式 #创建PIL图像对象 image = Image.fromarray(image)#使用PIL库的fromarray函数将NumPy数组(即经过颜色格式转换后的图像数据)转换为PIL的Image对象 image.resize((600, 300)) #两个Python字典的定义和赋值操作 submit_json = { "作者" : "阿水" , "时间" : "231011", "模型名字" : "model_name", "测试结果" : [] } submit_json = { "author" : "abc" , "time" : "231011", "model" : "model_name", "test_results" : [] } #使用了Python中的glob模块来匹配文件路径,获取指定目录下所有文件的路径并将结果进行排序 paths = glob.glob(r'.\chusai\*') paths.sort() #对paths列表中的每个视频路径进行处理,并生成相应的结果 for video_path in paths: print(video_path) # clip_id = video_path.split('/')[-1] clip_id = os.path.split(video_path)[-1] print(clip_id) # clip_id = video_path.split('/')[-1][:-4] cap = cv2.VideoCapture(video_path)#打开视频文件 img = cap.read()[1]#读取视频帧,将得到的图像赋值给变量img image = cv2.cvtColor(img, cv2.COLOR_BGR2RGB) # image = cv2.cvtColor(img, cv2.COLOR_BGR2GRAY) image = Image.fromarray(image) #将BGR格式的图像转换为RGB格式,并将结果赋值给变量image #定义了一个字典single_video_result,包含了一些视频相关的属性 single_video_result = { "clip_id": clip_id, "scenario" : "cityroad", "weather":"clear", "period":"daytime", "road_structure":"namal", "general_obstacle":"nothing", "abnormal_condition":"nothing", "ego_car_behavior":"go straight", "closest_participants_type":"passenger car", "closest_participants_behavior":"braking" } #遍历en_match_words字典中的关键字,对除了weather、road_structure、scerario和period以外的关键字进行处理 for keyword in en_match_words.keys(): if keyword not in ["weather", "road_structure", 'scenario', 'road_structure', 'period']: continue texts = np.array(en_match_words[keyword])#转化为Numpy数组 inputs = processor(text=list(texts), images=image, return_tensors="pt", padding=True)#使用模型的处理器(processor)对文本和图像进行处理,生成模型输入所需的格式。这里的处理器负责将文本和图像转换为模型能够接受的输入格式 print(inputs) outputs = model(**inputs)#调用模型,将处理后的输入传入模型中,得到模型的输出。模型的输出包括了图像和文本之间的相似度得分 logits_per_image = outputs.logits_per_image # this is the image-text similarity score probs = logits_per_image.softmax(dim=1) # probs: [[1.2686e-03, 5.4499e-02, 6.7968e-04, 9.4355e-01]]将相似度得分进行softmax处理,得到每个类别的概率分布 single_video_result[keyword] = texts[probs[0].argsort().numpy()[::-1][0]]#根据概率最大的类别,从文本数组中取出相应的文本,并将其作为该关键字对应的值,赋给single_video_result字典 submit_json["test_results"].append(single_video_result)#将处理得到的single_video_result字典添加到submit_json["test_results"]列表中,最终得到一个JSON对象,其中包含了对每个视频的预测结果 len(paths) # 遍历每个数据条目,对clip_id进行修改 #首先,这个循环遍历了名为submit_json的JSON对象中的'test_results'字段对应的列表。对于列表中的每个条目(在代码中称为entry),它检查是否存在名为'clip_id'的字段。 #如果存在'clip_id'字段,代码会执行entry['clip_id'].split("\\")[-1]操作。这行代码的作用是将'clip_id'字段的值按照反斜杠\分割,并取分割后的结果的最后一个部分。这样的操作通常用于获取文件路径中的文件名部分。 for entry in submit_json['test_results']: if 'clip_id' in entry: entry['clip_id'] = entry['clip_id'].split("\\")[-1] #代码打开了一个名为coggle_result5.json的文件(路径为D:/D/Download/360安全浏览器下载/)以供写入,并使用json.dump将经过处理的submit_json对象写入到这个文件中。参数ensure_ascii=False表示在生成的JSON文件中允许非ASCII字符的存在,通常用于处理非英文文本。 with open(r'D:/D/Download/360安全浏览器下载/coggle_result5.json', 'w', encoding='utf-8') as up: json.dump(submit_json, up, ensure_ascii=False) # "作者" : "abc" , # "时间" : "YYMMDD", # "模型名字" : "model_name", # "测试结果" :[ # { # "视频ID" : "xxxx_1", # "工况描述" : "城市道路", # "天气":"未知", # "时间":"夜晚", # "道路结构":"匝道", # "一般障碍物":"无", # "道路异常情况":"无", # "自车行为":"右转", # "最近的交通参与者":"小轿车", # "最近的交通参与者行为":"制动" # }, submit_json- 1
- 2
- 3
- 4
- 5
- 6
- 7
- 8
- 9
- 10
- 11
- 12
- 13
- 14
- 15
- 16
- 17
- 18
- 19
- 20
- 21
- 22
- 23
- 24
- 25
- 26
- 27
- 28
- 29
- 30
- 31
- 32
- 33
- 34
- 35
- 36
- 37
- 38
- 39
- 40
- 41
- 42
- 43
- 44
- 45
- 46
- 47
- 48
- 49
- 50
- 51
- 52
- 53
- 54
- 55
- 56
- 57
- 58
- 59
- 60
- 61
- 62
- 63
- 64
- 65
- 66
- 67
- 68
- 69
- 70
- 71
- 72
- 73
- 74
- 75
- 76
- 77
- 78
- 79
- 80
- 81
- 82
- 83
- 84
- 85
- 86
- 87
- 88
- 89
- 90
- 91
- 92
- 93
- 94
- 95
- 96
- 97
- 98
- 99
- 100
- 101
- 102
- 103
- 104
- 105
- 106
- 107
- 108
- 109
- 110
- 111
- 112
- 113
- 114
- 115
- 116
- 117
- 118
- 119
- 120
- 121
- 122
- 123
- 124
- 125
- 126
- 127
- 128
- 129
- 130
- 131
- 132
- 133
- 134
- 135
- 136
- 137
- 138
- 139
- 140
- 141
- 142
- 143
- 144
- 145
- 146
- 147
目前分数147
在pytorch版上做的改进
1.换模型
clip-vit-large-patch14 是两年前的模型
clip-vit-large-patch14-336是一年前的模型
秉着新的肯定会比老的效果好的想法分数从121->126不错!
2.然后还尝试改了一下single_video_resultsingle_video_result = { "clip_id": clip_id, "scenario" : "cityroad", "weather":"clear", "period":"daytime", "road_structure":"namal", "general_obstacle":"nothing", "abnormal_condition":"nothing", "ego_car_behavior":"go straight", "closest_participants_type":"passenger car", "closest_participants_behavior":"braking" }- 1
- 2
- 3
- 4
- 5
- 6
- 7
- 8
- 9
- 10
- 11
- 12
然后就126->132了
3.尝试在keyword中加入“closest_participants_behavior”
分数132->147第一次直播:
(baseline讲解)
1、对部分合适的视频标签进行识别,需要考虑哪些标签可以从图片的角度识别?
2.clip的版本(https://huggingface.co/models?sort=trending&serach=clip),会用精度的差异
3、视频抽帧,考虑抽取多张图进行预测最终投票。
4、暂时不需要gpu,因为只是做模型预测并没有模型训练。可以标一些数据进行有监督的训练
5、找一些预训练模型可以用,如视频问答,图片问答去做
6、视频太少不太建议对clip进行微调
7、考虑无监督,抽取关键点的方式
8.天气的预测现有模型很难匹配,很有可能是unknow,如何让clip模型回答“unknow”
9、提示词的区别也会影响精度(clip的文本promote会影响精度)
10、单帧角度不行的话考虑多帧或者视频角度
第二次直播:
(进阶思路)
1、可以用VQA的模型去做,不过也需要去构建提示词,需要去尝试判断和本身的模型包含哪些模块,
使用其它模型需要考虑与CLIP模型有重叠部分的,需要避免
比如BLIP2模型

pip install ultralytics2、对于视频数据
用OpenCV逐帧读取
包括读取视频帧、转换图像格式以及保存图像的操作#读取视频的下一帧图像并保存为图像 "img1.jpg" cap = cv2.VideoCapture(r'D:/D/Download/360安全浏览器下载/初赛测试视频/初赛测试视频/41.avi') img = cap.read()[1] image = cv2.cvtColor(img, cv2.COLOR_BGR2RGB) image = Image.fromarray(image) image.save('img1.jpg') #跳过前50帧并保存第51帧图像为 "img10.jpg" cap = cv2.VideoCapture(r'D:/D/Download/360安全浏览器下载/初赛测试视频/初赛测试视频/41.avi') for _ in range(50): cap.read() img = cap.read()[1] image = cv2.cvtColor(img, cv2.COLOR_BGR2RGB) image = Image.fromarray(image) image.save('img10.jpg')- 1
- 2
- 3
- 4
- 5
- 6
- 7
- 8
- 9
- 10
- 11
- 12
- 13
- 14
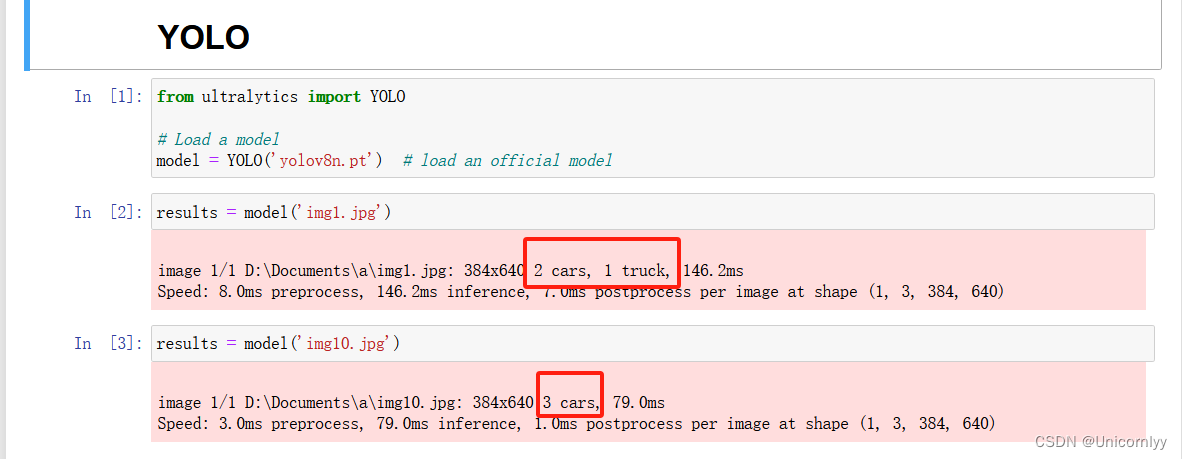
3、加入目标检测模型
YOLO,对视频中的一些物体进行识别,如障碍物,行人,车辆
4、关键点
ORB识别并绘制关键点(一般都是角点在道路两旁 不会在道路中间)
并做关键点的暴力匹配并计算距离,来判断左图与右图旋转的角度以及关键点的运动#进行特征点检测和描述符计算,并绘制关键点在图像上的位置 import numpy as np import cv2 as cv from matplotlib import pyplot as plt #读取图像并转为灰度图像 img = cv.imread('img1.jpg', cv.IMREAD_GRAYSCALE) # 初始化ORB检测器Initiate ORB detector,使用OpenCV的ORB_create函数创建一个ORB检测器对象。ORB(Oriented FAST and Rotated BRIEF)是一种特征点检测和描述符计算的算法 #检测关键点 orb = cv.ORB_create() # find the keypoints with ORB kp = orb.detect(img,None)#使用ORB检测器的detect方法检测图像中的关键点。None表示没有输入掩码 #计算描述符 compute the descriptors with ORB kp, des = orb.compute(img, kp)#使用ORB检测器的compute方法计算关键点的描述符。kp是输入的关键点,des是输出的描述符 # 绘制关键点draw only keypoints location,not size and orientation img2 = cv.drawKeypoints(img, kp, None, color=(0,255,0), flags=0) plt.imshow(img2), plt.show()#使用OpenCV的drawKeypoints函数绘制关键点在图像上的位置,并将结果保存在img2变量中。kp是关键点,None表示没有输出图像(直接在原图上绘制),color=(0,255,0)表示绘制的颜色为绿色,flags=0表示不显示关键点的大小和方向。最后使用matplotlib库的imshow和show方法显示绘制好关键点的图像- 1
- 2
- 3
- 4
- 5
- 6
- 7
- 8
- 9
- 10
- 11
- 12
- 13
- 14
- 15
- 16

使用OpenCV库进行图像特征匹配,并绘制匹配结果import numpy as np import cv2 as cv import matplotlib.pyplot as plt #读取两张图像并转为灰度图像 img1 = cv.imread('img1.jpg',cv.IMREAD_GRAYSCALE) # queryImage img2 = cv.imread('img10.jpg',cv.IMREAD_GRAYSCALE) # trainImage # 初始化SIFT检测器Initiate SIFT detector sift = cv.SIFT_create()#SIFT(Scale-Invariant Feature Transform)是一种常用的特征点检测和描述符计算算法 # 检测关键点和计算描述符find the keypoints and descriptors with SIFT kp1, des1 = sift.detectAndCompute(img1,None) kp2, des2 = sift.detectAndCompute(img2,None) # 使用Brute-Force匹配器进行特征匹配BFMatcher with default params bf = cv.BFMatcher() matches = bf.knnMatch(des1,des2,k=2)#使用OpenCV的BFMatcher函数创建一个Brute-Force匹配器对象,并使用knnMatch方法对两张图像的描述符进行匹配。参数k=2表示返回每个查询描述符的前两个最佳匹配 # 应用比值测试Apply ratio test good = [] for m,n in matches: if m.distance < 0.35*n.distance: good.append([m])#对特征匹配结果应用比值测试,如果最佳匹配的距离小于次佳匹配的距离的0.35倍,则将其添加到good列表中 # 绘制匹配结果cv.drawMatchesKnn expects list of lists as matches. img3 = cv.drawMatchesKnn(img1,kp1,img2,kp2,good,None,flags=cv.DrawMatchesFlags_NOT_DRAW_SINGLE_POINTS) plt.figure(figsize=(10, 5)) plt.imshow(img3),plt.show()#使用OpenCV的drawMatchesKnn函数绘制匹配结果,并将结果保存在img3变量中。img1和img2分别是两张输入图像,kp1和kp2分别是两张图像的关键点,good是匹配结果,None表示没有输出图像(直接在原图上绘制),flags参数设置为cv.DrawMatchesFlags_NOT_DRAW_SINGLE_POINTS表示不绘制单个关键点。最后使用matplotlib库的imshow和show方法显示绘制好匹配结果的图像- 1
- 2
- 3
- 4
- 5
- 6
- 7
- 8
- 9
- 10
- 11
- 12
- 13
- 14
- 15
- 16
- 17
- 18
- 19
- 20
- 21
- 22
- 23
- 24

5、运动检测
用Opencv读取两帧结果判断两帧是否发生变化
从视频中捕获帧并检测运动的# import the opencv module import cv2 # capturing video capture = cv2.VideoCapture("./初赛测试视频/44.avi") while capture.isOpened(): # to read frame by frame _, img_1 = capture.read() _, img_2 = capture.read() _, img_2 = capture.read() _, img_2 = capture.read() _, img_2 = capture.read() _, img_2 = capture.read() # find difference between two frames diff = cv2.absdiff(img_1, img_2)#使用cv2.absdiff()函数计算当前帧与前一帧两帧之间的差异图像。 #转换为灰度图像 to convert the frame to grayscale diff_gray = cv2.cvtColor(diff, cv2.COLOR_BGR2GRAY) # 使用cv2.GaussianBlur()函数对灰度图像进行高斯模糊。apply some blur to smoothen the frame diff_blur = cv2.GaussianBlur(diff_gray, (5, 5), 0) # 使用cv2.threshold()函数将灰度图像转换为二值图像to get the binary image _, thresh_bin = cv2.threshold(diff_blur, 40, 255, cv2.THRESH_BINARY) #使用cv2.findContours()函数寻找二值图像中的轮廓 to find contours contours, hierarchy = cv2.findContours(thresh_bin, cv2.RETR_TREE, cv2.CHAIN_APPROX_SIMPLE) #使用cv2.boundingRect()函数获取每个轮廓的边界框坐标,如果轮廓的面积大于300,则绘制矩形框 to draw the bounding box when the motion is detected for contour in contours: x, y, w, h = cv2.boundingRect(contour) if cv2.contourArea(contour) > 300: cv2.rectangle(img_1, (x, y), (x+w, y+h), (0, 255, 0), 2) # cv2.drawContours(img_1, contours, -1, (0, 255, 0), 2) # display the output plt.imshow(img_1) break- 1
- 2
- 3
- 4
- 5
- 6
- 7
- 8
- 9
- 10
- 11
- 12
- 13
- 14
- 15
- 16
- 17
- 18
- 19
- 20
- 21
- 22
- 23
- 24
- 25
- 26
- 27
- 28
- 29
- 30
- 31
- 32
- 33
- 34
- 35
- 36
- 37
- 38
- 39
- 40
- 41
- 42
- 43
- 44
6、车道线检测
通过深度学习模型识别并分割车道线来判断车辆运动状态
7、距离识别
可以检测最近交通参与者(如其他车辆、行人等)及其行为,通过目标检测、目标跟踪等技术来识别并推断出目标的距离和行为,例如判断目标是否静止、行走或驾驶方向 -
相关阅读:
计算机毕业设计(附源码)python智能化车辆管理综合信息平台
【JavaSE】Java方法的使用攻略
xilinx fpga ultrascale 器件GTX参考时钟注意点
uniapp 下拉框数据回显的问题
YOLO算法改进5【中阶改进篇】:添加SENet注意力机制
DyGRAIN: An Incremental Learning Framework for Dynamic Graphs
24.Ubuntu新磁盘挂载
《深入理解java虚拟机 第三版》学习笔记二
java多线程实现同步锁卖票窗口案例
javax.net.ssl.SSLException: Unrecognized SSL message, plaintext connection
- 原文地址:https://blog.csdn.net/m0_68165821/article/details/134375454
