-
7-爬虫-中间件和下载中间件(加代理,加请求头,加cookie)、scrapy集成selenium、源码去重规则(布隆过滤器)、分布式爬虫
1 爬虫中间件和下载中间件
1.1 爬虫中间件(一般不用)
1.2 下载中间件(代理,加请求头,加cookie)
1.2.1 加请求头(加到请求对象中)
1.2.2 加cookie
1.2.3 加代理持久化(pipelines.py)使用步骤
# 1 scrapy 框架,安装,创建项目,创建爬虫,运行爬虫 # 2 scrapy架构 # 3 解析数据 1 response对象有css方法和xpath方法 -css中写css选择器 response.css('') -xpath中写xpath选择 response.xpath('') 2 重点1: -xpath取文本内容 './/a[contains(@class,"link-title")]/text()' -xpath取属性 './/a[contains(@class,"link-title")]/@href' -css取文本 'a.link-title::text' -css取属性 'img.image-scale::attr(src)' 3 重点2: .extract_first() 取一个 .extract() 取所有 # 4 继续爬取 - 下一页的地址:Request(url=next, callback=self.parse) - 详情地址:Request(url=url, callback=self.detail_parser) -额外去写detail_parser内的解析 # 5 数据传递 -解析中有数据---》下个解析中还能拿到 Request(url=url, callback=self.detail_parser,meta={'item':item})----》给了Response对象的meta属性 # 6 配置文件 -基础配置 -高级配置--》提高爬虫效率 # 7 持久化---》把数据保存到磁盘上:文件,mysql -管道 -使用步骤 -1 写个类:items.py,里面写字段 class CnblogItem(scrapy.Item): name = scrapy.Field() author = scrapy.Field() url = scrapy.Field() img = scrapy.Field() desc_content = scrapy.Field() # 文本详情 text = scrapy.Field() -2 配置文件配置(管道,配置多个,存在多个位置) ITEM_PIPELINES = { "scrapy_demo.pipelines.CnblogPipeline": 300, "scrapy_demo.pipelines.CnblogMysqlPipeline": 200, } -3 爬虫解析中:yield item -3 pipelines.py中写类:open_spider,close_spider,process_item- 1
- 2
- 3
- 4
- 5
- 6
- 7
- 8
- 9
- 10
- 11
- 12
- 13
- 14
- 15
- 16
- 17
- 18
- 19
- 20
- 21
- 22
- 23
- 24
- 25
- 26
- 27
- 28
- 29
- 30
- 31
- 32
- 33
- 34
- 35
- 36
- 37
- 38
- 39
- 40
- 41
- 42
- 43
- 44
- 45
- 46
- 47
- 48
- 49
- 50
- 51
- 52
1 爬虫中间件和下载中间件
1.1 爬虫中间件(一般不用)
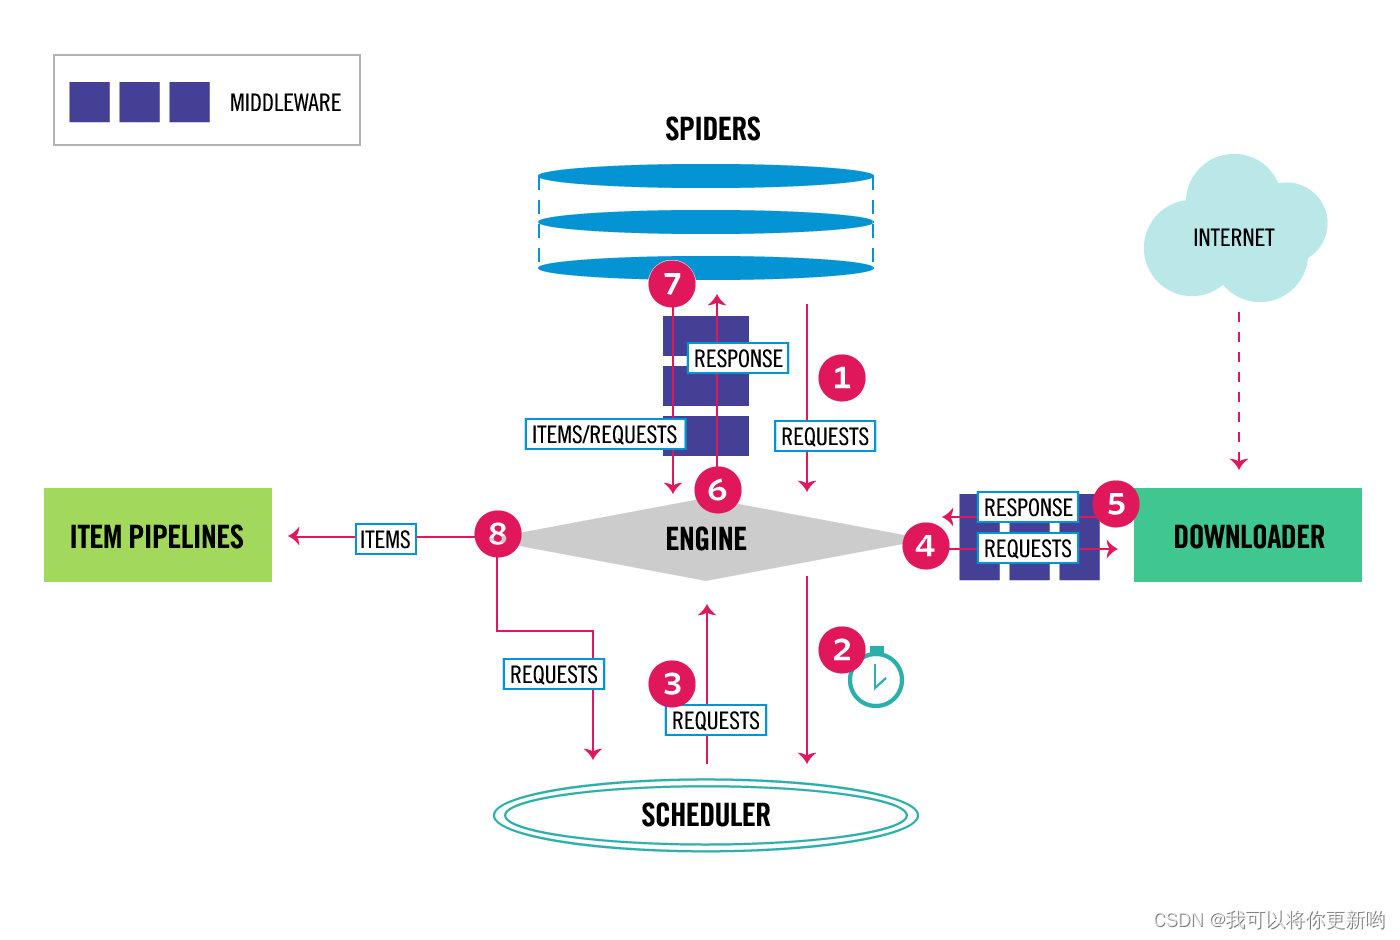
# 第一步:写个爬虫中间件类 class ScrapyDemoSpiderMiddleware: @classmethod def from_crawler(cls, crawler): # This method is used by Scrapy to create your spiders. s = cls() crawler.signals.connect(s.spider_opened, signal=signals.spider_opened) return s # 走架构图第1步,会触发这里 def process_spider_input(self, response, spider): # Called for each response that goes through the spider # middleware and into the spider. # Should return None or raise an exception. return None # 架构图,第1,7步走这里 def process_spider_output(self, response, result, spider): # Called with the results returned from the Spider, after # it has processed the response. # Must return an iterable of Request, or item objects. for i in result: yield i def process_spider_exception(self, response, exception, spider): # Called when a spider or process_spider_input() method # (from other spider middleware) raises an exception. # Should return either None or an iterable of Request or item objects. pass # 架构图第一步 def process_start_requests(self, start_requests, spider): # Called with the start requests of the spider, and works # similarly to the process_spider_output() method, except # that it doesn’t have a response associated. # Must return only requests (not items). for r in start_requests: yield r def spider_opened(self, spider): spider.logger.info("Spider opened: %s" % spider.name) # 2 配置文件配置 SPIDER_MIDDLEWARES = { "scrapy_demo.middlewares.ScrapyDemoSpiderMiddleware": 543, }- 1
- 2
- 3
- 4
- 5
- 6
- 7
- 8
- 9
- 10
- 11
- 12
- 13
- 14
- 15
- 16
- 17
- 18
- 19
- 20
- 21
- 22
- 23
- 24
- 25
- 26
- 27
- 28
- 29
- 30
- 31
- 32
- 33
- 34
- 35
- 36
- 37
- 38
- 39
- 40
- 41
- 42
- 43
- 44
- 45
- 46
- 47
- 48
- 49
- 50
- 51
1.2 下载中间件(代理,加请求头,加cookie)
class ScrapyDemoDownloaderMiddleware: @classmethod def from_crawler(cls, crawler): # This method is used by Scrapy to create your spiders. s = cls() crawler.signals.connect(s.spider_opened, signal=signals.spider_opened) return s def process_request(self, request, spider): # - return None: 继续执行当次请求,继续走下一个中间件---》如果中间件没了---》执行下载 # - return Response :直接把Response返回给引擎,引擎交给爬虫去解析 # - return Request :把request返回给引擎,引擎给调度器,等待下一次被爬取 # - 直接抛异常: 触发process_exception执行 return None def process_response(self, request, response, spider): # Must either; # - return Response:正常爬取完---》给引擎---》引擎给爬虫去解析 # - return Request: 爬取失败--》给引擎--》引擎给调度器--》等待下次爬取 # - 抛异常 :走到process_exception return response def process_exception(self, request, exception, spider): # Called when a download handler or a process_request() # (from other downloader middleware) raises an exception. # Must either: # - return None: continue processing this exception # - return a Response object: stops process_exception() chain # - return a Request object: stops process_exception() chain pass def spider_opened(self, spider): spider.logger.info("Spider opened: %s" % spider.name)- 1
- 2
- 3
- 4
- 5
- 6
- 7
- 8
- 9
- 10
- 11
- 12
- 13
- 14
- 15
- 16
- 17
- 18
- 19
- 20
- 21
- 22
- 23
- 24
- 25
- 26
- 27
- 28
- 29
- 30
- 31
- 32
- 33
- 34
- 35
1.2.1 加请求头(加到请求对象中)
# faker 模块 :随机生成假数据 # pip install fake_useragent:随机生成请求头 ### 加referer,加token 加 user-agent def process_request(self, request, spider): #### 加请求头 print(request.headers) request.headers['referer'] = 'http://www.lagou.com' request.headers['token'] = 'asdfasdf.asdfads.asfdasfd' # user-agent--->写死了---》想随机请求头 from fake_useragent import UserAgent ua = UserAgent() request.headers['User-Agent'] = str(ua.random) print(request.headers) return None- 1
- 2
- 3
- 4
- 5
- 6
- 7
- 8
- 9
- 10
- 11
- 12
- 13
- 14
- 15
- 16
- 17
- 18
1.2.2 加cookie
def process_request(self, request, spider): print(request.cookies) request.cookies['name']='lqz' return None- 1
- 2
- 3
- 4
1.2.3 加代理
# 在下载中间件的def process_request(self, request, spider):写代码 # 第一步: -在下载中间件写process_request方法 def get_proxy(self): import requests res = requests.get('http://127.0.0.1:5010/get/').json() if res.get('https'): return 'https://' + res.get('proxy') else: return 'http://' + res.get('proxy') def process_request(self, request, spider): #request.meta['proxy'] = self.get_proxy() request.meta['proxy'] = 'http://192.168.11.11:8888' return None # 第二步:代理可能不能用,会触发process_exception,在里面写 def process_exception(self, request, exception, spider): print('-----',request.url) # 这个地址没有爬 return request- 1
- 2
- 3
- 4
- 5
- 6
- 7
- 8
- 9
- 10
- 11
- 12
- 13
- 14
- 15
- 16
- 17
- 18
- 19
- 20
- 21
- 22
- 23
2 scrapy集成selenium
# 使用scrapy默认下载器---》类似于requests模块发送请求,不能执行js,有的页面拿回来数据不完整 # 想在scrapy中集成selenium,获取数据更完整,获取完后,自己组装成 Response对象,就会进爬虫解析,现在解析的是使用selenium拿回来的页面,数据更完整- 1
- 2
- 3
- 4
- 5
# 集成selenium 因为有的页面,是执行完js后才渲染完,必须使用selenium去爬取数据才完整 # 保证整个爬虫中,只有一个浏览器器 # 只要爬取 下一页这种地址,使用selenium,爬取详情,继续使用原来的 # 第一步:在爬虫类中写 from selenium import webdriver class CnblogsSpider(scrapy.Spider): bro = webdriver.Chrome() # 使用无头 bro.implicitly_wait(10) def close(spider, reason): spider.bro.close() #浏览器关掉 # 第二步:在中间件中 def process_request(self, request, spider): # 爬取下一页这种地址---》用selenium,但是文章详情,就用原来的 if 'sitehome/p' in request.url: spider.bro.get(request.url) from scrapy.http.response.html import HtmlResponse response = HtmlResponse(url=request.url, body=bytes(spider.bro.page_source, encoding='utf-8')) return response else: return None- 1
- 2
- 3
- 4
- 5
- 6
- 7
- 8
- 9
- 10
- 11
- 12
- 13
- 14
- 15
- 16
- 17
- 18
- 19
- 20
- 21
- 22
- 23
- 24
3 源码去重规则(布隆过滤器)
# 如果爬取过的地址,就不会再爬了,scrapy 自带去重 # 调度器可以去重,研究一下,如何去重的---》使用了集合 # 要爬取的Request对象,在进入到scheduler调度器排队之前,先执行enqueue_request,它如果return False,这个Request就丢弃掉,不爬了----》如何判断这个Request要不要丢弃掉,执行了self.df.request_seen(request),它来决定的-----》RFPDupeFilter类中的方法----》request_seen---》会返回True或False----》如果这个request在集合中,说明爬过了,就return True,如果不在集合中,就加入到集合中,然后返回False # 调度器源码 from scrapy.core.scheduler import Scheduler # 这个方法如果return True表示这个request要爬取,如果return False表示这个网址就不爬了(已经爬过了) def enqueue_request(self, request: Request) -> bool: # request当次要爬取的地址对象 if self.df.request_seen(request): # 有的请情况,在爬虫中解析出来的网址,不想爬了,就就可以指定 # yield Request(url=url, callback=self.detail_parse, meta={'item': item},dont_filter=True) # 如果符合这个条件,表示这个网址已经爬过了 return False return True # self.df 去重类 是去重类的对象 RFPDupeFilter--》配置文件配置的 -在配置文件中如果配置了:DUPEFILTER_CLASS = 'scrapy.dupefilters.RFPDupeFilter'表示,使用它作为去重类,按照它的规则做去重 -RFPDupeFilter的request_seen def request_seen(self, request: Request) -> bool: # request_fingerprint 生成指纹 fp = self.request_fingerprint(request) #request当次要爬取的地址对象 #判断 fp 在不在集合中,如果在,return True if fp in self.fingerprints: return True #如果不在,加入到集合,return False self.fingerprints.add(fp) return False # 传进来是个request对象,生成的是指纹 -爬取的网址:https://www.cnblogs.com/teach/p/17238610.html?name=lqz&age=19 -和 https://www.cnblogs.com/teach/p/17238610.html?age=19&name=lqz -它俩是一样的,返回的数据都是一样的,就应该是一条url,就只会爬取一次 -所以 request_fingerprint 就是来把它们做成一样的(核心原理是把查询条件排序,再拼接到后面) -生成指纹,指纹是什么? 生成的指纹放到集合中去重 -www.cnblogs.com?name=lqz&age=19 -www.cnblogs.com?age=19&name=lqz -上面的两种地址生成的指纹是一样的 # 测试指纹 from scrapy.utils.request import RequestFingerprinter from scrapy import Request fingerprinter = RequestFingerprinter() request1 = Request(url='http://www.cnblogs.com?name=lqz&age=20') request2 = Request(url='http://www.cnblogs.com?age=20&name=lqz') res1 = fingerprinter.fingerprint(request1).hex() res2 = fingerprinter.fingerprint(request2).hex() print(res1) print(res2) # 集合去重,集合中放 # a一个bytes # 假设爬了1亿条url,放在内存中,占空间非常大 a6af0a0ffa18a9b2432550e1914361b6bffcff1a a6af0a0ffa18a9b2432550e191361b6bffc34f1a # 想一种方式,极小内存实现去重---》布隆过滤器 https://zhuanlan.zhihu.com/p/94668361- 1
- 2
- 3
- 4
- 5
- 6
- 7
- 8
- 9
- 10
- 11
- 12
- 13
- 14
- 15
- 16
- 17
- 18
- 19
- 20
- 21
- 22
- 23
- 24
- 25
- 26
- 27
- 28
- 29
- 30
- 31
- 32
- 33
- 34
- 35
- 36
- 37
- 38
- 39
- 40
- 41
- 42
- 43
- 44
- 45
- 46
- 47
- 48
- 49
- 50
- 51
- 52
- 53
- 54
- 55
- 56
- 57
- 58
- 59
- 60
- 61
- 62
- 63
- 64
- 65
- 66
- 67
- 68
- 69
- 70
3.1 布隆过滤器
# 极小内存实现去重: # 应用场景:爬虫去重,避免缓存穿透,垃圾邮件过滤 # bloomfilter:是一个通过多哈希函数映射到一张表的数据结构,能够快速的判断一个元素在一个集合内是否存在,具有很好的空间和时间效率。(典型例子,爬虫url去重)- 1
- 2
- 3
- 4
#布隆案例 # from pybloom_live import ScalableBloomFilter # bloom = ScalableBloomFilter(initial_capacity=100, error_rate=0.001, mode=ScalableBloomFilter.LARGE_SET_GROWTH) # url = "www.cnblogs.com" # url2 = "www.liuqingzheng.top" # bloom.add(url) # print(url in bloom) # print(url2 in bloom) from pybloom_live import BloomFilter bf = BloomFilter(capacity=1000) url='www.baidu.com' bf.add(url) print(url in bf) print("www.liuqingzheng.top" in bf)- 1
- 2
- 3
- 4
- 5
- 6
- 7
- 8
- 9
- 10
- 11
- 12
- 13
- 14
- 15
- 16
- 17
from scrapy.dupefilters import BaseDupeFilter from scrapy.utils.request import RequestFingerprinter from pybloom_live import ScalableBloomFilter class MyPDupeFilter(BaseDupeFilter): fingerprints = ScalableBloomFilter(initial_capacity=100, error_rate=0.001, mode=ScalableBloomFilter.LARGE_SET_GROWTH) fingerprinter = RequestFingerprinter() def request_seen(self, request): print('zoule') fp = self.request_fingerprint(request) if fp in self.fingerprints: return True self.fingerprints.add(fp) return False def request_fingerprint(self, request) -> str: return self.fingerprinter.fingerprint(request).hex()- 1
- 2
- 3
- 4
- 5
- 6
- 7
- 8
- 9
- 10
- 11
- 12
- 13
- 14
- 15
- 16
- 17
- 18
- 19
- 20
4 分布式爬虫
# 原来scrapy的Scheduler维护的是本机的任务队列(待爬取的地址)+本机的去重队列(放在集合中)---》在本机内存中 # 如果把scrapy项目,部署到多台机器上,多台机器爬取的内容是重复的 # 所以实现分布式爬取的关键就是,找一台专门的主机上运行一个共享的队列比如Redis, 然后重写Scrapy的Scheduler,让新的Scheduler到共享队列存取Request,并且去除重复的Request请求,所以总结下来,实现分布式的关键就是三点: #1、多台机器共享队列 #2、重写Scheduler,让其无论是去重还是任务都去访问共享队列 #3、为Scheduler定制去重规则(利用redis的集合类型) # scrapy-redis实现分布式爬虫 -公共的去重 -公共的待爬取地址队列 # 使用步骤 0 下载:pip2 install scrapy-redis 1 把之前爬虫类,继承class CnblogsSpider(RedisSpider): 2 去掉起始爬取的地址,加入一个类属性 redis_key = 'myspider:start_urls' # redis列表的key,后期我们需要手动插入起始地址 3 配置文件中配置 DUPEFILTER_CLASS = "scrapy_redis.dupefilter.RFPDupeFilter" # scrapy redis去重类,使用redis的集合去重 # 不使用原生的调度器了,使用scrapy_redis提供的调度器,它就是使用了redis的列表 SCHEDULER = "scrapy_redis.scheduler.Scheduler" REDIS_HOST = 'localhost' # 主机名 REDIS_PORT = 6379 # 端口 ITEM_PIPELINES = { # 'mysfirstscrapy.pipelines.MyCnblogsPipeline': 300, 'mysfirstscrapy.pipelines.MyCnblogsMySqlPipeline': 301, 'scrapy_redis.pipelines.RedisPipeline': 400, } 4 再不同多台机器上运行scrapy的爬虫,就实现了分布式爬虫 5 写入到redis的列表中起始爬取的地址:列表key:myspider:start_urls rpush myspider:start_urls https://www.cnblogs.com- 1
- 2
- 3
- 4
- 5
- 6
- 7
- 8
- 9
- 10
- 11
- 12
- 13
- 14
- 15
- 16
- 17
- 18
- 19
- 20
- 21
- 22
- 23
- 24
- 25
- 26
- 27
- 28
- 29
- 30
- 31
- 32
- 33
- 34
- 35
- 36
- 37
- 38
- 39
- 40
- 41
-
相关阅读:
linux提权辅助工具linux-smart-enumeration(三种工具)
mysql使用orderby 不起作用
LeetCode——622.设计循环队列
Android 13 新特性及适配指南
更安全的ssh协议与Gui图形化界面使用
nginx配置域名不需要项目名称
Visual Studio 2022下载安装的详细步骤-----C语言编辑器
100天精通Python(爬虫篇)——第47天:selenium自动化操作浏览器
maven的pom没有指定包的版本
11月22日:操作系统实验杂记(文本编辑器vim,查看文件内容cat命令,创建并使用Makefile文件,虚拟机共享文件夹)
- 原文地址:https://blog.csdn.net/weixin_44145338/article/details/134376915
