-
Java Web 学习笔记(四) —— MyBatis
目录
1 MyBatis 概述
MyBatis 本是 Apache 的一个开源项目 iBatis, 2010 年这个项目由 apache software
foundation 迁移到了 google code ,并且改名为 MyBatis 。 2013 年 11 月迁移到 Github。MyBatis 是一款优秀的 持久层 框架,用于 简化 JDBC 开发。官方文档
- 持久层
- 负责将数据到保存到数据库的那一层代码
- JavaEE三层架构:表现层、业务层、持久层
- 框架
- 框架就是一个半成品软件,是一套可重用的、通用的、软件基础代码模型
- 在框架的基础之上构建软件编写更加高效、规范、通用、可扩展
MyBatis 主要是用于简化 JDBC 开发,那么 JDBC 主要有哪些缺点呢?

那 MyBatis 又是如何简化 JDBC 开发的呢?

2 MyBatis 快速入门
查询 user 表中所有数据
- 创建 user 表,添加数据
- 创建模块,导入坐标
- 编写 MyBatis 核心配置文件 --> 替换连接信息 解决硬编码问
- 编写 SQL 映射文件 --> 统一管理 sql 语句,解决硬编码问题
- 编写代码
- 定义 POJO 类
- 加载核心配置文件,获取 SqlSessionFactory 对象
- 获取 SqlSession 对象,执行 SQL 语句
- 释放资源
示例代码
- 创建 user 表,添加数据
create database mybatis; use mybatis; drop table if exists tb_user; create table tb_user( id int primary key auto_increment, username varchar(20), password varchar(20), gender char(1), addr varchar(30) ); INSERT INTO tb_user VALUES (1, 'zhangsan', '123', '男', '北京'); INSERT INTO tb_user VALUES (2, '李四', '234', '女', '天津'); INSERT INTO tb_user VALUES (3, '王五', '11', '男', '西安');- 1
- 2
- 3
- 4
- 5
- 6
- 7
- 8
- 9
- 10
- 11
- 12
- 13
- 14
- 15
- 16
tb_user 表内容如下

- 创建模块 MyBatisDemo,导入坐标
如果使用 Maven 来构建项目,则需将下面的依赖代码置于 pom.xml 文件中
<dependencies> <!--MyBatis的依赖--> <dependency> <groupId>org.mybatis</groupId> <artifactId>mybatis</artifactId> <version>3.5.13</version> </dependency> <!-- mysql 驱动 --> <dependency> <groupId>mysql</groupId> <artifactId>mysql-connector-java</artifactId> <version>8.0.33</version> </dependency> <dependency> <groupId>junit</groupId> <artifactId>junit</artifactId> <version>4.13.2</version> <scope>test</scope> </dependency> <!-- 添加slf4j日志api --> <dependency> <groupId>org.slf4j</groupId> <artifactId>slf4j-api</artifactId> <version>2.0.5</version> </dependency> <!-- 添加logback-classic依赖 --> <dependency> <groupId>ch.qos.logback</groupId> <artifactId>logback-classic</artifactId> <version>1.4.7</version> </dependency> <!-- 添加logback-core依赖 --> <dependency> <groupId>ch.qos.logback</groupId> <artifactId>logback-core</artifactId> <version>1.4.7</version> </dependency> </dependencies>- 1
- 2
- 3
- 4
- 5
- 6
- 7
- 8
- 9
- 10
- 11
- 12
- 13
- 14
- 15
- 16
- 17
- 18
- 19
- 20
- 21
- 22
- 23
- 24
- 25
- 26
- 27
- 28
- 29
- 30
- 31
- 32
- 33
- 34
- 35
- 36
- 37
- 38
- 39
- 40
另外,logback除了以上三个配置信息之外,还需要一个配置文件
logback.xml
- 编写 MyBatis 核心配置文件
在
resources文件夹下新建配置文件mybatis-config.xmlDOCTYPE configuration PUBLIC "-//mybatis.org//DTD Config 3.0//EN" "https://mybatis.org/dtd/mybatis-3-config.dtd"> <configuration> <typeAliases> <package name="com.huwei.pojo"/> typeAliases> <environments default="development"> <environment id="development"> <transactionManager type="JDBC"/> <dataSource type="POOLED"> <property name="driver" value="com.mysql.jdbc.Driver"/> <property name="url" value="jdbc:mysql:///mybatis?useSSL=false"/> <property name="username" value="root"/> <property name="password" value="123123"/> dataSource> environment> environments> <mappers> <mapper resource="UserMapper.xml"/> mappers> configuration>- 1
- 2
- 3
- 4
- 5
- 6
- 7
- 8
- 9
- 10
- 11
- 12
- 13
- 14
- 15
- 16
- 17
- 18
- 19
- 20
- 21
- 22
- 23
- 24
- 25
- 26
- 27
- 28
- 29
- 30
- 31
- 32
注意,需要在下面配置 sql 映射文件
MyBatis 核心配置文件的顶层结构如下:

注意,在配置各个标签的时候,需要遵守前后顺序规则
- 编写 SQL 映射文件
在
resources文件夹下新建配置文件XxxMapper.xml,这里数据表为用户表,则取名UserMapper.xmlDOCTYPE mapper PUBLIC "-//mybatis.org//DTD Mapper 3.0//EN" "https://mybatis.org/dtd/mybatis-3-mapper.dtd"> <mapper namespace="user"> <select id="selectAll" resultType="user"> select * from tb_user; select> mapper>- 1
- 2
- 3
- 4
- 5
- 6
- 7
- 8
- 9
- 10
- 11
- 12
- 13
- 14
- 15
- 16
- 17
- 18
- 编写代码
定义 POJO 类 User 类
package com.huwei.pojo; public class User { private Integer id; private String username; private String password; private String gender; private String addr; public Integer getId() { return id; } public void setId(Integer id) { this.id = id; } public String getUsername() { return username; } public void setUsername(String username) { this.username = username; } public String getPassword() { return password; } public void setPassword(String password) { this.password = password; } public String getGender() { return gender; } public void setGender(String gender) { this.gender = gender; } public String getAddr() { return addr; } public void setAddr(String addr) { this.addr = addr; } @Override public String toString() { return "User{" + "id=" + id + ", username='" + username + '\'' + ", password='" + password + '\'' + ", gender='" + gender + '\'' + ", addr='" + addr + '\'' + '}'; } }- 1
- 2
- 3
- 4
- 5
- 6
- 7
- 8
- 9
- 10
- 11
- 12
- 13
- 14
- 15
- 16
- 17
- 18
- 19
- 20
- 21
- 22
- 23
- 24
- 25
- 26
- 27
- 28
- 29
- 30
- 31
- 32
- 33
- 34
- 35
- 36
- 37
- 38
- 39
- 40
- 41
- 42
- 43
- 44
- 45
- 46
- 47
- 48
- 49
- 50
- 51
- 52
- 53
- 54
- 55
- 56
- 57
- 58
- 59
- 60
编写测试类文件
MyBatisDemo.javapackage com.huwei; import com.huwei.pojo.User; import org.apache.ibatis.io.Resources; import org.apache.ibatis.session.SqlSession; import org.apache.ibatis.session.SqlSessionFactory; import org.apache.ibatis.session.SqlSessionFactoryBuilder; import java.io.IOException; import java.io.InputStream; import java.util.List; public class MyBatisDemo { public static void main(String[] args) throws IOException { // 1. 加载核心配置文件,获取 SqlSessionFactory 对象 String resource = "mybatis-config.xml"; // 该核心配置文件就在resource根目录下,直接写文件名就行 InputStream inputStream = Resources.getResourceAsStream(resource); SqlSessionFactory sqlSessionFactory = new SqlSessionFactoryBuilder().build(inputStream); // 2. 获取 SqlSession 对象,用它来执行 SQL 语句 SqlSession sqlSession = sqlSessionFactory.openSession(); // 3. 执行sql语句(传入sql语句的唯一标识) List<User> users = sqlSession.selectList("user.selectAll"); System.out.println(users); // 4. 释放资源 sqlSession.close(); } }- 1
- 2
- 3
- 4
- 5
- 6
- 7
- 8
- 9
- 10
- 11
- 12
- 13
- 14
- 15
- 16
- 17
- 18
- 19
- 20
- 21
- 22
- 23
- 24
- 25
- 26
- 27
- 28
- 29
- 30
- 31
解决 SQL 映射文件的警告提示
- 产生原因:IDEA和数据库没有建立连接,不识别表信息
- 解决方式:在IDEA中配置MySQL数据库连接

3 Mapper 代理开发
在第2小节 MyBatis 快速入门中,其实依然存在硬编码问题

而使用 Mapper 代理开发可以
- 解决原生方式中的硬编码
- 简化后期执行 SQL
使用 Mapper 代理方式完成入门案例
- 定义与 SQL 映射文件同名的 Mapper 接口,并且将 Mapper 接口和 SQL 映射文件放置在同一目录下
- 设置 SQL 映射文件的 namespace 属性为 Mapper 接口全限定名
- 在 Mapper 接口中定义方法,方法名就是 SQL 映射文件中 sql 语句的 id ,并保持参数类型和返回值类型一致
- 编码
- 通过 SqlSession 的 getMapper 方法获取 Mapper 接口的代理对象
- 调用对应方法完成 sql 的执行
示例代码:
- 定义与 SQL 映射文件同名的 Mapper 接口,并且将 Mapper 接口和 SQL 映射文件放置在同一目录下
在
resource文件夹下创建包(要和 Mapper 接口 所在的包名一致),注意,这里要使用/代代替.,创建完成后会变成.,然后将UserMapper.xml拖入该包中
由于此步骤改变了
UserMapper.xml的位置,我们还需要修改一下mybatis-config.xml文件
注意:如果 Mapper 接口名称和 SQL 映射文件名称相同,并在同一目录下,则可以使用包扫描的方式简化 SQL 映射文件的加载

另外,我在使用 Maven编译时遇到了这个报错 Maven问题:【不支持源选项5。请使用7或更高版本。】
- 设置 SQL 映射文件的 namespace 属性为 Mapper 接口全限定名

- 在 Mapper 接口中定义方法,方法名就是 SQL 映射文件中 sql 语句的 id ,并保持参数类型和返回值类型一致
package com.huwei.mapper; import com.huwei.pojo.User; import java.util.List; public interface UserMapper { List<User> selectAll(); }- 1
- 2
- 3
- 4
- 5
- 6
- 7
- 编写代码
public class MyBatisDemo { public static void main(String[] args) throws IOException { // 1. 加载核心配置文件,获取 SqlSessionFactory 对象 String resource = "mybatis-config.xml"; // 该核心配置文件就在resource根目录下,直接写文件名就行 InputStream inputStream = Resources.getResourceAsStream(resource); SqlSessionFactory sqlSessionFactory = new SqlSessionFactoryBuilder().build(inputStream); // 2. 获取 SqlSession 对象,用它来执行 SQL 语句 SqlSession sqlSession = sqlSessionFactory.openSession(); // // 3. 执行sql语句(传入sql语句的唯一标识) // Listusers = sqlSession.selectList("user.selectAll"); // 3. 获取 UserMapper 接口的代理对象 UserMapper mapper = sqlSession.getMapper(UserMapper.class); List<User> users = mapper.selectAll(); System.out.println(users); // 4. 释放资源 sqlSession.close(); } }- 1
- 2
- 3
- 4
- 5
- 6
- 7
- 8
- 9
- 10
- 11
- 12
- 13
- 14
- 15
- 16
- 17
- 18
- 19
- 20
- 21
- 22
- 23
4 配置文件实现CRUD
如下图所示产品原型,里面包含了品牌数据的
查询、按条件查询、添加、删除、批量删除、修改等功能,而这些功能其实就是对数据库表中的数据进行CRUD操作。接下来我们就使用 Mybatis 完成品牌数据的增删改查操作。
总的来说,MyBatis 完成操作需要三步:编写接口方法 —> 编写 SQL —> 执行方法。
4.1 环境准备
- 数据表
tb_brand和数据准备
-- 删除tb_brand表 drop table if exists tb_brand; -- 创建tb_brand表 create table tb_brand ( -- id 主键 id int primary key auto_increment, -- 品牌名称 brand_name varchar(20), -- 企业名称 company_name varchar(20), -- 排序字段 ordered int, -- 描述信息 description varchar(100), -- 状态:0:禁用 1:启用 status int ); -- 添加数据 insert into tb_brand (brand_name, company_name, ordered, description, status) values ('三只松鼠', '三只松鼠股份有限公司', 5, '好吃不上火', 0), ('华为', '华为技术有限公司', 100, '华为致力于把数字世界带入每个人、每个家庭、每个组织,构建万物互联的智能世界', 1), ('小米', '小米科技有限公司', 50, 'are you ok', 1);- 1
- 2
- 3
- 4
- 5
- 6
- 7
- 8
- 9
- 10
- 11
- 12
- 13
- 14
- 15
- 16
- 17
- 18
- 19
- 20
- 21
- 22
- 23
创建好的
tb_brand表
- 在
com.huwei.pojo包下创建 Brand 实体类
package com.huwei.pojo; public class Brand { // id 主键 private Integer id; // 品牌名称 private String brandName; // 企业名称 private String companyName; // 排序字段 private Integer ordered; // 描述信息 private String description; // 状态:0:禁用 1:启用 private Integer status; public Brand() { } public Brand(Integer id, String brandName, String companyName, Integer ordered, String description, Integer status) { this.id = id; this.brandName = brandName; this.companyName = companyName; this.ordered = ordered; this.description = description; this.status = status; } public Integer getId() { return id; } public void setId(Integer id) { this.id = id; } public String getBrandName() { return brandName; } public void setBrandName(String brandName) { this.brandName = brandName; } public String getCompanyName() { return companyName; } public void setCompanyName(String companyName) { this.companyName = companyName; } public Integer getOrdered() { return ordered; } public void setOrdered(Integer ordered) { this.ordered = ordered; } public String getDescription() { return description; } public void setDescription(String description) { this.description = description; } public Integer getStatus() { return status; } public void setStatus(Integer status) { this.status = status; } @Override public String toString() { return "Brand{" + "id=" + id + ", brandName='" + brandName + '\'' + ", companyName='" + companyName + '\'' + ", ordered=" + ordered + ", description='" + description + '\'' + ", status=" + status + '}'; } }- 1
- 2
- 3
- 4
- 5
- 6
- 7
- 8
- 9
- 10
- 11
- 12
- 13
- 14
- 15
- 16
- 17
- 18
- 19
- 20
- 21
- 22
- 23
- 24
- 25
- 26
- 27
- 28
- 29
- 30
- 31
- 32
- 33
- 34
- 35
- 36
- 37
- 38
- 39
- 40
- 41
- 42
- 43
- 44
- 45
- 46
- 47
- 48
- 49
- 50
- 51
- 52
- 53
- 54
- 55
- 56
- 57
- 58
- 59
- 60
- 61
- 62
- 63
- 64
- 65
- 66
- 67
- 68
- 69
- 70
- 71
- 72
- 73
- 74
- 75
- 76
- 77
- 78
- 79
- 80
- 81
- 82
- 83
- 84
- 85
- 86
- 87
- 88
- 编写测试用例,测试代码需要在
test/java目录下创建包及测试用例。
项目结构如下:

- 安装 MyBatisX 插件
MybatisX 是一款基于 IDEA 的快速开发插件,为效率而生。其主要功能:
- XML映射配置文件 和 接口方法 间相互跳转
- 根据接口方法生成 statement
安装方式
- 点击
file,选择settings,就能看到如下图所示界面

注意:安装完毕后需要重启IDEA
插件效果

红色头绳的表示映射配置文件,蓝色头绳的表示 mapper 接口。在 mapper 接口点击红色头绳的小鸟图标会自动跳转到对应的映射配置文件,在映射配置文件中点击蓝色头绳的小鸟图标会自动跳转到对应的 mapper 接口。
也可以在 mapper 接口中定义方法,自动生成映射配置文件中的
statement,如图所示:
4.2 查询所有数据
4.2.1 编写接口方法
接口方法: Mapper 接口
- 参数:无
- 结果:
List
在
com.huwei.mapper包写创建名为BrandMapper的接口。并在该接口中定义List方法selectAll() public interface BrandMapper { List<Brand> selectAll(); }- 1
- 2
- 3
4.2.2 编写 SQL 语句
在
reources下创建com/huwei/mapper目录结构,并在该目录下创建名为BrandMapper.xml的映射配置文件DOCTYPE mapper PUBLIC "-//mybatis.org//DTD Mapper 3.0//EN" "https://mybatis.org/dtd/mybatis-3-mapper.dtd"> <mapper namespace="com.huwei.mapper.BrandMapper"> <select id="selectAll" resultType="brand"> select * from tb_brand; select> mapper>- 1
- 2
- 3
- 4
- 5
- 6
- 7
- 8
- 9
- 10
4.2.3 编写测试方法
在
MybatisTest类中编写测试查询所有的方法@Test public void testSelectAll() throws IOException { // 1. 加载核心配置文件,获取 SqlSessionFactory 对象 String resource = "mybatis-config.xml"; // 该核心配置文件就在resource根目录下,直接写文件名就行 InputStream inputStream = Resources.getResourceAsStream(resource); SqlSessionFactory sqlSessionFactory = new SqlSessionFactoryBuilder().build(inputStream); // 2. 获取 SqlSession 对象,用它来执行 SQL 语句 SqlSession sqlSession = sqlSessionFactory.openSession(); // 3. 获取 UserMapper 接口的代理对象 BrandMapper mapper = sqlSession.getMapper(BrandMapper.class); // 4. 执行方法 List<Brand> brands = mapper.selectAll(); System.out.println(brands); // 5. 释放资源 sqlSession.close(); }- 1
- 2
- 3
- 4
- 5
- 6
- 7
- 8
- 9
- 10
- 11
- 12
- 13
- 14
- 15
- 16
- 17
- 18
- 19
注意:现在我们感觉测试这部分代码写起来特别麻烦,我们可以先忍忍。以后我们只会写上面的第3步的代码,其他的都不需要我们来完成。
执行测试方法结果如下:

4.2.4 结果映射问题
从上面结果我们看到了问题,有些数据封装成功了,而有些数据并没有封装成功。为什么这样呢?
从上面结果可以看到
brandName和companyName这两个属性的数据没有封装成功,查询 实体类 和 表中的字段 发现,在实体类中属性名是brandName和companyName,而表中的字段名为brand_name和company_name,如下图所示 。
那么我们只需要保持这两部分的名称一致这个问题就迎刃而解。
这个问题可以通过两种方式进行解决:
- 给字段起别名
- 使用 resultMap 定义字段和属性的映射关系
BrandMapper.xmlDOCTYPE mapper PUBLIC "-//mybatis.org//DTD Mapper 3.0//EN" "https://mybatis.org/dtd/mybatis-3-mapper.dtd"> <mapper namespace="com.huwei.mapper.BrandMapper"> <resultMap id="brandResultMap" type="brand"> <result column="brand_name" property="brandName"/> <result column="company_name" property="companyName"/> resultMap> <select id="selectAll" resultMap="brandResultMap"> select * from tb_brand; select> mapper>- 1
- 2
- 3
- 4
- 5
- 6
- 7
- 8
- 9
- 10
- 11
- 12
- 13
- 14
- 15
- 16
- 17
- 18
- 19
- 20
- 21
- 22
- 23
- 24
- 25
- 26
- 27
- 28
- 29
- 30
- 31
- 32
- 33
- 34
- 35
- 36
- 37
- 38
- 39
- 40
- 41
- 42
- 43
- 44
- 45
- 46
- 47
- 48
- 49
- 50
- 51
- 52
- 53
- 54
- 55
- 56
- 57
4.3 查询详情
有些数据的属性比较多,在页面表格中无法全部实现,而只会显示部分,而其他属性数据的查询可以通过
查看详情来进行查询,如下图所示。
4.3.1 编写接口方法
Mapper接口
- 参数:id
- 查看详情就是查询某一行数据,所以需要根据 id 进行查询。而id以后是由页面传递过来。
- 结果:Brand
- 根据id查询出来的数据只要一条,而将一条数据封装成一个 Brand 对象即可在
BrandMapper接口中定义根据id查询数据的方法/** * 查看详情:根据Id查询 */ Brand selectById(int id);- 1
- 2
- 3
- 4
4.3.2 编写SQL语句
在
BrandMapper.xml映射配置文件中编写statement,使用resultMap而不是使用resultType<select id="selectById" resultMap="brandResultMap"> select * from tb_brand where id = #{id}; select>- 1
- 2
- 3
- 4
- 5
- 6
- 7
- 8
注意:
- 参数占位符
#{}:会将其替换为?,为了防止 SQL 注入- 参数传递的时候使用
${}:字符串拼接SQL,会存在 SQL 注入问题- 表名或列名不固定的时候,但是也会存在 SQL 注入问题
- 特殊字符处理(映射配置文件是 xml 类型的问题,而
><等这些字符在xml中有特殊含义,这里以<为例)- 转义字符

- CDATA区(在IDEA中键入
CD回车)

- 转义字符
4.3.3 编写测试方法
在
test/java下的com.huwei.mapper包下的MybatisTest类中定义测试方法@Test public void testSelectById() throws IOException { // 接收参数 int id=1; // 1. 加载核心配置文件,获取 SqlSessionFactory 对象 String resource = "mybatis-config.xml"; // 该核心配置文件就在resource根目录下,直接写文件名就行 InputStream inputStream = Resources.getResourceAsStream(resource); SqlSessionFactory sqlSessionFactory = new SqlSessionFactoryBuilder().build(inputStream); // 2. 获取 SqlSession 对象,用它来执行 SQL 语句 SqlSession sqlSession = sqlSessionFactory.openSession(); // 3. 获取 UserMapper 接口的代理对象 BrandMapper mapper = sqlSession.getMapper(BrandMapper.class); // 4. 执行方法 Brand brand = mapper.selectById(id); System.out.println(brand); // 5. 释放资源 sqlSession.close(); }- 1
- 2
- 3
- 4
- 5
- 6
- 7
- 8
- 9
- 10
- 11
- 12
- 13
- 14
- 15
- 16
- 17
- 18
- 19
- 20
- 21
- 22
执行测试方法结果如下:

4.4 多条件查询

我们经常会遇到如上图所示的多条件查询,将多条件查询的结果展示在下方的数据列表中。
条件字段
企业名称和品牌名称需要进行模糊查询,所以条件应该是:
4.4.1 编写接口方法
在
BrandMapper接口中定义多条件查询的方法- 参数:所有查询条件
- 结果:List
而该功能有三个参数,我们就需要考虑定义接口时,参数应该如何定义。Mybatis针对多参数有多种实现:
- 散装参数:使用
@Param("参数名称")标记每一个参数,在映射配置文件中就需要使用#{参数名称}进行占位
List<Brand> selectByCondition(@Param("status") int status, @Param("companyName") String companyName,@Param("brandName") String brandName);- 1
- 对象参数:将多个参数封装成一个 实体对象 ,将该实体对象作为接口的方法参数。该方式要求在映射配置文件的SQL中使用
#{内容}时,里面的内容必须和实体类属性名保持一致。
List<Brand> selectByCondition(Brand brand);- 1
- map集合参数:将多个参数封装到map集合中,将map集合作为接口的方法参数。该方式要求在映射配置文件的SQL中使用
#{内容}时,里面的内容必须和map集合中键的名称一致。
List<Brand> selectByCondition(Map map);- 1
4.4.2 编写SQL语句
在
BrandMapper.xml映射配置文件中编写statement,使用resultMap而不是使用resultType<select id="selectByCondition" resultMap="brandResultMap"> select * from tb_brand where status = #{status} and company_name like #{companyName} and brand_name like #{brandName} select>- 1
- 2
- 3
- 4
- 5
- 6
- 7
注意:
like在没有使用通配符时等同于=操作符4.4.3 编写测试方法
在
test/java下的com.huwei.mapper包下的MybatisTest类中定义测试方法@Test public void testSelectByCondition() throws IOException { //接收参数 int status = 1; String companyName = "华为"; String brandName = "华为"; // 处理参数 companyName = "%" + companyName + "%"; brandName = "%" + brandName + "%"; //1. 获取SqlSessionFactory String resource = "mybatis-config.xml"; InputStream inputStream = Resources.getResourceAsStream(resource); SqlSessionFactory sqlSessionFactory = new SqlSessionFactoryBuilder().build(inputStream); //2. 获取SqlSession对象 SqlSession sqlSession = sqlSessionFactory.openSession(); //3. 获取Mapper接口的代理对象 BrandMapper brandMapper = sqlSession.getMapper(BrandMapper.class); //4. 执行方法 //方式一 :接口方法参数使用 @Param 方式调用的方法 //Listbrands = brandMapper.selectByCondition(status, companyName, brandName); //方式二 :接口方法参数是 实体类对象 方式调用的方法 //封装对象 /* Brand brand = new Brand(); brand.setStatus(status); brand.setCompanyName(companyName); brand.setBrandName(brandName);*/ //Listbrands = brandMapper.selectByCondition(brand); //方式三 :接口方法参数是 map集合对象 方式调用的方法 Map map = new HashMap(); map.put("status" , status); map.put("companyName", companyName); map.put("brandName" , brandName); List<Brand> brands = brandMapper.selectByCondition(map); System.out.println(brands); //5. 释放资源 sqlSession.close(); }- 1
- 2
- 3
- 4
- 5
- 6
- 7
- 8
- 9
- 10
- 11
- 12
- 13
- 14
- 15
- 16
- 17
- 18
- 19
- 20
- 21
- 22
- 23
- 24
- 25
- 26
- 27
- 28
- 29
- 30
- 31
- 32
- 33
- 34
- 35
- 36
- 37
- 38
- 39
- 40
- 41
- 42
上述功能实现存在很大的问题。因为用户在输入条件时,很可能不会所有的条件都填写
例如,我们只输入
brandName,就会出现如下情况
4.5 多条件动态查询
SQL 语句会随着用户输入或外部条件的变化而变化,我们称为 动态SQL。
而 Mybatis 对动态SQL有很强大的支撑:
- if
- choose (when, otherwise)
- trim (where, set)
- foreach
在
BrandMapper.xml映射配置文件修改 SQL 语句<select id="selectByCondition" resultMap="brandResultMap"> select * from tb_brand where <if test="status != null"> status = #{status} if> <if test="companyName != null and companyName != '' "> and company_name like #{companyName} if> <if test="brandName != null and brandName != '' "> and brand_name like #{brandName} if> select>- 1
- 2
- 3
- 4
- 5
- 6
- 7
- 8
- 9
- 10
- 11
- 12
- 13
- 14
- 15
如上的这种SQL语句就会根据传递的参数值进行动态的拼接。如果此时
status和companyName有值那么就会值拼接这两个条件。执行结果如下:

但是它也存在问题,如果此时给的参数值是
Map map = new HashMap(); // map.put("status" , status); map.put("companyName", companyName); map.put("brandName" , brandName);- 1
- 2
- 3
- 4
拼接的SQL语句就变成了
select * from tb_brand where and company_name like ? and brand_name like ?- 1
而上面的语句中
where关键后直接跟and关键字,这就是一条错误的SQL语句。可以通过恒等式解决
<select id="selectByCondition" resultMap="brandResultMap"> select * from tb_brand where 1=1 <if test="status != null"> and status = #{status} if> <if test="companyName != null and companyName != '' "> and company_name like #{companyName} if> <if test="brandName != null and brandName != '' "> and brand_name like #{brandName} if> select>- 1
- 2
- 3
- 4
- 5
- 6
- 7
- 8
- 9
- 10
- 11
- 12
- 13
- 14
- 15
- 16
这个问题,我们也可以通过
where标签解决where标签的作用:- 替换
where关键字 - 会动态的去掉第一个条件前的
and - 如果所有的参数没有值则不加
where关键字
<select id="selectByCondition" resultMap="brandResultMap"> select * from tb_brand <where> <if test="status != null"> status = #{status} if> <if test="companyName != null and companyName != '' "> and company_name like #{companyName} if> <if test="brandName != null and brandName != '' "> and brand_name like #{brandName} if> where> select>- 1
- 2
- 3
- 4
- 5
- 6
- 7
- 8
- 9
- 10
- 11
- 12
- 13
- 14
- 15
4.6 单条件动态查询

如上图所示,在查询时只能选择
品牌名称、当前状态、企业名称这三个条件中的一个,但是用户到底选择哪儿一个,我们并不能确定。这种就属于单个条件的动态SQL语句。这种需求需要使用到
choose(when,otherwise)标签实现, 而choose标签类似于Java 中的switch语句。4.6.1 编写接口方法
在
BrandMapper接口中定义单条件查询的方法4.6.2 编写SQL语句
在
BrandMapper.xml映射配置文件中编写statement,使用resultMap而不是使用resultType<select id="selectByConditionSingle" resultMap="brandResultMap"> select * from tb_brand <where> <choose> <when test="status != null"> status = #{status} when> <when test="companyName != null and companyName != '' "> company_name like #{companyName} when> <when test="brandName != null and brandName != ''"> brand_name like #{brandName} when> choose> where> select>- 1
- 2
- 3
- 4
- 5
- 6
- 7
- 8
- 9
- 10
- 11
- 12
- 13
- 14
- 15
- 16
- 17
- 18
- 19
- 20
4.6.3 编写测试方法
在
test/java下的com.huwei.mapper包下的MybatisTest类中定义测试方法@Test public void testSelectByConditionSingle() throws IOException { //接收参数 int status = 1; String companyName = "华为"; String brandName = "华为"; // 处理参数 companyName = "%" + companyName + "%"; brandName = "%" + brandName + "%"; //封装对象 Brand brand = new Brand(); //brand.setStatus(status); brand.setCompanyName(companyName); //brand.setBrandName(brandName); //1. 获取SqlSessionFactory String resource = "mybatis-config.xml"; InputStream inputStream = Resources.getResourceAsStream(resource); SqlSessionFactory sqlSessionFactory = new SqlSessionFactoryBuilder().build(inputStream); //2. 获取SqlSession对象 SqlSession sqlSession = sqlSessionFactory.openSession(); //3. 获取Mapper接口的代理对象 BrandMapper brandMapper = sqlSession.getMapper(BrandMapper.class); //4. 执行方法 List<Brand> brands = brandMapper.selectByConditionSingle(brand); System.out.println(brands); //5. 释放资源 sqlSession.close(); }- 1
- 2
- 3
- 4
- 5
- 6
- 7
- 8
- 9
- 10
- 11
- 12
- 13
- 14
- 15
- 16
- 17
- 18
- 19
- 20
- 21
- 22
- 23
- 24
- 25
- 26
- 27
- 28
- 29
- 30
- 31
- 32
4.7 添加数据
4.7.1 编写接口方法
在
BrandMapper接口中定义添加方法void add(Brand brand);- 1
4.7.2 编写SQL语句
在
BrandMapper.xml映射配置文件中编写添加数据的statement<insert id="add"> insert into tb_brand (brand_name, company_name, ordered, description, status) values (#{brandName}, #{companyName}, #{ordered}, #{description}, #{status}); insert>- 1
- 2
- 3
- 4
4.7.3 编写测试方法
在
test/java下的com.huwei.mapper包下的MybatisTest类中定义测试方法@Test public void testAdd() throws IOException { //接收参数 int status = 1; String companyName = "波导手机"; String brandName = "波导"; String description = "手机中的战斗机"; int ordered = 100; //封装对象 Brand brand = new Brand(); brand.setStatus(status); brand.setCompanyName(companyName); brand.setBrandName(brandName); brand.setDescription(description); brand.setOrdered(ordered); //1. 获取SqlSessionFactory String resource = "mybatis-config.xml"; InputStream inputStream = Resources.getResourceAsStream(resource); SqlSessionFactory sqlSessionFactory = new SqlSessionFactoryBuilder().build(inputStream); //2. 获取SqlSession对象 SqlSession sqlSession = sqlSessionFactory.openSession(); //SqlSession sqlSession = sqlSessionFactory.openSession(true); //设置自动提交事务,这种情况不需要手动提交事务了 //3. 获取Mapper接口的代理对象 BrandMapper brandMapper = sqlSession.getMapper(BrandMapper.class); //4. 执行方法 brandMapper.add(brand); //可以发现我们获取不到添加数据的id //Integer id =brand.getId(); //System.out.println(id); // null //提交事务 sqlSession.commit(); //5. 释放资源 sqlSession.close(); }- 1
- 2
- 3
- 4
- 5
- 6
- 7
- 8
- 9
- 10
- 11
- 12
- 13
- 14
- 15
- 16
- 17
- 18
- 19
- 20
- 21
- 22
- 23
- 24
- 25
- 26
- 27
- 28
- 29
- 30
- 31
- 32
- 33
- 34
- 35
- 36
- 37
在数据添加成功后,有时候需要获取插入数据库数据的主键(主键是自增长),即 主键返回。但是像上述代码那样直接打印主键,是获取不到主键值的。
我们将上面添加品牌数据的案例中
BrandMapper.xml映射配置文件里statement进行修改,如下<insert id="add" useGeneratedKeys="true" keyProperty="id"> insert into tb_brand (brand_name, company_name, ordered, description, status) values (#{brandName}, #{companyName}, #{ordered}, #{description}, #{status}); insert>- 1
- 2
- 3
- 4
在 insert 标签上添加如下属性:
useGeneratedKeys:是够获取自动增长的主键值。true表示获取keyProperty:指定将获取到的主键值封装到实体类的哪儿个属性里
4.8 修改全部字段
4.8.1 编写接口方法
在
BrandMapper接口中定义修改方法int update(Brand brand); // 返回影响的数据行数- 1
上述方法参数 Brand 就是封装了需要修改的数据,而id肯定是有数据的,这也是和添加方法的区别
4.8.2 编写SQL语句
在
BrandMapper.xml映射配置文件中编写修改数据的statement<update id="update"> update tb_brand set brand_name = #{brandName}, company_name = #{companyName}, ordered = #{ordered}, description = #{description}, status = #{status} where id = #{id}; update>- 1
- 2
- 3
- 4
- 5
- 6
- 7
- 8
- 9
4.8.3 编写测试方法
在
test/java下的com.huwei.mapper包下的MybatisTest类中定义测试方法@Test public void testUpdate() throws IOException { //接收参数 int status = 1; String companyName = "vivo"; String brandName = "vivo手机"; String description = "真好使"; int ordered = 200; int id =5; //封装对象 Brand brand = new Brand(); brand.setStatus(status); brand.setCompanyName(companyName); brand.setBrandName(brandName); brand.setDescription(description); brand.setOrdered(ordered); brand.setId(id); //1. 获取SqlSessionFactory String resource = "mybatis-config.xml"; InputStream inputStream = Resources.getResourceAsStream(resource); SqlSessionFactory sqlSessionFactory = new SqlSessionFactoryBuilder().build(inputStream); //2. 获取SqlSession对象 SqlSession sqlSession = sqlSessionFactory.openSession(); //3. 获取Mapper接口的代理对象 BrandMapper brandMapper = sqlSession.getMapper(BrandMapper.class); //4. 执行方法 int cnt = brandMapper.update(brand); System.out.println(cnt); //提交事务 sqlSession.commit(); //5. 释放资源 sqlSession.close(); }- 1
- 2
- 3
- 4
- 5
- 6
- 7
- 8
- 9
- 10
- 11
- 12
- 13
- 14
- 15
- 16
- 17
- 18
- 19
- 20
- 21
- 22
- 23
- 24
- 25
- 26
- 27
- 28
- 29
- 30
- 31
- 32
- 33
- 34
- 35
- 36
4.8.4 修改动态字段
比如我们只修改
status的值,修改MybatisTest类中的测试方法//封装对象 Brand brand = new Brand(); brand.setStatus(status); //brand.setCompanyName(companyName); //brand.setBrandName(brandName); //brand.setDescription(description); //brand.setOrdered(ordered); brand.setId(id);- 1
- 2
- 3
- 4
- 5
- 6
- 7
- 8
运行结果如下:

在
BrandMapper.xml映射配置文件中做如下修改<update id="update"> update tb_brand <set> <if test="brandName != null and brandName != ''"> brand_name = #{brandName}, if> <if test="companyName != null and companyName != ''"> company_name = #{companyName}, if> <if test="ordered != null"> ordered = #{ordered}, if> <if test="description != null and description != ''"> description = #{description}, if> <if test="status != null"> status = #{status} if> set> where id = #{id}; update>- 1
- 2
- 3
- 4
- 5
- 6
- 7
- 8
- 9
- 10
- 11
- 12
- 13
- 14
- 15
- 16
- 17
- 18
- 19
- 20
- 21
执行测试方法结果如下:

从结果中SQL语句可以看出,只修改了
status字段值,因为我们给的数据中只给Brand实体对象的status属性设置值了。这就是set标签的作用。set标签可以用于动态包含需要更新的列,忽略其它不更新的列。4.9 删除一行数据
4.9.1 编写接口方法
在
BrandMapper接口中定义根据id删除方法void deleteById(int id);- 1
4.9.2 编写SQL语句
在
BrandMapper.xml映射配置文件中编写删除一行数据的statement<delete id="deleteById"> delete from tb_brand where id = #{id}; delete>- 1
- 2
- 3
4.9.3 编写测试方法
在
test/java下的com.huwei.mapper包下的MybatisTest类中定义测试方法@Test public void testDeleteById() throws IOException { //接收参数 int id = 6; //1. 获取SqlSessionFactory String resource = "mybatis-config.xml"; InputStream inputStream = Resources.getResourceAsStream(resource); SqlSessionFactory sqlSessionFactory = new SqlSessionFactoryBuilder().build(inputStream); //2. 获取SqlSession对象 SqlSession sqlSession = sqlSessionFactory.openSession(); //SqlSession sqlSession = sqlSessionFactory.openSession(true); //3. 获取Mapper接口的代理对象 BrandMapper brandMapper = sqlSession.getMapper(BrandMapper.class); //4. 执行方法 brandMapper.deleteById(id); //提交事务 sqlSession.commit(); //5. 释放资源 sqlSession.close(); }- 1
- 2
- 3
- 4
- 5
- 6
- 7
- 8
- 9
- 10
- 11
- 12
- 13
- 14
- 15
- 16
- 17
- 18
- 19
- 20
- 21
4.10 批量删除数据
4.10.1 编写接口方法
在
BrandMapper接口中定义删除多行数据的方法。void deleteByIds(int[] ids); // void deleteByIds(@Param(ids) int[] ids); // 可以通过 @Param 改变对应map里key的名称为ids- 1
- 2
参数是一个数组,数组中存储的是多条数据的 id
4.10.2 编写SQL语句
在
BrandMapper.xml映射配置文件中编写删除多条数据的statement。编写SQL时需要遍历数组来拼接SQL语句。Mybatis 提供了
foreach标签供我们使用
,用来迭代任何可迭代的对象(如数组,集合)。- collection 属性:mybatis会将数组参数,封装为一个Map集合。
- 默认:
array = 数组 - 使用
@Param注解改变map集合的默认key的名称
- 默认:
- item 属性:本次迭代获取到的元素。
- separator 属性:集合项迭代之间的分隔符。
foreach标签不会错误地添加多余的分隔符。也就是最后一次迭代不会加分隔符。 - open 属性:该属性值是在拼接SQL语句之前拼接的语句,只会拼接一次
- close 属性:该属性值是在拼接SQL语句拼接后拼接的语句,只会拼接一次
<delete id="deleteByIds"> delete from tb_brand where id in <foreach collection="array" item="id" separator="," open="(" close=")"> #{id} foreach> ; delete>- 1
- 2
- 3
- 4
- 5
- 6
- 7
- 8
假如数组中的 id 数据是
{1,2,3},那么拼接后的 sql 语句就是:delete from tb_brand where id in (1,2,3);- 1
4.10.3 编写测试方法
在
test/java下的com.huwei.mapper包下的MybatisTest类中定义测试方法@Test public void testDeleteByIds() throws IOException { //接收参数 int[] ids = {5,7,8}; //1. 获取SqlSessionFactory String resource = "mybatis-config.xml"; InputStream inputStream = Resources.getResourceAsStream(resource); SqlSessionFactory sqlSessionFactory = new SqlSessionFactoryBuilder().build(inputStream); //2. 获取SqlSession对象 SqlSession sqlSession = sqlSessionFactory.openSession(); //SqlSession sqlSession = sqlSessionFactory.openSession(true); //3. 获取Mapper接口的代理对象 BrandMapper brandMapper = sqlSession.getMapper(BrandMapper.class); //4. 执行方法 brandMapper.deleteByIds(ids); //提交事务 sqlSession.commit(); //5. 释放资源 sqlSession.close(); }- 1
- 2
- 3
- 4
- 5
- 6
- 7
- 8
- 9
- 10
- 11
- 12
- 13
- 14
- 15
- 16
- 17
- 18
- 19
- 20
- 21
4.11 MyBatis 参数传递
Mybatis 接口方法中可以接收各种各样的参数,如下:
- 多个参数
- 单个参数:单个参数又可以是如下类型
- POJO 类型
- Map 集合类型
- Collection 集合类型
- List 集合类型
- Array 类型
- 其他类型
4.11.1 多个参数
如下面的代码,就是接收两个参数,而接收多个参数需要使用
@Param注解,那么为什么要加该注解呢?这个问题要弄明白就必须来研究Mybatis 底层对于这些参数是如何处理的。User select(@Param("username") String username,@Param("password") String password);- 1
<select id="select" resultType="user"> select * from tb_user where username=#{username} and password=#{password} select>- 1
- 2
- 3
- 4
- 5
- 6
- 7
我们在接口方法中定义多个参数,Mybatis 会将这些参数封装成 Map 集合对象,值就是参数值,而键在没有使用
@Param注解时有以下命名规则:- 以
arg开头 :第一个参数就叫arg0,第二个参数就叫arg1,以此类推。如:map.put("arg0",参数值1);map.put("arg1",参数值2);
- 以
param开头 : 第一个参数就叫param1,第二个参数就叫param2,依次类推。如:map.put("param1",参数值1);map.put("param2",参数值2);
示例代码
在
UserMapper接口中定义如下方法User select(String username,String password);- 1
在
UserMapper.xml映射配置文件中定义SQL<select id="select" resultType="user"> select * from tb_user where username=#{arg0} and password=#{arg1} select>- 1
- 2
- 3
- 4
- 5
- 6
- 7
或者
<select id="select" resultType="user"> select * from tb_user where username=#{param1} and password=#{param2} select>- 1
- 2
- 3
- 4
- 5
- 6
- 7
运行代码结果如下
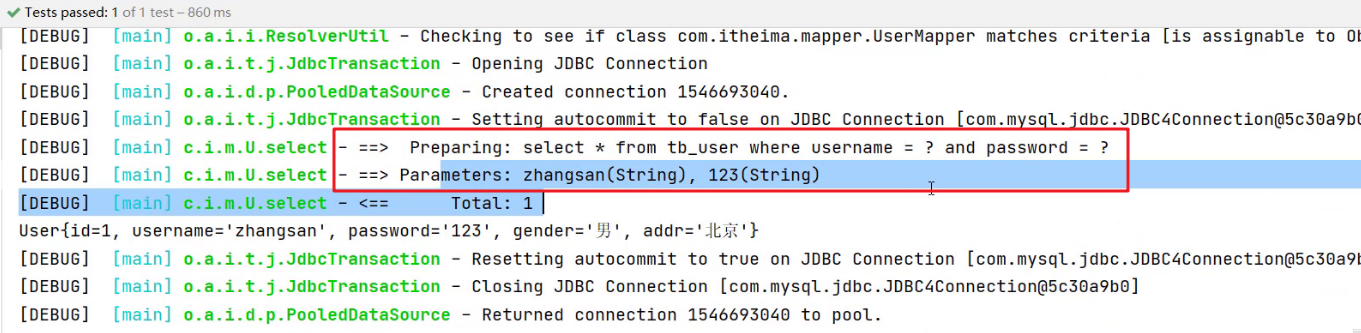
在映射配合文件的SQL语句中使用用
arg开头的和param书写,代码的可读性会变的特别差,此时可以使用@Param注解。以后接口参数是多个时,在每个参数上都使用
@Param注解。这样代码的可读性更高。4.11.2 单个参数
- POJO 类型
- 直接使用。要求
属性名和参数占位符名称一致
- 直接使用。要求
- Map 集合类型
- 直接使用。要求
map集合的键名和参数占位符名称一致
- 直接使用。要求
- Collection 集合类型
- Mybatis 会将集合封装到 map 集合中,如下:
map.put("arg0",collection集合);map.put("collection",collection集合);
- Mybatis 会将集合封装到 map 集合中,如下:
- List 集合类型
- Mybatis 会将集合封装到 map 集合中,如下:
map.put("arg0",list集合);map.put("collection",list集合);map.put("list",list集合);
- Mybatis 会将集合封装到 map 集合中,如下:
- Array 类型
- Mybatis 会将集合封装到 map 集合中,如下:
map.put("arg0",数组);map.put("array",数组);
- Mybatis 会将集合封装到 map 集合中,如下:
- 其他类型
- 比如int类型,
参数占位符名称叫什么都可以。尽量做到见名知意
- 比如int类型,
5 注解实现 CRUD
使用注解开发会比配置文件开发更加方便。如下就是使用注解进行开发
@Select(value = "select * from tb_user where id = #{id}") public User select(int id);- 1
- 2
注解是用来替换映射配置文件方式配置的,所以使用了注解,就不需要再映射配置文件中书写对应的
statementMybatis 针对 CURD 操作都提供了对应的注解,已经做到见名知意。如下:
- 查询 :
@Select - 添加 :
@Insert - 修改 :
@Update - 删除 :
@Delete
使用示例
将之前案例中
UserMapper.xml中的 根据id查询数据 的statement注释掉
在
UserMapper接口的selectById方法上添加注解
运行测试程序也能正常查询到数据
如何选择?
- 注解完成简单功能,配置文件完成复杂功能
- 持久层
-
相关阅读:
EXCEL数据导入HIVE
正则表达式=》判断中文字
怎么文字转语音真人发声?安利下面这三款软件
大疆Livox MID-360安装ROS1/2驱动 Ubuntu20.04
Flink安装和演示
哈工大李治军老师操作系统笔记【5】:操作系统的历史(Learning OS Concepts By Coding Them !)
go语言学习-go环境安装
C++的缺陷和思考(四)
安装深度(Deepin)系统
Webmin -- Filesystem Backup
- 原文地址:https://blog.csdn.net/hu_wei123/article/details/134207265
