-
kubernetes(5) 续4
目录
volumes
emptyDir卷
- [root@k8s2 volumes]# vim emptydir.yaml
- apiVersion: v1
- kind: Pod
- metadata:
- name: vol1
- spec:
- containers:
- - image: busyboxplus
- name: vm1
- command: ["sleep", "300"]
- volumeMounts:
- - mountPath: /cache
- name: cache-volume
- - name: vm2
- image: nginx
- volumeMounts:
- - mountPath: /usr/share/nginx/html
- name: cache-volume
- volumes:
- - name: cache-volume
- emptyDir:
- medium: Memory
- sizeLimit: 100Mi

- [root@k8s2 volumes]# kubectl apply -f emptydir.yaml
- [root@k8s2 volumes]# kubectl get pod
- [root@k8s2 volumes]# kubectl exec vol1 -c vm1 -it -- sh
- / # cd /cache/
- /cache # ls
- /cache # curl localhost
- /cache # echo www.westos.org > index.html
- /cache # curl localhost
- /cache # dd if=/dev/zero of=bigfile bs=1M count=200
- /cache # du -h bigfile

hostpath卷
- [root@k8s2 volumes]# vim hostpath.yaml
- apiVersion: v1
- kind: Pod
- metadata:
- name: vol2
- spec:
- nodeName: k8s4
- containers:
- - image: nginx
- name: test-container
- volumeMounts:
- - mountPath: /usr/share/nginx/html
- name: test-volume
- volumes:
- - name: test-volume
- hostPath:
- path: /data
- type: DirectoryOrCreate

- [root@k8s2 volumes]# kubectl apply -f hostpath.yaml
- [root@k8s2 volumes]# kubectl get pod -o wide
- [root@k8s4 data]# echo www.westos.org > index.html
- [root@k8s2 volumes]# curl 10.244.106.140


nfs卷
配置nfsserver
- [root@k8s1 ~]# yum install -y nfs-utils
- [root@k8s1 ~]# vim /etc/exports
- /nfsdata *(rw,sync,no_root_squash)
- [root@k8s1 ~]# mkdir -m 777 /nfsdata
- [root@k8s1 ~]# systemctl enable --now nfs
- [root@k8s1 ~]# showmount -e


- [root@k8s2 volumes]# vim nfs.yaml
- apiVersion: v1
- kind: Pod
- metadata:
- name: nfs
- spec:
- containers:
- - image: nginx
- name: test-container
- volumeMounts:
- - mountPath: /usr/share/nginx/html
- name: test-volume
- volumes:
- - name: test-volume
- nfs:
- server: 192.168.81.10
- path: /nfsdata
 需要在所有k8s节点上安装nfs-utils软件包
yum install -y nfs-utils没有安装会有以下错误

- [root@k8s2 volumes]# kubectl apply -f nfs.yaml
- [root@k8s2 volumes]# kubectl get pod -o wide
- 在nfsserver端创建测试页
- [root@k8s1 ~]# cd /nfsdata/
- [root@k8s1 nfsdata]# echo www.westos.org > index.html
- [root@k8s2 volumes]# curl 10.244.106.141
- www.westos.org

持久卷
配置nfs输出目录
- [root@k8s1 ~]# cd /nfsdata/
- [root@k8s1 nfsdata]# mkdir pv1 pv2 pv3
创建静态pv
- [root@k8s2 pv]# vim pv.yaml
- apiVersion: v1
- kind: PersistentVolume
- metadata:
- name: pv1
- spec:
- capacity:
- storage: 5Gi
- volumeMode: Filesystem
- accessModes:
- - ReadWriteOnce
- persistentVolumeReclaimPolicy: Recycle
- storageClassName: nfs
- nfs:
- path: /nfsdata/pv1
- server: 192.168.81.10
- ---
- apiVersion: v1
- kind: PersistentVolume
- metadata:
- name: pv2
- spec:
- capacity:
- storage: 10Gi
- volumeMode: Filesystem
- accessModes:
- - ReadWriteMany
- persistentVolumeReclaimPolicy: Recycle
- storageClassName: nfs
- nfs:
- path: /nfsdata/pv2
- server: 192.168.81.10
- ---
- apiVersion: v1
- kind: PersistentVolume
- metadata:
- name: pv3
- spec:
- capacity:
- storage: 15Gi
- volumeMode: Filesystem
- accessModes:
- - ReadOnlyMany
- persistentVolumeReclaimPolicy: Recycle
- storageClassName: nfs
- nfs:
- path: /nfsdata/pv3
- server: 192.168.81.10

- [root@k8s2 pv]# kubectl apply -f pv.yaml
- [root@k8s2 pv]# kubectl get pv

创建pvc
- [root@k8s2 pv]# vim pvc.yaml
- apiVersion: v1
- kind: PersistentVolumeClaim
- metadata:
- name: pvc1
- spec:
- storageClassName: nfs
- accessModes:
- - ReadWriteOnce
- resources:
- requests:
- storage: 1Gi
- ---
- apiVersion: v1
- kind: PersistentVolumeClaim
- metadata:
- name: pvc2
- spec:
- storageClassName: nfs
- accessModes:
- - ReadWriteMany
- resources:
- requests:
- storage: 10Gi
- ---
- apiVersion: v1
- kind: PersistentVolumeClaim
- metadata:
- name: pvc3
- spec:
- storageClassName: nfs
- accessModes:
- - ReadOnlyMany
- resources:
- requests:
- storage: 15Gi

- [root@k8s2 pv]# kubectl apply -f pvc.yaml
- [root@k8s2 pv]# kubectl get pvc
- [root@k8s2 pv]# kubectl get pv

创建pod
- [root@k8s2 pv]# vim pod.yaml
- apiVersion: v1
- kind: Pod
- metadata:
- name: test-pd
- spec:
- containers:
- - image: nginx
- name: nginx
- volumeMounts:
- - mountPath: /usr/share/nginx/html
- name: vol1
- volumes:
- - name: vol1
- persistentVolumeClaim:
- claimName: pvc1

在nfs输出目录中创建测试页
- [root@k8s2 pv]# kubectl apply -f pod.yaml
- [root@k8s1 pv1]# echo pv1 > index.html
- [root@k8s2 pv]# kubectl get pod -o wide
- [root@k8s2 pv]# curl 10.244.106.144
 回收资源,需要按顺序回收:pod->pvc->pv
- [root@k8s2 pv]# kubectl delete pod test-pd
- [root@k8s2 pv]# kubectl delete -f pvc.yaml
回收pvc后,pv会被回收再利用
[root@k8s2 pv]# kubectl get pvpv的回收需要拉取镜像,提前在node节点导入镜像:registry.k8s.io/debian-base:v2.0.0
registry.k8s.io 替代 k8s.gcr.io 这个仓库,但依然需要魔法上网
- containerd 导入镜像
- [root@k8s3 ~]# ctr -n=k8s.io image import debian-base.tar
- [root@k8s4 ~]# ctr -n=k8s.io image import debian-base.tar
- docker
- [root@k8s3 ~]# docker pull registry.k8s.io/debian-base:v2.0.0
- [root@k8s2 pv]# kubectl delete -f pv.yaml

上传镜像

创建sa并授权
- [root@k8s2 nfs]# vim rbac.yaml
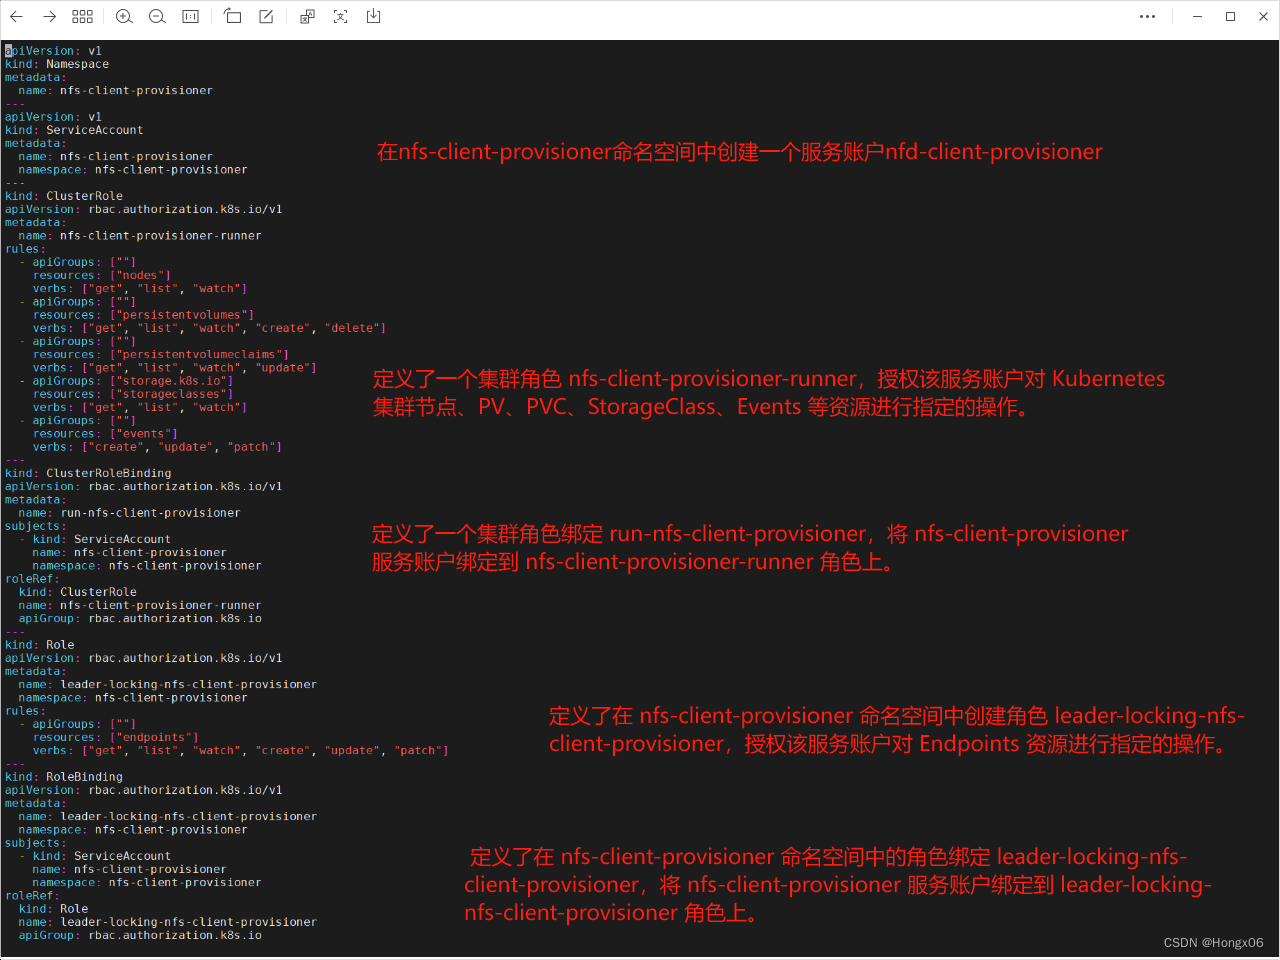
- apiVersion: v1
- kind: Namespace
- metadata:
- name: nfs-client-provisioner
- ---
- apiVersion: v1
- kind: ServiceAccount
- metadata:
- name: nfs-client-provisioner
- namespace: nfs-client-provisioner
- ---
- kind: ClusterRole
- apiVersion: rbac.authorization.k8s.io/v1
- metadata:
- name: nfs-client-provisioner-runner
- rules:
- - apiGroups: [""]
- resources: ["nodes"]
- verbs: ["get", "list", "watch"]
- - apiGroups: [""]
- resources: ["persistentvolumes"]
- verbs: ["get", "list", "watch", "create", "delete"]
- - apiGroups: [""]
- resources: ["persistentvolumeclaims"]
- verbs: ["get", "list", "watch", "update"]
- - apiGroups: ["storage.k8s.io"]
- resources: ["storageclasses"]
- verbs: ["get", "list", "watch"]
- - apiGroups: [""]
- resources: ["events"]
- verbs: ["create", "update", "patch"]
- ---
- kind: ClusterRoleBinding
- apiVersion: rbac.authorization.k8s.io/v1
- metadata:
- name: run-nfs-client-provisioner
- subjects:
- - kind: ServiceAccount
- name: nfs-client-provisioner
- namespace: nfs-client-provisioner
- roleRef:
- kind: ClusterRole
- name: nfs-client-provisioner-runner
- apiGroup: rbac.authorization.k8s.io
- ---
- kind: Role
- apiVersion: rbac.authorization.k8s.io/v1
- metadata:
- name: leader-locking-nfs-client-provisioner
- namespace: nfs-client-provisioner
- rules:
- - apiGroups: [""]
- resources: ["endpoints"]
- verbs: ["get", "list", "watch", "create", "update", "patch"]
- ---
- kind: RoleBinding
- apiVersion: rbac.authorization.k8s.io/v1
- metadata:
- name: leader-locking-nfs-client-provisioner
- namespace: nfs-client-provisioner
- subjects:
- - kind: ServiceAccount
- name: nfs-client-provisioner
- namespace: nfs-client-provisioner
- roleRef:
- kind: Role
- name: leader-locking-nfs-client-provisioner
- apiGroup: rbac.authorization.k8s.io
- [root@k8s2 nfs]# kubectl apply -f rbac.yaml
部署应用
- [root@k8s2 nfs]# vim deployment.yaml
- apiVersion: apps/v1
- kind: Deployment
- metadata:
- name: nfs-client-provisioner
- labels:
- app: nfs-client-provisioner
- namespace: nfs-client-provisioner
- spec:
- replicas: 1
- strategy:
- type: Recreate
- selector:
- matchLabels:
- app: nfs-client-provisioner
- template:
- metadata:
- labels:
- app: nfs-client-provisioner
- spec:
- serviceAccountName: nfs-client-provisioner
- containers:
- - name: nfs-client-provisioner
- image: sig-storage/nfs-subdir-external-provisioner:v4.0.2
- volumeMounts:
- - name: nfs-client-root
- mountPath: /persistentvolumes
- env:
- - name: PROVISIONER_NAME
- value: k8s-sigs.io/nfs-subdir-external-provisioner
- - name: NFS_SERVER
- value: 192.168.81.10
- - name: NFS_PATH
- value: /nfsdata
- volumes:
- - name: nfs-client-root
- nfs:
- server: 192.168.81.10
- path: /nfsdata
- [root@k8s2 nfs]# kubectl apply -f deployment.yaml
- [root@k8s2 nfs]# kubectl -n nfs-client-provisioner get pod

创建存储类
- [root@k8s2 nfs]# vim class.yaml
- apiVersion: storage.k8s.io/v1
- kind: StorageClass
- metadata:
- name: nfs-client
- provisioner: k8s-sigs.io/nfs-subdir-external-provisioner
- parameters:
- archiveOnDelete: "false"
- [root@k8s2 nfs]# kubectl apply -f class.yaml
- [root@k8s2 nfs]# kubectl get sc


创建pvc类
- [root@k8s2 nfs]# vim pvc.yaml
- kind: PersistentVolumeClaim
- apiVersion: v1
- metadata:
- name: test-claim
- spec:
- storageClassName: nfs-client
- accessModes:
- - ReadWriteMany
- resources:
- requests:
- storage: 1Gi
- [root@k8s2 nfs]# kubectl apply -f pvc.yaml
- [root@k8s2 nfs]# kubectl get pvc


创建pod
- [root@k8s2 nfs]# vim pod.yaml
- kind: Pod
- apiVersion: v1
- metadata:
- name: test-pod
- spec:
- containers:
- - name: test-pod
- image: busybox
- command:
- - "/bin/sh"
- args:
- - "-c"
- - "touch /mnt/SUCCESS && exit 0 || exit 1"
- volumeMounts:
- - name: nfs-pvc
- mountPath: "/mnt"
- restartPolicy: "Never"
- volumes:
- - name: nfs-pvc
- persistentVolumeClaim:
- claimName: test-claim
- [root@k8s2 nfs]# kubectl apply -f pod.yaml

pod会在pv中创建一个文件

设置默认存储类,这样在创建pvc时可以不用指定storageClassName
[root@k8s2 pvc]# kubectl patch storageclass nfs-client -p '{"metadata": {"annotations":{"storageclass.kubernetes.io/is-default-class":"true"}}}'statefulset控制器
- [root@k8s2 statefulset]# vim headless.yaml
- apiVersion: v1
- kind: Service
- metadata:
- name: nginx-svc
- labels:
- app: nginx
- spec:
- ports:
- - port: 80
- name: web
- clusterIP: None
- selector:
- app: nginx
- [root@k8s2 statefulset]# kubectl apply -f headless.yaml
- [root@k8s2 statefulset]# kubectl get svc

- [root@k8s2 statefulset]# vim statefulset.yaml
- apiVersion: apps/v1
- kind: StatefulSet
- metadata:
- name: web
- spec:
- serviceName: "nginx-svc"
- replicas: 3
- selector:
- matchLabels:
- app: nginx
- template:
- metadata:
- labels:
- app: nginx
- spec:
- containers:
- - name: nginx
- image: nginx
- volumeMounts:
- - name: www
- mountPath: /usr/share/nginx/html
- volumeClaimTemplates:
- - metadata:
- name: www
- spec:
- storageClassName: nfs-client
- accessModes:
- - ReadWriteOnce
- resources:
- requests:
- storage: 1Gi
- [root@k8s2 statefulset]# kubectl apply -f statefulset.yaml
- [root@k8s2 statefulset]# kubectl get pod


在nfs输出目录创建测试页

- [root@k8s2 statefulset]# kubectl run demo --image busyboxplus -it
- / # curl web-0.nginx-svc
- / # curl web-1.nginx-svc
- / # curl web-2.nginx-svc

上传镜像

- [root@k8s2 mysql]# vim configmap.yaml
- apiVersion: v1
- kind: ConfigMap
- metadata:
- name: mysql
- labels:
- app: mysql
- app.kubernetes.io/name: mysql
- data:
- primary.cnf: |
- [mysqld]
- log-bin
- replica.cnf: |
- [mysqld]
- super-read-only
- [root@k8s2 mysql]# kubectl apply -f configmap.yaml

- [root@k8s2 mysql]# vim svc.yaml
- apiVersion: v1
- kind: Service
- metadata:
- name: mysql
- labels:
- app: mysql
- app.kubernetes.io/name: mysql
- spec:
- ports:
- - name: mysql
- port: 3306
- clusterIP: None
- selector:
- app: mysql
- ---
- apiVersion: v1
- kind: Service
- metadata:
- name: mysql-read
- labels:
- app: mysql
- app.kubernetes.io/name: mysql
- readonly: "true"
- spec:
- ports:
- - name: mysql
- port: 3306
- selector:
- app: mysql
- [root@k8s2 mysql]# kubectl apply -f svc.yaml
- [root@k8s2 mysql]# kubectl get svc


- [root@k8s2 mysql]# vim statefulset.yaml
- apiVersion: apps/v1
- kind: StatefulSet
- metadata:
- name: mysql
- spec:
- selector:
- matchLabels:
- app: mysql
- app.kubernetes.io/name: mysql
- serviceName: mysql
- replicas: 0
- template:
- metadata:
- labels:
- app: mysql
- app.kubernetes.io/name: mysql
- spec:
- initContainers:
- - name: init-mysql
- image: mysql:5.7
- command:
- - bash
- - "-c"
- - |
- set -ex
- # 基于 Pod 序号生成 MySQL 服务器的 ID。
- [[ $HOSTNAME =~ -([0-9]+)$ ]] || exit 1
- ordinal=${BASH_REMATCH[1]}
- echo [mysqld] > /mnt/conf.d/server-id.cnf
- # 添加偏移量以避免使用 server-id=0 这一保留值。
- echo server-id=$((100 + $ordinal)) >> /mnt/conf.d/server-id.cnf
- # 将合适的 conf.d 文件从 config-map 复制到 emptyDir。
- if [[ $ordinal -eq 0 ]]; then
- cp /mnt/config-map/primary.cnf /mnt/conf.d/
- else
- cp /mnt/config-map/replica.cnf /mnt/conf.d/
- fi
- volumeMounts:
- - name: conf
- mountPath: /mnt/conf.d
- - name: config-map
- mountPath: /mnt/config-map
- - name: clone-mysql
- image: xtrabackup:1.0
- command:
- - bash
- - "-c"
- - |
- set -ex
- # 如果已有数据,则跳过克隆。
- [[ -d /var/lib/mysql/mysql ]] && exit 0
- # 跳过主实例(序号索引 0)的克隆。
- [[ `hostname` =~ -([0-9]+)$ ]] || exit 1
- ordinal=${BASH_REMATCH[1]}
- [[ $ordinal -eq 0 ]] && exit 0
- # 从原来的对等节点克隆数据。
- ncat --recv-only mysql-$(($ordinal-1)).mysql 3307 | xbstream -x -C /var/lib/mysql
- # 准备备份。
- xtrabackup --prepare --target-dir=/var/lib/mysql
- volumeMounts:
- - name: data
- mountPath: /var/lib/mysql
- subPath: mysql
- - name: conf
- mountPath: /etc/mysql/conf.d
- containers:
- - name: mysql
- image: mysql:5.7
- env:
- - name: MYSQL_ALLOW_EMPTY_PASSWORD
- value: "1"
- ports:
- - name: mysql
- containerPort: 3306
- volumeMounts:
- - name: data
- mountPath: /var/lib/mysql
- subPath: mysql
- - name: conf
- mountPath: /etc/mysql/conf.d
- resources:
- requests:
- cpu: 500m
- memory: 512Mi
- livenessProbe:
- exec:
- command: ["mysqladmin", "ping"]
- initialDelaySeconds: 30
- periodSeconds: 10
- timeoutSeconds: 5
- readinessProbe:
- exec:
- # 检查我们是否可以通过 TCP 执行查询(skip-networking 是关闭的)。
- command: ["mysql", "-h", "127.0.0.1", "-e", "SELECT 1"]
- initialDelaySeconds: 5
- periodSeconds: 2
- timeoutSeconds: 1
- - name: xtrabackup
- image: xtrabackup:1.0
- ports:
- - name: xtrabackup
- containerPort: 3307
- command:
- - bash
- - "-c"
- - |
- set -ex
- cd /var/lib/mysql
- # 确定克隆数据的 binlog 位置(如果有的话)。
- if [[ -f xtrabackup_slave_info && "x$(
- # XtraBackup 已经生成了部分的 “CHANGE MASTER TO” 查询
- # 因为我们从一个现有副本进行克隆。(需要删除末尾的分号!)
- cat xtrabackup_slave_info | sed -E 's/;$//g' > change_master_to.sql.in
- # 在这里要忽略 xtrabackup_binlog_info (它是没用的)。
- rm -f xtrabackup_slave_info xtrabackup_binlog_info
- elif [[ -f xtrabackup_binlog_info ]]; then
- # 我们直接从主实例进行克隆。解析 binlog 位置。
- [[ `cat xtrabackup_binlog_info` =~ ^(.*?)[[:space:]]+(.*?)$ ]] || exit 1
- rm -f xtrabackup_binlog_info xtrabackup_slave_info
- echo "CHANGE MASTER TO MASTER_LOG_FILE='${BASH_REMATCH[1]}',\
- MASTER_LOG_POS=${BASH_REMATCH[2]}" > change_master_to.sql.in
- fi
- # 检查我们是否需要通过启动复制来完成克隆。
- if [[ -f change_master_to.sql.in ]]; then
- echo "Waiting for mysqld to be ready (accepting connections)"
- until mysql -h 127.0.0.1 -e "SELECT 1"; do sleep 1; done
- echo "Initializing replication from clone position"
- mysql -h 127.0.0.1 \
- -e "$(
- MASTER_HOST='mysql-0.mysql', \
- MASTER_USER='root', \
- MASTER_PASSWORD='', \
- MASTER_CONNECT_RETRY=10; \
- START SLAVE;" || exit 1
- # 如果容器重新启动,最多尝试一次。
- mv change_master_to.sql.in change_master_to.sql.orig
- fi
- # 当对等点请求时,启动服务器发送备份。
- exec ncat --listen --keep-open --send-only --max-conns=1 3307 -c \
- "xtrabackup --backup --slave-info --stream=xbstream --host=127.0.0.1 --user=root"
- volumeMounts:
- - name: data
- mountPath: /var/lib/mysql
- subPath: mysql
- - name: conf
- mountPath: /etc/mysql/conf.d
- resources:
- requests:
- cpu: 100m
- memory: 100Mi
- volumes:
- - name: conf
- emptyDir: {}
- - name: config-map
- configMap:
- name: mysql
- volumeClaimTemplates:
- - metadata:
- name: data
- spec:
- accessModes: ["ReadWriteOnce"]
- resources:
- requests:
- storage: 10Gi
- [root@k8s2 mysql]# kubectl apply -f statefulset.yaml
- [root@k8s2 mysql]# kubectl get pod

连接测试
- [root@k8s2 mysql]# kubectl run demo --image mysql:5.7 -it -- bash
- bash-4.2# mysql -h mysql-0.mysql
- mysql> show databases;

回收
- [root@k8s2 mysql]# kubectl delete -f statefulset.yaml
- [root@k8s2 mysql]# kubectl delete pvc --all
-
相关阅读:
多物种组织载玻片——ProSci 胰腺组织解决方案
云计算学习笔记——第三章 计算虚拟化[二]
day3 ARM
chrome v3开发插件实现所有网站允许跨域
华为云服务器(Centos7)安装与卸载mysql8
【案例实战】分布式应用下登录检验解决方案(JWT)
我用Cypress做了前端自动化测试
Flink实现kafka到kafka、kafka到doris的精准一次消费
GAN基础知识及代码
接了一个2000块的小活,大家进来看看值不值,附源码
- 原文地址:https://blog.csdn.net/m0_64028800/article/details/134275693

