-
2023 electron最新最简版windows、mac打包、自动升级详解
这里我将讲解一下从0搭建一个electron最简版架子,以及如何实现打包自动化更新
之前我有写过两篇文章关于electron框架概述以及 常用api的使用,感兴趣的同学可以看看
Electron桌面应用开发搭建electron
官方文档:https://www.electronjs.org/zh/

只需要三个文件就可以跑起来electron创建一个文件目录
mkdir my-electron-app && cd my-electron-app yarn init- 1
- 2
然后,将 electron 包安装到应用的开发依赖中。
yarn add --dev electron- 1
{ "name": "my-electron-app", "version": "1.0.0", "description": "Hello World!", "main": "main.js", // 入口文件 "author": "Jane Doe", "license": "MIT", "scripts": { "start": "electron ." }, "devDependencies": { "electron": "^27.0.3", } }- 1
- 2
- 3
- 4
- 5
- 6
- 7
- 8
- 9
- 10
- 11
- 12
- 13
- 14
main.js
const createWindow = () => { const win = new BrowserWindow({ width: 800, height: 600 }) win.loadFile('index.html') // 加载index.html }- 1
- 2
- 3
- 4
- 5
- 6
- 7
- 8
index.html
<!DOCTYPE html> <html> <head> <meta charset="UTF-8"> <!-- https://developer.mozilla.org/zh-CN/docs/Web/HTTP/CSP --> <meta http-equiv="Content-Security-Policy" content="default-src 'self'; script-src 'self'"> <title>你好!</title> </head> <body> <h1>你好!</h1> 我们正在使用 Node.js <span id="node-version"></span>, Chromium <span id="chrome-version"></span>, 和 Electron <span id="electron-version"></span>. </body> </html>- 1
- 2
- 3
- 4
- 5
- 6
- 7
- 8
- 9
- 10
- 11
- 12
- 13
- 14
- 15
yarn start就可以启动起来,这是最简版的框架配置打包、自动升级
这里强调一下
做mac的打包需要开通苹果开发者账号,购买证书,打包需要签名,这里购买和配置的流程很复杂就不做过多赘述,都搜的到。
其实windows也需要签名 证书,但是不提供也可以打包
打包和自动升级用到了官方提供的两个工具
打包:
electron-builder
升级:electron-updaterelectron-builder官方文档地址:https://www.electron.build/configuration/win#WindowsConfiguration-certificateSubjectName
如果觉得英文看着不方便,有大神中文总结了一下,地址:https://blog.csdn.net/qq_38830593/article/details/89843722
首先下载这两个库:
yarn add electron-builder -D
yarn add electron-updaterpackage.json里做参数配置
看build参数,各个参数对照着官方文档
{ "name": "electron-test", "version": "1.0.0", "description": "Hello World!", "main": "main.js", "license": "MIT", "scripts": { "start": "electron .", "build": "electron-builder" }, "build": { "productName": "electron-test", "appId": "cn.legaldawn.Lawdawn", "copyright": "版权所有信息", "asar": false, "directories": { "output": "dist" }, "dmg": { "artifactName": "${name}-${version}.${ext}" }, "publish": [ { "provider": "generic", "url": "https://lawdawn-download.oss-cn-beijing.aliyuncs.com/win-2023-11-04-1/" } ], "mac": { "category": "public.app-category.developer-tools", "entitlementsInherit": "build/app-entitlements.plist", "icon": "build/icon.png" }, "win": { "icon": "build/icon.ico", "requestedExecutionLevel": "highestAvailable", "target": [ { "target": "nsis", "arch": [ "x64" ] } ] }, "linux": { "target": [ { "target": "deb", "arch": [ "x64" ] } ], "icon": "build/icon.png", "maintainer": "主要贡献者", "description": "基于4.1.4配置" }, "nsis": { "oneClick": false, "allowElevation": true, "perMachine": false, "allowToChangeInstallationDirectory": true, "createDesktopShortcut": true, "createStartMenuShortcut": true, "uninstallDisplayName": "${productName}", "shortcutName": "${productName}", "artifactName": "${name}-${version}-setup.${ext}", "runAfterFinish": true } }, "devDependencies": { "electron": "^27.0.3", "electron-builder": "^24.6.4" }, "dependencies": { "electron-log": "^5.0.0", "electron-updater": "^6.1.4" } }- 1
- 2
- 3
- 4
- 5
- 6
- 7
- 8
- 9
- 10
- 11
- 12
- 13
- 14
- 15
- 16
- 17
- 18
- 19
- 20
- 21
- 22
- 23
- 24
- 25
- 26
- 27
- 28
- 29
- 30
- 31
- 32
- 33
- 34
- 35
- 36
- 37
- 38
- 39
- 40
- 41
- 42
- 43
- 44
- 45
- 46
- 47
- 48
- 49
- 50
- 51
- 52
- 53
- 54
- 55
- 56
- 57
- 58
- 59
- 60
- 61
- 62
- 63
- 64
- 65
- 66
- 67
- 68
- 69
- 70
- 71
- 72
- 73
- 74
- 75
- 76
- 77
- 78
- 79
- 80
main.js
const { app, BrowserWindow, ipcMain } = require('electron') const { autoUpdater} = require('electron-updater') const os = require('os') const logger = require('electron-log') //打印log到本地 logger.transports.file.maxSize = 1002430 // 10M logger.transports.file.format = '[{y}-{m}-{d} {h}:{i}:{s}.{ms}] [{level}]{scope} {text}' logger.transports.file.resolvePath = () => './operation.log' //打印在你安装的软件位置, autoUpdater.autoDownload = false //这个必须写成false,写成true时,我这会报没权限更新,也没清楚什么原因 // 将创建窗口独立成一个函数 function createWindow() { let mainWin = new BrowserWindow({ x: 100, y: 100, // 设置窗口显示的位置,相对于当前屏幕的左上角 show: false, // 默认情况下创建一个窗口对象之后就会显示,设置为false 就不会显示了 width: 800, height: 400, // maxHeight: 600, // maxWidth: 1000, minHeight: 200, minWidth: 300, // 可以通过 min max 来设置当前应用窗口的最大和最小尺寸 resizable: true, // 是否允许缩放应用的窗口大小 title: 'electron-tester', webPreferences: { enableWebSQL: false, webSecurity: false, spellcheck: false, nativeWindowOpen: true, nodeIntegration: true, contextIsolation: false, }, experimentalDarkMode: true, }) mainWin.loadFile('./src/index.html') //忽略无关代码 ipcMain.on('checkUpdate', () => { console.log('checkUpdate-->') //处理更新操作 const returnData = { error: { status: -1, msg: '更新时发生意外,无法进行正常更新!', }, checking: { status: 0, msg: '正在检查更新……', }, updateAva: { status: 1, msg: '正在升级……', }, updateNotAva: { status: 2, msg: '当前没有可用的更新...', }, } let platform = os.platform() === 'darwin' ? process.arch === 'x64' ? 'darwin' : 'darwin-arm64' : 'win32' let commitId = 'ab4f3c131bfec65670dd265549646b725f8ee649' //更新连接 autoUpdater.setFeedURL( // `https://devxz.dafenqi.law/lawdawn-api/api/update/${platform}/${commitId}` 'https://lawdawn-download.oss-cn-beijing.aliyuncs.com/win-2023-11-04-1' ) logger.error(['检查更新']) //更新错误事件 autoUpdater.on('error', function (error) { console.log('err-->', error) logger.error(['检查更新失败', error]) sendUpdateMessage(returnData.error) }) //检查事件 autoUpdater.on('checking-for-update', function () { sendUpdateMessage(returnData.checking) }) //发现新版本 autoUpdater.on('update-available', function (info) { console.log('info22-->', info) logger.info(['发现新版本', info]) sendUpdateMessage(returnData.updateAva) autoUpdater.downloadUpdate() }) //当前版本为最新版本 autoUpdater.on('update-not-available', function (info) { console.log('info11-->', info) setTimeout(function () { sendUpdateMessage(returnData.updateNotAva) }, 1000) }) //更新下载进度事件 autoUpdater.on( 'download-progress', function (progressObj, bytesPerSecond, percent, total, transferred) { console.log('progressObj-->', progressObj) mainWin.webContents.send('downloadProgress', progressObj) } ) //下载完毕 autoUpdater.on('update-downloaded', function (event, releaseObj) { //退出并进行安装(这里可以做成让用户确认后再调用) console.log('releaseNotes-->', releaseObj) autoUpdater.quitAndInstall() }) //发送消息给窗口 function sendUpdateMessage(text) { mainWin.webContents.send('message', text) } //发送请求更新 autoUpdater.checkForUpdates() }) mainWin.on('ready-to-show', () => { mainWin.show() }) // mainWin.on('closed', () => { // console.log('mainWin is closed') // mainWin = null // }) } process.env['ELECTRON_DISABLE_SECURITY_WARNINGS'] = 'true' app.on('ready', createWindow) app.on('window-all-closed', () => { console.log('all window is closed') app.quit() })- 1
- 2
- 3
- 4
- 5
- 6
- 7
- 8
- 9
- 10
- 11
- 12
- 13
- 14
- 15
- 16
- 17
- 18
- 19
- 20
- 21
- 22
- 23
- 24
- 25
- 26
- 27
- 28
- 29
- 30
- 31
- 32
- 33
- 34
- 35
- 36
- 37
- 38
- 39
- 40
- 41
- 42
- 43
- 44
- 45
- 46
- 47
- 48
- 49
- 50
- 51
- 52
- 53
- 54
- 55
- 56
- 57
- 58
- 59
- 60
- 61
- 62
- 63
- 64
- 65
- 66
- 67
- 68
- 69
- 70
- 71
- 72
- 73
- 74
- 75
- 76
- 77
- 78
- 79
- 80
- 81
- 82
- 83
- 84
- 85
- 86
- 87
- 88
- 89
- 90
- 91
- 92
- 93
- 94
- 95
- 96
- 97
- 98
- 99
- 100
- 101
- 102
- 103
- 104
- 105
- 106
- 107
- 108
- 109
- 110
- 111
- 112
- 113
- 114
- 115
- 116
- 117
- 118
- 119
- 120
- 121
- 122
- 123
- 124
- 125
- 126
- 127
- 128
- 129
- 130
- 131
- 132
- 133
- 134
- 135
- 136
- 137
- 138
- 139
- 140
- 141
- 142
- 143
- 144
- 145
- 146
- 147
index.html
<!DOCTYPE html> <html lang="en"> <head> <meta charset="UTF-8" /> <meta name="viewport" content="width=device-width, initial-scale=1.0" /> <title>Document</title> </head> <body> <h1>Document...</h1> <button id="btn">test</button> <button id="btn1">检查更新</button> </body> </html> <script> const fs = require('fs') const { ipcRenderer } = require('electron') document.getElementById('btn').onclick = () => { console.log('window-->', window) console.log('process-->', process, fs) navigator.mediaDevices .getUserMedia({ audio: true }) .then((stream) => { console.log('stream-》', stream) // Do something with the stream }) .catch((error) => { console.error('Failed to access microphone:', error) }) } document.getElementById('btn1').onclick = () => { //请求检查更新 ipcRenderer.send('checkUpdate') } //下载中收到的进度信息 ipcRenderer.on('downloadProgress', (event, data) => { // me.prograssStyle.width = data.percent.toFixed(2) + "%";//更新进度条样式 // me.stepText = "正在更新中(" + me.prograssStyle.width + ")..."; console.log('data-->', data) }) //监听请求更新响应,用来处理不同的事件 ipcRenderer.on('message', (event, data) => { switch (data.status) { case -1: alert(data.msg) break case 1: console.log('正在升级') break case 2: alert(data.msg) break } }) </script>- 1
- 2
- 3
- 4
- 5
- 6
- 7
- 8
- 9
- 10
- 11
- 12
- 13
- 14
- 15
- 16
- 17
- 18
- 19
- 20
- 21
- 22
- 23
- 24
- 25
- 26
- 27
- 28
- 29
- 30
- 31
- 32
- 33
- 34
- 35
- 36
- 37
- 38
- 39
- 40
- 41
- 42
- 43
- 44
- 45
- 46
- 47
- 48
- 49
- 50
- 51
- 52
- 53
- 54
- 55
- 56
- 57
执行升级
执行
yarn build之后,会生成安装包 和 yml文件

yml文件是内部做检测更新使用version: 1.0.0 files: - url: electron-test-1.0.0-arm64-mac.zip sha512: YFebRa4hFb0eq7JBHtIbe6zpEm59b3uR0NaKJJaY5M7G7ZfCoFIWJl/N3cDzSvPK1vWSgeGTRwxteHmwV7PXBQ== size: 88974676 - url: electron-test-1.0.0.dmg sha512: ZToMM68na/NWbvYpqqEk3Ej0LzsDoyEYd9rW2qHIaq5FxU/HHNntzX2KiSv002WcLX6aQgLSgh37gvUJytvOpQ== size: 92423278 path: electron-test-1.0.0-arm64-mac.zip sha512: YFebRa4hFb0eq7JBHtIbe6zpEm59b3uR0NaKJJaY5M7G7ZfCoFIWJl/N3cDzSvPK1vWSgeGTRwxteHmwV7PXBQ== releaseDate: '2023-11-05T08:56:32.685Z'- 1
- 2
- 3
- 4
- 5
- 6
- 7
- 8
- 9
- 10
- 11
- 12
我们需要把这三个文件放在 对象存储服务器上
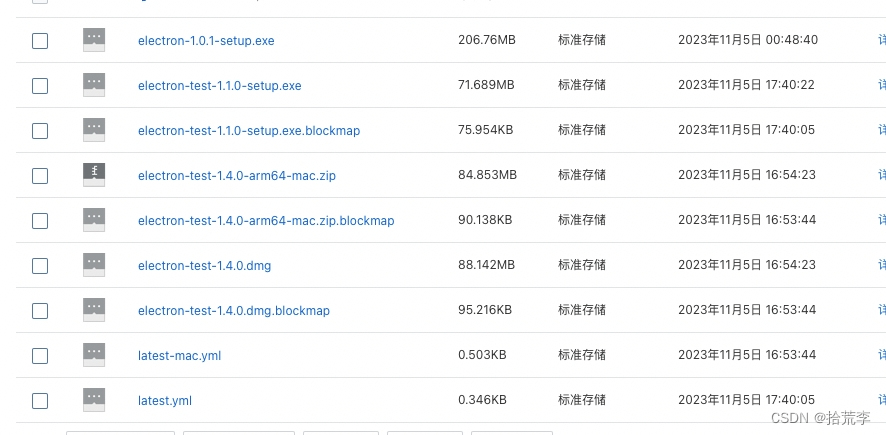
只要提供的更新地址拼接上 latest-mac.yml文件的 可以访问到就可以

这样就可以做更新了如果做测试,本地启动一个服务
//更新连接 autoUpdater.setFeedURL( 'http://127.0.0.1:5500/build' )- 1
- 2
- 3
- 4
这里指向本地就可以,打包生层的文件放在build目录下 一样测试


-
相关阅读:
ENVI+ERDAS实现Hyperion叶绿素含量反演:经验比值法、一阶微分法
【Java EE初阶二十六】简单的表白墙(二)
蓄电池与超级电容混合储能并网逆变系统Simulink仿真
jmeter报Java.NET.BindException: Address already in use: connect
萌新源api管理系统更新教程
Java线程的生命周期,终止与复位
java基础10题
MySQL-多表查询(关联查询)
心理咨询软件开发系统分析
RockyLinux9.0系统在VMware虚拟机上【保姆级】安装步骤,并修改网络配置,使用固定IP进行SSH连接【47张过程图】
- 原文地址:https://blog.csdn.net/woyebuzhidao321/article/details/134232902
