-
postman接口测试—Restful接口开发与测试
开发完接口,接下来我们需要对我们开发的接口进行测试。接口测试的方法比较多,使用接口工具或者Python来测试都可以,工具方面比如之前我们学习过的Postman或者Jmeter ,Python脚本测试可以使用Requests + unittest来测试。
测试思路
功能测试:数据的增删改查
异常测试:未授权,参数异常等
Postman测试
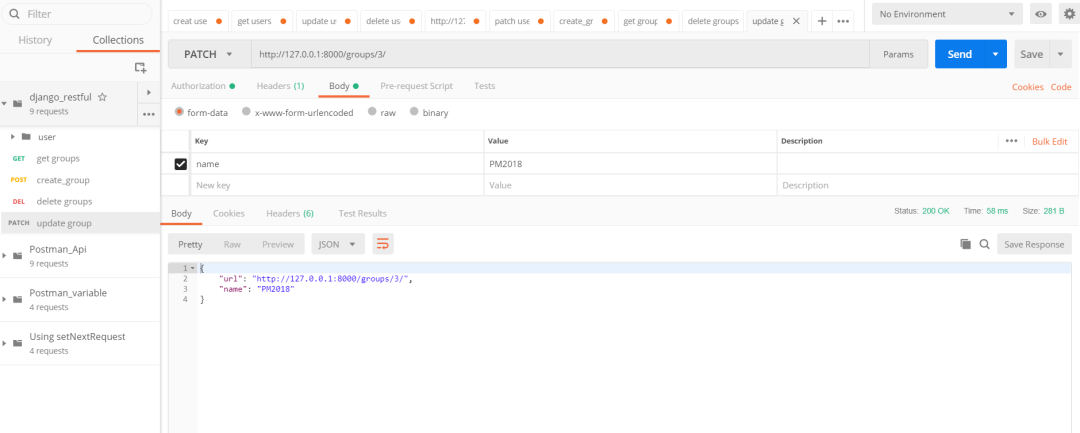
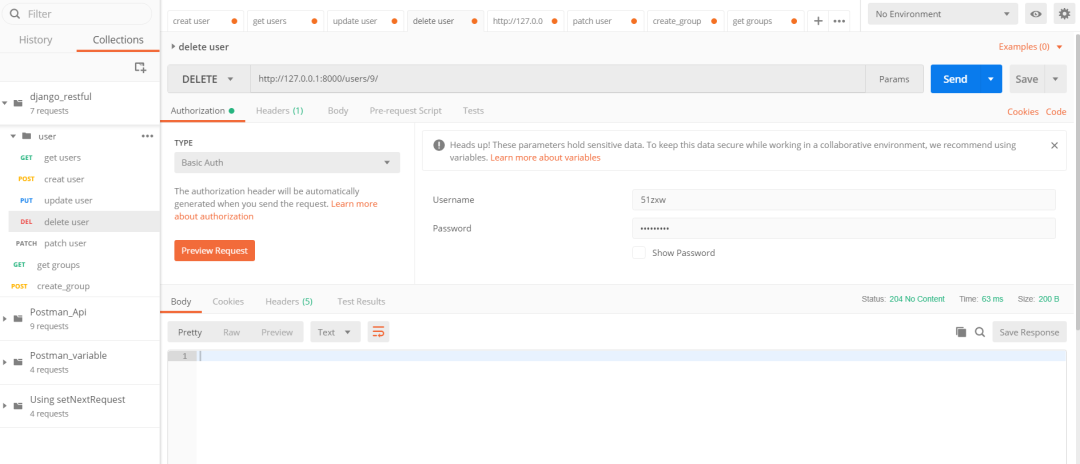
使用测试工具Postman测试结果如下所示:user接口测试
查询所有用户
创建用户

修改用户

删除用户

未授权测试

groups接口测试
查询所有groups数据

修改group数据
 删除groups
Requests+Unittest
在
api目录下面新建一个test_unittest.py,代码实现如下:tests_unittest.py
- import requests
- import unittest
- class UserTest(unittest.TestCase):
- def setUp(self):
- self.base_url='http://127.0.0.1:8000/users'
- self.auth=('51zxw','zxw20182018')
- def test_get_user(self):
- r=requests.get(self.base_url+'/1/',auth=self.auth)
- result=r.json()
- self.assertEqual(result['username'],'51zxw')
- self.assertEqual(result['email'],'51zxw@163.com')
- def test_add_user(self):
- form_data={'username':'zxw222','email':'zxw668@qq.com','groups':'http://127.0.0.1:8000/groups/2/'}
- r=requests.post(self.base_url+'/',data=form_data,auth=self.auth)
- result=r.json()
- self.assertEqual(result['username'],'zxw222')
- def test_delete_user(self):
- r=requests.delete(self.base_url+'/11/',auth=self.auth)
- self.assertEqual(r.status_code,204)
- def test_update_user(self):
- form_data={'email':'2222@163.com'}
- r=requests.patch(self.base_url+'/2/',auth=self.auth,data=form_data)
- result=r.json()
- self.assertEqual(result['email'],'2222@163.com')
- def test_no_auth(self):
- r=requests.get(self.base_url)
- result=r.json()
- self.assertEqual(result['detail'],'Authentication credentials were not provided.')
- class GroupTest(unittest.TestCase):
- def setUp(self):
- self.base_url='http://127.0.0.1:8000/groups'
- self.auth=('51zxw','zxw20182018')
- def test_group_developer(self):
- r=requests.get(self.base_url+'/7/',auth=self.auth)
- result=r.json()
- self.assertEqual(result['name'],'Developer')
- def test_add_group(self):
- form_data={'name':'Pm'}
- r=requests.post(self.base_url+'/',auth=self.auth,data=form_data)
- result=r.json()
- self.assertEqual(result['name'],'Pm')
- def test_update_group(self):
- form_data={'name':'Boss'}
- r=requests.patch(self.base_url+'/6/',auth=self.auth,data=form_data)
- result=r.json()
- self.assertEqual(result['name'],'Boss')
- def test_detele_group(self):
- r=requests.delete(self.base_url+'/6/',auth=self.auth)
- self.assertEqual(r.status_code,204)
- if __name__ == '__main__':
- unittest.main()
Django自带测试模块
打开
api目录下面的tests文件,编写如下测试代码tests.py
- from django.test import TestCase
- import requests
- # Create your tests here.
- class UserTest(TestCase):
- def setUp(self):
- self.base_url='http://127.0.0.1:8000/users'
- self.auth=('51zxw','xxxxx')
- def test_get_user(self):
- r=requests.get(self.base_url+'/1/',auth=self.auth)
- result=r.json()
- self.assertEqual(result['username'],'51zxw')
- self.assertEqual(result['email'],'zxw886@qq.com')
- # @unittest.skip('skip add user')
- def test_add_user(self):
- form_data={'username':'zxw222','email':'zxw668@qq.com','groups':'http://127.0.0.1:8000/groups/2/'}
- r=requests.post(self.base_url+'/',data=form_data,auth=self.auth)
- result=r.json()
- self.assertEqual(result['username'],'zxw222')
- # @unittest.skip('skip test_delete_user')
- def test_delete_user(self):
- r=requests.delete(self.base_url+'/11/',auth=self.auth)
- self.assertEqual(r.status_code,204)
- def test_update_user(self):
- form_data={'email':'2222@163.com'}
- r=requests.patch(self.base_url+'/2/',auth=self.auth,data=form_data)
- result=r.json()
- self.assertEqual(result['email'],'2222@163.com')
- def test_user_already_exists(self):
- form_data = {'username': 'zxw222', 'email': 'zxw668@qq.com', 'groups': 'http://127.0.0.1:8000/groups/2/'}
- r = requests.post(self.base_url + '/', data=form_data, auth=self.auth)
- result = r.json()
- #预期返回值:{"username":["A user with that username already exists."]}
- self.assertEqual(result['username'][0], 'A user with that username already exists.')
- def test_no_auth(self):
- r=requests.get(self.base_url)
- result=r.json()
- self.assertEqual(result['detail'],'Authentication credentials were not provided.')
- class GroupTest(TestCase):
- def setUp(self):
- self.base_url='http://127.0.0.1:8000/groups'
- self.auth=('51zxw','xxxxxx')
- def test_group_developer(self):
- r=requests.get(self.base_url+'/3/',auth=self.auth)
- result=r.json()
- self.assertEqual(result['name'],'Pm')
- # @unittest.skip('skip test_add_group')
- def test_add_group(self):
- form_data={'name':'Leader'}
- r=requests.post(self.base_url+'/',auth=self.auth,data=form_data)
- result=r.json()
- self.assertEqual(result['name'],'Leader')
- def test_update_group(self):
- form_data={'name':'Boss'}
- r=requests.patch(self.base_url+'/6/',auth=self.auth,data=form_data)
- result=r.json()
- self.assertEqual(result['name'],'Boss')
- def test_detele_group(self):
- r=requests.delete(self.base_url+'/6/',auth=self.auth)
- self.assertEqual(r.status_code,204)
运行方式:打开cmd使用如下命令来运行即可:
D:\django_restful>python manage.py test上面命令是默认测试全部的用例,如果想测试部分用例则可以使用如下命令:
测试指定的测试类
D:\django_restful>python manage.py test api.tests.UserTest测试具体的某一条具体用例
D:\django_restful>python manage.py test api.tests.UserTest.test_get_user报错相关
1.迁移数据库时没有权限写入
- File "C:\Users\jli75\AppData\Local\Programs\Python\Python37\lib\site-packages\MySQLdb\connections.py", line 280, in query
- _mysql.connection.query(self, query)
- django.db.utils.InternalError: (7, "Error on rename of '.\\httprunnermanager\\#sql-1178_7.frm' to '.\\httprunnermanager\\djcelery_taskstate.frm' (Errcode: 13 - Permission denied)")
原因:可能是杀毒软件通过阻止修改frm文件来解决此问题。通过在杀毒软件威胁防护高级选项中禁用按访问扫描,并杀毒软件设置为忽略这些扩展名来解决此问题
- 迁移数据库时没有清除之前的迁移文件
migrations
- File "C:\Users\jli75\AppData\Local\Programs\Python\Python37\lib\site-packages\MySQLdb\connections.py", line 280, in query
- _mysql.connection.query(self, query)
- _mysql_exceptions.OperationalError: (1050, "Table 'djcelery_crontabschedule' already exists")
解决方案:删除
migrations文件夹即可。- setting配置错误
- raise MigrationSchemaMissing("Unable to create the django_migrations table (%s)" % exc)
- django.db.migrations.exceptions.MigrationSchemaMissing: Unable to create the django_migrations table ((1064, "You have an error in your SQL syntax; check the manual that corresponds to your MySQL server version for the right syntax to use near '(6) NOT NULL)' at line 1"))
解决方案:Django2.1不再支持MySQL5.5,必须5.6版本以上 可以使用如下命令 查看当前Mysql版本
- mysql -V
- mysql Ver 8.0.1-dmr for Win64 on x86_64 (MySQL Community Server (GPL))
【软件测试行业现状】2023年干测试,约等于49年入国军。未来已寄..测试人该何去何从?【自动化测试、软件测试面试、性能测试】
-
相关阅读:
灵界的科学丨五、心灵与意识的科学奥祕
Electron+vite+vuetify项目搭建
屋顶太阳能光伏系统的性能分析指标研究
IDC服务器商是如何保护服务器的数据安全
【附源码】计算机毕业设计JAVA宠物领养管理系统
Unity 踩坑记录 Rigidbody 刚体重力失效
2000-2023年省市县人工智能企业数量数据
JS判断类型(typeof+constructor+toString)
Maven------pom.xml详解
2022-08-30 第五组 张明敏 学习笔记
- 原文地址:https://blog.csdn.net/2301_79535618/article/details/134127037
