-
centos7安装oxidized备份软件
首先需要提前下载ruby,因为默认yum安装的版本太低
https://cache.ruby-lang.org/pub/ruby/3.1/ruby-3.1.0.tar.gz
1、yum remove ruby ruby-devel(有就卸载,没有则忽略)
2、将下载好的ruby包解压到/opt下
- [root@oxidized ruby-3.1.0]# pwd
- /opt/ruby-3.1.0
3、安装依赖
[root@oxidized ruby-3.1.0] yum install make cmake which sqlite-devel openssl-devel libssh2-devel gcc libicu-devel gcc-c++ -y4、进入ruby安装目录编译安装
- [root@oxidized ruby-3.1.0]# ./configure
- [root@oxidized ruby-3.1.0]# make
- [root@oxidized ruby-3.1.0]# make install
- [root@oxidized ruby-3.1.0]# which ruby
- /usr/local/bin/ruby
- 检查ruby版本:
- [root@oxidized ruby-3.1.0]# ruby -v
- ruby 3.1.0p0 (2021-12-25 revision fb4df44d16) [x86_64-linux]
- [root@oxidized ruby-3.1.0]# yum install rubygems -y
- [root@oxidized ~]# gem -v
- 2.0.14.1
5、安装oxidized
- [root@oxidized ruby-3.1.0]# gem install oxidized
- 报错没有源,添加源
- [root@oxidized ~]# gem sources --add https://mirrors.tuna.tsinghua.edu.cn/rubygems/
- Error fetching https://mirrors.tuna.tsinghua.edu.cn/rubygems/:
- SSL_connect returned=1 errno=0 state=error: certificate verify failed (https://mirrors.tuna.tsinghua.edu.cn/rubygems/specs.4.8.gz)
- [root@oxidized ~]# gem sources -l
- *** CURRENT SOURCES ***
- [root@oxidized ~]# gem sources -a https://rubygems.org/
- Error fetching https://rubygems.org/:
- SSL_connect returned=1 errno=0 state=error: certificate verify failed (https://rubygems.org/specs.4.8.gz)
- [root@oxidized ~]# gem sources -a http://rubygems.org/
- https://rubygems.org is recommended for security over http://rubygems.org/
- Do you want to add this insecure source? [yn] y
- Error fetching http://rubygems.org/:
- server did not return a valid file (http://rubygems.org/specs.4.8.gz)
试了几种源都是不行的(部署时环境的网络有问题,后来切换了网段就好了)
解决方法:
- 找到.gemrc文件,添加源
- [root@oxidized ~]# find /* -name '*gemrc*'
- /root/.config/gem/gemrc
- /root/.gemrc
- [root@oxidized ~]# vim /root/.gemrc
- ---
- :backtrace: false
- :bulk_threshold: 1000
- :sources:
- - http://mirrors.tuna.tsinghua.edu.cn/rubygems/
- :update_sources: true
- :verbose: true
- 保存退出,再次查看就能看到添加上了
- [root@oxidized ~]# gem sources
- *** CURRENT SOURCES ***
- http://mirrors.tuna.tsinghua.edu.cn/rubygems/
再次尝试安装,报错:
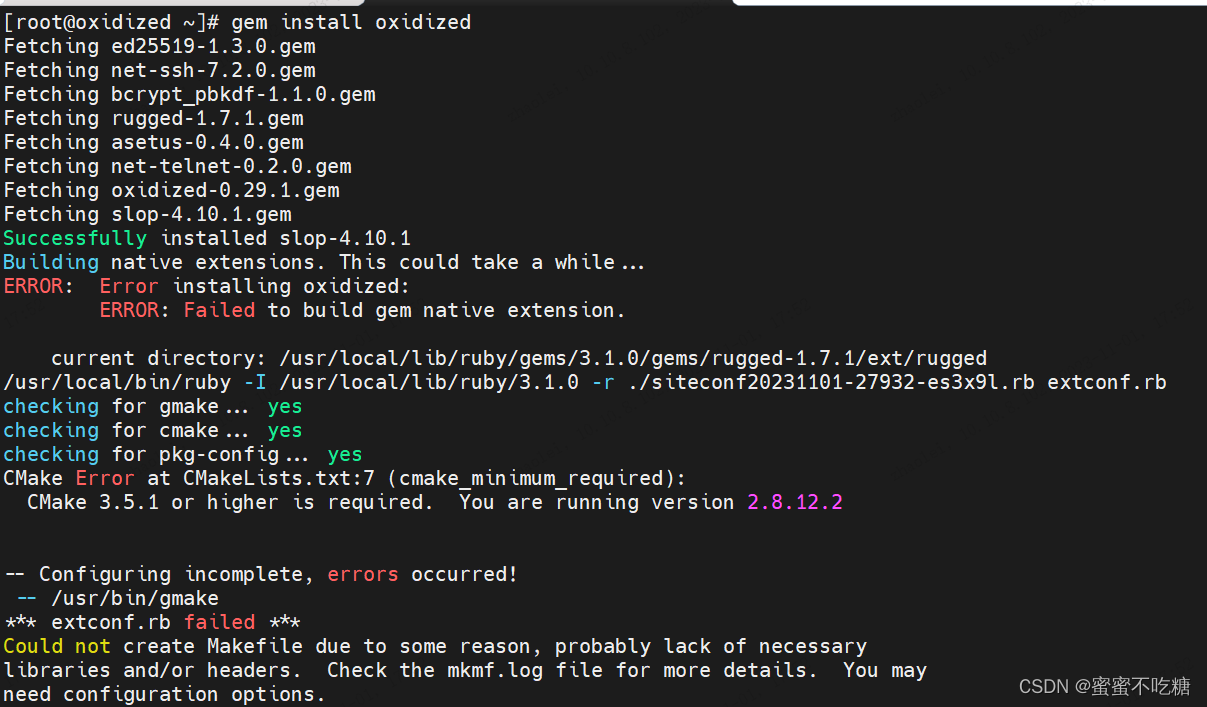
CMake 3.5.1 or higher is required. You are running version 2.8.12.2
6、升级cmake
- 1、移除老版本,并下载依赖
- [root@oxidized cmake-3.7.2]# yum remove cmake -y ; yum install -y gcc gcc-c++ make automake openssl openssl-devel
- 2、下载安装包并解压
- [root@oxidized cmake-3.7.2]# wget https://cmake.org/files/v3.7/cmake-3.7.2.tar.gz ; tar -zxf cmake*.tar.gz
- 3、编译、安装
- [root@oxidized cmake-3.7.2]# cd cmake* ; ./bootstrap ; gmake -j `grep 'processor' /proc/cpuinfo | wc -l` ; gmake install
- 4、查看编译后的cmake版本并创建连接,最后查看cmake版本
- [root@oxidized cmake-3.7.2]# /usr/local/bin/cmake --version
- [root@oxidized cmake-3.7.2]# ln -s /usr/local/bin/cmake /usr/bin/
- [root@oxidized cmake-3.7.2]# cmake --version
- cmake version 3.7.2
- CMake suite maintained and supported by Kitware (kitware.com/cmake).
再次执行安装oxidized

成功了,再安装oxidized-script,oxidized-web


OK了~!
- [root@oxidized cmake-3.7.2]# oxidized
- edit ~/.config/oxidized/config
- 查看默认配置文件
- [root@oxidized cmake-3.7.2]# cat ~/.config/oxidized/config
- ---
- username: username
- password: password
- model: junos
- resolve_dns: true
- interval: 3600
- use_syslog: false
- debug: false
- threads: 30
- use_max_threads: false
- timeout: 20
- retries: 3
- prompt: !ruby/regexp /^([\w.@-]+[#>]\s?)$/
- rest: 127.0.0.1:8888
- next_adds_job: false
- vars: {}
- groups: {}
- group_map: {}
- models: {}
- pid: "/root/.config/oxidized/pid"
- crash:
- directory: "/root/.config/oxidized/crashes"
- hostnames: false
- stats:
- history_size: 10
- input:
- default: ssh, telnet
- debug: false
- ssh:
- secure: false
- ftp:
- passive: true
- utf8_encoded: true
- output:
- default: file
- source:
- default: csv
- model_map:
- juniper: junos
- cisco: ios
oxidized详细使用见:https://blog.csdn.net/weixin_44147924/article/details/134185835?spm=1001.2014.3001.5501
-
相关阅读:
1.6 计算机网络的性能
Java中System.getProperty()方法具有什么功能呢?
基础springboot扫描讲解
CRM系统如何帮助企业数字化转型?分为几个阶段?
软考考后常见问题详解~
Sfdp 超级表单开发平台 V6.0.5 正式发布
微机原理与技术接口 实验五 基本IO操作温度控制实验
python-基础(4)-list
passorder函数下单买卖
liunx 安装达梦数据库
- 原文地址:https://blog.csdn.net/weixin_44147924/article/details/134161004