-
DSP开发例程(3): sys_print_to_uart
DSP开发例程: sys_print_to_uart
在DSP 应用的执行过程中, 我们经常需要调用
System_printf()来显示当前的执行状态. 不只是System_printf()函数, SYS/BIOS 打印信息的函数还包括:System_aprintf(),System_aprintf(),System_aprintf(),System_putch()和System_vprintf(). 默认情况下, 这些函数打印的信息只能在 RTOS Object View 中查看. 此例程实现将 SYS/BIOS 系统打印的信息通过串口输出, , 并在 EVM6678L 开发板上进行了测试. 例程源码可从我的 gitee 仓库上克隆或下载. 点击 DSP 开发教程(0): 汇总查看其他例程说明.创建工程
此示例工程直接在 led_flash 工程基础上修改.
- 选中 led_flash 工程, 右键选择 Copy 或 使用快捷键
Ctrl+C复制工程.

- 在工程浏览视图中, 右键选择 Paste 或使用快捷键
Ctrl+V粘贴工程.

- 在弹出的 Copy Project 对话框中 修改工程名为: sys_print_to_uart, 点击 OK.

- 删除 sys_print_to_uart 工程中的 Debug目录, 右键选择 Build Project, 编译此工程.
源码编辑
os.c
新建 os.c 源文件. 内容如下:
#include#include #include /** * 添加此函数到 Idle Thread. * * ```xdc * var Idle = xdc.useModule('ti.sysbios.knl.Idle'); * * Idle.idleFxns[0] = "&os_systemFlush"; * ``` */ void os_systemFlush() { System_flush(); } /** * 将 System_printf() 重定向到 platform_uart_write(). * * 请在 .cfg 中添加: * ``` * SysMin.outputFxn = "&os_systemOutput"; * ``` */ Void os_systemOutput(Char *str, UInt len) { UInt i; for(i = 0; i < len; i++) { platform_uart_write(str[i]); } } - 1
- 2
- 3
- 4
- 5
- 6
- 7
- 8
- 9
- 10
- 11
- 12
- 13
- 14
- 15
- 16
- 17
- 18
- 19
- 20
- 21
- 22
- 23
- 24
- 25
- 26
- 27
- 28
- 29
- 30
- 31
- 32
- 33
- 34
其中包含两个函数:
os_systemFlush(): 用来 flush 系统打印的信息.os_systemOutput(): 将系统打印的信息通过串口输出.
app.cfg
- 使用 XGCONF 打开 app.cfg 文件.

- 点击 Idle 模块.
 - 勾选 Add the Idle function management module to my configuration, 并将
 os_systemFlush添加到 User idle function 中. 或者直接在 app.cfg 中输入:
var Idle = xdc.useModule('ti.sysbios.knl.Idle'); Idle.idleFxns[0] = "&os_systemFlush";- 1
- 2
- 3
- 点击 Outline 视图中的 SysMin, 将 Output function 设置为
os_systemOutput
 或者直接在 app.cfg 中添加:
SysMin.outputFxn = "&os_systemOutput";- 1
main.c
修改 main.c 源文件, 在平台初始化函数
EVM_init中调用 串口初始化函数platform_uart_init(). 在 任务函数task_ledFlash()中添加两条周期打印信息. 修改后的 main.c 内容如下:/* * ======== main.c ======== */ #include#include #include #include #include #include #include #include /* * ======== taskFxn ======== */ Void task_ledFlash(UArg a0, UArg a1) { System_printf("enter task_ledFlash()\n"); while(1) { platform_led(0, PLATFORM_LED_ON, PLATFORM_USER_LED_CLASS); System_printf("LED 0 ON\n"); Task_sleep(500); platform_led(0, PLATFORM_LED_OFF, PLATFORM_USER_LED_CLASS); System_printf("LED 0 OFF\n"); Task_sleep(500); } } /** * 平台初始化 */ void EVM_init() { platform_init_flags init_flags; platform_init_config init_config; // plaform initialize memset(&init_flags, 1, sizeof(platform_init_flags)); init_flags.phy = 0; memset(&init_config, 0, sizeof(platform_init_config)); if (platform_init(&init_flags, &init_config) != Platform_EOK) { printf("Platform failed to initialize, errno = 0x%x \n", platform_errno); while(1); } platform_uart_init(); } /* * ======== main ======== */ Int main() { Task_Handle task; Error_Block eb; System_printf("enter main()\n"); Error_init(&eb); task = Task_create(task_ledFlash, NULL, &eb); if (task == NULL) { System_printf("Task_create() failed!\n"); BIOS_exit(0); } BIOS_start(); /* does not return */ return(0); } - 1
- 2
- 3
- 4
- 5
- 6
- 7
- 8
- 9
- 10
- 11
- 12
- 13
- 14
- 15
- 16
- 17
- 18
- 19
- 20
- 21
- 22
- 23
- 24
- 25
- 26
- 27
- 28
- 29
- 30
- 31
- 32
- 33
- 34
- 35
- 36
- 37
- 38
- 39
- 40
- 41
- 42
- 43
- 44
- 45
- 46
- 47
- 48
- 49
- 50
- 51
- 52
- 53
- 54
- 55
- 56
- 57
- 58
- 59
- 60
- 61
- 62
- 63
- 64
- 65
- 66
- 67
- 68
- 69
- 70
- 71
- 72
- 73
- 74
- 75
- 76
保存上述修改, 并编译工程.
调试
完成编译后, 在 EVM6678L 上调试.
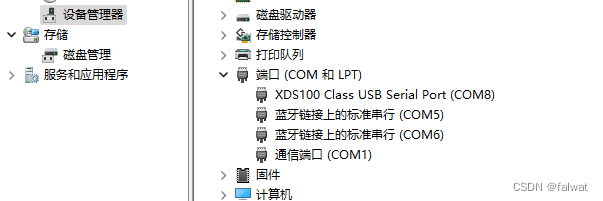
串口通过USB连接计算机. 请确保 COM_SEL1 跳线设置在正确位置. 且在计算机设备管理器中能够找到对应板卡的串口.
打开串口终端, 连接对应串口, 串口设置如下:

点击运行按钮, 运行程序. 此时在串口终端能够看到System_printf()函数打印的信息.
原理分析
需要说明的是, 调用
System_printf()打印信息时, 并不直接调用我们添加的os_systemOutput()函数, 而是将 打印的字符串添加到 Output Buffer(输出缓存) 中. 只有调用System_flush()时,os_systemOutput()才会被执行. 所以我们需要应用程序能够自觉执行System_flush()函数.我们可以将
System_flush()函数的执行, 交给 Idle 线程. 只要所有任务因为某些原因被阻塞(Sleep, 等待信号量等), Idle线程就会被执行. 这样做的好处是, 打印信息的串口输出不会占用 任务的执行时间. - 选中 led_flash 工程, 右键选择 Copy 或 使用快捷键
-
相关阅读:
uni-app 5小时快速入门 6 项目配置
CTO(技术总监)平时都在做些什么?
Qt QLable 字符过长省略
office2019在保存的时候报错
浅入浅出分布式事务
CLIP 基础模型介绍寄论文讲解
ASP.NET Core使用记录3
linux 查看版本信息详细版
可恶的一直按键又来了
基于java+ssm+vue+mysql的旅游管理系统左右分栏
- 原文地址:https://blog.csdn.net/falwat/article/details/134058616