-
Python+Appium+Pytest+Allure实战APP自动化测试!
pytest只是单独的一个单元测试框架,要完成app测试自动化需要把pytest和appium进行整合,同时利用allure完成测试报告的产出。
编写常规的线性脚本具体的步骤如下:
1、设计待测试APP的自动化测试用例
2、新建app测试项目
3、配置conftest.py文件等
4、编写整体app测试用例运行文件
5、把设计好的自动化测试用例转化成脚本备注:
为了保证脚本的稳定性,又把pytest常用功能应用,以下示例采用android计算器为示例讲解。
Gitee上完整代码:https://gitee.com/YouJeffrey/AUTO_TEST_APP
前置条件:下载第三方库
1、下载 appium-python-client
2、下载pytest
3、下载 allure-pytest
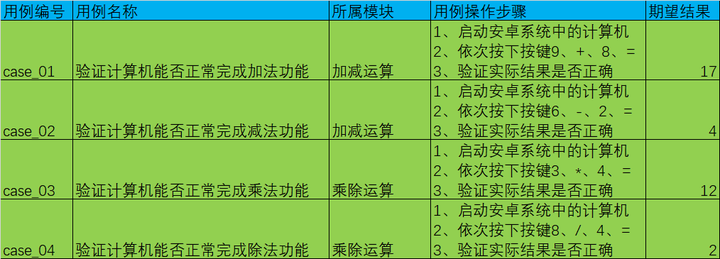
一、设计待测试APP的自动化测试用例
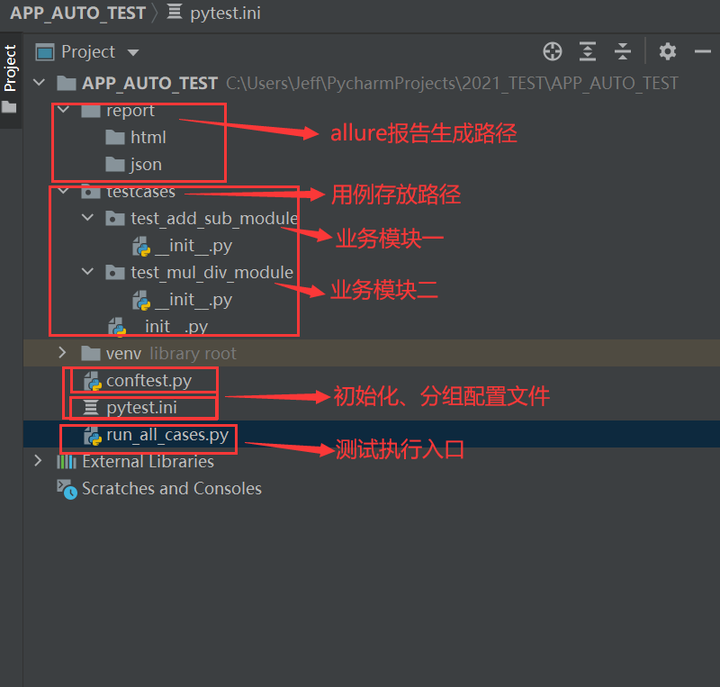
二、新建APP测试项目
三、配置文件信息
1、先配置外层conftest.py文件
- import pytest
- # 配置app的各种连接信息
- @pytest.fixture(scope='session')
- def android_setting():
- des = {
- 'automationName': 'appium',
- 'platformName': 'Android',
- 'platformVersion': '6.0.1', # 填写android虚拟机/真机的系统版本号
- 'deviceName': 'MuMu', # 填写安卓虚拟机/真机的设备名称
- 'appPackage': 'com.sky.jisuanji', # 填写被测app包名
- 'appActivity': '.JisuanjizixieActivity', # 填写被测app的入口
- 'udid': '127.0.0.1:7555', # 填写通过命令行 adb devices 查看到的udid
- 'noReset': True, # 是否重置APP
- 'noSign': True, # 是否不签名
- 'unicodeKeyboard': True, # 是否支持中文输入
- 'resetKeyboard': True, # 是否支持重置键盘
- 'newCommandTimeout': 30 # 30秒没发送新命令就断开连接
- }
- return des
2、再配置用例层的conftest.py文件
- import time
- import pytest
- from appium import webdriver
- driver = None
- # 启动安卓系统中的计算器app
- @pytest.fixture()
- def start_app(android_setting):
- global driver
- driver = webdriver.Remote('http://127.0.0.1:4723/wd/hub',android_setting)
- return driver
- # 关闭安卓系统中的计算器app
- @pytest.fixture()
- def close_app():
- yield driver
- time.sleep(2)
- driver.close_app()
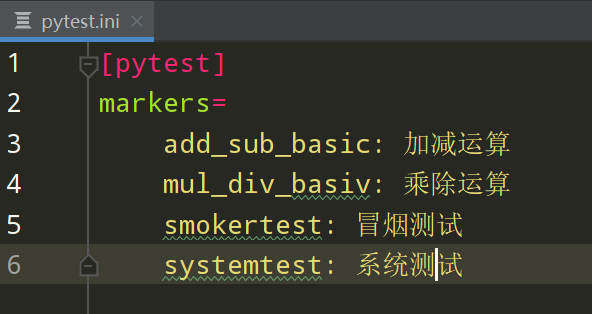
3、配置pytest.ini文件进行分组设置
四、编写run_all_cases.py测试执行入口文件
- import os
- import pytest
- # 当前路径(使用 abspath 方法可通过dos窗口执行)
- current_path = os.path.dirname(os.path.abspath(__file__))
- # json报告路径
- json_report_path = os.path.join(current_path,'report/json')
- # html报告路径
- html_report_path = os.path.join(current_path,'report/html')
- # 执行pytest下的用例并生成json文件
- pytest.main(['-s','-v','--alluredir=%s'%json_report_path,'--clean-alluredir'])
- # 把json文件转成html报告
- os.system('allure generate %s -o %s --clean'%(json_report_path,html_report_path))
五、编写测试用例
在testcases层下有两个业务子模块 test_add_sub_module 和 test_mul_div_module;
1、test_add_sub_module模块下test_add.py文件
代码如下:
- import allure
- from appium.webdriver.webdriver import By
- @allure.epic('安卓计算机项目')
- @allure.feature('V1.0版本')
- class TestAddSub():
- @allure.story('加法运算')
- @allure.title('[case01] 验证计算机能否正常完成加法功能')
- # @pytest.mark.add_basic
- def test_cases01(self,start_app,close_app):
- with allure.step('1、启动安卓系统中的计算机app'):
- driver = start_app
- with allure.step('2、依次按下9、+、8、='):
- driver.find_element(By.XPATH,'//android.widget.Button[@resource-id="com.sky.jisuanji:id/btn9"]').click()
- driver.find_element(By.XPATH, '//android.widget.Button[@resource-id="com.sky.jisuanji:id/jia"]').click()
- driver.find_element(By.XPATH, '//android.widget.Button[@resource-id="com.sky.jisuanji:id/btn8"]').click()
- driver.find_element(By.XPATH, '//android.widget.Button[@resource-id="com.sky.jisuanji:id/denyu"]').click()
- actual_result = driver.find_element(By.XPATH, '//android.widget.EditText[@resource-id="com.sky.jisuanji:id/text"]').text
- with allure.step('3、验证实际结果是否正确'):
- # 断言 实际结果 == 17.0
- assert actual_result == '17.0'
2、test_add_sub_module模块下test_sub.py文件
代码如下:
- import allure
- from appium.webdriver.webdriver import By
- @allure.epic('安卓计算机项目')
- @allure.feature('V1.0版本')
- class TestAddSub():
- @allure.story('减法运算')
- @allure.title('[case01] 验证计算机能否正常完成减法功能')
- def test_cases01(self,start_app,close_app):
- with allure.step('1、启动安卓系统中的计算机app'):
- driver = start_app
- with allure.step('2、依次按下6、-、2、='):
- driver.find_element(By.XPATH,'//android.widget.Button[@resource-id="com.sky.jisuanji:id/btn6"]').click()
- driver.find_element(By.XPATH, '//android.widget.Button[@resource-id="com.sky.jisuanji:id/jian"]').click()
- driver.find_element(By.XPATH, '//android.widget.Button[@resource-id="com.sky.jisuanji:id/btn2"]').click()
- driver.find_element(By.XPATH, '//android.widget.Button[@resource-id="com.sky.jisuanji:id/denyu"]').click()
- actual_result = driver.find_element(By.XPATH, '//android.widget.EditText[@resource-id="com.sky.jisuanji:id/text"]').text
- with allure.step('3、验证实际结果是否正确'):
- # 断言 实际结果 == 4.0
- assert actual_result == '4.0'
3、test_mul_div_module模块下test_mul.py文件
代码如下:
- import allure
- from appium.webdriver.webdriver import By
- @allure.epic('安卓计算机项目')
- @allure.feature('V1.0版本')
- class TestAddSub():
- @allure.story('乘法运算')
- @allure.title('[case01] 验证计算机能否正常完成乘法功能')
- def test_cases01(self,start_app,close_app):
- with allure.step('1、启动安卓系统中的计算机app'):
- driver = start_app
- with allure.step('2、依次按下3、*、4、='):
- driver.find_element(By.XPATH,'//android.widget.Button[@resource-id="com.sky.jisuanji:id/btn3"]').click()
- driver.find_element(By.XPATH, '//android.widget.Button[@resource-id="com.sky.jisuanji:id/chen"]').click()
- driver.find_element(By.XPATH, '//android.widget.Button[@resource-id="com.sky.jisuanji:id/btn4"]').click()
- driver.find_element(By.XPATH, '//android.widget.Button[@resource-id="com.sky.jisuanji:id/denyu"]').click()
- actual_result = driver.find_element(By.XPATH, '//android.widget.EditText[@resource-id="com.sky.jisuanji:id/text"]').text
- with allure.step('3、验证实际结果是否正确'):
- # 断言 实际结果 == 12.0
- assert actual_result == '12.0'
4、test_mul_div_module模块下test_div.py文件
代码如下:
- import allure
- from appium.webdriver.webdriver import By
- @allure.epic('安卓计算机项目')
- @allure.feature('V1.0版本')
- class TestAddSub():
- @allure.story('除法运算')
- @allure.title('[case01] 验证计算机能否正常完成除法功能')
- def test_cases01(self,start_app,close_app):
- with allure.step('1、启动安卓系统中的计算机app'):
- driver = start_app
- with allure.step('2、依次按下8、*、4、='):
- driver.find_element(By.XPATH,'//android.widget.Button[@resource-id="com.sky.jisuanji:id/btn8"]').click()
- driver.find_element(By.XPATH, '//android.widget.Button[@resource-id="com.sky.jisuanji:id/chu"]').click()
- driver.find_element(By.XPATH, '//android.widget.Button[@resource-id="com.sky.jisuanji:id/btn4"]').click()
- driver.find_element(By.XPATH, '//android.widget.Button[@resource-id="com.sky.jisuanji:id/denyu"]').click()
- actual_result = driver.find_element(By.XPATH, '//android.widget.EditText[@resource-id="com.sky.jisuanji:id/text"]').text
- with allure.step('3、验证实际结果是否正确'):
- # 断言 实际结果 == 2.0
- assert actual_result == '2.0'
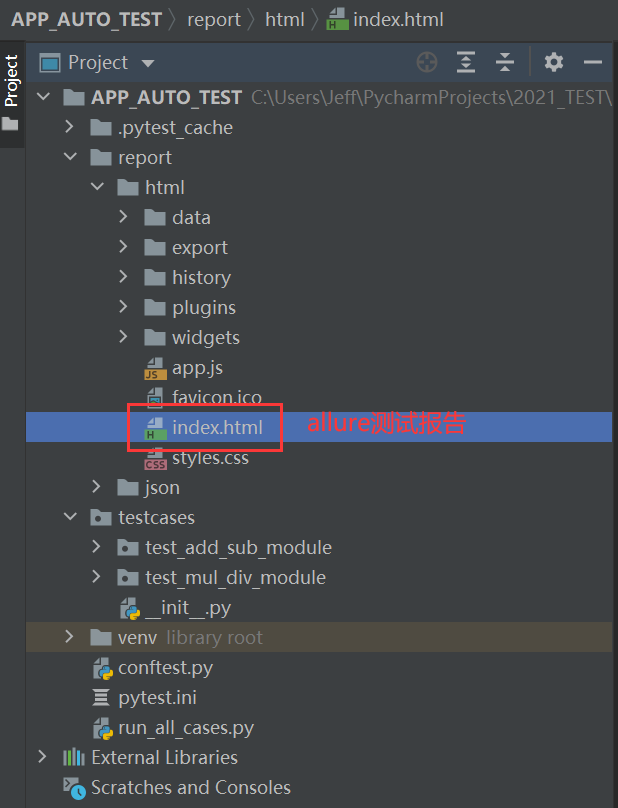
六、运行结果生成测试报告
最后感谢每一个认真阅读我文章的人,礼尚往来总是要有的,虽然不是什么很值钱的东西,如果你用得到的话可以直接拿走:
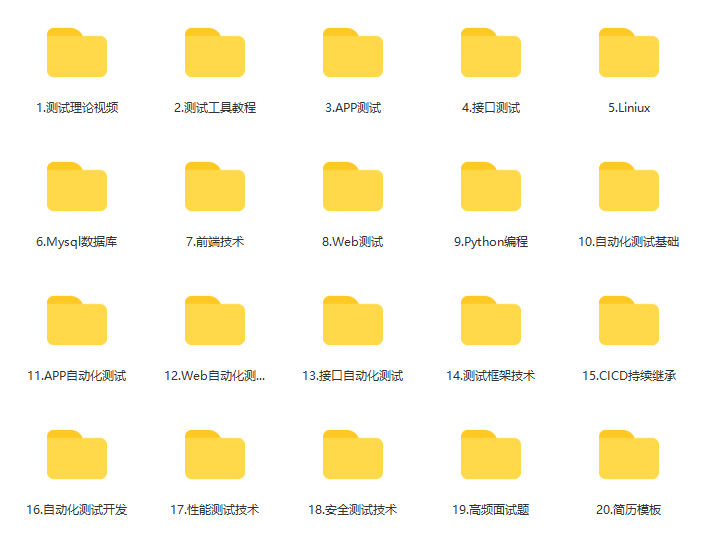
这些资料,对于【软件测试】的朋友来说应该是最全面最完整的备战仓库,这个仓库也陪伴上万个测试工程师们走过最艰难的路程,希望也能帮助到你!

-
相关阅读:
2.6每日一题(不定积分)
springcloud13:服务网关(gateway)
datawhale8月组队学习《pandas数据处理与分析》(下)(文本、分类、时序数据)
买美容仪看这篇,全网超火美容仪真实测评
Hyperf使用ElasticSearch记录
C++ 哈希表及unordered_set + unordered_map容器
vim的使用笔记
Centos7.9云计算CloudStack4.15 高级网络配置(3)
Qt系列-常用控件使用整理
【 毕设项目源码推荐 javaweb 项目】 基于 springboot+vue 的图书个性化推荐系统的设计与实现(springboot003)
- 原文地址:https://blog.csdn.net/NHB456789/article/details/134034580
