-
鱼眼图像去畸变python / c++

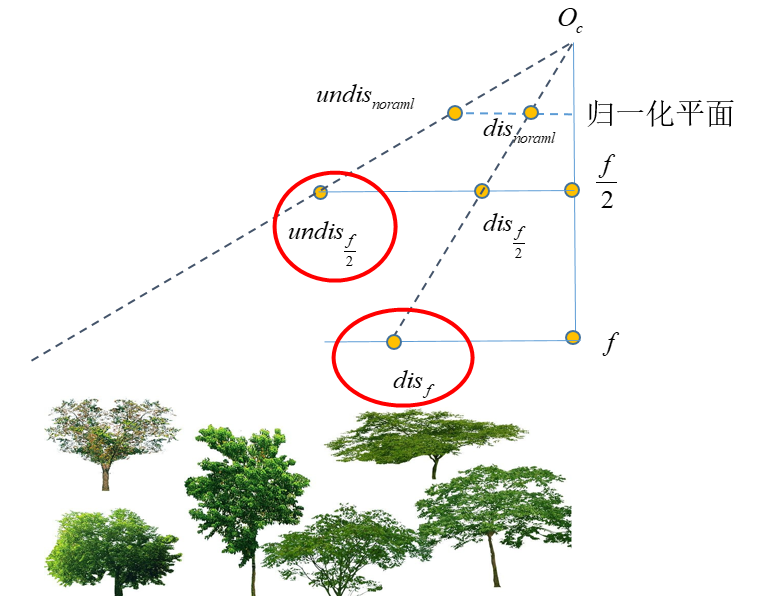
本文假设去畸变后的图像与原图大小一样大。由于去畸变后的图像符合针孔投影模型,因此不同的去畸变焦距得到不同的视场大小,且物体的分辨率也不同。可以见上图,当焦距缩小为一半时,相同大小的图像(横向投影距离一样长),对应的视场角不同。所以为了扩大视野,需要缩小焦距,作为相机坐标系到去畸变图像的投影内参焦距。理论方面不再多说,直接上代码:
C++ 版本
#include#include #include using namespace std; //图像去畸变部分/// int main(){ cv::Size img_sizea; std::string image_file = "test.jpeg"; cv::Mat src = cv::imread(image_file); cv::Mat distortiona(img_sizea,CV_8UC3); // 内参 cv::Mat camera_matrixa = (cv::Mat_<double>(3, 3) << 5.4108215568312232e+02, 0.0, 1.0318237337253406e+03, 0, 5.4083086444334469e+02, 1.0225293088570558e+03, 0, 0, 1); cv::Mat distortion_coefficientsa=(cv::Mat_<double >(1,4)<<1.0926628389307196e-01,-6.5713320780575097e-04,8.4866561354316559e-03,-4.2045330300667406e-03); cv::Mat new_intrinsic_mat(3, 3, CV_64FC1, cv::Scalar(0)); camera_matrixa.copyTo(new_intrinsic_mat); //调整输出校正图的视场 new_intrinsic_mat.at<double>(0, 0) *= 0.4; //注意数据类型,非常重要 new_intrinsic_mat.at<double>(1, 1) *= 0.4; //调整输出校正图的中心 new_intrinsic_mat.at<double>(0, 2) *= 1.0; new_intrinsic_mat.at<double>(1, 2) *= 1.0; // new_intrinsic_mat.at (0, 2) += 0.0; // new_intrinsic_mat.at(1, 2) += 0.0; cv::fisheye::undistortImage(src, distortiona, camera_matrixa, distortion_coefficientsa, new_intrinsic_mat); cv::resize(distortiona, distortiona, cv::Size(1024,1024)); cv::imshow("undistort", distortiona); cv::waitKey(0); imwrite("undistort.jpg", distortiona); return 0; }- 1
- 2
- 3
- 4
- 5
- 6
- 7
- 8
- 9
- 10
- 11
- 12
- 13
- 14
- 15
- 16
- 17
- 18
- 19
- 20
- 21
- 22
- 23
- 24
- 25
- 26
- 27
- 28
- 29
- 30
- 31
- 32
- 33
- 34
Python 版本
import cv2 as cv import numpy as np def fisheye_undistortion(img, K, D, fs): #一定要使用copy,作为不同的变量 newK = K.copy() #调整输出校正图的视场 newK[0][0] = fs * newK[0][0] newK[1][1] = fs * newK[1][1] #调整输出校正图的中心 newK[0][2] = 1.0 * newK[0][2] newK[1][2] = 1.0 * newK[1][2] undis_img = cv.fisheye.undistortImage(img, K, D, None, newK) return undis_img, newK def camera2undistortionimg(camera_point, newK): x = camera_point[0] / camera_point[2] y = camera_point[1] / camera_point[2] u = x * newK[0][0] + newK[0][2] v = y * newK[1][1] + newK[1][2] return [u, v] #内参 K = np.array([[5.4108215568312232e+02, 0.0, 1.0318237337253406e+03], [0, 5.4083086444334469e+02, 1.0225293088570558e+03], [0, 0, 1]], dtype=np.float32) #畸变系数 D = np.array([[1.0926628389307196e-01], [-6.5713320780575097e-04], [8.4866561354316559e-03], [-4.2045330300667406e-03]], dtype=np.float32) #读取图像 srcimg = cv.imread("./test.jpeg") #去畸变 fs = 0.4 #焦距比例控制,控制视场大小 undis_img, newK = fisheye_undistortion(srcimg, K, D, fs) print(newK) #相机到去畸变图像映射 camera_p = (-20, 20, 6) [u, v] = camera2undistortionimg(camera_p, newK) print([u, v]) #显示验证 cv.circle(undis_img,(int(u), int(v)), 10, (0,0,255), -1) undis_img = cv.resize(undis_img,(1024, 1024)) cv.imshow("undis_img",undis_img) cv.waitKey(0)- 1
- 2
- 3
- 4
- 5
- 6
- 7
- 8
- 9
- 10
- 11
- 12
- 13
- 14
- 15
- 16
- 17
- 18
- 19
- 20
- 21
- 22
- 23
- 24
- 25
- 26
- 27
- 28
- 29
- 30
- 31
- 32
- 33
- 34
- 35
- 36
- 37
- 38
- 39
- 40
- 41
- 42
- 43
- 44
- 45
- 46
- 47
- 48
- 49
-
相关阅读:
Java 核心技术卷 I —— 第1章 Java 程序设计概述
PZ-3B-70E2A-10、PZ-6B-220E2A-20电控比例压力流量驱动泵放大器
Spring Boot 配置文件
MySQL:更新过程(buffer pool与redo、bin、undo log)
docker network 组件内网
安卓面试总结(2)——Java 集合框架
0x2C动态定义数据标识符服务
剑指OfferⅡ 045.二叉树最底层最左边的值 dfs
方法与递归(JAVA基础一)
【Java多线程】线程同步机制(含同步方法)及不安全案例讲解
- 原文地址:https://blog.csdn.net/long630576366/article/details/134042387
