-
TTS | 轻量级VITS2的项目实现以及API设置
----------------------------------🗣️ 语音合成 VITS相关系列直达 🗣️ -------------------------------------
🫧VITS :TTS | 保姆级端到端的语音合成VITS论文详解及项目实现(超详细图文代码)
🫧MB-iSTFT-VITS:TTS | 轻量级语音合成论文详解及项目实现
🫧MB-iSTFT-VITS2:TTS | 轻量级VITS2的项目实现以及API设置-CSDN博客
🫧PolyLangVITS:MTTS | 多语言多人的VITS语音合成项目实现-CSDN博客
本文主要是实现了MB-iSTFT-VITS2语音合成模型的训练,相比于VITS模型,MB-iSTFT-VITS模型相对来说会小一点,最重要的是在合成结果来看,MB-iSTFT-VITS模型推理更快,更加自然(个人经验).项目地址如下:
FENRlR/MB-iSTFT-VITS2: Application of MB-iSTFT-VITS components to vits2_pytorch (github.com)
目前项目还未来得及发表论文,且项目还在完善中(截止到2023.10.18)。
目录
[PS3]API设置时出现,RuntimeError: Invalid device, must be cuda device
[PS5]TypeError: load_checkpoint() got an unexpected keyword argument 'skip_optimizer'
0.环境设置
docker镜像容器(Linux20.04+Pytorch1.13.1+torchvision0.14.1+cuda11.7+python3.8),
可靠的版本依赖
环境1:torch1.13+cuda11.7
pip install torch==1.13.1+cu117 torchvision==0.14.1+cu117 torchaudio==0.13.1 -f https://download.pytorch.org/whl/torch_stable.html环境2:torch1.14.0a0+410ce96+cuda11.8
1.项目设置及数据处理
- # 克隆项目到本地
- git clone https://github.com/FENRlR/MB-iSTFT-VITS2
- cd MB-iSTFT-VITS2
- #安装所需要的库
- pip install -r requirements.txt
- apt-get install espeak
- # 文本预处理
- ## 选择1 : 单人数据集
- python preprocess.py --text_index 1 --filelists PATH_TO_train.txt --text_cleaners CLEANER_NAME
- python preprocess.py --text_index 1 --filelists PATH_TO_val.txt --text_cleaners CLEANER_NAME
- ## 选择2 : 多人数据集
- python preprocess.py --text_index 2 --filelists PATH_TO_train.txt --text_cleaners CLEANER_NAME
- python preprocess.py --text_index 2 --filelists PATH_TO_val.txt --text_cleaners CLEANER_NAME
- # 设置MAS
- cd monotonic_align
- mkdir monotonic_align
- python setup.py build_ext --inplace
前期设置与vits/vits2基本相同
编辑配置文件
2.训练
2.1. 单人数据集训练
- # 选择1 : 单人数据集训练
- python train.py -c configs/mb_istft_vits2_base.json -m models/test
- # 训练采样小的模型
- #python train.py -c configs/mini_mb_istft_vits2_base.json -m models/mini_bae
训练后生成

训练过程

2.2. 多人数据集训练
- # python preprocess.py --text_index 2 --filelists filelists/history_ms_train.txt filelists/history_ms_val.txt --text_cleaners korean_cleaners
- # 选择2 : 多人数据集训练
- python train_ms.py -c configs/mb_istft_vits2_base.json -m models/test
多人数据格式

3.设置API
3.1.单人webui.py
- import sys, os
- import logging
- import re
- logging.getLogger("numba").setLevel(logging.WARNING)
- logging.getLogger("markdown_it").setLevel(logging.WARNING)
- logging.getLogger("urllib3").setLevel(logging.WARNING)
- logging.getLogger("matplotlib").setLevel(logging.WARNING)
- logging.basicConfig(
- level=logging.INFO, format="| %(name)s | %(levelname)s | %(message)s"
- )
- logger = logging.getLogger(__name__)
- import torch
- import argparse
- import commons
- import utils
- from models import SynthesizerTrn
- from text.symbols import symbols
- #from text import cleaned_text_to_sequence
- from text import text_to_sequence
- #from text.cleaner import clean_text
- import gradio as gr
- import webbrowser
- import numpy as np
- net_g = None
- if sys.platform == "darwin" and torch.backends.mps.is_available():
- device = "mps"
- os.environ["PYTORCH_ENABLE_MPS_FALLBACK"] = "1"
- else:
- device = "cuda"
- def get_text(text, hps):
- text_norm = text_to_sequence(text, hps.data.text_cleaners)
- if hps.data.add_blank:
- text_norm = commons.intersperse(text_norm, 0)
- text_norm = torch.LongTensor(text_norm)
- return text_norm
- def infer(text, sdp_ratio, noise_scale, noise_scale_w, length_scale, sid):
- global net_g
- fltstr = re.sub(r"[\[\]\(\)\{\}]", "", text)
- stn_tst = get_text(fltstr, hps)
- speed = 1
- output_dir = 'output'
- sid = 0
- with torch.no_grad():
- x_tst = stn_tst.to(device).unsqueeze(0)
- x_tst_lengths = torch.LongTensor([stn_tst.size(0)]).to(device)
- audio = net_g.infer(x_tst, x_tst_lengths, noise_scale=.667, noise_scale_w=0.8, length_scale=1 / speed)[0][
- 0, 0].data.cpu().float().numpy()
- return audio
- def tts_fn(
- text, speaker, sdp_ratio, noise_scale, noise_scale_w, length_scale
- ):
- slices = text.split("|")
- audio_list = []
- with torch.no_grad():
- for slice in slices:
- audio = infer(
- slice,
- sdp_ratio=sdp_ratio,
- noise_scale=noise_scale,
- noise_scale_w=noise_scale_w,
- length_scale=length_scale,
- sid=speaker,
- )
- audio_list.append(audio)
- silence = np.zeros(hps.data.sampling_rate) # 生成1秒的静音
- audio_list.append(silence) # 将静音添加到列表中
- audio_concat = np.concatenate(audio_list)
- return "Success", (hps.data.sampling_rate, audio_concat)
- if __name__ == "__main__":
- parser = argparse.ArgumentParser()
- parser.add_argument(
- "-m", "--model", default="/workspace/tts/MB-iSTFT-VITS2/logs/models/G_94000.pth", help="path of your model"
- )
- parser.add_argument(
- "-c",
- "--config",
- default="/workspace/tts/MB-iSTFT-VITS2/logs/models/config.json",
- help="path of your config file",
- )
- parser.add_argument(
- "--share", default=False, help="make link public", action="store_true"
- )
- parser.add_argument(
- "-d", "--debug", action="store_true", help="enable DEBUG-LEVEL log"
- )
- args = parser.parse_args()
- if args.debug:
- logger.info("Enable DEBUG-LEVEL log")
- logging.basicConfig(level=logging.DEBUG)
- hps = utils.get_hparams_from_file(args.config)
- if "use_mel_posterior_encoder" in hps.model.keys() and hps.model.use_mel_posterior_encoder == True:
- print("Using mel posterior encoder for VITS2")
- posterior_channels = 80 # vits2
- hps.data.use_mel_posterior_encoder = True
- else:
- print("Using lin posterior encoder for VITS1")
- posterior_channels = hps.data.filter_length // 2 + 1
- hps.data.use_mel_posterior_encoder = False
- device = (
- "cuda:0"
- if torch.cuda.is_available()
- else (
- "mps"
- if sys.platform == "darwin" and torch.backends.mps.is_available()
- else "cpu"
- )
- )
- net_g = SynthesizerTrn(
- len(symbols),
- posterior_channels,
- hps.train.segment_size // hps.data.hop_length,
- n_speakers=hps.data.n_speakers, #- >0 for multi speaker
- **hps.model
- ).to(device)
- _ = net_g.eval()
- #_ = utils.load_checkpoint(args.model, net_g, None, skip_optimizer=True)
- _ = utils.load_checkpoint(path_to_model, net_g, None)
- #speaker_ids = hps.data.spk2id
- #speakers = list(speaker_ids.keys())
- speakers = hps.data.n_speakers
- languages = ["KO"]
- with gr.Blocks() as app:
- with gr.Row():
- with gr.Column():
- text = gr.TextArea(
- label="Text",
- placeholder="Input Text Here",
- value="测试文本.",
- )
- '''speaker = gr.Dropdown(
- choices=speakers, value=speakers[0], label="Speaker"
- )'''
- speaker = gr.Slider(
- minimum=0, maximum=speakers-1, value=0, step=1, label="Speaker"
- )
- sdp_ratio = gr.Slider(
- minimum=0, maximum=1, value=0.2, step=0.1, label="SDP Ratio"
- )
- noise_scale = gr.Slider(
- minimum=0.1, maximum=2, value=0.6, step=0.1, label="Noise Scale"
- )
- noise_scale_w = gr.Slider(
- minimum=0.1, maximum=2, value=0.8, step=0.1, label="Noise Scale W"
- )
- length_scale = gr.Slider(
- minimum=0.1, maximum=2, value=1, step=0.1, label="Length Scale"
- )
- language = gr.Dropdown(
- choices=languages, value=languages[0], label="Language"
- )
- btn = gr.Button("Generate!", variant="primary")
- with gr.Column():
- text_output = gr.Textbox(label="Message")
- audio_output = gr.Audio(label="Output Audio")
- btn.click(
- tts_fn,
- inputs=[
- text,
- speaker,
- sdp_ratio,
- noise_scale,
- noise_scale_w,
- length_scale,
- ],
- outputs=[text_output, audio_output],
- )
- webbrowser.open("http://127.0.0.1:7860")
- app.launch(share=True)
运行后实现

4.Vits2和MB-iSTFT-VITS2的区别
MB-iSTFT-VITS2
不使用use_spk_conditioned_encoder,gin_channels
添加了:duration_discriminator_type,subbands,gen_istft_n_fft,gen_istft_hop_size
5.Q&A
5.1.在指定文字处理类型使用korean_cleaners2/cjke_cleaners2时,处理后数据为原文本
korean_cleaners正常使用


应该出现的类型

如果使用cjke_cleaner的境况,格式要求备注语言格式
例如:英文使用
''' cjke type cleaners below '''
#- text for these cleaners must be labeled first
# ex1 (single) : some.wav|[EN]put some text here[EN]
# ex2 (multi) : some.wav|0|[EN]put some text here[EN]中文使用
单人:audio.wav|[ZH]这是个语音文本[ZH]
多人:audio.wav|0|[ZH]这是个语音文本[ZH]
audio1.wav|1|[ZH]这是个语音文本[ZH]
过程中遇到的问题及解决(PS)
[PS1]训练时出现cuda out of m
解决办法:
- 修改batch size
- 修改num_workers=0
[PS2]训练后出现线程相关错误
Traceback (most recent call last):
File "/opt/miniconda3/envs/vits/lib/python3.8/site-packages/torch/multiprocessing/spawn.py", line 69, in _wrap
fn(i, *args)
File "/workspace/tts/MB-iSTFT-VITS2/train.py", line 240, in run
train_and_evaluate(rank, epoch, hps, [net_g, net_d, net_dur_disc], [optim_g, optim_d, optim_dur_disc],
File "/workspace/tts/MB-iSTFT-VITS2/train.py", line 358, in train_and_evaluate
scaler.scale(loss_gen_all).backward()
File "/opt/miniconda3/envs/vits/lib/python3.8/site-packages/torch/_tensor.py", line 488, in backward
torch.autograd.backward(
File "/opt/miniconda3/envs/vits/lib/python3.8/site-packages/torch/autograd/__init__.py", line 197, in backward
Variable._execution_engine.run_backward( # Calls into the C++ engine to run the backward pass
RuntimeError: Detected mismatch between collectives on ranks. Rank 1 is running collective: CollectiveFingerPrint(OpType=ALLREDUCE, TensorShape=[5248002], TensorDtypes=Float, TensorDeviceTypes=TensorOptions(dtype=float (default), device=cuda, layout=Strided (default), requires_grad=false (default), pinned_memory=false (default), memory_format=(nullopt))), but Rank 0 is running collective: CollectiveFingerPrint(OpType=ALLREDUCE).原因分析:
在jupyter lab时调用gpu后出现的错误。
解决方案:
重新再次训练后就解决了,再次训练时,会加载上次训练的权重文件。
第二次错误

一个docker的容器正在训练,且占用了一半的显存
在另外的容器中训练时出现的问题,rank0被占用
在此之前需要了解的基础:DDP相关概念
rank:用于表示进程的编号/序号(在一些结构图中rank指的是软节点,rank可以看成一个计算单位),每一个进程对应了一个rank的进程,整个分布式由许多rank完成。
node:物理节点,可以是一台机器也可以是一个容器,节点内部可以有多个GPU。
rank与local_rank: rank是指在整个分布式任务中进程的序号;local_rank是指在一个node上进程的相对序号,local_rank在node之间相互独立。(注意:在代码中,会使用local_rank来指定GPU,并且local_rank和实际的gpu编号存在映射关系,比如,指定gpu 4,5进行训练,local_rank仍然是0,1,但前提是要先设置os.environ['CUDA_VISIBLE_DEVICES'] = "4,5")。
nnodes、node_rank与nproc_per_node: nnodes是指物理节点数量,node_rank是物理节点的序号;nproc_per_node是指每个物理节点上面进程的数量。
word size : 全局(一个分布式任务)中,rank的数量。可参考【1】分布式训练中当rank被占用后,训练新进程如何改变rank数?【23】
可能是来自 DDP 和 SyncBatchNorm 的集合体相互冲突。再次训练后正常。原因未知,未解决!
[PS2-1]训练后出现ZeroDivisionError: integer division or modulo by zero
File "/workspace/TTS/MB-iSTFT-VITS2/train.py", line 274, in train_and_evaluate
for batch_idx, (x, x_lengths, spec, spec_lengths, y, y_lengths) in enumerate(loader):
File "/opt/conda/lib/python3.8/site-packages/torch/utils/data/dataloader.py", line 443, in __iter__
return self._get_iterator()
File "/opt/conda/lib/python3.8/site-packages/torch/utils/data/dataloader.py", line 389, in _get_iterator
return _MultiProcessingDataLoaderIter(self)
File "/opt/conda/lib/python3.8/site-packages/torch/utils/data/dataloader.py", line 1023, in __init__
super(_MultiProcessingDataLoaderIter, self).__init__(loader)
File "/opt/conda/lib/python3.8/site-packages/torch/utils/data/dataloader.py", line 638, in __init__
self._sampler_iter = iter(self._index_sampler)
File "/workspace/TTS/MB-iSTFT-VITS2/data_utils.py", line 418, in __iter__
ids_bucket = ids_bucket + ids_bucket * (rem // len_bucket) + ids_bucket[:(rem % len_bucket)]
ZeroDivisionError: integer division or modulo by zero出错原因
数据采样不同导致的,英文论文中网络对配置文件等都设置的是22050,如果不是这个采样率就会出错。
[PS3]API设置时出现,RuntimeError: Invalid device, must be cuda device
Traceback (most recent call last):
File "aoi.py", line 55, in
model.build_wav(0, "안녕하세요", "./test.wav")
File "aoi.py", line 50, in build_wav
audio = self.net_g.infer(x_tst, x_tst_lengths, sid=sid, noise_scale=.667, noise_scale_w=0.8, length_scale=1)[0][0,0].data.cpu().float().numpy()
File "/workspace/tts/MB-iSTFT-VITS-multilingual/models.py", line 718, in infer
o, o_mb = self.dec((z * y_mask)[:,:,:max_len], g=g)
File "/usr/local/lib/python3.8/dist-packages/torch/nn/modules/module.py", line 1194, in _call_impl
return forward_call(*input, **kwargs)
File "/workspace/tts/MB-iSTFT-VITS-multilingual/models.py", line 344, in forward
pqmf = PQMF(x.device)
File "/workspace/tts/MB-iSTFT-VITS-multilingual/pqmf.py", line 78, in __init__
analysis_filter = torch.from_numpy(h_analysis).float().unsqueeze(1).cuda(device)
RuntimeError: Invalid device, must be cuda device原因分析
1.在不支持
cuda(GPU)的机器上,把模型或者数据放到GPU中。2.因为在训练别的程序,大概率是把卡所有的显存都用上了,所以导致显存不足。
解决办法,停掉正在训练的程序,改小batch size,减少显存占用量。
[PS4]RuntimeError: Error(s) in loading state_dict for SynthesizerTrn:
size mismatch for enc_q.pre.weight: copying a param with shape torch.Size([192, 80, 1]) from checkpoint, the shape in current model is torch.Size([192, 513, 1]).解决办法
将
- net_g = SynthesizerTrn(
- len(symbols),
- hps.data.filter_length // 2 + 1,
- hps.train.segment_size // hps.data.hop_length,
- n_speakers=hps.data.n_speakers,
- **hps.model,
- ).to(device)
改为
- net_g = SynthesizerTrn(
- len(symbols),
- posterior_channels,
- hps.train.segment_size // hps.data.hop_length,
- n_speakers=hps.data.n_speakers, #- >0 for multi speaker
- **hps.model).to(device)
[PS5]TypeError: load_checkpoint() got an unexpected keyword argument 'skip_optimizer'
解决办法
将原本的
_ = utils.load_checkpoint(args.model, net_g, None, skip_optimizer=True)
改为
_ = utils.load_checkpoint(args.model, net_g, None)
[PS6]api设置后运行是空白,编写gradio程序时候,发现任何代码运行起来都是一直显示Loading也不报错。

解决方案:
pip install gradio==3.12.0
或pip install gradio==3.23.0
[PS6]ValueError: numpy.ndarray size changed, may indicate binary incompatibility. Expected 96 from C header, got 80 from PyObject
如果在推理时出现
可能是库没处理好,需要安装相关库
- sudo apt-get install portaudio19-dev
- sudo apt-get install python3-all-dev
- pip install pyaudio
- # 根据Ubuntu版本不同,有的可能需要apt安装,而不apt-get
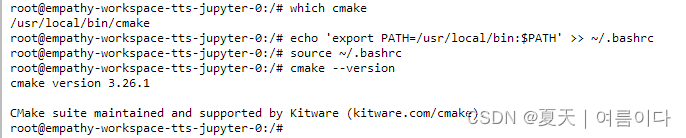
[PS7]pip install pyopenjtalk 无法安装解决

出现相关问题大都是因为cmake没设置好

因为环境要求里有pip 的cmake,apt也安装过camke,所以要卸载pip安装的cmake
一般pip安装的路径是/usr/local/bin/cmake 输入路径后,等一会就卸载好啦~

- #查看现在使用的cmake的路径
- which cmake
- # 移除没有用的路径
- # 更新路径
- echo 'export PATH=/usr/local/bin:$PATH' >> ~/.bashrc
- source ~/.bashrc
[PS8]不小心卸载pip后恢复
- # 尝试 1:未解决
- python -m ensurepip --upgrade
- #解决方案
- curl https://bootstrap.pypa.io/get-pip.py -o get-pip.py
- python get-pip.py
- pip --version

[PS9]Numpy is not available

使用python inference.py可以运行,但是inference.ipynb中出现错误,错误原因可能是运行时中间代码有遗漏导致。把代码依次运行后就好啦~
RuntimeError: Numpy is not available
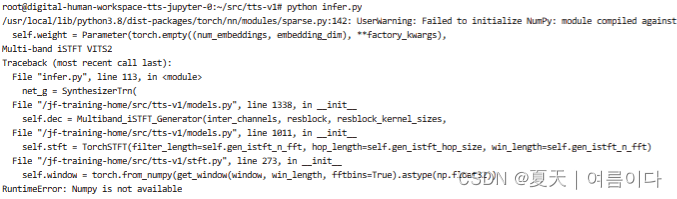
因为numpy版本与torch版本,python版本不适应
这里是torch1.14.0a0+410ce96
numpy==1.23.5
[PS10]self.transformer_flow_type 在 AVAILABLE_FLOW_TYPES 中,f "transformer_flow_type 必须是 {AVAILABLE_FLOW_TYPES} 中的一个"
原本想将所有推理文件都写到一个python文件中,中间差相关文件,在别的文件中可以找到。
[PS11]_pickle.UnpicklingError: invalid load key, '<'.

下载权重文件出现错误,这里使用wget下载的权重文件,
[PS12]RuntimeError: PytorchStreamReader failed reading zip archive: failed finding central directory

在上面环境可行,下面的不行

本以为是版本问题,但是换了个权重文件就可以啦,还是权重下载的问题。
[PS13]训练时遇到RuntimeError: Given groups=1, weight of size [192, 80, 1], expected input[64, 513, 470] to have 80 channels, but got 513 channels instead

因为自定义了部分代码,所以出错,把模型中的代码换成原模型的代码就不会出错
[PS14]nltk_data下载失败
Traceback (most recent call last): File "/usr/local/lib/python3.8/dist-packages/nltk/corpus/util.py", line 84, in __load root = nltk.data.find(f"{self.subdir}/{zip_name}") File "/usr/local/lib/python3.8/dist-packages/nltk/data.py", line 583, in find raise LookupError(resource_not_found) LookupError: ********************************************************************** Resource [93mcmudict[0m not found. Please use the NLTK Downloader to obtain the resource: [31m>>> import nltk >>> nltk.download('cmudict') [0m For more information see: https://www.nltk.org/data.html Attempted to load [93mcorpora/cmudict.zip/cmudict/[0m Searched in: - '/root/nltk_data' - '/usr/nltk_data' - '/usr/share/nltk_data' - '/usr/lib/nltk_data' - '/usr/share/nltk_data' - '/usr/local/share/nltk_data' - '/usr/lib/nltk_data' - '/usr/local/lib/nltk_data' **********************************************************************
cd /usr/share
git clone https://github.com/nltk/nltk_data
ll /usr/share/nltk_data/

如果还是错误,查看路径是否正确,文件下应包含以下文件

[PS15]RuntimeError: PytorchStreamReader failed reading zip archive: failed finding central directory
错误原因分析:可能是由于 PyTorch 读取权重文件时出现问题导致的。
-
检查权重文件: 权重文件没有损坏,并且是有效的 PyTorch checkpoint 文件。
-
检查 PyTorch 版本: 确保代码和权重文件是相应版本的 PyTorch 创建的。如果权重文件是使用不同版本的 PyTorch 创建的,可能会导致加载失败。尽量保持一致的 PyTorch 版本。
-
重新保存权重文件
错误原因:服务器上传时出现错误和权重重命名中间遇到问题
解决方法:重新上传权重,未重命名后好使!
参考文献
【1】Pytorch多卡/多GPU/分布式DPP的基本概念_gpu rank_작은 여우的博客-CSDN博客
【2】pytorch distributed 分布式训练_怎么修改local_rank-CSDN博客
【3】Detected mismatch between collectives on ranks - distributed - PyTorch Forums
-
相关阅读:
DSMM是什么?一篇内容让你快速了解
管理类报表可视化工具有哪些:图形可视化和数据分析软件
简单聊下Redis的主从复制和哨兵机制以及集群(面试题)
乾元通聚合路由器实现多5G转WIFI6信号覆盖
Xcode打包ipa文件,查看app包内文件
数据结构学习笔记——哈夫曼树
代码随想录day57|647. 回文子串516. 最长回文子序列
23种设计模式 - C++实现
Layui数据表格table排序(后端PHP)
研发效能工程实践-代码评审
- 原文地址:https://blog.csdn.net/weixin_44649780/article/details/133904548