-
Nginx虚拟主机的搭建 基于ip 基于端口 基于域名
一、虚拟主机介绍
虚拟主机是一种特殊的软硬件技术,他可以将网络上的每一台计算机分成多个虚拟主机,每个虚拟主机可以单独对外提供web服务,这样就可以实现一台主机对多个web服务,每个虚拟主机都是独立的,互相不影响
nginx支持三种类型的虚拟主机配置
- 基于域名的虚拟主机
- 基于ip的虚拟主机
- 基于端口的虚拟主机
二、基于端口
创建web目录
[root@localhost ~]# mkdir -p /var/www/html- 1
修改配置文件
[root@localhost ~]# vim /etc/nginx/conf.d/default.conf server { listen 80; server_name localhost location / { root /usr/share/nginx/html; index index.html index.htm; } } server { listen 81; server_name localhost; location / { root /var/www/html; index index.html ; } }- 1
- 2
- 3
- 4
- 5
- 6
- 7
- 8
- 9
- 10
- 11
- 12
- 13
- 14
- 15
- 16
- 17
重启nginx服务
[root@localhost html]# nginx -t nginx: the configuration file /etc/nginx/nginx.conf syntax is ok nginx: configuration file /etc/nginx/nginx.conf test is successful [root@localhost html]# nginx -s reload- 1
- 2
- 3
- 4
发布你的项目
客户端访问


三、基于域名
修改配置文件
server { listen 80; server_name www.zhangxiao.com; location / { root /usr/share/nginx/html; index index.html ; } } server { listen 80; server_name www.zx.com; location / { root /var/www/html; index index.html ; } }- 1
- 2
- 3
- 4
- 5
- 6
- 7
- 8
- 9
- 10
- 11
- 12
- 13
- 14
- 15
- 16
域名解析

修改该目录下的hosts文件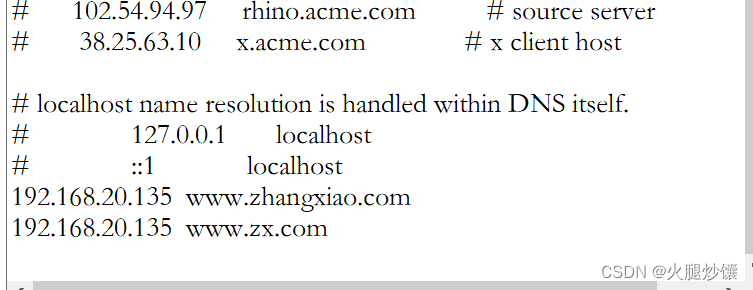
重启nginx服务
[root@localhost html]# nginx -t nginx: the configuration file /etc/nginx/nginx.conf syntax is ok nginx: configuration file /etc/nginx/nginx.conf test is successful [root@localhost html]# nginx -s reload- 1
- 2
- 3
- 4
客户端浏览器访问


四、基于端口
添加一个可用ip
[root@localhost html]# ip a a 192.168.142.136/24 dev ens33- 1
修改配置文件
server { listen 80; server_name 192.168.142.135; location / { root /usr/share/nginx/html; index index.html ; } } server { listen 80; server_name 192.168.20.136; location / { root /var/www/html; index index.html ; } }- 1
- 2
- 3
- 4
- 5
- 6
- 7
- 8
- 9
- 10
- 11
- 12
- 13
- 14
- 15
- 16
重启nginx服务
[root@localhost html]# nginx -t nginx: the configuration file /etc/nginx/nginx.conf syntax is ok nginx: configuration file /etc/nginx/nginx.conf test is successful- 1
- 2
- 3
客户端浏览器访问


-
相关阅读:
程序链接和加载
[GWCTF 2019]我有一个数据库
后台交互-首页->与后台数据进行交互,wsx的使用
Linux--信号signal、父子进程、SIGCHLD信号相关命令
EPLAN_009#3D箱柜转2D模型视图
用低代码平台开发应用
使用iperf3测试远程服务器之间的带宽和延迟
Tomcat多实例及nginx反向代理tomcat
神策分析 2.5 上线「经营分析」:可视化分析能力重磅升级!
阿里内部疯传“Java面试笔记”,熬了半个月刷完,斩获大厂offer
- 原文地址:https://blog.csdn.net/2301_78315274/article/details/133963772
