-
【TensorFlow1.X】系列学习笔记【基础一】
【TensorFlow1.X】系列学习笔记【入门三】
大量经典论文的算法均采用 TF 1.x 实现, 为了阅读方便, 同时加深对实现细节的理解, 需要 TF 1.x 的知识
前言
本篇博主将用最简洁的代码由浅入深实现几个小案例,让读者直观体验深度学习模型面对线性回归、非线性回归以及逻辑回归的处理逻辑和性能表现。【代码参考】
线性回归
线性回归是一种常见回归分析方法,它假设目标值与特征之间存在线性关系。线性回归模型通过拟合线性函数来预测目标值。线性回归模型的形式比较单一的,即满足一个多元一次方程。常见的线性方程如: y = w × x + b {\rm{y}} = w \times x + b y=w×x+b,但是观测到的数据往往是带有噪声,于是给现有的模型一个因子 ε \varepsilon ε,并假设该因子符合标准正态分布: y = w × x + b + ε {\rm{y}} = w \times x + b + \varepsilon y=w×x+b+ε。对于线性模型,深度学习可以通过构建单层神经网络来描述,这个单层神经网络通常被称为全连接层(Fully Connected Layer)或线性层(Linear Layer),其中每个神经元都与上一层的所有神经元相连接,且没有非线性激活函数。
import tensorflow as tf import numpy as np import matplotlib.pyplot as plt # 随机生成100个数据点,服从“0~1”均匀分布 x_data = np.random.rand(100) # 提升维度(100)-->(100,1) x_data = x_data[:, np.newaxis] # 制作噪声,shape与x_data一致 noise = np.random.normal(0, 0.02, x_data.shape) # 构造目标公式 y_data = 0.8 * x_data + 0.1 + noise # 输入层:placeholder用于接收训练的数据 x = tf.placeholder(tf.float32, [None, 1], name="x_input") y = tf.placeholder(tf.float32, [None, 1], name="y_input") # 构造线性模型 b = tf.Variable(0., name="bias") w = tf.Variable(0., name="weight") out = w * x_data + b # 构建损失函数 loss = 1/2*tf.reduce_mean(tf.square(out - y)) # print(loss) # 定义优化器 optim = tf.train.GradientDescentOptimizer(0.1) # print(optim) # 最小化损失函数 train_step = optim.minimize(loss) # 初始化全部的变量 init = tf.global_variables_initializer() # 训练迭代 with tf.Session() as sess: sess.run(init) for step in range(2000): sess.run([loss, train_step], {x: x_data, y: y_data}) if step % 200 == 0: w_value, b_value, loss_value = sess.run([w, b, loss], {x: x_data, y: y_data}) print("step={}, k={}, b={}, loss={}".format(step, w_value, b_value, loss_value)) prediction_value = sess.run(out, feed_dict={x: x_data}) plt.figure() plt.scatter(x_data, y_data) plt.plot(x_data, prediction_value, "r-", lw=3) plt.show()- 1
- 2
- 3
- 4
- 5
- 6
- 7
- 8
- 9
- 10
- 11
- 12
- 13
- 14
- 15
- 16
- 17
- 18
- 19
- 20
- 21
- 22
- 23
- 24
- 25
- 26
- 27
- 28
- 29
- 30
- 31
- 32
- 33
- 34
- 35
- 36
- 37
- 38
- 39
- 40
- 41
- 42
- 43
- 44
- 45
- 46
- 47
- 48
- 49
- 50
- 51
- 52
- 53

非线性回归
非线性回归也是一种常见回归分析方法,它假设目标值与特征之间存在非线性关系。与线性回归不同,非线性回归模型可以拟合复杂的非线性关系。通过拟合非线性函数到数据中,非线性回归模型可以找到最佳的函数参数,以建立一个能够适应数据的非线性关系的模型。非线性回归模型的形式可以是多项式函数、指数函数、对数函数、三角函数等任意形式的非线性函数,这些函数可以包含自变量的高次项、交互项或其他非线性变换。常见的非线性方程如: y = x 2 {\rm{y}} = {x^2} y=x2,但是观测到的数据往往是带有噪声,于是给现有的模型一个因子 ε \varepsilon ε,并假设该因子符合标准正态分布: y = x 2 + ε {\rm{y}} = {x^2} + \varepsilon y=x2+ε。深度学习模型通常由多个神经网络层组成,每一层都包含许多神经元。每个神经元接收来自前一层的输入,并通过激活函数对输入进行非线性转换,然后将结果传递给下一层,通过多个层的堆叠,深度学习模型可以学习到多个抽象层次的特征表示。
import tensorflow as tf import numpy as np import matplotlib.pyplot as plt # 生成200个数据点,从“-0.5~0.5”均匀排布 x_data = np.linspace(-0.5, 0.5, 200) # 提升维度(200)-->(200,1) x_data = x_data[:, np.newaxis] # 制作噪声,shape与x_data一致 noise = np.random.normal(0, 0.02, x_data.shape) # 构造目标公式 y_data = np.square(x_data) + noise # 输入层:placeholder用于接收训练的数据 x = tf.placeholder(tf.float32, [None, 1], name="x_input") y = tf.placeholder(tf.float32, [None, 1], name="y_input") # 隐藏层 W_1 = tf.Variable(tf.random_normal([1, 10])) b_1 = tf.Variable(tf.zeros([1, 10])) a_1 = tf.matmul(x, W_1) + b_1 out_1 = tf.nn.tanh(a_1) # 输出层 W_2 = tf.Variable(tf.random_normal([10, 1])) b_2 = tf.Variable(tf.zeros([1, 1])) a_2 = tf.matmul(out_1, W_2) + b_2 out_2 = tf.nn.tanh(a_2) # 构建损失函数 loss = 1/2*tf.reduce_mean(tf.square(out_2- y)) # 定义优化器 optim = tf.train.GradientDescentOptimizer(0.1) # 最小化损失函数 train_step = optim.minimize(loss) # 初始化全部的变量 init = tf.global_variables_initializer() # 训练 with tf.Session() as sess: sess.run(init) for epc in range(10000): sess.run([loss, train_step], {x:x_data,y:y_data}) if epc % 1000 == 0: loss_value = sess.run([loss], {x:x_data,y:y_data}) print("epc={}, loss={}".format(epc, loss_value)) prediction_value = sess.run(out_2, feed_dict={x:x_data}) plt.figure() plt.scatter(x_data, y_data) plt.plot(x_data, prediction_value, "r-", lw=3) plt.show()- 1
- 2
- 3
- 4
- 5
- 6
- 7
- 8
- 9
- 10
- 11
- 12
- 13
- 14
- 15
- 16
- 17
- 18
- 19
- 20
- 21
- 22
- 23
- 24
- 25
- 26
- 27
- 28
- 29
- 30
- 31
- 32
- 33
- 34
- 35
- 36
- 37
- 38
- 39
- 40
- 41
- 42
- 43
- 44
- 45
- 46
- 47
- 48
- 49
- 50
- 51
- 52
- 53
- 54
- 55
- 56
- 57
- 58

逻辑回归
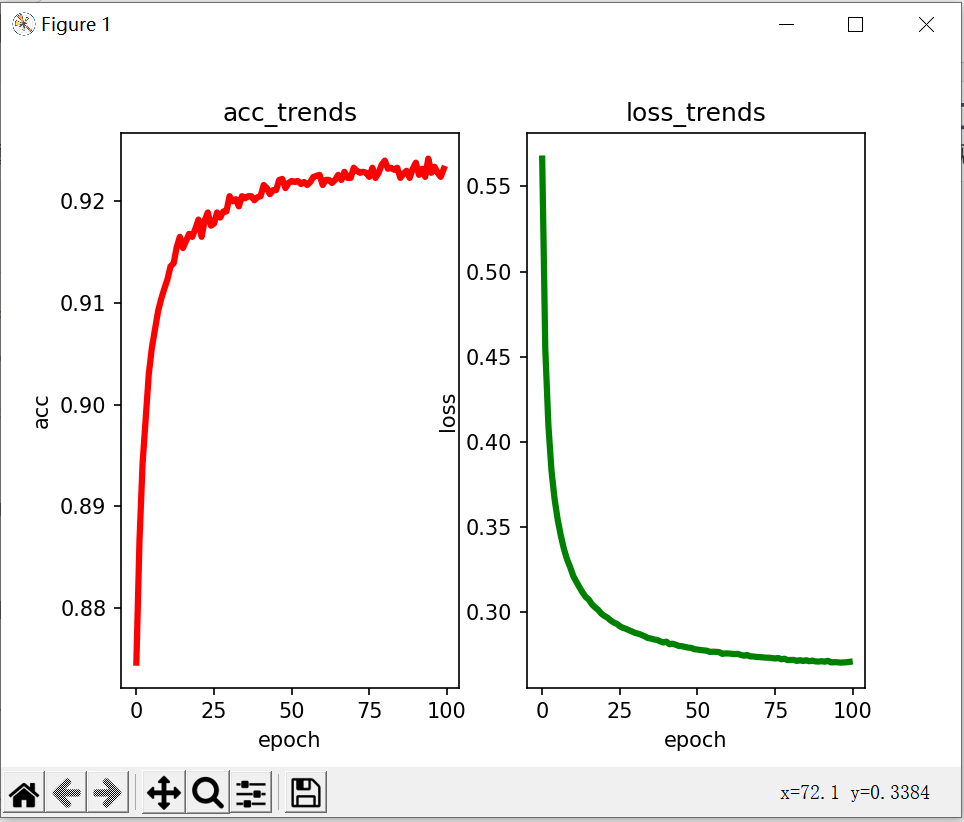
逻辑回归是一种用于分类问题的统计模型,它假设目标变量与特征之间存在概率关系。逻辑回归模型通过线性函数和逻辑函数的组合来建模概率,以预测样本属于某个类别的概率。逻辑回归本身是一个简单的线性分类模型,但深度学习可以自动地学习特征表示,并通过多层非线性变换来模拟更复杂的关系。MNIST数据集通常被认为是深度学习的入门级别任务之一,可以帮助初学者熟悉深度学习的基本概念、模型构建和训练过程。虽然MNIST是一个入门级别的任务,但它并不能完全代表实际应用中的复杂视觉问题。在实践中,还需要面对更大规模的数据集、多类别分类、图像分割、目标检测等更具挑战性的问题。
import numpy as np import tensorflow as tf from tensorflow.examples.tutorials.mnist import input_data import matplotlib.pyplot as plt # 载入数据集:首次调用时自动下载数据集(MNIS 数据集)并将其保存到指定的目录中。 mnist = input_data.read_data_sets("MNIST", one_hot=True) # 设置batch_size的大小 batch_size = 50 # (几乎)所有数据集被用于训练所需的次数 n_batchs = mnist.train.num_examples // batch_size # 输入层:placeholder用于接收训练的数据 # 这里图像大小是28×28,对数据集进行压缩28×28=782 x = tf.placeholder(tf.float32, [None, 784],name="x-input") # 10分类(数字0~9) y = tf.placeholder(tf.float32, [None, 10], name="y-input") # 隐藏层 w = tf.Variable(tf.zeros([784, 10])) b = tf.Variable(tf.zeros([1,10])) # 全连接层 prediction = tf.matmul(x, w) + b prediction_softmax = tf.nn.softmax(prediction) # 交叉熵损失函数+计算张量在指定维度(默认0维)上的平均值 loss = tf.reduce_mean(tf.nn.softmax_cross_entropy_with_logits(logits=prediction, labels=y)) # 定义优化器 optim = tf.train.GradientDescentOptimizer(0.01) # 最小化损失函数 train_step = optim.minimize(loss) # 初始化全部的变量 init = tf.global_variables_initializer() # 计算准确率:选择概率最大的数字作为预测值与真实值进行比较,统计正确的个数再计算准确率 correct_prediction = tf.equal(tf.argmax(prediction_softmax, 1), tf.argmax(y, 1)) accuarcy = tf.reduce_mean(tf.cast(correct_prediction, tf.float32)) # GPU使用和显存分配:最大限度为1/3 gpu_options = tf.GPUOptions(per_process_gpu_memory_fraction=0.333) # 用于配置 GPU sess = tf.Session(config=tf.ConfigProto(gpu_options=gpu_options)) epoch_arr = np.array([]) acc_arr = np.array([]) loss_arr = np.array([]) with tf.Session() as sess: sess.run(init) # 训练总次数 for epoch in range(200): # 每轮训练的迭代次数 for batch in range(n_batchs): batch_x, batch_y = mnist.train.next_batch(batch_size) sess.run([train_step],{x:batch_x, y: batch_y}) # 用训练集每完成一次训练,则用测试集验证 acc, los = sess.run([accuarcy, loss], feed_dict = {x:mnist.test.images, y:mnist.test.labels}) epoch_arr= np.append(epoch_arr, epoch) acc_arr = np.append(acc_arr, acc) loss_arr = np.append(loss_arr, los) print("epoch: ", epoch, "acc: ",acc, "loss: ", los) # 分别显示精度上升趋势和损失下降趋势 fig, (ax1, ax2) = plt.subplots(1, 2) ax1.set_title('acc_trends') ax1.set_xlabel('epoch') ax1.set_ylabel('acc') ax1.plot(epoch_arr, acc_arr, "r-", lw=3) ax2.set_title('loss_trends') ax2.set_xlabel('epoch') ax2.set_ylabel('loss') ax2.plot(epoch_arr, loss_arr, "g-", lw=3) plt.show()- 1
- 2
- 3
- 4
- 5
- 6
- 7
- 8
- 9
- 10
- 11
- 12
- 13
- 14
- 15
- 16
- 17
- 18
- 19
- 20
- 21
- 22
- 23
- 24
- 25
- 26
- 27
- 28
- 29
- 30
- 31
- 32
- 33
- 34
- 35
- 36
- 37
- 38
- 39
- 40
- 41
- 42
- 43
- 44
- 45
- 46
- 47
- 48
- 49
- 50
- 51
- 52
- 53
- 54
- 55
- 56
- 57
- 58
- 59
- 60
- 61
- 62
- 63
- 64
- 65
- 66
- 67
- 68
- 69
- 70
- 71
- 72
- 73
- 74
- 75
- 76
- 77
- 78

总结
训练深度学习模型通常需要大量的标记数据和计算资源。一种常用的训练算法是反向传播算法,它通过最小化损失函数来优化模型参数。常见的损失函数是均方误差损失函数和交叉熵损失函数,可以度量模型输出的概率分布与实际标签之间的差异。在实际应用中,深度学习通常用于处理非线性回归,而逻辑回归和线性回归则是其中的一些特殊情况。
-
相关阅读:
搞定蓝牙——第二篇(蓝牙架构)
RMarkdown进阶操作
Flutter高仿微信-第23篇-支付-设置金额
CN_以太网规格和传输介质@双绞线@基带同轴电缆
二叉树的顺序结构以及堆的实现——【数据结构】
【3】贪心算法-最优装载问题-加勒比海盗
Jenkins学习笔记2
设计模式之适配器模式(五)
rmq-dashboard消息查询
第八章 防火墙技术与原理运用
- 原文地址:https://blog.csdn.net/yangyu0515/article/details/133947854
